
Related Manuals for Turbo Air TMW-1100E

Summary of Contents for Turbo Air TMW-1100E
- Page 1 1250 Victoria St. CARSON, CA 90746 TEL: (562) 981-0123 FAX: (562) 981-0124 Toll Free: 1-800-627-0032 (U.S.A. In Canada) http://www.turboairinc.com...
-
Page 2: Microwave Oven
MICROWAVE OVEN TMW-1100E OPERATING INSTRUCTIONS Before operating this oven, please read these instructions completely. -
Page 3: Table Of Contents
PRECAUTIONS TO AVOID POSSIBLE EXPOSURE TO EXCESSIVE MICROWAVE ENERGY (a) Do not attempt to operate this oven with the door open since open-door operation can result in harmful exposure to microwave energy. It is important not to defeat or tamper with the safety interlocks. (b) Do not place any object between the oven front face and the door or allow soil or cleaner residue to accumulate on sealing surfaces. -
Page 4: Important Safety Instruction
IMPORTANT SAFETY INSTRUCTIONS When using electrical appliances, basic safety precautions should be followed, including the following: WARNING - To reduce the risk of burns, electric shock, fire, injury to persons or exposure to excessive microwave energy: 11. Read all instructions before using the appliance. b) When separate cleaning instructions are provided, See door surface cleaning instructions on. -
Page 5: Federal Communications Commission Radio Frequency Interference Statement
FEDERAL COMMUNICATIONS COMMISSION RADIO FREQUENCY INTERFERENCE STATEMENT WARNING: This equipment generates and uses ISM frequency energy and if not installed and used properly, that is in strict accordance with the manufacturer's instructions, may cause interference to radio and television reception. It has been type-tested and found to comply with limits for an ISM Equipment pursuant to part 18 of FCC Rules, which are designed to provide reasonable protection against such interference in a residential installation. -
Page 6: Installation
INSTALLATION Examine the oven after unpacking. Check for damage such as a misaligned door, broken door or dent in the cavity. If any damage is visible, DO NOT INSTALL, and notify your dealer immediately. Level, flat location. Install the microwave oven on a level, flat surface. Ventilation. -
Page 7: Specifications
SPECIFICATIONS POWER SUPPLY 120V AC 60 Hz SINGLE PHASE WITH GROUNDING POWER CONSUMPTION 1500W MICROWAVE OUTPUT POWER 1100W FREQUENCY 2450 MHZ OUTSIDE DIMENSIONS (WXHXD) 560X344X483 mm ( 22.0X13.5X19.0 in. ) CAVITY DIMENSIONS (WXHXD) 369X221X400 mm ( 14.5X8.7X15.7 in. ) NET WEIGHT APPROX. -
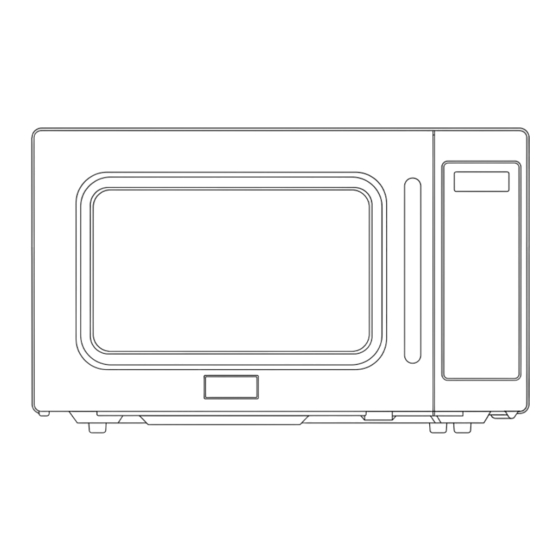
Page 8: Features Diagram
FEATURES DIAGRAM 1 Safety Interlock System. 5 Door Seal - Door seal maintains the microwave energy within the oven cavity and prevents 2 Door Viewing Screen - Allows viewing of food. microwave leakage. The screen is designed so that light can pass 6 Plate Tray - Made of special heat resistant through, but not the microwave. - Page 9 FEATURES DIAGRAM (continued) PROGRAM DEFROST DOUBLE CHECK POWER QUANTITY STOP/CLEAR START/ +30SEC 9 MICROWAVE indicator, showing microwaving y CHECK - Used to check cooking data. in progress. u DOUBLE QUANTITY - Used to extend 0 DEFROST indicator, showing defrosting in programmed cooking time.
-
Page 10: Operation Procedure
OPERATION PROCEDURE This section includes useful information about oven operation. 1. Plug power supply cord into a standard 3- pronged 15 Amp, 120V AC 60Hz power outlet. 2. After placing the food in a suitable container, open the oven door and put it on the glass tray. The glass tray and roller guide must always be in place during cooking. -
Page 11: Controls
CONTROLS TIME DEFROSTING When DEFROST is selected, the automatic cycle divides the defrosting time into periods of alternating defrost and stand times by cycling on and off. 1. Touch DEFROST pad. The DEFROST indicator lights and " : 0" is DEFROST displayed. -
Page 12: Cooking In One Stage
COOKING IN ONE STAGE 1. Touch POWER pad. The MICROWAVE and % indicators light. POWER (Select desired power level.) The display will show what you touched. 2. Touch the number pads for the This example shows power level 60. cooking time. The display will show the numbers you pressed in the order you touched. -
Page 13: Memory Function
MEMORY FUNCTION This microwave oven has 20 programmable pads (1~20). 1. Touch PROGRAM pad. The display will show “PROGRAM”. PROGRAM 2. Touch the number pads. ex)5 The display will show “PROG-05”. 3. Touch POWER pad. (Select The MICROWAVE and % indicators light. desired power level.) 4. -
Page 14: +30 Sec
+30 SEC +30 SEC allows you to reheat for 30 seconds at 100% (full power) by simply touching the +30 SEC pad. By repeatedly touching the +30 SEC pad, you can also extend reheating time to 5 minutes by 30 second increments. -
Page 15: Child Safety Lock
CHILD SAFETY LOCK The safety lock prevents unwanted oven operation such as by small children. To set, press and hold STOP/CLEAR for 3 seconds, LOCK indicator lights. To cancel, press and hold STOP/CLEAR for 3 seconds, LOCK indicator goes off. POWER SAVE MODE This function is used for saving energy. -
Page 16: Cooking Instruction
COOKING INSTRUCTIONS Utensils should be checked to ensure that they are suitable for use in microwave ovens. UTENSILS TEST Place the utensil in question next to a glass measure filled with water, in the microwave oven. Microwave at high power for 1-2 minutes. If the water heats up, but the utensil remains cool, the utensil is microwave-safe. However if the utensil becomes warm, microwaves are being absorbed by the utensil and it should not be in the microwave oven. -
Page 17: Microwaving Principles
MICROWAVING PRINCIPLES Microwave energy has been used in this country to cook and reheat food since early experiments with RADAR in World War ll. Microwaves are present in the atmosphere all the time, both naturally and manmade sources. Manmade sources include radar, radio, television, telecommunication links and car HOW MICROWAVES COOK FOOD In a microwave oven, TRANSMISSION... -
Page 18: Cooking Techniques
COOKING TECHNIQUES STANDING TIME STARTING TEMPERATURE Dense foods e.g. meat, jacket potatoes and cakes, The colder the food, the longer it takes to heat up. require standing time(inside or outside of the oven) Food from a fridge takes longer to reheat than food after cooking, to allow heat to finish conducting to at room temperature. -
Page 19: Defrosting Guide
DEFROSTING GUIDE GENERAL INFORMATION Put the food on a microwave rack (roasts, bone-in pieces) or in a microwave casserole (small pieces such as cubes or strips) or weigh at home on a kitchen scale. Round number to the nearest tenth of a pound and choose that number with each item pads. -
Page 20: Defrosting Chart
DEFROSTING CHART Item and Weight Defrosting Time Standing Time Special Techniques BEEF Break apart and remove thawed Mineed beef 5-7 min. 5-7 min. portions with fork. 454g (1 lb.) Stew Meat Separate and rearrange once. 6-8 min. 5-7 min. 681 (1 1 /2 lbs.) Turn over after half the time. -
Page 21: Cooking Chart
COOKING CHART Check time per 1lb. in chart below and multiply by the weight of the item. MEAT ITEM POWER LEVEL COOKING TIMER PER POUND Beef Standing/rolled Rib - Rare P-80 5-7 min. - Medium P-80 6-8 min. - well done P-80 7-9 min. -
Page 22: Reheating Chart
VEGETABLE ITEM POWER LEVEL PREPARATION QUANTITY COOKING TIME STANDING TIME Asparagus, fresh P-HI -in.pieces 500g(1 lb.) 3-5 min. 3 min. Asparagus, frozen P-HI Whole spears 280g(10 oz. pkg) 5-7 min. 3 min. Broccoli, fresh P-HI Spears 500g(1 lb.) 3-5 min. Broccoli, frozen P-HI Whole or cut... - Page 23 ITEM QUANTITY POWER LEVEL COOKING TIME SPECIAL INSTRUCTION 2 pieces P-HI 1-2 min. Fried chicken 4 pieces P-HI 2-4 min. Arrange, on paper tower lined paper 6 pieces P-HI 3-5 min. plate, covered with paper tower. 2 fillets P-HI 1-2 min. Fried fresh fillets 4 fillets P-HI...
-
Page 24: Care Of Your Microwave Oven
CARE OF YOUR MICROWAVE OVEN Turn the oven off before cleaning. Keep the inside of the oven clean. When food spatters or spilled liquids adhere to oven walls, plate tray, stirrer cover and inlet cover wipe with a damp cloth. Mild detergent may be used if the oven gets very dirty. The use of harsh detergent or abrasives is not recommended. -
Page 25: Use Your Microwave Oven Safely
USE YOUR MICROWAVE OVEN SAFELY General Use Do not attempt to defeat or tamper with safety interlocks. Do not place any object between the oven front frame and the door or allow residue to build up on sealing surfaces. Wipe with a mild detergent, rinse and dry. Never use abrasive powders or pads. Do not subject the oven door to strain or weight such as a child hanging on an open door. -
Page 26: Before You Call For Service
BEFORE YOU CALL FOR SERVICE Refer to following checklist, you may prevent an unnecessary service call. * The oven doesn't work; 1. Check that the power cord is securely plugged in. 2. Check that the door firmly closed. 3. Check that the cooking time is set. 4. - Page 27 QUESTIONS AND ANSWERS (continued) Q : Why is standing time recommended after the cooking operation has been completed? A : Standing time is very important. With microwave cooking, the heat is in the food, not in the oven. Many foods build up enough internal heat to allow the cooking process to continue, even after the food is removed from the oven.
-
Page 28: Warranty
Turbo Air reserves the right to change or improve the design of the model of the product warranted hereunder without incurring any obligation to make any modifications to or to install any improvements in or on the product. In no event shall Turbo Air be linble for special or consequential damage arising from the use of this product.
Need help?
Do you have a question about the TMW-1100E and is the answer not in the manual?
Questions and answers