Table of Contents
Advertisement
Quick Links
Advertisement
Table of Contents

Subscribe to Our Youtube Channel
Related Manuals for Geemarc BDP400


Summary of Contents for Geemarc BDP400
- Page 1 BDP400 BDP400 TALKING TELEPHONE WITH LARGE LCD DISPLAY English...
- Page 2 Caution : This telephone product is specifically designed for people with hearing difficulties and is provided with a handset earpiece volume control for individual requirements. Due care must be taken by all users that the handset earpiece volume control is set to the lowest level acceptable by each respective user.
-
Page 3: Table Of Contents
CONTENTS BDP400 Talking telephone with large LCD display Please retain these instructions for future reference. General Description ··················································3 Important safety instructions·····································3 Items supplied with the telephone ···························5 Accessories ·······························································5 Orientation ·································································6 Getting started ·························································13 Setting up ·······························································13 Wall mounting ·························································15 Operation··································································16 Menu navigation ·····················································16 Settings···································································17... -
Page 4: General Description
GENERAL DESCRIPTION IMPORTANT SAFETY INSTRUCTIONS When using your device equipment, basic safety precautions should always be followed to reduce the risk of fire, electric shock and injury to persons, including the following: 1. Do not use this product near water, for example, near a bath tub, wash bowl, kitchen sink or laundry tub, in a wet basement or near a swimming pool. - Page 5 GENERAL DESCRIPTION This is a multi-function telephone developed in collaboration with Sonic Alert, the leading charity supporting blind and partially sighted people. The telephone offers voice announcements throughout, making it user-friendly, particularly for someone who is blind or partially sighted. All buttons have been designed to be easy to identify and locate.
-
Page 6: Items Supplied With The Telephone
ITEMS / ACCESSORIES Items supplied with the telephone • Telephone • Handset cord • Mains adaptor • Telephone line cord • Large print instruction guide • Two screws for wall fixing ACCESSORIES As an optional extra you can also purchase a headset and microphone from Sonic Alert. -
Page 7: Orientation
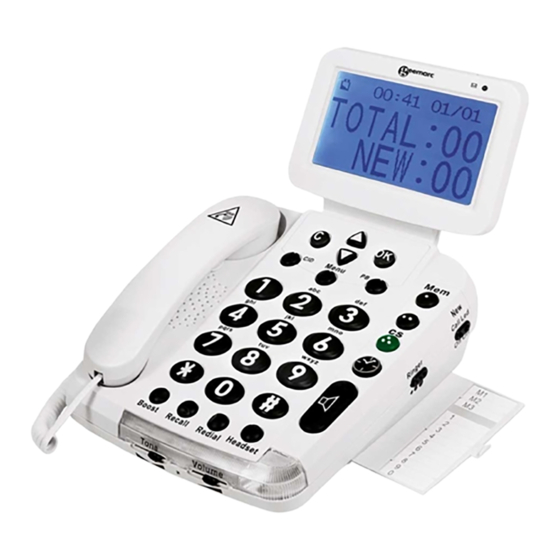
ORIENTATION Front Front With the front of the telephone facing towards you, you will notice that there is a large LCD display towards the top end of the telephone. This display is almost the same width as the telephone and can be moved backwards and forwards from a horizontal position to a vertical stance of about 90- degrees. - Page 8 ORIENTATION Front right of this are two triangular-shaped buttons, one facing upwards and the other, below it, facing downwards. These are the " " scroll buttons. To the right of these buttons is another circular button with the letters OK on it (which is also tactile).
- Page 9 Third Memory key labeled CS with the 3 dots is pre programmed with the Sonic Alert/ Geemarc customer service number. For customer service help or technical questions press this key to dial customer service.
- Page 10 ORIENTATION ORIENTATION Back Front Back On the back of the telephone you will feel four round, non- slip feet in each corner. There are two protruded oval- shaped parts, one located at the top part on the back of the telephone, in between the two non-slip feet. The other part is located about three inches below.
- Page 11 ORIENTATION Left edge / Right edge Left edge On the left edge of the telephone is a slide-control. This is the "Volume control" for the Also on the left edge, but towards the base of the telephone is a small, square-shaped recess. This is the socket for the handset cord.
- Page 12 ORIENTATION Bottom edge / Top edge Bottom edge On the bottom edge of the telephone are two slide-controls. The slide-control on the left is the "Tone control". The slide-control on the right is the "Volume control" for the earpiece. Just above these two slide-controls, and below the four round buttons on the front of the telephone is a clear plastic area.
- Page 13 ORIENTATION Display Display Please note: The information shown on the LCD display can either be with black text on a white background, or white text on a black background. Details how to change the colours of the display are covered further on in these instructions.
-
Page 14: Getting Started
GETTING STARTED Setting up Setting up Connect one end of the curly cord to the handset, and the other end into the socket on the left edge of the telephone. Open the battery compartment on the back of the telephone by pushing the small clip downwards and then remove the lid. - Page 15 GETTING STARTED Setting up Please note: Do not use rechargeable batteries. Do not put batteries into the household rubbish, pay attention to battery regulations regarding battery disposal in accordance with your Local Authority. Connect the telephone line cord to the square socket located at the top edge of the telephone and then connect the plug into the wall socket.
-
Page 16: Wall Mounting
WALL MOUNTING Drill two holes vertically one above the other, 83mm apart, and leave the screws protruding from the wall by 5mm. Caution: Ensure there are no electrical lines, water pipes etc. in the wall where the holes are drilled. Turn the small hook in the receiver cradle 180-degrees so that the receiver can be placed on-hook (the handset will remain in place when mounted to a wall). -
Page 17: Operation
OPERATION Menu navigation Menu navigation To access the settings, press the "Menu" button when in standby mode. To exit the menu, press either the PB, CID(row two) or C buttons(row one) at the top of the telephone, and a beep tone will be heard. -
Page 18: Settings
OPERATION Settings Settings Voice function setting Please note: The Voice function setting is set to ON as default. However, if you do need to reset it in future for whatever reason, some people may require sighted assistance when initially setting the voice function. When the voice function is on, the Caller ID, Phone book, the settings in the menu, numbers 0-9 in pre-dial mode, numbers held in the call log, numbers and letters and all... -
Page 19: Time Setting
OPERATION Settings Time setting If you subscribe to a Caller Display service, the date and time will be set whenever you receive a call. However, if you do not subscribe to this service, you will need to set the date and time manually. To set the time and date, press the "Menu"... -
Page 20: Area Code Setting
OPERATION OPERATION Settings Settings The telephone will then say: "Set month" and the month number digits on the display will flash. Press either the " " or " " button to toggle through the months in numbers between 1-12 (each of which will be shown and announced as a month), and press "Ok"... -
Page 21: Ringer Volume Setting
OPERATION Settings Dialling mode (Tone/Pulse) settings In the UK, all telephone exchanges now use Tone dialling. If your phone does not dial out, it is probably being used from an older private switchboard (PBX). In this case, the Tone/Pulse setting must be changed to Pulse. To set the Tone/Pulse, press the "Menu"... -
Page 22: Ringer Tone Setting
OPERATION OPERATION Settings Settings Ringer tone setting To set the ringer tone, press the "Menu" button to enter the menu. The display will show and announce the word "Store". Press either the " " or " " button until you reach "Setting"... -
Page 23: Using The Telephone
OPERATION Using the telephone Using the telephone Making a call Pick up the handset. When you hear the dialling tone, dial the number on the keypad. The number will be displayed on the LCD display. To end the call, simply replace the handset in the cradle. - Page 24 OPERATION Using the telephone Making a call - hands-free Dial the number on the keypad in the on-hook position. Use the "C" button if necessary to cancel any digit input incorrectly. Press the " " button and the number will be dialled automatically.
-
Page 25: Receiving A Call
OPERATION Using the telephone Receiving a call When an incoming call is received, the telephone will ring. If the caller can be identified (due to subscription to a Caller Display service), the caller’s telephone number will be displayed. The caller’s name will also be displayed provided that the number and name stored are in the phone book. -
Page 26: Handset Volume Setting
OPERATION Using the telephone Handset volume setting During a call, the handset volume can be adjusted using the volume (right slide control) on front edge of the telephone. It can then be increased using the "Boost" button (bottom row - first button from left to right). Please note: Setting the receiver volume to maximum may under certain circumstances, cause ear damage. -
Page 27: Call Timer
OPERATION Using the telephone Call timer Your handset automatically times the duration of every external call. The time is shown on the display during the call and for a few seconds after the call has ended. Hearing aid use This telephone is hearing aid compatible. Select the T mode on your hearing aid to enable this feature. -
Page 28: Caller Display
OPERATION Caller display Caller display Please note: The features described in this section are only available if you subscribe to a Caller Display service from your network provider. Caller Display means you can establish who is calling before you answer a call or also who has called in your absence (provided the number is not withheld, unavailable or is an international call). - Page 29 OPERATION Caller display (but not announced). If several calls have been received from a particular number, "NEW REP" will be displayed on the LCD display (but not announced). The red incoming call indicator light, located on the top right of your LCD display will flash when you have received a new call in your absence.
-
Page 30: View Caller Display List
OPERATION Caller display View Caller display list Enter "Phone book" mode (by pressing the PB button - second row from top, right button) and a book symbol will be shown on the display in the top right corner, and the telephone will say: "Phone book". -
Page 31: Dial A Number From The Caller Display List
OPERATION Caller display Dial a number from the Caller display list Lift the handset or press the " " button to get a dial tone. Use the " " and " " buttons to scroll through the caller display list until you find the telephone number you wish to dial. -
Page 32: Delete All Entries From The Caller Display List
OPERATION Caller display Delete all entries from the Caller display list Use the " " or " " buttons to scroll through the caller display list until you find the telephone number you wish to delete. The telephone will show the contact and also announce the contact's number (and name if recorded). -
Page 33: Phone Book
OPERATION OPERATION Phone book Phone book Phone book Telephone numbers and associated names can be stored in the phone book. The phone book can contain up to 85 telephone numbers (maximum of 22 digits) with names (maximum of 16 letters). If you subscribe to a caller ID service the name in the phone book will be shown for incoming calls. -
Page 34: Keypad Characters
OPERATION Phone book Speak the desired name clearly and at a distance of 15- 20cm from the telephone. The recording can be up to three seconds long. Then, release the "Ok" button. Repeat the above steps to store other numbers to your phone book or press the "PB"... -
Page 35: View Phone Book Entries
OPERATION Phone book View phone book entries Press the "PB" (second row, right button) and the telephone will say: "Phone book". Use the " " and " " buttons to scroll through the phone book entries. If names have been recorded and the "Voice" function is switched on, the entries will be read aloud. -
Page 36: Delete A Phone Book Entry
OPERATION Phone book Delete a name recording from the phonebook This function deletes the person's name recording only. The telephone number will still appear in the phone book and will be announced (the name will still be shown on the display). -
Page 37: Delete All Phone Book Entries
OPERATION Phone book Delete all phone book entries Locate the required telephone number by accessing the phone book (by pressing the "PB" button and scrolling through using the " " and " " buttons). Press and hold the "C" button and "DEL. ALL?" will be shown on the display. -
Page 38: Modify A Phone Book Entry
OPERATION Phone book Modify a phone book entry Locate the required telephone number by accessing the phone book (by pressing the "PB" button and scrolling through using the " " and " " buttons). Press and hold the "Menu" (second row, middle button) until the LCD display shows "EDIT?"... -
Page 39: Quick-Dial
OPERATION Quick-dial Quick-dial Storing a quick dial number To store a quick dial number, press the "Menu" button to enter the menu. The display will show and announce the word "Store". Press the "Ok" button to confirm. Using the keypad, enter the desired number (up to 22 digits - each of which will be announced if voice function is on). -
Page 40: Technical Specification
TECHNICAL SPECIFICATION • Voice clock function • 40dB High speech loudness receiver with LED indicator • Tone receiver frequency control • Camera flash ringing indicator • Extra Loud ringer 90 dBspl (at 1 meter) • Multi-viewing angle Super Big FSTN display(160 x 240 dots) with white back light •... -
Page 41: Troubleshooting
TROUBLESHOOTING No display Make sure that the power adaptor is plugged in correctly and is not damaged. The telephone does not ring Make sure that the telephone line cord is plugged in correctly and is not damaged. Connect another telephone to the telephone line socket or move your telephone to another socket to track if the failure is coming from your telephone or your telephone line socket. - Page 42 TROUBLESHOOTING No number is displayed when the telephone rings Please contact your telephone network provider to obtain the Caller display service or ensure that it has been activated if you have already subscribed. Even if you have subscribed to Caller display, if the caller does not want to show their number, the display will show "Private number", or if the call is from an area not providing caller display, "Unavailable number"...
-
Page 43: Safety Information
SAFETY INFORMATION General / Cleaning General Only use the correct, authorised power supply provided with the product. Do not open the unit (except to replace the batteries). Contact your place of purchase for any technical queries or to report a fault. Never dispose of batteries in a fire. -
Page 44: Environmental
SAFETY INFORMATION Environmental Environmental Do not expose to direct sunlight. Always ensure there is a free flow of air over the surfaces of the telephone. Do not place any part of your product in water and do not use it in damp or humid conditions, e.g. bathrooms. Do not expose your product to fire or other hazardous conditions. -
Page 45: Regulatory Compliance
REGULATORY COMPLIANCE - This equipment complies with Part 68 of the FCC rules and the requirements adopted by the ACTA. On the bottom of this equipment is a label that contains, among other information, a product identifer in the format US:AAAEQ##TXXXX. If requested, this number must be provided to the telephone company. - Page 46 REGULATORY COMPLIANCE - This equipment may not be used on coin service provided by the telephone company. Connection to party lines is subject to state tariffs. This equipment is hearing aid compatible. Warning: Changes or modifications to this unit not expressly approved by the party responsible for compliance could void the user’s authority to operate the equipment.
- Page 47 REGULATORY COMPLIANCE REGULATORY COMPLIANCE - If trouble is experienced with this equipment, for repair or warranty information, please contact our customer service staff at: 1-888-864-2446. If the equipment is causing harm to the telephone network, the telephone company may request that you disconnect the equipment until the problem is resolved.
-
Page 48: Guarantee
GUARANTEE Sonic Alert warrants the phone against any defect in materials or workmanship for the period of one year from the date of purchase. Should you experience a problem, contact our customer service department. Be sure to save your sales receipt as proof of purchase date should you need warranty service. - Page 49 GUARANTEE Sonic Alert shall not be responsible for loss of time, inconvenience, property damage caused by your phone or any other accidental or consequential damages Warranty service is available only with proof of purchase. Simply send the BDP400 (postpaid) and a copy of your sales slip as proof of purchase to: Sonic Alert Inc., 1050 E.
Need help?
Do you have a question about the BDP400 and is the answer not in the manual?
Questions and answers