Table of Contents
Advertisement
Advertisement
Table of Contents

Related Manuals for Geemarc combi dect 295


Summary of Contents for Geemarc combi dect 295
- Page 1 Connevans.info Solutions to improve the quality of life This product may be purchased from Connevans Limited DeafEquipment.co.uk secure online store at www.DeafEquipment.co.uk...
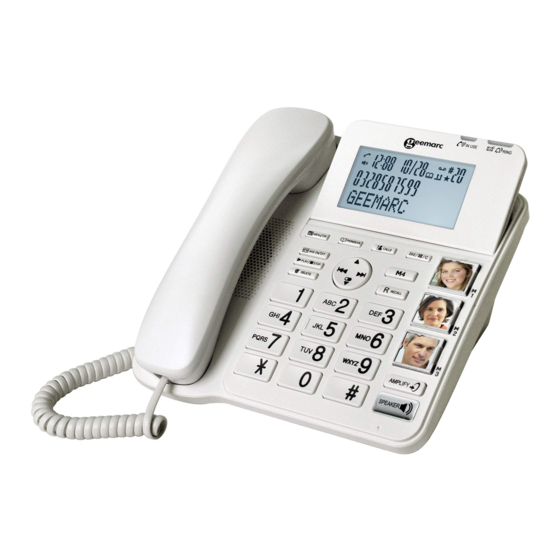
- Page 2 User’s manual COMBI DECT 295 English...
-
Page 4: Table Of Contents
TABLE OF CONTENTS IMPORTANT SAFETY INSTRUCTIONS ......1 SET UP THE TELEPHONE ..........2 Package Contents................2 Location ...................2 Connect the Corded Base Station ............3 Install and Charge the Handset Battery ..........4 Base Station Installation options ............5 2.5.1 Tabletop to Wall Mount Installation ........5 2.5.2 Wall Mount to Tabletop Installation ........6 GET TO KNOW YOUR PHONE ........... - Page 5 4.13.1 Intercom ................ 27 4.13.2 Call All Handsets ............27 4.13.3 Transfer an External Call ..........28 4.13.4 Make a 3-way Conference Call ........28 PHONEBOOK ..............29 Add a New Phonebook Entry ............29 Search for a Phonebook Entry ............30 View a Phonebook Entry ..............
- Page 6 8.5.3 Set the Ringer Volume ............46 8.5.4 De-register a Handset ............47 8.5.5 Set the Flash Time .............. 47 8.5.6 Set the Dial Mode ............47 8.5.7 Set the Key Tone ................ 47 8.5.8 Change the System PIN ..........48 8.5.9 Set the Memory Keys............
-
Page 7: Important Safety Instructions
IMPORTANT SAFETY INSTRUCTIONS When using your telephone equipment, basic safety precautions should always be followed to reduce the risk of fire, electric shock and injury, including the following: 1. Read and understand all the instructions. 2. Follow all warnings and instructions marked on the product. 3. -
Page 8: Set Up The Telephone
SET UP THE TELEPHONE Package Contents The package contains the following items: • Base station • Corded handset • Cordless handset • Charger with an AC power adapter • AC power adapter (for base unit) • NiMH rechargeable battery pack (for handset) •... -
Page 9: Connect The Corded Base Station
Connect the Corded Base Station Plug the large end of Plug one end of the telephone base the telephone line power adapter into a cord into a power outlet. telephone jack or a DSL filter. Route the power If you have DSL high- adapter cord through speed Internet service, this slot. -
Page 10: Install And Charge The Handset Battery
Install and Charge the Handset Battery 1. Plug the battery connector securely into the socket inside the handset battery compartment. Insert the supplied battery as indicated. 2. Align the cover flat against the battery compartment, and then slide it upwards until it clicks into place. -
Page 11: Base Station Installation Options
Base Station Installation options Your telephone base is ready for tabletop use. If you want to mount your telephone on a wall, follow the steps to connect the telephone base with a standard dual-stud telephone wall mounting plate. You may need a professional to install the mounting plate. -
Page 12: Wall Mount To Tabletop Installation
2.5.2 Wall Mount to Tabletop Installation 1. Unplug the power adapter from the power outlet. Unplug the telephone line cord from the wall jack (or DSL filter). If the telephone line cord and power adapter cord are bundled, untie them first. Push the telephone base up to remove it from wall. -
Page 13: Get To Know Your Phone
GET TO KNOW YOUR PHONE Overview of the Handset 1. EARPIECE 2. LCD DISPLAY 3. CHARGE LIGHT Steadily on when the handset is charging in the charger. 4. MENU/OK In idle mode: Press to access the main menu. In sub-menu mode: Press to confirm the selection. During a call: Press to access Intercom / Phonebook / Redial list / Call list. - Page 14 5. UP/CALL LIST ( ) In idle mode: Press to access the call list. In menu mode: Press to scroll up the menu items. In phonebook list/redial list/call list: Press to scroll up the list. In editing mode: Press to move the cursor one character to the left. During a call: Press to increase the listening volume.
- Page 15 12. TALK OFF ( During a call: Press to end a call and go back to idle screen. In menu/editing mode: Press to go back to previous menu. In menu/editing mode: Press and hold to go back to idle screen. In idle mode: Press and hold to power off the handset.
-
Page 16: Overview Of The Corded Base
Overview of the Corded Base IN USE RING MENU/OK PHONEBOO K CALLS INT/MUTE/CLEAR ANS ON/OFF PLAY/STO P RECALL DELETE VOLUME BOOST SPEAKER 1. LCD DISPLAY 2. IN USE On during a call. 3. RING light Flashes when there is an incoming call. Steadily on when the answering machine is turned on. - Page 17 7. INT/MUTE/CLEAR In main menu mode: Press to go back to idle screen. In sub-menu mode: Press to go back to previous level. In sub-menu mode: Press and hold to go back to idle screen. In editing / predialing mode: Press to clear a character / digit. In editing / predialing mode: Press and hold to delete all the characters / digits.
-
Page 18: Overview Of The Handset Charger
13. ANS ON/OFF In Idle: Press to switch the answering machine ON or OFF. 14. PLAY/STOP In idle mode: Press to playback messages. During TAM message playback: Press to stop playing messages. 15. DELETE In TAM message playback mode: Press to delete the current TAM message playback. -
Page 19: Handset Lcd Display Icons And Symbols
Handset LCD Display Icons and Symbols The screen display gives you information on the current status of the telephone. Steadily on when the handset is within range of the base. Flashes when the handset is out of range of the base or cannot communicate with the base. - Page 20 Steadily on when more digits are existed after the text currently displayed. Press to confirm the current selection if applicable. Steadily on when there is (are) new call(s) in call list. Scroll up / down the menu items / Phonebook / Redial list / Call List. Press to clear a character or stop the alarm if applicable, press to mute / unmute during a call.
-
Page 21: Handset Menu Structure
Handset Menu Structure In idle mode, pressing MENU/OK will access the menu. Refer to the following for the menu structure. MENU/OK Main Menu PHONEBOOK CALL LIST BS SETTINGS HS SETTINGS Sub menu Review Review Call BS RINGER RING SETUP phonebook list List RING TONE SETUP... -
Page 22: Base Lcd Display
Base LCD Display The screen display gives you information on the current status of the telephone. This will display when there is a new calls list entry or if one is being viewed. Indicate a call is in progress. This will display when you are in the phonebook menu. This will display when the same caller has called more than once Indicate that speakerphone is being used. -
Page 23: Base Menu Structure
Base Menu Structure In idle mode, pressing MENU/OK will access the menu. Refer to the following for the menu structure. MENU/OK Main Menu PHONEBOOK CALL LOG DATE & TIME LANGUAGE Sub menu VIEW MISSED TIME FORMAT ENGLISH RECEIVED SET CLOCK DEUTSCH EDIT DIALED... -
Page 24: Text And Digit Entry Table
Text and Digit Entry Table The following tables show you where each letter and punctuation character can be found. This will be helpful when storing a name in the phonebook or renaming your handset. In editing mode, a cursor is displayed to indicate the current text entry position. It is positioned at the right of the last character entered. -
Page 25: Use Your Phone
USE YOUR PHONE Make an External Call 4.1.1 Preparatory Dialing Using a handset: Enter the phone number and press to dial the number. Press CANCEL/MUTE to clear the entry. Using the base: Enter the phone number and lift the corded handset or press SPEAKER to dial the number. -
Page 26: Call From The Call List
4.1.4 Call from the Call List Using a handset: 1. Press CALLS to access the call list. 1. Press MENU/OK to enter the main menu. 2. Press to select the desired call list entry. 3. Press to dial the selected call list entry. Press it again to turn on the speakerphone. -
Page 27: Make A Call From Direct Access Memory
Make a Call from Direct Access Memory Using the base: In idle mode, press any direct memory key in which a number is stored, the phone will automatically dial out the telephone number stored in the selected memory key in speakerphone mode. -
Page 28: Volume Boost Function
Volume Boost Function The Volume Boost function allows you to amplify the handset earpiece volume to compensate for the ear’s limited sensitivity. Using a handset: To turn on the Volume Boost function: • at any time during a call. “BOOST ON” displays Press VOLUME BOOST on the handset screen. -
Page 29: Adjust Earpiece And Speakerphone Volume
Adjust Earpiece and Speakerphone Volume There are 5 levels (VOLUME 1 to VOLUME 5) to choose from for each of earpiece and speakerphone volume. Using a handset: During a call: Press to select volume 1-5. The current setting is shown. When you end the call, the setting will remain at the last selected level. -
Page 30: Emergency Call Without Main Power
4.10 Emergency Call without Main Power The corded base unit can make an emergency call with the corded handset when the mains AC power is disconnected. Pick up the corded handset and wait for several seconds to get the dial tone and then enter the phone number to make a call. -
Page 31: Store A Redial Number Into The Phonebook
4.11.2 Store a Redial Number into the Phonebook Using a handset: 1. Follow Steps 1 and 2 in section 4.11.1. 2. Press to select ADD TO PB. 3. Press to enter the name. 4. Press to store the redial number into the phonebook. 5. -
Page 32: Delete The Entire Redial List
4.11.4 Delete the Entire Redial List Using a handset: 1. Follow Steps 1 and 2 in section 4.11.1. 2. Press to select DELETE ALL. 3. Press to confirm. 4. Press to reconfirm. Using the base: 1. Follow Steps 1 and 2 in section 4.11.1 2. -
Page 33: Make An Internal Call
4.13 Make an Internal Call This feature allows you to make internal calls, transfer external calls and make conference calls. If the called base or handset is not answered within 60 seconds, the called base or handset will stop ringing and the calling one will return to standby mode. 4.13.1 Intercom Using a handset:... -
Page 34: Transfer An External Call
4.13.3 Transfer an External Call Using a handset: During an external call: 1. Press MENU/OK and to select INTERCOM. 2. Press to select the desired handset you want to intercom with. 3. The external call is put on hold automatically and the called handset rings. 4. -
Page 35: Phonebook
PHONEBOOK Your phone can store up to 50 private phonebook in the cordless handset and the telephone base with names and numbers. Each phonebook entry can have a maximum of 20 digits for the phone number and 12 characters for the name. You can also select different ringer tones for your phonebook entries. -
Page 36: Search For A Phonebook Entry
Search for a Phonebook Entry Using a handset or the base: In idle: 1. Enter the phonebook list. 2. Enter the first character of your desired name of the phonebook entries by multi-tap. View a Phonebook Entry Using a handset: In idle: 1. -
Page 37: Edit A Phonebook Entry
Edit a Phonebook Entry Using a handset: In idle: 1. Press MENU/OK to select PHONEBOOK main menu item and then press to access the phonebook list. 2. Press to select the desired phonebook entry. 3. Press to select EDIT. 4. Press and the current contents of the selected phonebook entry displays. -
Page 38: Delete A Phonebook Entry
Delete a Phonebook Entry Using a handset: In idle: 1. Press MENU/OK to select PHONEBOOK main menu item and then press MENU/OK to access the phonebook list. 2. Press to select the desired phonebook entry. 3. Press MENU/OK and to select DELETE. 4. -
Page 39: Check The Phonebook Usage
Check the Phonebook Usage You can check how many phonebook entries have been occupied in your phone and how many phonebook entries are available for you to store in the phonebook. Using a handset: 1. Press MENU/OK to select PHONEBOOK main menu item and then press to access the phonebook list. -
Page 40: Caller Display (Network Dependent)
6 CALLER DISPLAY (NETWORK DEPENDENT) This feature is available if you have subscribed the Caller Line Identification service with your network service provider. Your phone can store up to 20 received calls on the cordless handset and the telephone base with date/time information in the call list. -
Page 41: Store A Call List Number Into The Phonebook
Store a Call List Number into the Phonebook Using a handset: 1. Follow Section 6.1 to access the call list. 2. Press MENU/OK to select ADD TO PB. 3. Press and enter the name. 4. Press and the selected call list number will be displayed. 5. -
Page 42: Delete The Entire Call List
Delete the Entire Call List Using a handset: 1. Follow Section 6.1 to access the call list. 2. Press MENU/OK and to select DELETE ALL. 3. Press to confirm. 4. Press to re-confirm. Using the base: 1. Follow Section 6.1 to access the call list. 2. -
Page 43: Direct Memories Keys
7 DIRECT MEMORY KEYS You can store direct memory numbers (M1 to M4) in the handset. Then, you can dial them directly from idle mode using the Photodect295. Set Direct Memory Keys in Handset 1. Press LEFT SOFTKEY to select DIRECT MEM. 2. -
Page 44: Phone Settings
PHONE SETTINGS Your phone comes with a selection of settings that you can change to personalize your phone the way you like it to work. Clock Settings You will need to set the correct date and time so that you know when you received answering machine messages or call list entries. - Page 45 8.1.4 Set the Date 1. Press MENU/OK and to select DATE & TIME. 2. Press to select SET DATE. 3. Press and enter the date information. The date entered will be in the format you set in section 8.1.2. 4. Press to confirm.
-
Page 46: Alarm Settings (Handset Only)
Alarm Settings (Handset only) You can use this phone to set an alarm clock. When an alarm is set, the displays and “ALARM ON” flash on the on the screen. When the alarm time is reached, the screen ringing with the alarm melody for a duration of 45 seconds. You can press any key to disable the alarm. -
Page 47: Handset Settings
Handset Settings 8.3.1 Set the Ringer Melody for Internal Calls You can set special melody to personalize your internal ringer. A total of 10 melodies are provided for your selection. 1. Press MENU/OK to select HS SETTINGS. 2. Press to select RING SETUP. 3. -
Page 48: Set Alert Tones
8.3.4 Set Alert Tones A single beep is emitted when you press a key. You can turn on or off the key tone. You can also turn on the alert tones when low battery and out of range are detected. Low battery tone will be emitted while you are talking with the phone to alert you that you need to charge up your battery. -
Page 49: Choose The Information To Be Displayed In Idle
8.3.8 Choose the Information to be displayed in Idle You can choose to display time or handset name in your idle screen. 1. Press MENU/OK to select HS SETTINGS. 2. Press to select HS DISPLAY. 3. Press to select HANDSET NAME or TIME. 4. -
Page 50: Base Settings Using The Handset
Base Settings using the Handset 8.4.1 Set the Ringer Melody You can set special melody to personalize your base external ringer. A total of 5 melodies are provided for your selection. 1. Press MENU/OK to select BS SETTINGS. 2. Press to select BS RINGER. -
Page 51: Set The Dial Mode
8.4.4 Set the Dial Mode The default dial mode is best suitable for your country and network operator. It is unlikely that you should need to change this setting unless advised to do so. 1. Press MENU/OK to select BS SETTINGS. 2. -
Page 52: Base Settings Using The Base
Base Settings using the Base 8.5.1 Set the Ringer Melody for Internal Calls You can set special melody to personalize your base internal ringer. A total of 10 melodies are provided for your selection. 1. Press MENU/OK and to select SETTINGS. 2. -
Page 53: De-Register A Handset
8.5.4 De-register a Handset You will need to enter the 4-digit system PIN code in order to de-register a handset from the base station. (The default PIN is 0000.) 1. Press MENU/OK and to select SETTINGS. 2. Press MENU/OK and to select DELETE HS. -
Page 54: Change The System Pin
8.5.8 Change the System PIN 1. Press MENU/OK and to select SETTINGS. 2. Press MENU/OK and to select CHANGE PIN. 3. Press MENU/OK and you are requested to enter the 4-digit system PIN. 4. Enter the old system PIN. 5. Press MENU/OK and enter the new system PIN. 6. -
Page 55: Registration
Registration Your handset and base station is pre-registered. Up to five handsets can be registered to a single base station. If for some reason, the handset is not registered to the base station ( flashes even when the handset is near the base station), register your handset according to the following procedure. -
Page 56: Reset Your Phone
Reset Your Phone You can reset your phone to the default settings. After reset, all your personal settings and call list entries will be deleted, but your phonebook list remains unchanged. Using a handset: Press MENU/OK to select DEFAULT. Press and you are requested to enter the 4-digit system PIN. -
Page 57: Answering Machine
ANSWERING MACHINE Your telephone base includes a telephone answering machine that records unanswered calls when it is on. The answering machine can store up to 59 messages within the maximum recording time of approximately 15 minutes. As well as recording incoming messages, you can record memos for other users of your phone. -
Page 58: Play Messages On Tam
Play Messages on TAM If you have new messages, the display will show e.g. 02/05 MSGS, which means you have 2 new message out of total 5 messages. New messages are played first, and then are saved as old messages, until they are deleted. Old messages are played again after all new messages are played completely. -
Page 59: Delete All Messages On Tam
Using the base direct key: In idle: 1. Press PLAY/STOP to listen to messages and memos. 2. Press PLAY/STOP if you want to stop the playback. 3. Press once if you want to repeat the current message from the beginning, or press twice to skip back to the previous message during message playback. -
Page 60: Record Memos On Tam
Record Memos on TAM You can record your memo message for another user. When you record a memo, the message counter will increase by one and the message can be played in the same way as answering machine messages. Memo recording can still function even when the answering machine is turned off. -
Page 61: Answering Machine Settings (Base Only)
Answering Machine Settings 9.5.1 Set the Answer Mode By default, the answer machine is set in ANS&REC mode which allows callers to leave a message. This mode can be changed to ANSONLY which does not allow callers to leave a message. In that case, your callers will be prompted to call back later. You can select ANS &... -
Page 62: Record Your Outgoing Message (Ogm)
9.5.3 Record your Outgoing Message (OGM) You can record your own OGM for ANS & REC mode or ANSWER ONLY mode. When you record your own OGM, it will be used when the answering machine answers the call. If your personalized OGM is deleted, the pre-set OGM will be restored automatically. -
Page 63: Playback The Outgoing Message (Ogm)
9.5.4 Playback the Outgoing Message (OGM) Using a handset: 1. Press MENU/OK to select ANS. MACHINE. 2. Press to select TAM SETTINGS. 3. Press to select OGM SETTINGS. 4. Press to select ANS & REC or ANSWER ONLY. 5. Press to select PLAYBACK. -
Page 64: Delete A Personalized Ogm (Set Ogm To Default)
9.5.5 Delete a Personalized OGM (SET OGM to DEFAULT) Using a handset: 1. Repeat Steps 1 to 6 in the section of Playback the Outgoing Message (OGM). 2. Press CANCEL/MUTE to delete your personalized OGM and return to previous menu and the pre-set OGM is restored automatically. NOTE: If pre-set OGM is playing, you are not allowed to delete the pre-set OGM. -
Page 65: Set The Recording Time Of Incoming Message
9.5.7 Set the Recording Time of Incoming Message You can set the maximum length of the recording time of the incoming messages. Using a handset: 1. Press MENU/OK to select ANS. MACHINE. 2. Press to select TAM SETTINGS. 3. Press to select RECORD TIME. -
Page 66: Change The Compression Rate
9.5.9 Change the Compression Rate Three different compression rates (HIGH, MID and LOW) are provided for you to select different quality levels of recording incoming message. The lower the compression rate, the higher the recording quality level attained, but the shorter the total recording time available. -
Page 67: Activate Remote Access
9.5.10 Activate Remote Access Your phone lets you check your messages, or otherwise operate your answering machine, by calling the answering machine when you are away from home by entering a 4-digit remote access PIN on a tone-dialing phone. Use the 4-digit remote access PIN code to prevent other people from unauthorized access of your answering machine. -
Page 68: Activate Or Deactivate The Remote Access
9.5.10.2 Activate or Deactivate the Remote access Using a handset: 1. Press MENU/OK to select ANS. MACHINE. 2. Press to select TAM SETTINGS. 3. Press to select REMOTE ACC. 4. Press to select ON or OFF to turn on or off the remote access respectively. -
Page 69: Remote Operations
9.5.10.4 Remote Operations If you are away from your home, you can call your answering machine to switch on or off the answering machine and listen to your messages remotely using another tone-dialing phone. 1. Place a call from a tone-dialing phone. 2. -
Page 70: Troubleshooting
TROUBLESHOOTING If you have difficulty with your phone, please try the suggestions listed below. Problem Solutions • My telephone does Make sure the battery is installed and charged correctly. not work at all. • For optimum daily performance, return the handset to the telephone base after use. - Page 71 • There is The handset may be out of range. Move it closer to the interference telephone base. during a • If you subscribe to high-speed Internet service (digital telephone subscriber line - DSL) through your telephone line, you must conversation.
- Page 72 Common If the telephone is not responding normally, put cure for the handset in the telephone base. If it does not electronic respond, try the following (in the order listed): equipment. • Disconnect the power to the telephone base. • Disconnect the battery on the handset.
-
Page 73: Technical Specifications
TECHNICAL SPECIFICATIONS Basic Information Indoor: 50m * Handset Valid range Outdoor: 300m * Handset Operating Time Standby time: 100Hours approx. ** Talk time: 10Hours approx. ** RF Parameter Frequency 1.88GHz to 1.9GHz Number of Channels Power Supply Base Input 100-240V 50/60Hz; output 6V; 450mA adapter Handset Charger Input 100-240V 50/60Hz;... -
Page 74: Care And Maintenance Instructions
CARE AND MAINTENANCE INSTRUCTIONS Take care of your telephone • Your cordless telephone contains sophisticated electronic parts, so you must treat it with care. • Avoid rough treatment. • Place the handset down gently. • Save the original packing materials to protect your telephone if you ever need to ship it. -
Page 75: Guarantee
GUARANTEE From the moment your Geemarc product is purchased, Geemarc guarantee it for the period of two years. During this time, all repairs or replacements (at our discretion) are free of charge. Should you experience a problem then contact our help line or visit our website at www.geemarc.com. -
Page 76: Declarations
DECLARATIONS: CE Directives Geemarc Telecom SA hereby declares that this product is in compliance with the essential requirements and other relevant provisions of the Radio and Telecommunications Terminal Equipment Directive 2014/53/UE. The CE declaration of conformity may be consulted at www.geemarc.com... - Page 77 G COMBI DECT295_En_v0.1...
Need help?
Do you have a question about the combi dect 295 and is the answer not in the manual?
Questions and answers
New phone cl595 shows no line
The Geemarc Combi DECT 295 may show "no line" with the new phone CL595 if there is interference or an issue with the telephone line connection. Possible reasons include:
- The telephone base is not properly connected to the wall jack.
- A DSL Internet service is causing interference and a DSL filter is not installed.
- The handset is out of range from the telephone base.
- Other electronic devices or cordless phones on the same circuit are causing interference.
Ensure proper line connections, install a DSL filter if needed, and move the base or other devices to reduce interference.
This answer is automatically generated
How can I extend the ringing time on an incoming call? Is it possible to increase the number of times the phone rings? Geemark combi
The context does not provide information on how to extend the ringing time for incoming calls on the Geemarc Combi DECT 295.
This answer is automatically generated
Screen on handset states two new calls.cant delete this and get back to normal. Base showing *2