Table of Contents
Advertisement
Quick Links
THERMAL PRINTER
BL2-58
INSTRUCTION MANUAL
This is a Class B product based on the standard of the Voluntary Control Council for Interference by
Information Technology Equipment
(VCCI). If this equipment is used in domestic environments, radio
disturbance may arise. When such trouble occurs, the user may be required to take corrective actions.
Introduction
Thank
you
very
much
for
purchasing
the
BL2-58
Instructions'and'1.Operating Precautions' carefully before using this printer for safe handling of it.
Save these instructions for future reference.
Safety instructions
To use this equipment safety, or to protect damage to the equipment, the following symbols are used
throughout this manual to highlight safety information.
The symbol indicates that failure to observe these instructions or mishandle this
Warning
equipment could lead to severer injury or death.
The symbol indicates that failure to observe these instructions or mishandle this
Caution
equipment could lead to injury or only property damage
Examples of Symbols
The
symbol indicates caution (including DANGER or WARNING). The example in the
left column indicates that caution or warning conditions exist.
The
symbol indicates the action is prohibited. The example in the left column indicates
disassembly is prohibited.
The
symbol indicates a required operation that must be performed or an obligatory
Instruction. The example in the left column indicates unplugging is required.
Warning
Do not use any battery pack, AC adapter and AC power cord.
Failure to follow this instruction may result in overheating or inflammation, which may lead to
fire or accidents.
Do not bend the power cord forcibly, or place heavy objectives on the power cord.
Doing so may damage the power cord and cause fire or electric shock. If the power cord
Is damaged, discontinue using it.
Never disassemble the printer, the AC adapter, the AC cable, the battery pack and the
battery charger. Failure to follow this instruction may result in overheating or inflammation,
which may lead to fire or accidents.
Caution
Do not drop any metallic object nor spill coffee,soft drinksand, water and any other liquid.
As the thermal head may be very hot immediately after printing, do not touch it. Be sure that
the thermal head is cool before removing the paper jam or cleaning the thermal head.
Do not plug or unplug the AC adapter and batteries with wet hand.
It may result in electric shock, burn and failure.
Do not use the printer in place where it will be exposed to excess moisture and where is
watered. It may result in electric shock, burn and failure.
Remove the interface cable or AC adapter from the connector or the receptacle by holding
the connector or the AC plug. Never pull the cable itself. Doing so may damage the cable or
adapter.
For following case, turn the printer power OFF, unplug the AC power cord from outlet, and
remove the bettry. Continueous use may occur the printer failure, fire and electric shock.
◆ In case the problem is not cleared and fixed
◆ Emitting smoke, making unusual noise and odd smell from the printer
◆ The metallic object dropped or spilled liquid into the printer
1.Operating Precautions
Observe the following for safe and proper operation.
■Notes on use
Do not subject the printer to strong shocks by
◆
droping or hitting it.
Turn off the power switch and keep the AC plug
◆
removed from the outlet when the unit is not
used.
Do not pull the paper from paper exit. It may
thermal
printer.
Read
the
'Safety
◆
cause the damage or failure of the printer
mechanism.
■Notes on treatment of thermal paper
Store the paper in a dry, cool and dark place.
◆
Do not rub the paper with hard substance.
◆
Keep the paper away from organic solvent.
◆
Do not let the paper touched with vinyl chloride
◆
film, eraser or adhesive tapes for hours.
Do not put the paper on diazo print or wet copy
◆
that has just been copied.
■Notes on installation
Install the printer on a level or upright and stable
◆
surface.
Avoid such places with:
◆
Slanted surface, strong vibration, direct sunlight,
full of dust, excessively high or low temperature,
electromagnetic noise, corrosive gas
2. Preparation
2.1 Unpacking
After unpacking, check whether the complete set is
present.
・Printer unit
・Thermal paper (paper length 15m)
・Instruction manual
・AC adapter
・AC power cord
★For ordering the thermal paper, contact our sales
office or local distributors.
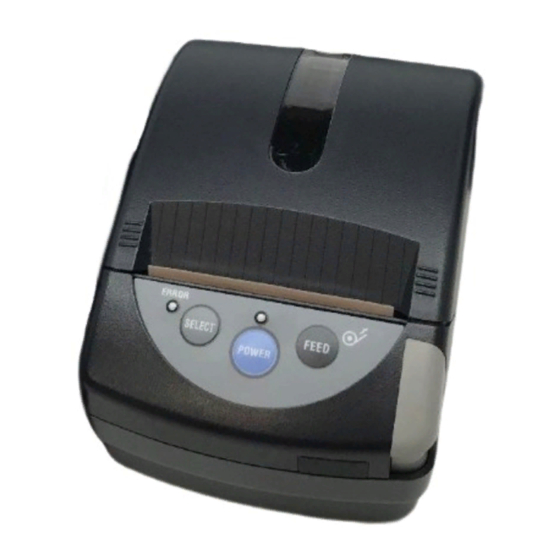
2.2 Components / parts
Window for checking paper
Paper cutter
Paper cover
Operational panel Cover open button IF connector Power connector
Insert nut
Battery cover
Operational panel
(2)
(3)
(1) POWER LED : Indicates the status of the power.
(2) ERROR LED:Indicates the error status.
(3) SELECT button:Selects the printer mode.
(4) POWER button:Turns the power ON/OFF.
(5) FEED button:Feeds the thermal paper while
3. Handling
3.1 Setting thermal paper
①Press the cover open button to open the paper
cover.
②Set the paper roll as shown in the picture(Make
sure the printing surface is correct, or it does not
print properly)
③Close the paper with the tip end emerging from
the tear bar.
Handle the tear bar carefully not to injure
the finger or hand.
3.2 Battery pack
●Installing battery pack
1 unit
1 roll
①Place the printer upside down. Press both sides
1 volume
of the battery cover and push up the battery
1 piece
cover.
1 piece
②Place the battery pack on the bucket and slide
it toward the arrow direction until locked.
③Close the battery cover.
●Remove battery pack
Operate in a direction opposite to installing.
●Battery charge (Only chargeable mode)
①Turn the power ON with connecting AC adapter.
②Press SELECT button on the operational panel
for 3 sec, then POWER LED and ERROR LED
blink for charging.
③When the battery charging completes, the printer
status becomes standby and POWER LED on.
④It takes for Ave.3 hours(UR-250), and for Ave.2.5
hours(UR-121) to charge. (each Max. 4 hours)
▼With a new full charged battery, the printer prints
210m in case of UR-250, and prints 140m in case
of UR-121. (Continuous printing、Printing density
100%、Printing ratio 30%)
▼Keep the battery pack removed from the battery
case when the printer is not used for long period.
(1)
▼After full charging of the battery pack, the printer
cuts off charging automatically and the printer does
not recharge again. Be sure the battery voltage is
reduced after charging and discharging
continuously because of memory effect.
▼The battery pack is worn out after charging and
discharging. The battery capacity is reduced
80% of the new battery after 300 times charging.
(5)
▼The battery works shorter time at low temperature
(4)
area.
▼When the working time is noticeably shorter than
normal, replace the battery pack.
▼The printer can not print while charging.
Do not dispose the battery pack, and
bring it to the near recycling shop.
pressing this button.
3.3 How to set to upright wall
Please ready two screws (M3x3mm), and set the
printer to upright wall not sideling in the vicinity and
from side to side, keeping power connector side
down, using the insert nut in back side.
Printing speed Max.80mm/sec
(Dedicated AC adapter, Printing ratio 12.5%
3.4 LED indication
or less)
When an error occurs, POWER/ERROR LED lights
or blinks depending on the type of errors.
Printing width/paper width 48mm/58mm
○:Turn ON for 0.1sec ●:Turn OFF for0.1sec
Barcode UPC-A/E,JAN13/8,CODE39,ITF,
Status
POWER
ERROR
Retrieve
Option 2D barcode
(Green)
(Red)
Standby printing ON
OFF
***
Initializing
○●○●
Complete
ON
Power source
initialization
Recharging
○●○●
●○●○
Complete
charging
Temperature
ON
○●●●
Cooling down
error
Paper empty
Put paper
ON
ON
Paper cover
ON
ON
Close the
open
cover
Low battery
○●○●
OFF
Recharge
battery
Excess recharge
○●●●
ON
Contact Sanei
Dimensions (W×D×H、No protruding parts)
Upper limit
OFF
OFF
Contact Sanei
voltage error
Weight
Lower limit
○●●●
OFF
Contact Sanei
voltage error
Operating environment
3.5 Self test print
Turning the power switch ON while pushing the
FEED button starts self test print. The printer prints
character sets and barcode.
3.6 HEX dump print
Data entered from the computer is printed in
hexadecimal numbers. While pressing SELECT
button, turn ON the power switch. When the mode
selecting is printed, press SELECT button, then
starts the HEX dump mode.
Storage environment
3.7 Function set (Soft switch)
Sets the printer function by Soft switch.
①While pressing SELECT button, turn ON the
power switch.
Thermal paper Part No.:P-58-30
②After printing the mode selecting, push FEED
button to enter the function setting mode.
③When a message is printed, press the FEED
button for YES and the SELECT for NO.
EMC regulations
④The printer prints 'SETTING MODE END'
when ending.
Setting items
Input buffer
Classified setting items are as follows.
・COMMON SETTING :Common information
◎The model name details are listed in Technical
・MODE-B SETTING
:BL-58 compatible
Guide. (BL2-58□□□□QC)
・INTERFACE SETTING:Interfaces
◎Updated printer drivers, specifications, and
For further information, please refer to the
Technical Guide are listed in the Website.
BL2-58 Technical Guide.
◎Windows is the registered Trademark of
3.8 Maintenance
Microsoft Corporation.
Clean the thermal head, platen roller and sensors
◎ESC/POS is registered Trademark of Seiko
periodically. The details show in the Technical
Epson Corporation.
Guide.
◎This instruction manual may be subject to
change without notice due to product
Before cleaning the printer, turn OFF the
improvement.
printer power and disconnect the AC
――――――――――――――――――――――
adapter and remove the battery pack
from the case.
Never get liquid such as water into the
printer.
Head office
Taisou Ikebukuro Building 5F, 2-61-1
Ikebukuro, Toshima-ku, Tokyo, 171-0014,
4. Specifications
Japan
4.1 General specifications
Phone: +81-3-3986-0646 (Representative)
Command systems:
ESC/POS、BL-58
Print method:
Direct line thermal
Fax: +81-3-3988-5876
Interface
BL2-58S Serial (RS-232C)
URL: http.//www./sanei-elec.co.jp
Connector:D-sub 9pin Male
BL2-58P Parallel (Centronics)
Connector:D-sub25pin F-male
BL2-58U USB ver.2.0
Connector:B type round 4-PIN
CODABAR,CODE128
QR,MaxiCode,PDF417,
MicroPDF417,DataMatrix
Battery pack: Li-ion battery(option)
Part No.:UR-250、UR-121
Dedicated AC adapter
Part No.:BLS-120W
Input:AC100V~240V、50/60Hz
Output:DC9.0V 3.0A
AC power cord
Part No.:ACS-120A(Japan)
ACS-100G(Europe)
ACS-100U(USA)
93mm×125mm×70mm
approx.265g
(without thermal paper and
battery pack)
Temperature When battery is used
-10℃ to +50℃
When AC adapter is used
0℃ to +40℃
While recharging battery
0℃ to +35℃
Printing quality guarantee
+5℃ to +40℃
Humidity 20%RH to 85%RH
(No condensation)
Temperature -20℃ to +60℃
Humidity 10%RH to 90%RH
(No condensation)
Paper width:58mm
Length:approx.30m
Outer diameter.:50mm
VCCI CLASS B、FCC CLASS B、
CE marking
8k bytes
+ 81-3-3986-1188 (Overseas sales)
(10.2008)
Advertisement
Table of Contents


Need help?
Do you have a question about the BL2-58 and is the answer not in the manual?
Questions and answers