Table of Contents
Advertisement
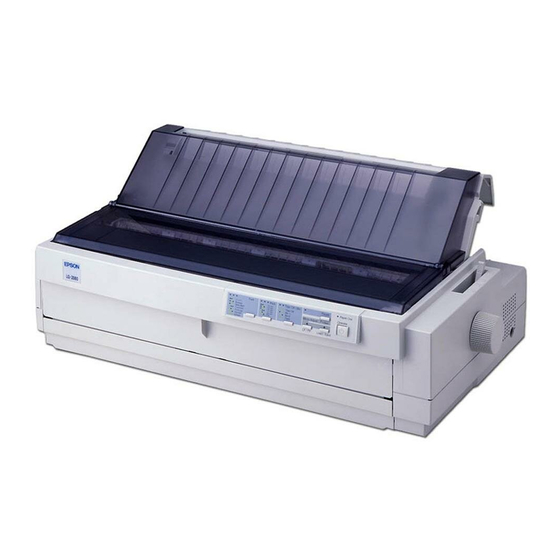
edge guides
paper guide
cover
printer cover
front paper guide
(closed)
control panel
bottom cover
paper thickness
lever
shield plate
parallel interface
tractor
front paper guide
front edge guides
(open)
paper guide
paper
separator
paper release
lever
knob
ribbon cartridge
paper tension
unit
2/99
User Replaceable Parts
User Replaceable Part
Bottom cover
Bottom cover
Connector cover
Upper connector cover
Connector cover screws (2) C.B. S-tite screw
Front edge guides
Front edge guides
Front paper guide
Front cover
Knob
Knob
Logo plate
Logo plate
Paper guide cover
Printer cover assembly
Paper tension unit
Paper eject assembly
Paper thickness lever cap
Lever cap
Printer cover
Printer cover assembly
Rear edge guides
Rear edge guides
Rear push tractor
Rear tractor assembly
Ribbon cartridge
Ribbon cartridge
Options
Paper Handling Options
High-capacity cut-sheet feeder (C80673 )
Feeds up to 150 sheets of paper, 25 plain bond envelopes, or
30 postcards into the printer without reloading. You can also
load a stack of single-sheet multipart forms up to 0.59 inch
(15 mm) thick in this feeder.
Second-bin cut-sheet feeder (C80674 )
Connects to the high-capacity cut-sheet feeder to create a
double-bin cut-sheet feeder. You can load up to 50 sheets of
ordinary single-sheet paper in the second-bin cut-sheet feeder.
Pull tractor (C80032 )
Improves continuous paper handling and reduces the chance
of paper jams. Using a pull tractor in combination with a
push tractor is especially useful for printing on continuous
preprinted forms, multipart forms, and labels, and also for
printing high-quality graphics.
Roll paper holder (#8310)
Allows you to use your printer with 8.5-inch roll paper like
that used with telex machines.
Note:
The asterisk ( ) is a substitute for the last digit of the product
number, which varies by country.
EPSON LQ-2080
Parts Price List Name
Part Number
1039404
1037223
1002674
1039456
1039403
1039405
1045389
1044972
1046629
1039412
1046632
1039499
1039012
S015086
EPSON LQ-2080
- 1
Advertisement
Table of Contents

Related Manuals for Epson 220


Summary of Contents for Epson 220
-
Page 1: User Replaceable Parts
Roll paper holder (#8310) Allows you to use your printer with 8.5-inch roll paper like that used with telex machines. Note: The asterisk ( ) is a substitute for the last digit of the product number, which varies by country. -
Page 2: Optional Interface Cards
You can install an optional interface card to supplement your printer’s built-in parallel interface and provide added network compatibility. The EPSON interface cards in the table below are compatible with your printer. (Not all interfaces are available in all countries.) - Page 3 Approx. 37 W (ISO/IEC 10561 letter pattern) Note: This product is also designed for IT power systems with Phase to Phase voltage 220 to 240 V. Check the label on the back of the printer for the voltage. Environmental Temperature Operation 41 to 95 °F (5 to 35 °C)
- Page 4 5.8 inches (148 mm) 3.9 to 5.8 inches (100 to 148 mm) Thickness 0.0087 inch (0.22 mm) Weight 51 lb (192 g/m 4 - EPSON LQ-2080 Continuous paper (standard and multipart): front, rear, and bottom entry Width Length Copies Thickness...
-
Page 5: Paper Alignment
The maximum width is 16.0 inches (406 mm). The maximum printable width is 13.6 inches (345 mm). For paper wider than 14.6 inches (371 mm), the side margins increase to match the width of the paper. 2/99 EPSON LQ-2080 printable area EPSON LQ-2080... -
Page 6: Control Panel Buttons And Lights
Pause light On when the printer is paused. Flashes when the printer is in the micro adjust mode. Paper Out light On when no paper is loaded in the selected paper source or paper is not loaded correctly. -
Page 7: Error Indicators
D and U buttons. Operate button Turns the printer on and off. The printer is off when the top of this button is even with the button protectors. Error Indicators You can identify many common printer problems using the lights on the control panel. -
Page 8: Status Monitor
EPSON LQ-2080 Status Monitor The EPSON Status Monitor 2 utility comes with your printer but is available only for use with Microsoft and 98. It allows you to monitor your printer’s status, alerts you when printer errors occur, and provides troubleshooting instructions when needed. - Page 9 The pull tractor provides the best paper jam prevention, and allows you to load continuous paper from the front, rear, or bottom of the printer. However, you cannot use the tear-off feature with the pull tractor.
-
Page 10: Printing On Single Sheets
EPSON LQ-2080 Printing on Single Sheets Your printer has two paper entry slots for printing on single sheets: top and front. When continuous paper is loaded on the front or rear push tractor, you can load single sheets in the top or front slot without removing the continuous paper. -
Page 11: Paper Thickness Lever Positions
2 through 5 tractor feeder. Do not print labels on single sheets because the printer may not feed labels on a shiny backing sheet properly. Thick paper, such as continuous paper with labels, requires a straight or almost straight paper path. You can load labels in the front (push or pull tractor) or bottom (pull tractor) paper slot;... -
Page 12: Using The Front Push Tractor (Optional)
For more information on when to use the front push tractor, see “Available Paper Paths” on page 8. Note: The tractor is installed in the rear push position only when the printer is shipped. For the front push tractor, purchase the optional tractor Tear unit (C80032*). - Page 13 1. Open the front paper guide by pulling the tab at the center of the guide. Then remove the guide by grasping both sides and pulling it straight out of the printer. Check that the tractor is installed in the front push position.
- Page 14 Always close the printer cover before printing. The printer does not print when the cover is open. 10. Turn on the printer. You may need to check and change the printer driver settings. When the printer receives data, it automatically loads the paper and starts printing. The printed pages are fed over the paper guide toward the back of the printer.
-
Page 15: Using The Rear Push Tractor
4. Press the tractor lock tabs, tilt the tractor up, and lift it out of the printer. 5. Replace the front paper guide by sliding it along the printer mounting slots until it locks in place. Then close the front paper guide. - Page 16 Always close the printer cover before printing. The printer does not print when the cover is open. 10. Turn on the printer. You may need to check and change the printer driver settings. When the printer receives data, it automatically loads the paper and starts printing. The printed pages are fed over the paper guide toward the back of the printer.
-
Page 17: Using The Tractor In The Pull Position
“Removing the front push tractor” on page 15. Note: The tractor is installed in the rear push position only when the printer is shipped. The rear push tractor cannot be removed. To install a tractor in the pull position, follow these steps: 1. - Page 18 To load paper onto the pull tractor, follow these steps: 1. Make sure the printer is turned off and the printer cover is removed. Also check that a tractor is installed in the pull position.
- Page 19 12. Turn on the printer. Remove any slack in the paper and adjust the top-of-form position by pressing the button or using the micro adjust feature. (To use the micro adjust feature, see “Adjusting the Top-of-Form Position” on page 22.) The printer will start printing at the current...
- Page 20 Never use the knob to remove slack in the paper or to adjust the top-of-form position while the printer is turned on; this may damage the printer or cause it to lose the top-of-form position. The knob can be used only when the printer is turned off.
-
Page 21: Switching Between Printing On Continuous Paper And Printing On Single Sheets
3. Press the tractor lock tabs, tilt the tractor toward you, and lift it off the printer. Store the tractor in a safe place, or install it in the front push position. -
Page 22: Adjusting The Top-Of-Form Position
Note: The printer has a minimum and a maximum top-of-form position. If you try to adjust it beyond these limits, the printer beeps and stops moving the paper. When the paper reaches the default top-of-form position, the printer also beeps and stops moving the paper briefly. You can use the default setting as a reference point when adjusting the top-of-form position. - Page 23 Note: If the Tear Off/Bin lights are flashing, the paper is in the tear-off position. If you press the Tear Off/Bin button, the printer feeds your paper to the next top-of-form position. Advancing paper to the tear-off position...
-
Page 24: Installing The Ribbon Cartridge
1. Make sure the printer is turned off. If the printer is connected to an electrical outlet, unplug it from the outlet. 2. Lift the printer cover by its back edge and then pull it straight up and off. 3. Slide the print head to the ribbon installation position (the indented portion of the paper tension unit) by hand. -
Page 25: Clearing Paper Jams
4. If continuous paper is jammed in the printer, tear off the fresh supply at the perforation nearest the paper entry slot. 5. Turn the knob on the right side of the printer away from you to eject the paper in the printer. Remove any remaining pieces of paper. -
Page 26: Changing Default Settings
You may exit the default-setting mode at any time by turning off the printer when the printer is not printing. 1. Make sure paper is loaded and the printer is turned off. Caution: Whenever you turn off the printer, wait at least five seconds before turning it back on;... -
Page 27: Printing A Self Test
Printing a Self Test Running the printer’s self test helps you determine whether the printer or the computer is the cause of a printing problem. You can print the self test using either single sheets or continuous paper. Note: Use paper that is at least 14.8 inches (376 mm) wide, such as A3-size paper. -
Page 28: Related Documentation
Keep the printer cover in place and lower the paper guide cover until it lies flat on the top of the printer to prevent water from getting inside the printer.
Need help?
Do you have a question about the 220 and is the answer not in the manual?
Questions and answers