Table of Contents
Advertisement
Available languages
Available languages
Advertisement
Table of Contents

Related Manuals for Craftsman 351.217881


Summary of Contents for Craftsman 351.217881
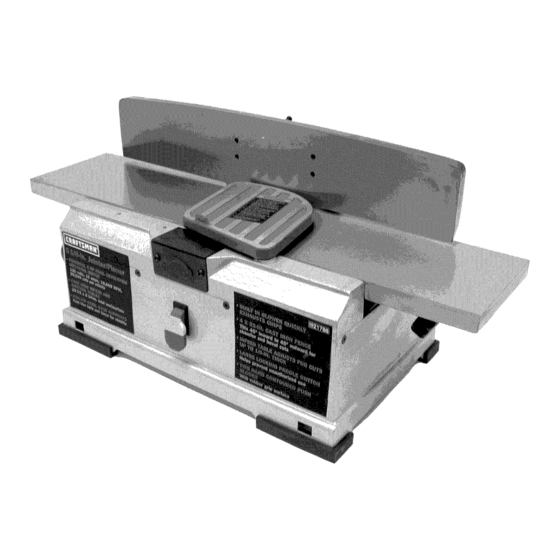
- Page 1 Manual CRFIF MFIN°I 1/8tr Bench Top JOINTER/PLANER Model No. 351.21 7881 CAUTION: Read and follow all Safety Rules and Operating Instructions before First Use of this Product. Sears, Roebuck and Co., Hoffman Estates, IL 60179 U.S.A. www.sears.com/craftsman 23719.02 Draft (03/20/07)
- Page 2 TOOL • Do not use power tools in dangerous environments. If this Craftsman tool fails due to a defect in material or • Do not use power tools in damp or wet locations. Do workmanship within one year from the date of purchase, not expose power tools to rain.
- Page 3 • Avoid accidental start-up. Make sure that the switch is in the OFF position before plugging in. • Do not force tool. It will work most efficiently at the rate for which it was designed. • Keep hands away from moving parts and cutting surfaces.
- Page 4 (not supplied). See Figure 6. COLLECTION Jointer Base Refer to Figure 5. The Craftsman Half Bag Dust Collection Set is designed to provide dust collection for woodworking Mounting Bracket tools with a 21/2"diameter dust exhaust port. The filter bag attachs to a 30-gallon trash can or a 30-gallon x 1.3 mil plastic trash bag for easy, convenient sawdust...
- Page 5 • The jointer/planer must be bolted to a firm, level sur- properly installed and grounded in accordance with face. all local codes and ordinances. Do not modify plug provided. If it will not fit in outlet, have proper outlet • Make sure the jointer/planer does not rock and the installed by a qualified electrician.
- Page 6 Do not plug in jointer/planer unless switch is in OFF position. After turning switch on, allow jointer/planer DESCRIPTION to come to full speed before operating. Craftsman 61/8 ' ' jointer/planer is used to surface the • Keep hands clear of all moving parts.
- Page 7 POSITIONING FENCE • Turn switch off and disconnect power whenever jointer/planer is not in use. The fence can be adjusted to cut any angle from 0o-45 ° • Replace or sharpen blades as they become damaged inward and outward. The fence can be tilted inward up or dull.
- Page 8 ADJUSTING BLADE HEIGHT Rotate the cutterhead by hand. The blades should just touch the straightedge. If a blade is too low or Refer to Figures 12-14. too high at either end, adjust blade height using the CAUTION: Make sure the switch is in the OFF posi- jack screws.
- Page 9 FEEDING WORKPIECE USING HOLD DOWN/PUSH BLOCKS Refer to Figures 16-18. Refer to Figure 19. Feed rate refers to rate at which wood is passed over • Always use hold-down/push-blocks when jointing wood that is narrower than 3", planing wood thinner blades.
- Page 10 SHARPENING BLADES • Place blade clamp against the replacement blade and replace in cutterhead. Refer to Figure 21. • Secure blade and blade clamp using four blade lock The blades can be honed individually by whetting them screws. Do not tighten blade lock screws. with a fine sharpening stone.
- Page 11 GENERAL MAINTENANCE • Remove four bolts (Key No. 24) that retain motor mounting plate (Key No. 49). Jointer/planer will operate best if it is kept in good oper- ating condition. Keep unit adjusted as described in "Operation." • Do not allow gum and pitch to accumulate on the tables, fence, blades and blade guard.
- Page 12 SYMPTOM CORRECTIVE ACTION POSSIBLE CAUSE(S) Motor does not start 1. Defective switch 1. Have switch replaced 2. Defective motor 2. Have motor replaced/repaired NOTE: 1 and 2 must be done by a qualified service technician; Consult Sears service. 3. Low line voltage 3.
- Page 13 NOTES...
- Page 14 Model 351.217881 Figure 24 - Replacement Parts Illustration for Fence and Infeed Table...
- Page 15 PART NO. DESCRIPTION QTY. PART NO. DESCRIPTION QTY. 23710.00 Fence 18424.00 Table Pin STD840508 5-0.8mm Hex Nut* 18425.00 Frame Pin STD840610 6-1.0mm Hex Nut* 18426.00 Fence Support 18954.00 5-0.8 x 25mm Hex Head Bolt 18427.00 18410.00 Handle 18428.00 Locking Plate 18454.00 Spacer STD840812...
- Page 16 Model 351.217881 Figure 25 - Replacement Parts Illustration for Base 14._ 55, 56...
- Page 17 PART NO. DESCRIPTION QTY. PART NO. DESCRIPTION QTY. Base with labels 18444.00 Fan Belt STD315215 18455.00 V4-20x 5/8" Socket Head Pan Screw 6201ZZ Ball Bearing 00519.00 18456.00 3AM1-12 Retaining Ring Blade Clamp 08077.00 Strain Relief 9-22994 Blade (set of 2) 00090.00 Line Cord 18458.00...
- Page 18 AI_IO GARANTIA COMPLETA DE UN PARA • Mantenga el Area de trabajo limpia. Las Areas de trabajo desordenadas atraen accidentes. HERRAMIENTA CRAFTSMAN • No use herramientas mecanicas en ambientes peligrosos. Siesta herramienta Craftsman fallara por causa de defectos en el...
- Page 19 • Mantenga todas las partes listas para funcionar. Revise el adicionales que deben asegurarse al cepillo mecanico/cepilladora antes de armar: protector u otras piezas para determinar si funcionan correc- tamente y hacen el trabajo que deben hacer. Conjunto de la bancada del cepillo mecanico B Gufa •...
- Page 20 Consulte la Figura 5. el portacuchilla queda cubierto a todo Io ancho. Fije la pieza El Equipo Recolector de Polvo de Media Bolsa Craftsman estb. de montaje en su lugar mediante la manivela de desplaza- dise_ado...
- Page 21 • El enchufe de conexi6n a tierra deberb, conectarse directa- y una fuente de alimentaci6n adecuada. Para instalar el cepillo mecanico/cepilladora de banco: mente a un z6calo para 3 clavijas instalado y conectado debidamente a tierra, tal como se muestra (vease la Figura 8).
- Page 22 SPECIFICACIONES CORDONES DE EXTENSION Tamaho de la mesa ......28% x 6W' • El uso de cualquier tipo de cord6n de extensi6n ocasionara una cafda en el voltaje y una perdida de potencia. Dimensiones de la gufa ......225/8x 33/4" •...
- Page 23 • Use bloques de sujeci6n/empuje para nivelar la uni6n de COMO POSICIONAR LA GUIA materiales de menos de 3" de ancho o desbastar materiales La guia se puede ajustar para cortar a cualquier ,_ngulo entre 0 ° y de menos de 3" de espesor. 45 °...
- Page 24 DAI_IAR EVITE CUCHILLAS COMO AJUSTAR LA ALTURA DE LAS CUCHILLAS Consulte las Figuras 12-14. El cepillo mecanico/cepilladora es una mb.quina de precisi6n para trabajar en madera y s61o se debe usar en madera de buena call- PRECAUCION: Cerci6rese de que el interruptor este en la dad.
- Page 25 • Haga avanzar la tabla a una velocidad uniforme y continua. vacila o para, puede hacer que se corte un "escal6n" en el borde de la tabla. Figura 19 - C6mo Alimentar con Bloques de Empuje • Agarre firmemente los bloques de sujeci6n/empuje.
- Page 26 • Ponga la plancha de alimentaci6n de modo que la piedra haga • Extraiga los residuos de madera y suelte el protector de las cuchillas. contacto con la cuchilla a Io largo de su superficie biselada. • Cerci6rese de apretar todos los tornillos de seguridad de la...
- Page 27 • Instale la correa nueva. Cerci6rese de que la correa encaje Mantenga afiladas las cuchillas (consulte C6mo afilar las completamente en las hendiduras de ambas poleas e instale cuchillas, pagina 26). En algunos casos, resulta mas la placa del motor en la base mediante los cuatro pernos.
- Page 28 SINTOMA MEDIDA CORRECTIVA CAUSAS(S) POSIBLE(S) El motor no arranca 1. Interruptor defectuoso 1. Solicite el reemplazo del interruptor 2. Motor defectuoso 2. Solicite el reemplazo/reparaci6n del motor AVlSO: 1 y 2 deben ser efectuados por un tecnico de mantenimiento profesional; consulte al centro servicio...
- Page 29 NOTAS...
- Page 30 NOTAS...
- Page 31 NOTAS...
- Page 32 Your Home For repair _ in your home _ of all major brand appliances, lawn and garden equipment, or heating and cooling systems, no matter who made it, no matter who sold it! For the replacement parts, accessories owner's manuals that you need to do-it-yours_f. For Sears professional installation of home appliances and items like garage door openers and water heaters.
Need help?
Do you have a question about the 351.217881 and is the answer not in the manual?
Questions and answers