Table of Contents
Advertisement
Available languages
Available languages
Operator's IVlanual
®
2600 PSi MAX
2.3 GPiVi M AX
iViodelNo. 580.752510
HOURS: IVlon. - Fri. B a.m. to 5 p.m. (CT)
WARNING
Before using this product, read this
manual and follow all Safety Rules
and Operating instructions.
ADVERTENCIA
Antes de utilizar el producto, lea este
manual y siga todas las Reglas de
Seguridad e Instrucciones de Uso.
,, Safety
,, Assembly
,, Operation
,, iVlaintenance
,, Parts
,, Espafiol,p. 34
* This pressure washer is rated in accordance to the Pressure Washer Manufacturers Association
(PWMA) standard PWI01 (Testing and Rating Performance of Pressure Washers).
* Esta limpiadora a presiOnest_ clasificada conforme a la norma PWl01 (comprobaciOn y clasificaciOn de rendimiento de limpiadoras
a presiOn) de la AsociaciOn de fabricantes de bombas a presiOn(Pressure Washer Manufacturers Association, PWMA).
Sears Brands ManagementCorporation,HoffrnanEstates,IL 60179 U.S.A.
Visit our Craftsman website: www.craftsman.com
Part No. 311118GS Draft A (01/05/2011)
Advertisement
Table of Contents

Related Manuals for Craftsman 580.752510


Summary of Contents for Craftsman 580.752510
- Page 1 * Esta limpiadora a presiOnest_ clasificada conforme a la norma PWl01 (comprobaciOn y clasificaciOn de rendimiento de limpiadoras a presiOn) de la AsociaciOn de fabricantes de bombas a presiOn(Pressure Washer Manufacturers Association, PWMA). Sears Brands ManagementCorporation,HoffrnanEstates,IL 60179 U.S.A. Visit our Craftsman website: www.craftsman.com Part No. 311118GS Draft A (01/05/2011)
- Page 2 Defective product will receive free repair or replacementif repair is unavailable. For warranty coverage details to obtain free repair or replacement,visit the web site: www.craftsman.com This warranty does not cover the spray guns, hoses, nozzle extensions, nozzles,filters and spark plugs, which are expendable parts that can wear out from normal use within the warranty period.
-
Page 3: Important Safety Information
,A WARNING The engine exhaust from this product Read this manual carefully and becomefamiliar with your pressurewasher. Knowits applications, contains chemicals known to the State of California to its limitations, and any hazards involved. cause cancer, birth defects, or other reproductive harm. importantSafetyinformation ,A WARNING This product contains lead and lead Safety Symbols and Meanings... - Page 4 ,&. WARNING Starter cord kickback (rapid retraction) will ,A WARNING Fuel and its vapors are extremely flammable and explosive which could cause burns, pull hand and arm toward engine faster than you fire or explosion resulting in death, ,_can let go which could cause broken bones, fractures, bruises, or sprains resulting in serious serious injury and/or property damage.
- Page 5 _1_WARNING Use of pressure washer could create ,& WARNING Risk of eye or bodily injury. puddles and slippery surfaces causing Spray could splash back or propel you to fall resulting in death or serious objects resulting in serious injury. injury. •...
-
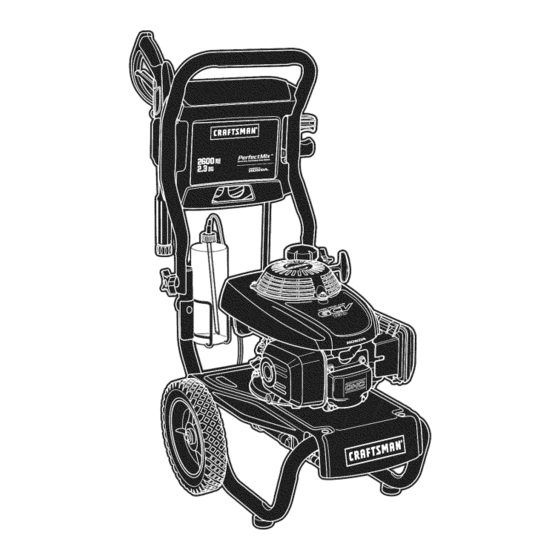
Page 6: Know Your Pressure Washer
KNOWYOURPRESSURE WASHER Read the Operator's Manual and safety rules before operating your pressure washer. Compare the illustrations with your pressure washer to familiarize yourself with the locations of various controls and adjustments. Save this manual for future reference. © A - AccessoryTray -- Provides convenient storage for accessories N - Fold Down Handle-- Handle and accessory tray fold flat atop such as gun, nozzle extension, etc. -
Page 7: Unpack Thepressure Washer
6. if any parts are missing or damaged, call the pressure washer helpline at 1-800-222-3136. ASSEMBLING PRESSURE WASHER Your Craftsman pressure washer will need assembly before operation: insert supplied accessories in spaces provided in Fill out and send in registration card. -
Page 8: Add Engine Oil
Align hose wrap (A) to the back side of accessory tray. Attach ProjectPro@PerfectiVIW MSiphon to Locate notch with "unlock" icon (B) on hose wrap. Pump Position notch at top with hose wrap in vertical position. Attach the hose end of the blue PerfectMix Siphon (G) to Clips in the back of accessory tray should slide into the the barbed hose fitting (H) on the pump. -
Page 9: Lubricateo-Rings
Add Fuel Install fuel cap and allow any spilled fuel to evaporate before starting engine. ,& WARNING Fueland its vapors are extremely flammable and explosivewhich could cause burns, CAUTION! Alcohol-blended fuels (called gasohol, ethanol or fire or explosion resulting in death, methanol) can attract moisture, which leadsto separation and serious injury and/or property damage. -
Page 10: Connect Hose And Water Supply To Pump
ConnectHose and Water Supply to Pump Run water through garden hose for 30 seconds to flush it of debris. Turn off water. NOTICE DO NOTsiphon standing water for the water NOTICE DO NOT run the pump without the water supply supply. -
Page 11: Pressure Washer Location
HOWTO USEYOURPRESSURE WASHER To Start Your Pressure Washer To start your engine-powered pressure washer for the first If you have any problems operating your pressure washer, time, follow these instructions step-by-step. This information please call the pressure washer helpline at 1-800-222-3136. also applies whenever you start the engine after you have let PressureWasher Location the pressure washer sit idle for at least a day. - Page 12 9. Pull c hoke r od(A)to"Closed" position. ,&. WARNING Starter cord kickback (rapid retraction) will puii hand and arm toward engine faster than you _,_._ can let go which could cause broken bones, fractures, bruises, or sprains resulting in serious injury.
-
Page 13: How To Stop Your Pressure Washer
How toUse SelectorNozzle How to Stop Your PressureWasher Releasespray gun trigger and let engine idle for two The selector nozzle allows you to switch between five minutes. different spray pattern nozzles.Spray patterns can be changed while pressure washer is running once spray gun Move engine stop switch to "Off"... - Page 14 2-1N-1Soap System Cleaning and Applying Detergentwith the Standard Clear Siphon _1_ WARNING Chemical Burn Hazard. To apply diluted detergent using the ..Chemicals could cause burns resulting in death, standard clear siphon tube, follow these ' serious injury, and/or property damage. steps: •...
-
Page 15: Pressure Washer Rinsing
Pressure Washer Rinsing Select and change to SOAP spray pattern nozzle on selector nozzle.See How To Use Selector Nozzle. For Rinsing: Flush for 1-2 minutes. Select and change to desired spray pattern nozzle on Shut off engine following instructions How to Stop selector nozzle. -
Page 16: Pressurewasher Specifications
PressureWasher Specifications Max Outlet Pressure ...... 2,600 PSI* Max Flow Rate......2.3 GPM Detergent Mix ......Use as directed Water Supply Temperature ..Not to exceed IO0°F EngineSpecifications Bore ....... 2.5 in. (64 mm) Stroke ......2.0 in. (50 ram) Displacement ....... -
Page 17: Owner's Responsibilities
OWNER'SRESPONSiBiLiTiES Some adjustments will need to be made periodically to properly maintain your pressure washer. Follow the hourly or calendar intervals, whichever occurs All service and adjustments should be made at least once first. More frequent service is required when operating in each season. - Page 18 Check High Pressure Hose Slowly push down until you feel the ball move slightly, push no more than 1/8". Slight pressure may be required High pressure hoses can develop leaks from wear, kinking, to free the bail. or abuse. Inspect hose before each use. Checkfor cuts, leaks, abrasions, bulging of cover, or damageor movement Repeatsteps 4 and 5 if necessary.
-
Page 19: Engine Maintenance
Reinstall selector nozzle into nozzle extension. Checking Oil Level Reconnect nozzle extension to spray gun. Oil level should be checked prior to each use or at least every 8 hours of operation. Keep oil level maintained. Make sure garden hose is connected to water inlet. Checkthat high pressure hose is connected to spray gun Place pressure washer on a level surface and clean area and pump. -
Page 20: Service Air Cleaner
Change oiJ whiJe engine is stiJJ warm from running, as Carefully remove air cleaner (C) from base (D). follows: Cleanair cleaner by tapping it several times on a hard Drain fuel tank by running pressure washer until fuel surface to remove dirt, or blow compressed air (not to tank is empty. -
Page 21: After Each Use
AFTEREACHUSE inspectIVluffler and Spark Attester inspect the muffler for cracks, corrosion, or other damage. Water should not remain in the unit for long periods of time. Removethe spark arrester, if equipped, and inspect for Sediments or minerals can deposit on pump parts and damage or carbon blockage, if replacement parts are required, "freeze"... -
Page 22: Winter Storage
WINTERSTORAGE Draining Fuel Tank and Carburetor: if fuel additive is not used, remove all fuel from tank and carburetor. NOTICE You must protect your unit from freezing • Place an approved fuel container below carburetor and temperatures. use a funnel to avoid spilling fuel. •... -
Page 23: Other Storage Tips
Protect Pump Other Storage Tips DO NOTstore fuel from one season to another unless it To protect the pump from damage caused by mineral deposits or freezing, use PumpSaver,item 7174403, to treat has been treated as described in Protect Fuel System. pump. - Page 24 Problem Correction Cause Soap spray pattern nozzle is Select high pressure spray pattern selected. nozzle on selector nozzle. Water inlet is blocked. Clear inlet. inadequatewater supply. Provide adequatewater flow. inlet hose is kinked or leaking. Straighten inlet hose, patch leak. Pump has following problems:failure Checkand clean inlet hose strainer.
- Page 26 CRAFTSMAN 2600 PSi PressureWasher 580.752510 Main Unit -- Exploded View and Parts List 900_, PartsNot Illustrated Item Part # Description 314139GS BASE Part # Description 204257BNGS HANDLE 311118GS MANUAL-OPERATOR 311114GS BILLBOARD 23139GS B1797GS CLiP 720134 204684GS WRAP-HOSE 192050GS E-RING 204658GS...
- Page 27 CRAFTSMAN 2600 PSi PressureWasher 580.752510 Pump = Exploded View and Parts List ° Part # Parts Not Illustrated Item Description 201495GS PLUG Part # Description 200275GS SCREW 208673GS VALVE-THERMORELIEF B2384GS FILTER-GARDEN HOSE 200344GS KIT-CHECKVALVE Optional Accessories Not illustrated 200345GS KIT-WATERSEAL...
- Page 28 ENGINE,Honda, GCV160LAN5R - ExplodedView 49o---@ 27 2829 35 35...
- Page 29 ENGINE,Honda, GCV150LAN5R - ExplodedView _104 98_<_...
- Page 30 ENGINE,Honda, GCV160LAN5R - Parts List Item Part # Description Item Part # Description 16212-ZL8-000 GASKET,INSULATOR 90001-ZE1-000 BOLT, CONNECTINGROD 16211-ZL8-000 INSULATOR, CARBURETOR 90201-ZM0-000 NUT, FLANGE(6MM) 16221-883-800 GASKET,CARBURETOR 28400-ZLB-O23ZC STARTERASSY, RECOIL*R280*(POWER 19650-ZM0-000 GUIDE, AIR RED) 16100-ZOL-861 CARBURETORASSY (BB65A A) 28461-ZL8-003 KNOB, RECOILSTARTER 16228-ZL8-000 GASKET,CARBURETOR(CHOKESIDE) 28462-ZL8-003...
- Page 32 California, U.S. EPA,and Sears Emissions Sears EmissionsControl Warranty Provisions ControlWarranty Statement The following are specific provisions relative to your Emissions Control Warranty Coverage. It is in addition to the YourWarranty Rights And 0bligations Searsengine warranty for non-regulated engines found in the Operator's Manual.
- Page 33 The warranty onemissions-related parts isasfollows: LookFor Relevant EmissionsDurability Period and Air Index information On Your Small Off-Road Engine • Any warranted part that is not scheduled for EmissionsLabel replacementas required maintenancein the owner's manual supplied, is warranted for the warranty period Enginesthat are certified to meet the California Air Resources stated above.
- Page 34 Una vez que adquiera ei contrato de protecci6n para reparaciones, s61otiene que hacer una sencilla Ilamada teief6nica para programar Su nuevo producto Craftsman® est_ diseSado y fabricado para un servicio. Puede Ilamar a cualquier hera dei dia o la noche, o funcionar de manera fiable durante muchos aSos.
-
Page 35: Informaci6N Importantede Seguridad
,i_ ADVERTENCIA El escape del motor de este producto Leaestemanualminuciosamente y conozca a fondolas partes y el funcionarnientodesurn_quina limpiadoraa contiene eiementos quimicos reconocidos en el Estado de presi6n.Conozca susaplicaciones, suslirnitacionesy los California por producir c_.ncer,defectos de nacimiento u peligros involucrados. otros da_os de tipo reproductivo. - Page 36 A ADVERTENCIA Elretroceso (repliegue r_.pido) del A AI:IVERTENCIAEl combustible y sus vapores son cable d elarrancador impedir_, que eiusuario extremadamenteinflamablesy explosivos, _,_,_ sueite e icable atiempo y tirar_, desumano y _1,_ Io que podria provocar quemaduras, incendioso explosiones;asi como da_os brazo hacia ei motor, io que podria provocar materiales,lesiones graveso incluso la muerte.
- Page 37 ,A ABVERTENCIA Peligro de quemadura quimica. ,A ADVERTENCIA Riesgo de lesiones en los ojos 0 el Las sustancias quimicas podrian provocar quemaduras, materiales, asi como da_os lesiones cuerpo. El agua rociada podria salpicar 0 graves o incluso la muerte. propulsar objetos, Io que puede •...
- Page 38 CONOZCA SU iViAQUINA LIIViPIADORA A PRESI6N Lea el Manual del Operafio y los reglas de segufidad antes de poner en marcha su limpiadora a presi6n. Compare los ilustraciones con su limpiadora a presi6n para familiarizarse con los ubicaciones de los diferentes controles y ajustes. Guarde este manual para referencias futuras.
-
Page 39: Desembalela Limpiadoraa Presi6N
Su limpiadora apresi6n requiere decierto e nsamble yestar_ lista Conecte manguera a alta presi6n a pistola rociadoray a bomba. para s er usado _nicamente despu_s dehaber depositado Conecte el suministro de agua a bomba. combustible yelaceite recomendado. Conecte boquilla la extensi6n al pistola rociadora. Sitiene problemas c onel ensambiedesum_quina limpiadoraa Conecte el boquilla de selector de conexi6n r_pidaal extensi6n... - Page 40 Alinee la o las abrazaderasde la manguera (A) con la parte Conecteel sistemade inyecci6nProjectPro@ PedectiVlix a la bomba trasera de la bandejade accesofios. Alinee las muescas y coloque la abrazaderade la manguera sobre el soporte de la Conecte el extreme de la manguera del sistema de inyecci6nProject parte trasera de la bandeja de accesorios.
-
Page 41: Lubriquelas Juntast6Ricas
Instale la tapa del tanque de combustible y limpie la gasolina Agreguegasolina que se haya derramado. ,& ADVERTENCIA El combustible y sus vapores son extremadamenteinfiamablesy explosivos, iPRECAUCION! Los combustibles con mezcla de alcohol (gasohol, podria quemaduras, etanol o metanol) pueden atraer ia humedad y provocar la provocar incendios o expiosiones;asi como da_os separaci6n y formaci6n de _cidos durante ei almacenamiento. - Page 42 Haga correr el agua a trav_s de la manguera de su jardin por Conectela manouera y el suministrode aoua a la bomba 30 segundos para limpiar cualquier escombro que se encuentre en ella. Desconecteel agua. ,zlif/$O Hace NO agua de parar de siphon para el abastecimiento de AIflSO NO haga funcionar la bomba si no tiene el agua.
- Page 43 COIViO USARSU LllViPIADORA A PRESI6N Para porteren marcha el limpiadoraa presi6n Para darle arranque a su limpiadora a presi6n movido a motor por Si tiene problemas con el funcionamiento de su m_quina Nmpiadora primera vez, siga estas instrucciones paso a paso. Esta informaci6n a presi6n, por favor Namea la Nneade ayuda de la m_quina acerca de la puesta en marcha inicial tambi_n es v_lida para cuando Nmpiadora a presi6n al 1-800-222-3136,...
- Page 44 9. Tire delavarilla d el e strangulador (A) h asta laposici6n ,A ADVERTENCIA El retroceso (repliegue r_.pido) del "Cerrade" ("Closed"). cable del arrancador impedir_, que ei usuario _,_< sueite ei cable a tiempo y tirar_ de su mane y T-" braze hacia ei motor, io que podria provocar fracturas, contusiones o esguinces;...
- Page 45 C6mo usar la bandeja de accesorios ,A ADVERTENCIA Los gases y el calor de escape La unidad estA equipadacon una bandejade accesorios con podrian infiamar los materiales compartimentos para guardar la pistola rociadora y el prolongador de combustibles las estructuras da_ar la boquiNa.La partetrasera de la bandejatambi_n incluye una el depOsito de combustible y provocar...
- Page 46 Para cambiar los patronesde rociado, siga estas instrucciones: Limpieza y aplicaci6n de detergente conel sistema de inyecci6nProject Pro® PerfectlViWM Seleccione el patrGnde rociado deseado: Siga estos pasos para aplicar detergente sin diluir • MAX - Parasuperficies dificiles de limpiar o de alcanzar, con el sistema de inyecci6n azul PerfectMixTM: como las que se encuentranen segundos pisos;...
- Page 47 Aplique un rociado de alta presi6n a una peque_a zona y luego AVISO El contacto con el silenciador a alta temperatura compruebe si se ha producido alg_n ripe de da_o. Si no podria producir da_os en el tube de inyecci6n de detergente. aprecia da_os, continue en el paso 4.
-
Page 48: Especificaciones Del Producto
ESPECIFICACIONES DELPRODUCTO Espe.cificaciones de la rnziquina lirnpiadoraa presion Presi6n de saiida m_ima ......2,600 PSi* Caudalm_imo ........2.3 GPM Mezcia de quimicos ....Use seg_n instrucciones Temperatura del suministro de agua ......Que no exceda los 100°F Especificaciones del motor Di_metro de camisa .... - Page 49 RECOIViENDACIONES GENERALES Recornendaciones o enerales El mantenimiento peri6dico mejorar_ el rendimiento y prolongar_ la Plan de mantenimiento vida _til del limpiadora a presidn. Si necesita asistencia, consulte Siga los intervalos de horas o de calendario, los que sucedan con un distribuidor de Sears o con otro distdbuidor cualificado. antes.
- Page 50 iVlANTENIiVllENTO DELA iViAQUINA Bola de retenci6nde inyecci6nde detergente LIIViPIADORA A PRESION En ocasiones, la bola de retenci6n se atascaen el sistema de inyecci6n de detergente cuando ha pasadoalmacenado o por Limpie los residuos acumulaci6n de jab6n seco o minerales en el agua. La bola de retenci6n se puede desatascar mediante lossiguientes pasos: Limpie a diario, o antes de cada uso, los residuos acumulados en el limpiadora a presi6n.
- Page 51 Vuelva a montar el boquilla de selector en ei prolongador de la Revise la pistola rociadora boquilla. Examine la conexi6n de la manguera con la pistola rociadora y Conecte de nuevo la extensi6n de la boquilla a la pistola aseg0resede que es correcta. Pruebe el gatillo apretando el bot6n rociadora.
- Page 52 AVISO Las otras viscosidades que se indican en la tabla se pueden Cambie el aceite cuando el motor siga estando caliente despu_s de haber funcionado: utilizar siempre que latemperatura media de su zona est_ dentro de los limites recomendados. Drene el tanque del combustible haciendo funcionar la m_quina limpiadora a presi6n hasta que el tanque est_ vacio.
- Page 53 Limpie la suciedad del cuerpo y la tapa del filtro de aire con un Inspeccione el siienciadory la pantalia trapo h_medo. H_galo con cuidado para evitar que la sucbdad apaoachispas penetre en el conducto de aire (E) que va al carburador. Inspeccione que el silencbdor no presente fisuras, corrosi6n u Instale un filtro de aire limpio (o nuevo) en la base.
-
Page 54: Despues Decadauso
AVISO Sustituya la pantalla apagachispas si estA rota o perforada. Desconectemanga del fusil del rocio y salida alta de presi6n en la bomba. Desag_Je agua de la manga, del fusil, y de la Instale la pantalla apagachispas limpia (o nueva) siguiendo el extensi6n de boquilla. -
Page 55: Almacenamiento P Arainvierno
ALMACENAMIENTO P ARAINVIERNO Protejael sisternade combustible Aditivo para Combustible: ,dl/ISO Usted deber_, proteger su unidad de las Siva a usar aditivo para combustible, Ilene el tanque de temperaturas de congelamiento. combustible con gasolina fresca. Si eltanque est_ parcialmente • Si no Io hace, da_ar_ permanentementela bombay la unidad no Ileno, el aire del tanque va a promover el deterioro del combustible podr_ funcionar. - Page 56 Carnbio de aceite Otrassuoerenciaspara el almacenarniento NO guarde combustible de una temporada a otra a menos que Con el motor todavia caliente, drene el aceite de la caja del cig0e_al. Io hayatratado como se indica en la secci6n Proteja el Sistema Vuelva a Ilenarlocon el grado de aceite recomendado.
- Page 57 Probiema Soluci6n CagSa La boquilla del patr6n de rociado para SOAP En el boquilla de selector, seleccione la boquilla (jab6n) estA seleccionada. del patr6n de rociado de alta presi6n. La entrada de agua estA bloqueada. Limpie la entrada. Suministro de agua inadecuado. Proporcione fiujo de agua adecuado.
- Page 58 Garantiade controlde emisionesde California, Disposicionesde la garantia contradefectos del sistema de control de emisiones de Sears U.S. EPAy Sears A continuaci6n se detaiian las disposiciones concretas Derechesy obligacienesde la garantia reiativas a la Cobertura de ia garantia contra defectos dei sistema de control de emisiones.
- Page 59 Lagarantia deloscomponentes relacionados conlas Sears.Sears no ser_.responsable de la cobertura de la emisiones eslasiguiente: garantia de fallos de componentes relacionados con el sistema de emisiones cubiertos por ia garantia • Los failos de todo componente cubierto por ia garantia provocados por el uso de componentes que no se deba sustituir como parte dei plan de complementarios o modificados.
- Page 60 Your Home For troubleshooting, product manuals and expert advice: managemyiife www.managemylife.com For repair - in your home - of all major brand appliances, lawn and garden equipment, or heating and cooling systems, no matter who made it, no matter sold it! For the replacement parts, accessories owner's manuals that you need to do-it-yourself.
Need help?
Do you have a question about the 580.752510 and is the answer not in the manual?
Questions and answers