
Related Manuals for ViewSonic PJ500-2


Summary of Contents for ViewSonic PJ500-2
- Page 1 PJ500/PJ550 PJ501/PJ551 User Guide Image Size 30” - 300” High Brightness Light Weight LCD Projector...
-
Page 2: Table Of Contents
OPTION Menu ....................17 Maintenance .................... 18 Lamp ........................18 Lamp Life ......................18 Replacing the Lamp ...................19 Resetting the Lamp Timer ..................19 Air-Filter ......................20 Maintenance Inside the Equipment ..............20 Cleaning the Lens ....................20 Cleaning the Cabinet and Remote Control ............20 ViewSonic PJ500/PJ550/PJ501/PJ551... - Page 3 PJ501 Technical Specifications ................. 24 PJ551 Technical Specifications ................. 25 Customer Support ...................26 LIMITED WARRANTY ................27 VIEWSONIC Projector ..................27 Appendix ....................28 Power Cord Safety Guidelines ................28 Compliance Information for U.S.A..............29 Compliance Information for Canada ..............29 Compliance Information for European Countries ..........
-
Page 4: For Your Records
NERGY ® Disclaimer: ViewSonic Corporation shall not be liable for technical or editorial errors or omissions contained herein; nor for incidental or consequential damages resulting from furnishing this material, or the performance or use of this product. -
Page 5: Features
• Component video maximizes video image quality Before Use Package Contents Make sure all of the following items are included in the package. If anything is missing, please contact ViewSonic. Power Cord Power Cord Remote Con- Power Cord Carrying Case... -
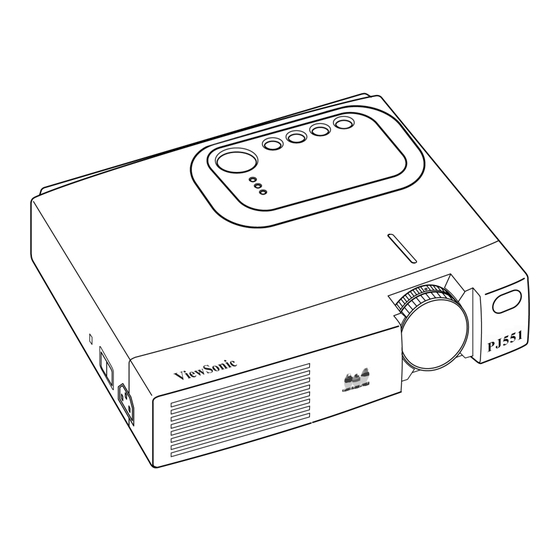
Page 6: Projector Components
(for the cooling fan) Speaker Rear foot adjuster Interface panel Remote control RGB (In) sensor Control (RS232) Component Video Y (In) Audio (In, 3.5 mm) (In) (In) R Audio (In) L Audio (In) S-Video (In) Video (In) Figure 2: Projector Components ViewSonic PJ500/PJ550/PJ501/PJ551... -
Page 7: Remote Control Components
VOLUME Button OFF Button MUTE Button FREEZE Button KEYSTONE Button POSITION Button MENU Button [Left] Arrow Button [Up] Arrow Button ENTER Button [Right] Arrow Button [Down] Arrow Button RESET Button ESC (Escape) Button Figure 3: Remote Control Components ViewSonic PJ500/PJ550/PJ501/PJ551... -
Page 8: Inserting The Batteries
• Keep the battery away from children and pets. • When the remote control will not to be used for an extended period, remove the batteries. NOTE: Replace the batteries if the operation of the remote control becomes irregular or weak. ViewSonic PJ500/PJ550/PJ501/PJ551... -
Page 9: Installation
Lift up the front side of the projector, press the foot adjuster button, and adjust the projection angle. Release the adjuster button to lock at the desired angle. Rotate the foot pad to adjust the left/right tilt of the displayed image. ViewSonic PJ500/PJ550/PJ501/PJ551... -
Page 10: Cabling
• Some computers may have multiple display screen modes. You may not be able to use some of the modes with this projector. Power Connection Use the correct power cord supplied with your projector. Connect the AC inlet of the projector to the power outlet as shown in the graphic below. Figure 7: Power Cord Connect ViewSonic PJ500/PJ550/PJ501/PJ551... -
Page 11: Example Of System Setup
Plug & Play is a system configured with peripheral equipment including a computer, display NOTE: and operating system. This projector is recognized as Plug & Play capable. Refer to the ViewSonic CD Wizard INF display driver files for configuration. Plug & Play will not operate with a direct connection to an Apple computer. -
Page 12: Operations
• To turn OFF the projector press the Standby/ON button and hold for 2 seconds . • The POWER LED on the control pad flashes orange during cool-down. • Wait until the POWER LED changes to a steady orange before you set the Power Switch to [O] OFF. ViewSonic PJ500/PJ550/PJ501/PJ551... -
Page 13: Basic Operation
(remote control) sound. After the desired volume is selected, press the VOLUME button again to exit the Volume mode. MUTE Set/Clear Mute Mode: Press the MUTE button. The sound is silenced in this mode. (remote control) ViewSonic PJ500/PJ550/PJ501/PJ551... - Page 14 Escape: Press the ESC button on the remote control to return to the previous menu from a selected sub-menu. (remote control) ENTER Escape: Press the ENTER button on the remote control activate the adjustment screen for a selected menu option. (remote control) NOTE: Pressing the button performs the same function. ViewSonic PJ500/PJ550/PJ501/PJ551...
-
Page 15: Main Menu
• NORMAL • CINEMA • DYNAMIC MIRROR Select Mirror Status: Press the button to select one of these options: • NORMAL • H:INVERT (Horizontally Inverted image) • V:INVERT (Vertically Inverted image) • H&V:INVERT (Horizontally and Vertically Inverted image) ViewSonic PJ500/PJ550/PJ501/PJ551... -
Page 16: Picture-1 Menu
Adjust Red Color Balance: Darker Lighter COLOR BAL B Adjust Blue Color Balance: Darker Lighter SHARPNESS Adjust Sharpness (for VIDEO/S-VIDEO): Sharper Softer COLOR Adjust COLOR (for VIDEO/S-VIDEO/COMPONENT VIDEO): Darker Lighter TINT Adjust Tint (for VIDEO/S-VIDEO): More Green More Red ViewSonic PJ500/PJ550/PJ501/PJ551... -
Page 17: Picture-2 Menu
• Adjust to eliminate flicker. H SIZE Adjust Horizontal Size (for RGB): Larger Smaller • If the horizontal size adjustment is excessive, the image may not be displayed correctly. In such cases, please initialize the H SIZE with the RESET button. ViewSonic PJ500/PJ550/PJ501/PJ551... -
Page 18: Input Menu
• In the SYNC ON G mode, the picture may be incorrect with some signals. In such cases, remove the signal connector so that no signal is received and turn the SYNC ON G off, and then reconnect the signal. ViewSonic PJ500/PJ550/PJ501/PJ551... - Page 19 The START UP screen is fixed screen displays when no signal is detected. This screen is active only when TURN ON option is selected from the START UP sub-menu. When TURN OFF is selected, the Blue blank screen displays when is no signal is detected. ViewSonic PJ500/PJ550/PJ501/PJ551...
-
Page 20: Option Menu
• Do not reset the filter time without replacing the filter. Reset the filter time always when replacing the filter. The message functions will not operate properly if the filter time is not reset correctly. • Before replacing the air filter, carefully read the descriptions of "Air-Filter" and "Replacing the Filter" on page 20. ViewSonic PJ500/PJ550/PJ501/PJ551... -
Page 21: Maintenance
The LAMP indicator is also red when the lamp unit reaches high temperature. Before NOTE: replacing the lamp switch the POWER OFF, wait approximately 20 minutes, and switch the POWER ON again. If the LAMP indicator is still red replace the lamp. ViewSonic PJ500/PJ550/PJ501/PJ551... -
Page 22: Replacing The Lamp
Press the Up arrow button to select the DEFAULT. The remaining lamp life is now reset to 2000 hours. Do not reset the lamp timer without replacing the lamp. The message functions will IMPORTANT: not operate properly if the lamp timer is not reset correctly. ViewSonic PJ500/PJ550/PJ501/PJ551... -
Page 23: Air-Filter
• Make sure the lens is cool before cleaning. • Do not use detergents or chemicals other than those noted above. Do not use benzene or thinners. • Do not use chemical sprays. • Use a soft cloth or lens paper only. ViewSonic PJ500/PJ550/PJ501/PJ551... -
Page 24: Troubleshooting
Lights green Turns off Turns off ON. Normal operation possible. Blinks orange Turns off Turns off Cooling. Please wait. Blinks red Cooling. Please wait. The error is found. Take the appropriate measures when the POWER indicator ceases blinking. ViewSonic PJ500/PJ550/PJ501/PJ551... -
Page 25: Symptom
Plug the power cord into an AC power outlet. page 7 disconnected. No video or The Input is not correctly Use INPUT button on projector control pad or remote control page 10 audio set. to select input source. No signal input. Connect correctly. page 7,8 ViewSonic PJ500/PJ550/PJ501/PJ551... - Page 26 The lamp is nearing the Replace lamp. page 19 end of its service life. Images are Focus or H PHASE is out Adjust the focus or H PHASE. page 14 blurred of adjustment. Adjust focus with Focus Ring. page 3 ViewSonic PJ500/PJ550/PJ501/PJ551...
-
Page 27: Specifications
1.0 Vp-p, 75 ohm Terminator (Positive) VIDEO 0.7 Vp-p, 75 ohm Terminator (Positive) 0.7 Vp-p, 75 ohm Terminator (Positive) 200 m Vrms, 47 k ohms (max. 3.0 Vp-p) AUDIO RCA jack Control functions CONTROL D-sub 15-pin shrink plug (RS232) ViewSonic PJ500/PJ550/PJ501/PJ551... -
Page 28: Pj551 Technical Specifications
1.0 Vp-p, 75 ohm Terminator (Positive) VIDEO 0.7 Vp-p, 75 ohm Terminator (Positive) 0.7 Vp-p, 75 ohm Terminator (Positive) 200 m Vrms, 47 k ohms (max. 3.0 Vp-p) AUDIO RCA jack Control functions CONTROL D-sub 15-pin shrink plug (RS232) ViewSonic PJ500/PJ550/PJ501/PJ551... -
Page 29: Customer Support
Table 15: Optional Parts Part Ordering Specifications Lamp Replacement To order parts contact your dealer or ViewSonic. Air Filter Replacement To order parts contact your dealer or ViewSonic. Slot for Kensington lock To order parts contact your dealer or ViewSonic. ViewSonic PJ500/PJ550/PJ501/PJ551... -
Page 30: Limited Warranty
How long the warranty is effective: ViewSonic projectors are warranted for three (3) years for all parts excluding the lamp and three (3) years for all labor from the date of the first consumer purchase. Projector lamps are warranted separately. -
Page 31: Appendix
HAR-Certified, and a special mark that will appear on the outer sheath, or on the insulation of one of the inner conductors. If you have any questions concerning which proper power cord to use, please consult with the dealer from whom you have purchased the product. ViewSonic PJ500/PJ550/PJ501/PJ551... -
Page 32: Compliance Information For U.s.a
The device complies with the requirements of the EEC directive 89/336/EEC as amended by 92/ 31/EEC and 93/68/EEC Art.5 with regard to “Electromagnetic compatibility,” and 73/23/EEC as amended by 93/68/EEC Art.13 with regard to “Safety.” User Information for all Countries NOTICE: Use the cables which are included with the projector or specified. ViewSonic PJ500/PJ550/PJ501/PJ551...
Need help?
Do you have a question about the PJ500-2 and is the answer not in the manual?
Questions and answers