Table of Contents
Advertisement
Quick Links
Advertisement
Table of Contents
Troubleshooting

Related Manuals for eMachines E4264


Summary of Contents for eMachines E4264
- Page 1 Computer Reference Guide...
-
Page 3: Table Of Contents
Accessing the online User Guide ..... . 2 eMachines contact information ..... . . 3 Microsoft Certificate of Authenticity . - Page 4 Contents Removing the side panel ......31 Removing the front bezel ......32 Closing the case .
- Page 5 Before calling Customer Care ..... 95 eMachines contact information ..... . 96 Self-help .
- Page 6 Contents...
-
Page 7: Chapter 1: About This Reference
Chapter 1 About This Reference • About this guide • Accessing the online User Guide • eMachines contact information • Microsoft Certificate of Authenticity • For more information... -
Page 8: About This Guide
For all other computer information, see the online User Guide. For more information For more information about your computer, visit eMachines’ Support page at www.emachines.com or the Web address shown on your computer’s label. -
Page 9: Emachines Contact Information
The label on the side of your computer case contains information that identifies your computer model and serial number. Customer Care will need this information if you call for assistance. Technical Support Serial number telephone number... - Page 10 Chapter 1: About This Reference...
-
Page 11: Chapter 2: Checking Out Your Computer
Chapter 2 Checking Out Your Computer • Front • Back... -
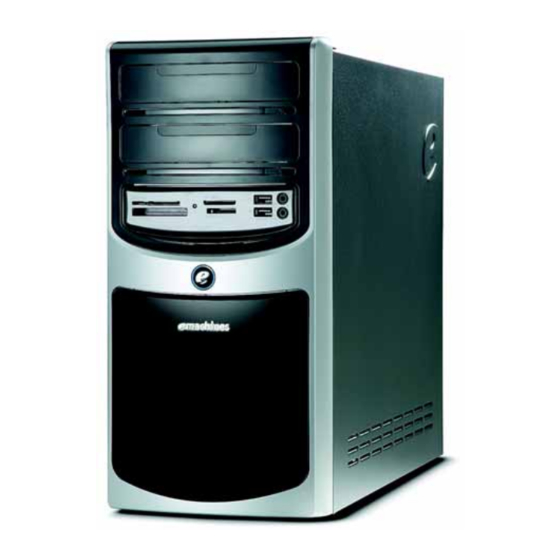
Page 12: Front
Chapter 2: Checking Out Your Computer Front DVD/CD drive DVD/CD drive (optional) USB ports Microphone jack Memory card reader Headphone jack (optional) Power button/ power indicator... - Page 13 Component Icon Description DVD/CD drive Use this drive to listen to audio CDs, install games and programs, watch DVDs, and store large files onto recordable discs (depending on drive type). This drive may be a CD, recordable CD, DVD, recordable DVD, Blu-ray, or HD DVD drive.
-
Page 14: Back
Chapter 2: Checking Out Your Computer Back Important Your computer’s hardware options and port locations may vary from this illustration. Voltage switch Case cover thumbscrew Power connector PS/2 keyboard port PS/2 mouse port Parallel port Monitor (VGA) port IEEE 1394/FireWire™ port Ethernet (network) jack USB ports Center/subwoofer jack... - Page 15 Component Icon Description Power connector Plug the power cord into this connector. For more information on connecting power, see “Preparing power connections” on page PS/2 keyboard port Plug a PS/2 keyboard into this port. Monitor (VGA) port Plug a VGA (blue connector) monitor cable into this port.
- Page 16 Chapter 2: Checking Out Your Computer Component Icon Description Parallel port Plug a parallel device (such as a printer) into this port. Ethernet (network) Plug an Ethernet network cable or a device jack (such as a DSL or cable modem for a broadband Internet connection) into this jack.
-
Page 17: Chapter 3: Setting Up And Getting Started
Chapter 3 Setting Up and Getting Started • Working safely and comfortably • Preparing power connections • Connecting to a broadband modem or network • Connecting a dial-up modem • Starting your computer • Turning off your computer • Restarting (rebooting) your computer •... -
Page 18: Chapter 3: Setting Up And Getting Started
Chapter 3: Setting Up and Getting Started Working safely and comfortably Before using your computer, follow these general guidelines for setting up a safe and comfortable work area and avoiding discomfort and strain: • Keep hands and arms parallel to the floor. •... -
Page 19: Reducing Eye Strain
Reducing eye strain Sunlight or bright indoor lighting should not reflect on the monitor screen or shine directly into your eyes. • Position the computer desk and screen so you can avoid glare on your screen and light shining directly into your eyes. -
Page 20: Sitting At Your Computer
Chapter 3: Setting Up and Getting Started Sitting at your computer • Avoid bending, arching, or angling your wrists. Make sure that they are in a relaxed position when you type. • Do not slouch forward or lean far back. Sit with your back straight so your knees, hips, and elbows form right angles when you work. -
Page 21: Checking The Voltage Selection
Checking the voltage selection Caution If you set the voltage selection switch incorrectly, your system will be damaged. Make sure this switch is set correctly for your location before turning on your computer. In the United States, the utility power is supplied at a nominal 115 volts at 60 Hz. -
Page 22: Connecting To A Broadband Modem Or Network
Chapter 3: Setting Up and Getting Started Connecting to a broadband modem or network Important Your computer may be equipped with a built-in Ethernet (network) jack. For information about setting up a wired or wireless Ethernet network, see the online User Guide. You can connect your computer to a cable or DSL modem or to a wired Ethernet network. -
Page 23: Starting Your Computer
Starting your computer To start your computer: Connect the power, network, mouse, keyboard, and monitor cables to your computer according to the setup poster. Press the power button on the front of your computer. If your computer does not turn on, check the power cable connections. -
Page 24: Turning Off Your Computer
Chapter 3: Setting Up and Getting Started Turning off your computer Warning When you turn off your computer, certain components in the power supply and system board remain energized. In order to remove all electrical power from your computer, unplug the power cord and modem cable from the wall outlets. -
Page 25: Restarting (Rebooting) Your Computer
Restarting (rebooting) your computer If your computer does not respond to keyboard or mouse input, you may need to restart (reboot) your computer. To restart your computer: Click (Start), click the arrow next to the lock icon, then click Restart. Your computer turns off, then turns on again. -
Page 26: Enhanced Keyboard
Chapter 3: Setting Up and Getting Started Enhanced keyboard Editing buttons Audio playback buttons Navigation keys Internet Function keys buttons Indicators Directional keys Windows keys Application key Numeric keypad Standard keyboard Navigation keys Function keys Indicators Internet buttons Directional keys Windows keys Application key Numeric keypad... - Page 27 Feature Icon Description Editing buttons Press these buttons to copy, cut, and paste. Function keys Press these keys to start program actions. Each program uses different function keys for different purposes. See the program documentation to find out more about the function key actions.
-
Page 28: Using The Mouse
Chapter 3: Setting Up and Getting Started Using the mouse Right button Left button Scroll wheel The mouse is a device that controls the pointer movement on the computer display. This illustration shows the standard mouse. As you move the mouse, the pointer (arrow) on the display moves in the same direction. - Page 29 You can use the left and right buttons on the mouse to select objects on the display. You can use the scroll wheel on the mouse to move through a document. This feature is not available in all programs.
-
Page 30: Adjusting The Volume
Chapter 3: Setting Up and Getting Started Adjusting the volume You can adjust volume using your speakers’ controls or the Windows volume controls. You can also adjust the volume of specific sound devices in your computer. To adjust the overall volume using hardware controls: •... - Page 31 To adjust device volume levels, click Mixer. The Volume Mixer dialog box opens, where you can click and drag sliders for individual devices. Adjust the Windows Sounds slider to change system sounds volume independently of general volume (such as the volume used for music and game sounds).
-
Page 32: Configuring The Audio Jacks
Chapter 3: Setting Up and Getting Started Configuring the audio jacks If the back of your computer has five audio jacks, they are universal jacks. This means that they can be used for more than one purpose. For example, the blue jack on the computer can be a stereo in jack or a stereo out jack. -
Page 33: Installing A Printer, Scanner, Or Other Device
Installing a printer, scanner, or other device Important Before you install a printer, scanner, or other peripheral device, see the device documentation and installation instructions. Your computer has one or more of the following ports: ® IEEE 1394 (also known as Firewire ), Universal Serial Bus (USB), serial, and parallel. - Page 34 Chapter 3: Setting Up and Getting Started...
-
Page 35: Chapter 4: Upgrading Your Computer
Chapter 4 Upgrading Your Computer • Preventing static electricity discharge • Opening and closing the case • Installing memory • Replacing the system battery • Adding or replacing an optical disc drive • Adding or replacing a hard drive • Replacing the heat sink and processor •... -
Page 36: Preventing Static Electricity Discharge
Chapter 4: Upgrading Your Computer Preventing static electricity discharge Warning To avoid exposure to dangerous electrical voltages and moving parts, turn off your computer and unplug the power cord and modem and network cables before opening the case. To prevent risk of electric shock, do not insert any object into the vent holes of the power supply. -
Page 37: Opening The Case
Opening the case Your computer case provides easy access to internal components. Removing the side panel Warning To avoid exposure to dangerous electrical voltages and moving parts, turn off your computer, then unplug the power cord and modem cable before opening the case. -
Page 38: Removing The Front Bezel
Chapter 4: Upgrading Your Computer Removing the front bezel To remove the front bezel: Remove the side panel by following the instructions in “Removing the side panel” on page Press the three bezel retention tabs, then swing the left side of the bezel away from the computer and remove it. -
Page 39: Closing The Case
Closing the case Replacing the front bezel To replace the front bezel: Slide the tabs on the right side of the bezel into the slots on the right side of the computer. Tabs Swing the left side of the bezel in to insert the release tabs on the left side of the bezel into the slots on the left side of the computer. -
Page 40: Installing Memory
Chapter 4: Upgrading Your Computer Tighten the two thumbscrews on the back edge of the side panel, then reconnect the cables and power cord. Installing memory When you upgrade the computer memory, make sure that you install the correct type of memory module for your computer. Your computer uses DIMM memory. - Page 41 If you are removing a DIMM from the memory module bank, gently pull the plastic tabs away from the sides of the memory module and remove it. - OR - If you are adding a DIMM to an empty memory module bank, gently pull the plastic tabs away from the sides of the memory module bank.
-
Page 42: Adding Or Replacing An Optical Disc Drive
Chapter 4: Upgrading Your Computer Adding or replacing an optical disc drive Tools You need a Phillips screwdriver to add or replace a CD or DVD drive. To add replace an optical disc drive: Remove the side panel by following the instructions in “Removing the side panel”... - Page 43 Remove the two drive retention screws. Drive retention screws Slide the drive forward and out of the drive bay. Slide the new drive into the drive bay, line up the screw holes on the drive bay with the screw holes on the drive, then replace the two drive retention screws.
-
Page 44: Adding Or Replacing A Hard Drive
Chapter 4: Upgrading Your Computer Adding or replacing a hard drive To add or replace a hard drive: Tools You need a Phillips screwdriver to add or replace a hard drive. Remove the side panel by following the instructions in “Removing the side panel”... - Page 45 Loosen the screw that secures the hard drive cage to the computer. (This screw cannot be removed.) Remove the hard drive cage from the computer. If you are replacing a drive, remove the screws that secure the hard drive to the hard drive cage, then slide the old hard drive out of the cage.
-
Page 46: Replacing The Heat Sink And Processor
Chapter 4: Upgrading Your Computer Line up the tabs on the right side of the cage with the slots on the inside of the case, then slide the cage into the case. Hard drive cage tabs Slots on inside of case Tighten the cage thumbscrew, then plug the hard drive cage fan cable back into the system board. - Page 47 Loosen the four captive screws (these screws cannot be removed) that secure the heat sink and fan assembly to the system board, then remove the assembly and place it on a stable surface with the flat surface of the heat sink (the side with the thermal grease) up.
-
Page 48: Adding Or Replacing An Expansion Card
Chapter 4: Upgrading Your Computer If this is a new heat sink, remove the strip on the heat sink that covers the gray thermal grease. If you are re-using a heat sink, re-apply a small bead of thermal grease (about the size of a pea) to the surface that contacts the processor. - Page 49 If you are replacing a card, remove the old expansion card. You can slightly seesaw the card end-to-end to loosen the card, but do not bend the card sideways. Caution Do not touch the contacts on the bottom part of the expansion card.
-
Page 50: Replacing The System Battery
Chapter 4: Upgrading Your Computer Replacing the system battery Warning Danger of explosion if battery is incorrectly replaced. Replace only with the same or equivalent type recommended by the manufacturer. Dispose of used batteries following the manufacturer’s instructions. If the computer clock does not keep time or the settings in the BIOS Setup utility are not saved when you turn off your computer, replace the system battery. - Page 51 Remove the side panel by following the instructions in “Removing the side panel” on page For more stability, place your computer on its side. To avoid scratching the case, place it on a towel or other non-abrasive surface. Locate the old battery on the system board and note its orientation.
-
Page 52: Replacing The System Board
Chapter 4: Upgrading Your Computer Replacing the system board To replace the system board: Remove the side panel by following the instructions in “Removing the side panel” on page Remove all expansion cards by following the directions “Adding or replacing an expansion card” on page Remove all memory modules by following the directions “Installing memory”... - Page 53 Align the new system board on the screw holes in the case, then secure it into the case with the screws. If your replacement system board does not include a processor, remove the processor and heat sink assembly from the old system board by following the directions in “Replacing the heat sink and processor”...
- Page 54 Chapter 4: Upgrading Your Computer...
-
Page 55: Chapter 5: Maintaining Your Computer
Chapter 5 Maintaining Your Computer • Setting up a maintenance schedule • Caring for your computer • Cleaning your computer • Updating Windows • Using BigFix • Managing hard drive space • Scheduling maintenance tasks • Moving from your old computer... -
Page 56: Setting Up A Maintenance Schedule
Chapter 5: Maintaining Your Computer Setting up a maintenance schedule Use the following table to set up a regular maintenance schedule. Maintenance task Weekly Monthly When needed Check for viruses Run Windows Update Manage hard drive space Clean up hard drives Scan hard drive for errors Defragment hard drive Back up files... -
Page 57: Cleaning Your Computer
• Avoid subjecting your computer to extreme temperature changes. The case can become brittle and easy to break in cold temperatures and can melt or warp in high temperatures. Damage due to either extreme is not covered by your warranty. As a general rule, your computer is safest at temperatures that are comfortable for you. -
Page 58: Cleaning The Exterior
Chapter 5: Maintaining Your Computer Cleaning the exterior Warning When you shut down your computer, the power turns off, but some electrical current still flows through it. To avoid possible injury from electrical shock, unplug the power cord, modem cable, and network cable from the wall outlets. -
Page 59: Cleaning The Monitor
Cleaning the monitor Caution A flat-panel display is made of specially coated glass and can be scratched or damaged by abrasive or ammonia-based glass cleaners. To clean the monitor: • To clean an LCD flat panel monitor, use a soft cloth and water to clean the screen. -
Page 60: Updating Windows
Chapter 5: Maintaining Your Computer Updating Windows Windows Update helps you keep your computer up-to-date. Use Windows Update to choose updates for your computer’s operating system, software, and hardware. New content is added to the site regularly, so you can always get the most recent updates and fixes to protect your computer and keep it running smoothly. -
Page 61: Managing Hard Drive Space
Managing hard drive space Windows provides several utilities you can use to check hard drive space, delete unnecessary files, defragment files, and back up files. Checking hard drive space To check hard drive space: Shortcut Start Computer right-click drive... -
Page 62: Deleting Unnecessary Files
Chapter 5: Maintaining Your Computer Right-click the drive that you want to check for available file space, then click Properties. Drive space information appears. Deleting unnecessary files Delete unnecessary files, such as temporary files and files in the Recycle Bin, to free hard drive space. To delete unnecessary files: Shortcut Start... -
Page 63: Checking The Hard Drive For Errors
Click one of the options: • My files only cleans only the folders for the currently logged in user. • Files from all users on this computer cleans all folders. The Disk Cleanup dialog box opens. Click to select the types of files you want to delete, then click OK. -
Page 64: Defragmenting The Hard Drive
Chapter 5: Maintaining Your Computer Click Check Now, then click Start. Your drive is checked for errors. This process may take several minutes. Important Error checking cannot scan a drive while the drive is being used, so if you try to check your hard drive for errors, you see a prompt asking you if you want to scan the hard drive later (the next time you restart your computer). -
Page 65: Backing Up Files
To defragment the hard drive: Disconnect your computer from the network. Click (Start), All Programs, Accessories, System Tools, then click Disk Defragmenter. The Disk Defragmenter dialog box opens. Click Defragment now. This process may take hours to complete, depending on the size of the drive being defragmented. - Page 66 Chapter 5: Maintaining Your Computer To back up files: Click (Start) then click Computer. The Computer window opens. Right-click the drive that you want to back up, click Properties, then click the Tools tab. Click Backup Now, then click Run a file backup now. Follow the on-screen instructions to select a backup storage location and the files and folders to back up.
-
Page 67: Scheduling Maintenance Tasks
Scheduling maintenance tasks Task Scheduler lets you schedule maintenance tasks such as running Disk Defragmenter and checking your drives for errors. Important Your computer must be on during scheduled tasks. If your computer is off, scheduled tasks will not run. -
Page 68: Moving From Your Old Computer
Chapter 5: Maintaining Your Computer Moving from your old computer Moving with Windows Easy Transfer You can move your files, folders, software settings, and user account settings (such as display, Internet, and e-mail settings) from your old computer to your new one using Windows Easy Transfer, providing your old computer uses Windows XP or Windows Vista. -
Page 69: Moving Files And Settings Manually
Moving files and settings manually You can manually transfer your personal data files by copying them to a network location, or to removable media, such as a writable disc, an external hard drive, or a flash drive. Finding your documents Many programs save your personal data files in the Documents or My Documents folder. - Page 70 Chapter 5: Maintaining Your Computer File type File usually ends in... Documents .DOC, .TXT, .RTF, .HTM, .HTML, .DOT Spreadsheets .XLS, .XLT, .TXT Pictures .JPG, .BMP, .GIF, .PDF, .PCT, .TIF, .PNG, .EPS Movies .MPEG, .MPG, .AVI, .GIF, .MOV Sound and music .WAV, .CDA, .MP3, .MID, .MIDI, .WMA To find files using Find or Search: In Windows Vista, click...
-
Page 71: Chapter 6: Troubleshooting
Chapter 6 Troubleshooting • Safety guidelines • First steps • Troubleshooting • Recovering your system • Telephone support... -
Page 72: Safety Guidelines
Chapter 6: Troubleshooting Safety guidelines While troubleshooting your computer, follow these safety guidelines: Warning Never remove your computer case cover while your computer is turned on and while the modem cable, network cable, and power cord are connected. Warning Make sure that you are correctly grounded before accessing internal components. -
Page 73: Troubleshooting
• If you added or removed peripheral devices, review the installation procedures you performed and make sure that you followed each instruction. • If an error occurs in a program, see the program’s printed documentation or the online help. - Page 74 Chapter 6: Troubleshooting • Restart your computer, then enter the BIOS Setup utility by pressing and holding F2 while your computer restarts. Make sure that the IDE controllers are enabled. • Make sure that the drive is configured correctly by following the instructions in the drive documentation.
-
Page 75: Diskette Drive
• DVDs and DVD drives contain regional codes that help control DVD title exports and help reduce illegal disc distribution. To be able to play a DVD, the disc’s regional code and your DVD drive’s regional code must match. -
Page 76: Dvd Drives
Chapter 6: Troubleshooting You see a “Disk is full” error message • Delete unnecessary files on the diskette. • Try a different diskette. Occasionally diskettes are flawed and cannot be read by the diskette drive. • Run Error Checking on the diskette. For more information, see “Checking the hard drive for errors”... -
Page 77: Expansion Cards
The computer does not recognize an add-in Ethernet card • Shut down and restart your computer. • Make sure that you have installed the required software. For more information, see the documentation that came with your Ethernet card. •... -
Page 78: Hard Drive
Chapter 6: Troubleshooting To restore deleted files: Double-click the Recycle Bin icon. Right-click the file you want to restore, then click Restore. The file is restored to the place where it was originally deleted from. If the Recycle Bin was emptied before you try to restore a file, the file cannot be restored. -
Page 79: Internet
Internet See also “Modem (dial-up)” on page You cannot connect to the Internet • If you are using a dial-up modem, make sure that the modem cable is plugged into the modem jack and not the Ethernet network jack. See your setup poster to make sure that the connections have been made correctly. -
Page 80: Keyboard
Chapter 6: Troubleshooting Connecting to a Web site takes too long Many factors can affect Internet performance: • The condition of the telephone lines in your residence or at your local telephone service • The condition of the Internet computers to which you connect and the number of users accessing those computers •... -
Page 81: Media Center
Display type—The Media Center is best viewed on display devices that were offered with the Media Center computer when you purchased it from eMachines. Other types of display devices, including retail TVs, may provide lower quality video. If you did not order a... - Page 82 • Quality of video cables—Poor quality or the incorrect type of video cables can cause problems and affect the video quality. eMachines recommends using high-quality video cables. Cable connections must be made correctly for optimal video quality. A poor cable connection can lower video quality.
- Page 83 VGA or an S-Video display device and automatically changes the display settings for the type of display device you are using. For more information, see the support Web site at www.emachines.com. You want to change display settings to get better TV or DVD image quality •...
-
Page 84: Memory
Chapter 6: Troubleshooting You want to know whether you can play recorded programs on other computers • Yes, you can. A DVR-MS file recorded to DVD can be replayed on another Media Center computer or on a non-Media Center computer that has a DVD player and DVD decoder software (such as WinDVD). -
Page 85: Modem (Cable Or Dsl)
Modem (cable or DSL) • See the documentation that came with your modem for additional troubleshooting information. Modem (dial-up) See also “Internet” on page Your modem does not dial or does not connect • Make sure that the modem cable is plugged into the modem jack and not the Ethernet network jack. - Page 86 Chapter 6: Troubleshooting Help For more information about dialing properties, click Start, then click Help and Support. Type dialing in the Search Help box, then press E NTER • Disconnect any answering machine, fax machine, or printer that is on the same line as the modem. Do not connect these devices to the same telephone line as the modem.
- Page 87 If your computer has a v.90 modem, the speed at which you can upload (send) data is limited to 33.6K. If your computer has a v.92 modem, the speed at which you can upload data is limited to 48K. Your ISP may not support 48K uploads.
-
Page 88: Monitor
Chapter 6: Troubleshooting The modem is noisy when it dials and connects When your modem tries to connect to another modem, it begins handshaking. Handshaking is a digital “getting acquainted” conversation between the two modems that establishes connection speeds and communication protocols. You may hear unusual handshaking sounds when the modems first connect. - Page 89 The color is not uniform • Make sure that the monitor warms up for at least 30 minutes before making a final judgment about color uniformity. • Make sure that: • Non-shielded speakers are not placed too close to the monitor.
-
Page 90: Mouse
Chapter 6: Troubleshooting Mouse The mouse does not work • Make sure that the mouse cable is plugged in correctly. • Shut down and restart your computer. • Remove all extension cables and switch boxes. • Try a mouse you know is working to make sure that the mouse port works. -
Page 91: Printer
• If your computer is plugged into a surge protector, make sure that the surge protector is connected securely to an electrical outlet, turned on, and working correctly. To test the outlet, plug a working device, such as a lamp, into the outlet and turn it on. -
Page 92: Sound
Chapter 6: Troubleshooting You see a “Printer queue is full” error message • Make sure that the printer is not set to work offline. To make sure that the printer is not set to work offline: Click (Start), then click Control Panel. The Control Panel window opens. -
Page 93: Recovering Your System
Problem-solving may also involve re-installing some or all of the computer’s software (also called recovering or restoring your system). eMachines provides everything you need to recover your system under most conditions. Caution To prepare your computer for additional system recovery options, you should create a set of software and driver recovery discs as soon as possible. -
Page 94: Recovering Pre-Installed Software And Drivers
To create discs for recovering pre-installed software and drivers: Click (Start), All Programs, eMachines Recovery Center, then click eMachines Recovery Center. The eMachines Recovery Center opens. Click Applications and drivers external media, then click Next. The What would you like to do? dialog box opens. - Page 95 Important If you have recently reinstalled Windows or installed a new hard drive, and your Start menu does not contain eMachines Recovery Center as an option, you must recover your software and drivers using software and driver recovery discs you have created. For instructions, “Recovering pre-installed software and drivers using recovery discs”...
-
Page 96: Using Microsoft System Restore
Next. If the software or driver is not shown on the list, and you have a multiple-disc set of recovery discs, close eMachines Recovery Center and try another disc. Using Microsoft System Restore Microsoft System Restore periodically takes “snapshots” of your system settings and saves them as restore points. - Page 97 To restore using Microsoft System Restore: Click (Start), Control Panel, System and Maintenance, then click Backup and Restore Center. The Backup and Restore Center opens. On the left side of the window, click Repair Windows using System Restore, then click Next. The Choose a...
- Page 98 Chapter 6: Troubleshooting Click the restore point you want, click Next, then click Finish. A confirmation message box appears. Click Yes. Your system is restored using the restore point you specified. Manually creating a restore point To manually create a restore point: Click (Start), Control Panel, System and Maintenance, then click Backup and Restore Center.
-
Page 99: Recovering Your System To Its Factory Condition
F8 until the Recovery Options screen opens. If Windows loads instead, restart the computer and try again. Press the arrow keys on your keyboard to select Repair Your Computer, then press E NTER eMachines System Recovery starts, and the System Recovery Options dialog box opens. -
Page 100: Recovering Your System Using The Windows Dvd
Password box and type the user account’s password (if any), then click Next. The System Recovery Options menu opens. Click Restore Application. The Welcome to eMachines System Recovery window opens. Click Next, click Full factory recovery, then click Next. -
Page 101: Telephone Support
If you have recently installed hardware or software, make sure that you have installed it according to the instructions provided with it. If you did not purchase the hardware or software from eMachines, see the manufacturer’s documentation and technical support resources. -
Page 102: Emachines Contact Information
The label on the side of your computer case contains information that identifies your computer model and serial number. Customer Care will need this information if you call for assistance. You can also go to www.emachines.com. Technical Support Serial number... -
Page 103: Self-Help
The printed or online documentation that came with your hardware or software. In many cases, additional product information and online documentation for eMachines-supplied hardware can be found in our Web site's Documentation Library. • This Reference Guide and the online User Guide. - Page 104 Chapter 6: Troubleshooting...
-
Page 105: Appendix A: Legal Notices
Appendix A Legal Notices • Important safety information • Regulatory compliance statements • Environmental information • Notices... - Page 106 Appendix A: Legal Notices Important safety information Warning Always follow these instructions to help guard against personal injury and damage to your system. Your system is designed and tested to meet the latest standards for safety of information technology equipment. However, to ensure safe use of this product, it is important that the safety instructions marked on the product and in the documentation are followed.
-
Page 107: Care During Use
Care during use Warning Do not use eMachines products in areas classified as hazardous locations. Such areas include patient care areas of medical and dental facilities, oxygen-laden environments, or industrial facilities. Warning To reduce the risk of fire, use only No. 26 AWG or larger telecommunications line cord. -
Page 108: Regulatory Compliance
Phone: 800-846-2000 Caution Changes or modifications not expressly approved by eMachines could void the FCC compliance and negate your authority to operate the product. This device complies with Part 15 of the FCC Rules. Operation of this device is subject to the... - Page 109 Telecommunications per Part 68 of the Code of Federal Regulations (CFR 47) (applicable to products fitted with USA modems) Your modem complies with Part 68 of the Code of Federal Regulations (CFR 47) rules. On the computer or modem card is a label that contains the FCC registration number and Ringer Equivalence Number (REN) for this device.
-
Page 110: Laser Safety Statement
If an outside antenna or cable system is to be connected to your eMachines PC, make sure that the antenna or cable system is electrically grounded to provide some protection against voltage surges and static charges. -
Page 111: Lightning Protection
Lightning protection For added protection of any eMachines product during a lightning storm or when it is left unattended or unused for long periods of time, unplug the product from the wall outlet and disconnect the antenna or cable system. -
Page 112: Environmental Information
For the latest product updates, consult the eMachines Web site at www.emachines.com. In no event will eMachines be liable for direct, indirect, special, exemplary, incidental, or consequential damages resulting from any defect or omission in this manual, even if advised of the possibility of such damages. -
Page 113: Macrovision Statement
Trademark acknowledgments Gateway and eMachines are trademarks or registered trademarks of Gateway, Inc. in the United States and other countries. All other brands and product names are trademarks or registered trademarks of their respective companies. Macrovision statement If your computer has a DVD-compatible drive and an analog... - Page 114 Appendix A: Legal Notices...
-
Page 115: Index
Index connecting Caps Lock indicator AC power connector cards accessories adding expansion safety precautions replacing expansion activity indicators troubleshooting add-in See indicators card application key troubleshooting memory arrow keys card audio case audio in jack closing center speaker jack opening configuring jacks front speaker jack cleaning... - Page 116 DVD drive side speaker adding subwoofer replacing universal troubleshooting video camera Zip drive editing buttons electrostatic discharge (ESD) eMachines contact information default printer defragmenting hard drive ergonomics deleting files and folders Error-checking digital audio out Ethernet jack...
- Page 117 Ethernet network Hibernate mode connecting jack expansion card IEEE adding IEEE 1394 port replacing indicators external audio jack Caps Lock Num Lock numeric keypad faxes Scroll Lock troubleshooting installing files battery backing up devices deleting digital camera opening digital video camera...
- Page 118 Index Internet Authenticity mouse modem navigation cable numeric connecting Windows jack troubleshooting modem jack label Microsoft Certificate of monitor Authenticity troubleshooting product mouse LCD panel buttons cleaning cleaning troubleshooting clicking double-clicking lights moving pointer See indicators moving screen objects line in jack opening files, folders, and line out jack programs...
- Page 119 See memory files rebooting computer folders recordable drive front bezel removing files and folders programs resetting computer shortcut menu restarting computer optical connection Resume mode right-clicking Pad Lock indicator parallel port S/PDIF out password safety peripheral devices...
- Page 120 Index shutting down computer Internet connection keyboard side panel LCD panel removing memory replacing memory card reader sound modem adjusting monitor controls mouse muting network speaker jack passwords speakers power configuring printer Standby mode safety guidelines screen starting screen area computer screen resolution programs...
- Page 121 Windows Product Key Code Windows Update wired Ethernet troubleshooting working safely Zip drive Zip drive port...
- Page 122 Index...
- Page 124 MAN ECOOPER HW REF R1 12/06...
Need help?
Do you have a question about the E4264 and is the answer not in the manual?
Questions and answers