Advertisement
Table of Contents
- 1 Important Safety Instructions
- 2 Replacing the Back-Up Batteries
- 3 Front Panel
- 4 Setting the Time
- 5 Setting the Date
- 6 Setting the Alarm Times
- 7 Snooze Operation
- 8 Listening to the Radio
- 9 Antenna Information
- 10 Presetting Stations in the Tuner Memory
- 11 Sleep to Music Timer
- 12 Siren Test
- 13 Care and Maintenance
- 14 Care of Cabinet
- 15 Limited Warranty
- Download this manual
Advertisement
Table of Contents

Related Manuals for Emerson Research CKW2000


Summary of Contents for Emerson Research CKW2000
- Page 1 All-Alert System Clock Radio With Dual Alarms, Digital Tuning And Specific Area Message Encoding OWNER’ S MANUAL CKW2000 Visit our web site at www.emersonradio.com CKW2000_041207.p65 12/4/2007, 11:56...
-
Page 2: Important Safety Instructions
TO PREVENT FIRE OR SHOCK HAZARD, DO NOT USE THIS PLUG WITH AN EXTENSION CORD, RECEPTACLE OR OTHER OUTLET UNLESS THE BLADES CAN BE FULLY INSERTED TO PREVENT BLADE EXPOSURE. TO PREVENT FIRE OR SHOCK HAZARD, DO NOT EXPOSE THIS APPLIANCE TO RAIN OR MOISTURE. The lightning flash with arrow- WARNING: TO REDUCE THE head symbol, within an equi-... - Page 3 The CKW2000 also includes a digital tuning AM/FM clock radio with dual alarms to keep you on time and entertained as well as informed.
- Page 4 I M P O R TAN T N O T E S • Avoid installing this unit in places exposed to direct sunlight or close to heat radiating appliances such as electric heaters, on top of other stereo equipment that radiates too much heat, places lacking ventilation or dusty areas, places subject to constant vibration and/or humid or...
- Page 5 Emerson cares about our environment. • Place the clock radio on a stable, level surface such as a table, desk, shelf or stand, convenient to an AC outlet, out of direct sunlight, and away from sources of excess heat, dust, moisture, or strong magnetic fields.
- Page 6 Installing The Back-Up Batteries – IMPORTANT! Although this clock radio operates primarily on normal 120V AC 60Hz house current with the included AC adapter, it is extremely important that you install 4 “AA” batteries in the back up battery compartment located on the bottom cabinet. The back up...
-
Page 7: Replacing The Back-Up Batteries
After installing the batteries the LCD panel will show the Time and Date display. The LCD panel backlighting will remain on for 5 seconds and then shut off automatically to preserve the battery life. Remember that if the back up batteries are not installed, or are installed incorrectly, the clock and alarm time memory, and all of the preset radio station memories, will have to be reset after every power interruption. - Page 8 Installing The AC Adapter – IMPORTANT! The wire of the AC adapter also functions as the FM antenna of this model. Please be sure to fully unwind the AC adapter cord and make sure the cord is extended to its full length for best FM reception. Connect the small female plug of the AC adapter to the “DC 6V”...
-
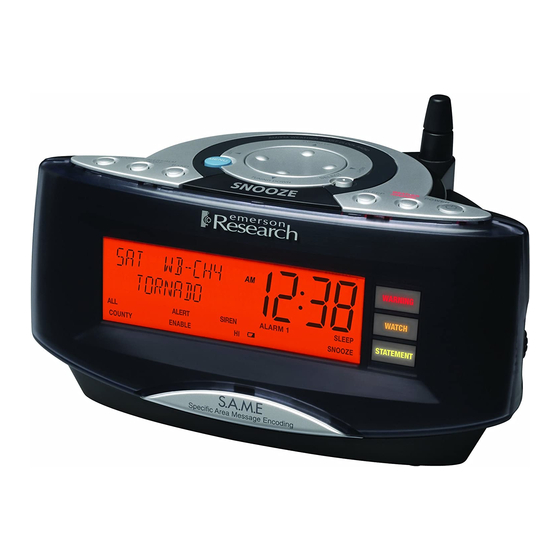
Page 9: Front Panel
L O C AT I O N O F C O N T R O L S AN D I N D I C AT O R S Front Panel Top Panel CKW2000_041207.p65 12/4/2007, 11:56... - Page 10 1.) Multi-Function LCD Display. 2.) Weather Band Telescopic Antenna. 3.) WARNING Indicator. 4.) WATCH Indicator. 5.) VOLUME Control. 6.) STATEMENT Indicator. 7.) Battery Compartment (Bottom Cabinet). 8.) ALM (Alarm) 1 Button. 9.) MENU Button. 10.) LEFT Button. 11.) TUNING UP Button. 12.) DC 6V 300mA Input Jack.
- Page 11 O P E R AT I N G I N S T R U C T I O N S OPERATING INSTRUCTIONS FOR CLOCK AND RADIO • Make sure that you have installed the back up batteries. • Make sure that you have connected the AC adapter to the back of this unit and to your AC outlet.
- Page 12 MENU Button Press the MENU button to enter the Menu mode. Press again to exit the Menu mode and return to the normal Time and Date display. After 30 seconds with no user input the LCD will return to the normal Time and Date mode automatically. NAVIGATION Buttons ( / / / ) After pressing the MENU button once the display will show “SETUP TIME”...
- Page 13 If you are looking up at the display from below – for example, if you are lying in bed and the clock radio is on a nightstand or table that is higher than the bed – the numbers on the display may seem to fade or may be completely invisible.
-
Page 14: Setting The Time
Setting The Time When you install the 4 back up batteries the display comes ‘ on’ and shows the initial default time and date setting: “SUNDAY, 01 – JAN – 2006, 12:00”. Set the display to the correct time as follows: 1.) Press the MENU button once. -
Page 15: Setting The Date
Setting The Date 1.) Press the MENU button once. The display shows “SETUP TIME”. 2.) Press the (TUNING UP) Navigation button. The display shows “SETUP DATE”. The first time you enter the Setup Date mode the display will show “01 – JAN – 2006”, which is the initial default date. -
Page 16: Setting The Alarm Times
Setting The Alarm Times This model has two alarms that can be set and used independently. You may set both alarms for Radio or Buzzer operation, or set one alarm for Radio and the other for Buzzer. Setting The Alarm 1 Wake Up Time 1.) Depress and hold the ALM 1 button for approximately 1 second. - Page 17 Setting The Alarm 2 Wake Up Time 1.) Depress and hold the ALM 2 button for approximately 1 second. The “SET ALARM 2” indicator appears and the Hour digits begin flashing. 2.) Press the Navigation buttons to set the display to the correct Alarm 2 wake up hour.
- Page 18 Selecting The Alarm Mode (Radio, Buzzer, or Off) 1.) Press the ALM 1 button once. The display shows the Alarm 1 Wake Up Time. 2.) Press the ALM 1 button again. The ALARM 1 indicator below the time display begins to flash.
-
Page 19: Snooze Operation
To select the Alarm Mode for Alarm 2, repeat the procedure above using the ALM 2 button instead of the ALM 1 button. Snooze Operation When the Radio or Buzzer alarm turns ‘ on’ in the morning you may press the SNOOZE/DIMMER button for a few minutes more sleep. -
Page 20: Listening To The Radio
Listening To The Radio This clock radio features a digital tuning AM/FM receiver that allows you to tune to the exact frequency of your desired station for the best possible reception. You may also store up to 10 of you favorite FM stations and 10 of your favorite AM stations in the preset memories for immediate and easy recall. -
Page 21: Antenna Information
Antenna Information The AM bar antenna is inside the cabinet. If AM reception is unsatisfactory try rotating or repositioning the radio until you find the position that provides the best AM reception. The AC adapter wire serves as the FM antenna. Make sure that the adapter wire is completely unwound and extended to its full length. -
Page 22: Presetting Stations In The Tuner Memory
Presetting Stations In the Tuner Memory 1.) Follow steps 1 and 2 of “Listening To The Radio”, on page 19, to tune to the first station you wish to memorize. Example: FM 88.3 MHZ. 2.) Press the MENU button once. The CH 01 indicator “01”... - Page 23 Recalling Preset Memory Stations • Turn the Radio ‘ On’ and press the BAND button to select the desired band. • Press the Navigation buttons to move to lower or higher numbered Preset Station Memory Numbers. Changing Preset Station Memories •...
-
Page 24: Sleep To Music Timer
Sleep To Music Timer The Sleep To Music Timer can be programmed to play the radio for up to 90 minutes and then shut ‘ off’ automatically. The Sleep Timer can be activated while the radio is ‘ on’ or ‘ off’ . •... - Page 25 These broadcasts are transmitted on seven different channels with the following frequencies: Channel # Your Emerson All-Alert Clock Radio receives all 7 of these frequencies clearly, and thanks to the sensitive digital tuner there is no cumbersome ‘ fine-tuning’ required.
- Page 26 To set up the radio to receive your local weather station: 1.) Fully extend the telescoping rod antenna. This antenna is only for the weather channel reception. 2.) Press the WEATHER/HAZARD button. The LCD will show the Time and Date display and “WB –...
- Page 27 EXT. ANT. jack on the back panel and make sure the external antenna wire is fully unwound and extended. • If you are using this clock radio on a bedside table and you find that extending the rod antenna is not convenient, you may use the external antenna instead.
- Page 28 When programmed correctly you will no longer be awakened or disturbed by alerts that do not apply to you. Your CKW2000 will then alert you only of weather and other emergencies for your specific county.
- Page 29 SAME# for each county. This is the number that you must enter in the CKW2000 to ensure that you only receive the alerts that apply to your county.
- Page 30 Once you have obtained your county’ s SAME# from the website or by phone, enter that number, or numbers, in the CKW2000 as follows: 1.) If the radio is ‘ On’ , press the POWER 2.) Press the MENU button to enter the Menu mode.
- Page 31 After you have selected the weather channel (1 –7) for your area and entered the correct SAME county code or codes, there are a few other adjustments that you can make to customize the operation of your CKW2000. CKW2000_041207.p65 12/4/2007, 11:56...
- Page 32 Select Alert Mode (Siren or Siren/Voice) When the SIREN mode is selected and an alert is received, the Siren will continue for approximately 5 minutes and then shut off automatically. To stop the Siren sooner, press the ALERT OFF/ALM 2 button. When the VOICE mode is selected and an alert is received the Siren will sound for about 8 seconds and then the weather broadcast will turn on and continue for about 5 minutes.
- Page 33 Defeat Siren Mode You have the option of shutting off the Siren or Voice Alert warning for some of the alert messages that your radio may receive. If you select the Defeat Siren mode for a specific message type, when your radio receives that type of message the WARNING, WATCH, or STATEMENT lights will turn ‘...
- Page 34 3.) Press the Navigation buttons to select the next alert (currently “AVALANCHE WATCH”) then press the buttons to change the Siren Mode setting for that alert if desired. ALERT ENABLE indicates that the siren mode is ‘ on’ . ALERT DISABLE indicates that the siren mode is ‘...
- Page 35 Select Siren Volume You can select between a High or Low volume siren level. • With the radio ‘ off’ , press the MENU button, then press the until the display shows “ALERT VOLUME” and the current setting. Press the SELECT button and the current setting starts flashing.
- Page 36 Backlight Operation (Normal / Continuous) If the AC adapter is properly connected to your 120V AC outlet and to the “DC 6V” jack on the back of this radio, the display backlight defaults to the CONTINUOUS mode and is ‘ On’ continuously. If the AC power is interrupted and the radio is running on the 4 “AA”...
-
Page 37: Siren Test
However at this moment your CKW2000 is capable of receiving all of the current NWR alerts. If future alerts are established, you may contact Emerson Radio Customer Service for detailed instructions for adding new alerts to this radio. - Page 38 In certain instances you may receive a new alert message while the first message is still in effect. The CKW2000 can store up to 15 different alert messages with overlapping effective times. When the new message is received it immediately appears on the display and the previous message is stored in the memory.
- Page 39 REQUIRED MONTHLY TEST SYSTEM DEMO NATIONAL PERIODIC TEST As the NWS adds new alert capabilities your CKW2000 is set to receive them and alert you automatically with no modifications. Additional Information For additional info about the NOAA, the NWS, and All Hazards Radio please visit the following websites: www.noaa.gov...
-
Page 40: Care And Maintenance
FOR CUSTOMER SERVICE, PLEASE WRITE TO: CKW2000_041207.p65 TO FIND THE LOCATION AND PHONE NUMBER OF YOUR NEAREST SERVICE CENTER PERMITTED TO PERFORM WARRANTY... 1-800-695-0098 PLEASE CALL: 1-800-898-9020 Emerson Radio Corp., Consumer Affairs Dept., 5101 Statesman Drive, Irving, TX 75063. 12/4/2007, 11:56... -
Page 41: Limited Warranty
For repair or replacement, pack your unit in a padded box, enclose your check or money order payable to Emerson Radio Corp. in the amount of $9.00 (not required by California residents) to cover shipping and handling costs, and enclose a copy of your proof of purchase. - Page 42 CKW2000-041207-02 Printed in China CKW2000_041207.p65 12/4/2007, 11:56...
Need help?
Do you have a question about the CKW2000 and is the answer not in the manual?
Questions and answers