Table of Contents
Advertisement
Advertisement
Table of Contents

Related Manuals for Emerson Research CKS3020


Summary of Contents for Emerson Research CKS3020
- Page 1 Dual Alarm AM/FM Clock Radio with Triple Display, Touchless Snooze and Display Control ® SmartSet Automatic Time Setting System (U.S. Patent No. 6,567,344) OWNER’ S MANUAL CKS3020 Visit our web site at www.emersonradio.com CKS3020_072706.p65 27/7/2006, 11:35...
-
Page 2: Important Safety Instructions
TO PREVENT FIRE OR SHOCK HAZARD, DO NOT USE THIS PLUG WITH AN EXTENSION CORD, RECEPTACLE OR OTHER OUTLET UNLESS THE BLADES CAN BE FULLY INSERTED TO PREVENT BLADE EXPOSURE. TO PREVENT FIRE OR SHOCK HAZARD, DO NOT EXPOSE THIS APPLIANCE TO RAIN OR MOISTURE. The lightning flash with arrow- WARNING: TO REDUCE THE head symbol, within an equi-... - Page 3 Automatic Time Setting System. The first time you connect this clock radio to your AC outlet it will immediately set itself to the correct year, month, date, day and time in the Eastern Time Zone. If you live in a different time zone there is one simple Time Zone adjustment to make and you will never see the dreaded “flashing 12:00”...
-
Page 4: Fcc Information
I M P O R TAN T N O T E S • Avoid installing this unit in places exposed to direct sunlight or close to heat radiating appliances such as electric heaters, on top of other stereo equipment that radiates too much heat, places lacking ventilation or dusty areas, places subject to constant vibration and/or humid or moist areas. - Page 5 P R E PAR AT I O N F O R U S E Unpacking And Set Up • Remove the radio from the carton and remove all packing material from the radio. We suggest that you save the packing material, if possible, in the unlikely event that your radio ever needs to be returned for service.
-
Page 6: Power Source
Power Source This radio is designed to operate on normal 120V 60Hz AC power only. Do not attempt to operate the radio on any other power source. You could cause damage to the radio that is not covered by your warranty. This radio should be connected to an AC outlet that is always ‘... - Page 7 L O C AT I O N O F C O N T R O L S AN D I N D I C AT O R S Front Panel Top Panel Left Side Panel CKS3020_072706.p65 Right Side Panel 27/7/2006, 11:35...
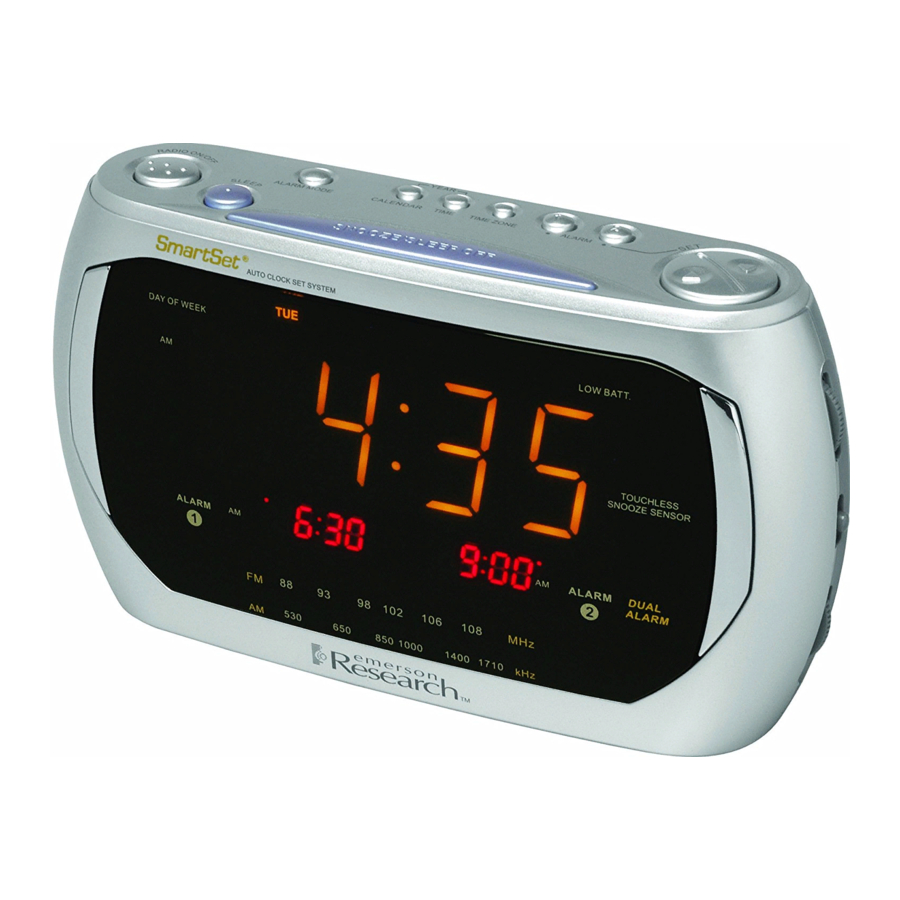
- Page 8 1.) ALARM 1 Time (Month/Date) Display. 2.) DIMMER (HIGH-LOW-OFF/WAVE) Selector Switch . 3.) ALARM 2 (RADIO/BUZZER/OFF) Selector Switch. 4.) ALARM 1 (RADIO/BUZZER/OFF) Selector Switch. 5.) Time Display. 6.) AM Indicator. 7.) DAY OF WEEK (MON, TUE, WED, THU, FRI, SAT, SUN) Indicators. LOW BATT.
-
Page 9: Setting The Time, The First Time
If you move to a different time zone, simply change the default zone display to the new zone and the SmartSet ® CKS3020_072706.p65 ® clock radio as follows: — Atlantic Time — Eastern Time (Default Setting) —... - Page 10 Month / Date / Year Display To see the correct “date” at any time, press the CALENDAR button. The correct month and date will appear in the ALARM 1 display and the correct year will appear in the ALARM 2 display. The month and date is displayed in the MM.DD format. For example, May 21 will be displayed as “5.21”.
-
Page 11: Manual Time Adjustments
Manual Time Adjustments Some people like to set their clocks 5 to 10 minutes fast to make sure that they will always be on time. Even though the SmartSet ® sets the time by itself, you still have the option of adjusting the time manually if you wish. To manually adjust the time display depress and hold the TIME button, and press either the SET (Up) or... -
Page 12: Adjusting The Wake Up Times
® Your SmartSet clock radio has two separate alarms that can be set and used independently. You may use the alarms to wake two people at different times, or you may use one alarm for weekdays and the other for weekend wake up times. -
Page 13: Selecting The Alarm Mode
Selecting The Alarm Mode ® Your SmartSet clock radio allows you to select from among three different alarm operation modes for either alarm. The alarm modes are: • Everyday – the alarm will turn on all 7 days. • Weekdays only – the alarm will only turn on Monday through Friday;... -
Page 14: Listening To The Radio
Listening To The Radio 1.) Set the BAND selector to the desired band, AM or FM. 2.) Set the VOLUME control to a low setting. 3.) Press the RADIO ON/OFF button to turn the radio ‘ On’ . The radio dial pointer will light. -
Page 15: Wake To Radio
Wake To RADIO 1.) Turn the radio ‘ On’ and select the Band, Station, and Volume level that you wish to hear when the alarm comes on, then turn the radio ‘ Off’ again. 2.) Reconfirm the wake up time and alarm mode settings for the alarm you are using, Alarm 1, Alarm 2, or both Alarms. - Page 16 Wake To BUZZER (Crescendo Alarm) NOTE: Alarm 1 and Alarm 2 have different buzzer sounds. • Alarm 1 is a “Single beep” sound. • Alarm 2 is a “Double beep” sound. You will be able to tell which alarm is going off by the sound that it makes. 1.) Reconfirm the wake up time and alarm mode settings for the alarm you are using, Alarm 1, Alarm 2, or both alarms.
- Page 17 Snooze/Repeat Alarm After the alarm turns ‘ On’ in the morning you can press the SNOOZE/SLEEP OFF button on the top cabinet for a few extra minutes sleep. The snooze LED indicator flashes. The alarm will stop for approximately 9 minutes and then comes ‘ On’ again. Touchless Snooze Control You can also activate the Snooze alarm without physically touching the SNOOZE/ SLEEP OFF button.
-
Page 18: Sleep To Music Timer
SLEEP To Music Timer You can program the sleep timer to play the radio for up to “99” minutes and then shut off automatically. 1.) Press the SLEEP button. The display will briefly show “L:30” and the radio will begin to play. After 30 minutes the radio will shut ‘ Off’ automatically. Each time you press the SLEEP button the sleep timer will start at 30 minutes. -
Page 19: Display Brightness Control
Display Selector Set To OFF/WAVE NOTES: A.) The clock radio must be at room temperature for the WAVE SENSOR to function properly. If the radio has been in a cold location the WAVE SENSOR may not operate immediately. Place the radio in the room where... -
Page 20: Changing The Lithium Battery
Changing The Lithium Battery Like all batteries, eventually the built in lithium battery will need to be replaced. A number of factors, such as, the length of time between the date the radio was manufactured and the date you plugged it in for the first time determine the amount of time before replacement. - Page 21 4.) Remove the original battery from the holder and insert the new battery into the holder the same way, observing the positive (+) direction. Slide the holder with the new battery back into the slot in the cabinet. 5.) Replace the screw that secures the battery holder in the cabinet. 6.) Turn the radio right side up and confirm that the ‘...
-
Page 22: Resetting The Clock After A Total Memory Loss
• The DAY OF WEEK indicator will change automatically as you adjust the “Year”, “Month/Date” settings. CKS3020_072706.p65 ® memory will be lost and the clock ® clock radio is completely incorrect, (Up) button to set the 27/7/2006, 11:35 ® internal (Up) button... - Page 23 4.) Depress the TIME button and the SET correct time. Be sure to confirm that you have set the time correctly to ‘ AM’ or ‘ PM’ by observing the AM indicator. 5.) After you set the time, reconfirm that the Day, and Month/Date displays are still correct.
-
Page 24: Care And Maintenance
FOR CUSTOMER SERVICE,PLEASE WRITE TO: CKS3020_072706.p65 TO FIND THE LOCATION AND PHONE NUMBER OF YOUR NEAREST SERVICE CENTER PERMITTED TO PERFORM WARRANTY... 1-800-695-0098 PLEASE CALL: 1-800-898-9020 Emerson Radio Corp., Consumer Affairs Dept., 5101 Statesman Drive, Irving, TX 75063. 27/7/2006, 11:35... -
Page 25: Limited Warranty
Emerson Radio Corp. in the amount of $9.00 (not required by California residents) to cover shipping and handling costs, and enclose a copy of your proof of purchase. - Page 26 EMERSON Part No. 16-3007 Printed in China 607-02 CKS3020_072706.p65 27/7/2006, 11:35...
Need help?
Do you have a question about the CKS3020 and is the answer not in the manual?
Questions and answers
How to reset the time on Emerson Radio Clock CKS 3020