Table of Contents

Related Manuals for Emerson CKD1100, CKD1100BL, CKD1100GN, CKD1100PK


Summary of Contents for Emerson CKD1100, CKD1100BL, CKD1100GN, CKD1100PK
- Page 1 Stereo Radio, CD-R/RW Player with Dual Alarm Clock OWNER’ S MANUAL CKD1100 (Silver Color) CKD1100BL (Blue Color) CKD1100GN (Green Color) CKD1100PK (Pink Color) Visit our web site at www.emersonradio.com CKD1100_052107.p65 21/5/2007, 10:44...
-
Page 2: Important Safety Instructions
TO PREVENT FIRE OR SHOCK HAZARD, DO NOT USE THIS PLUG WITH AN EXTENSION CORD, RECEPTACLE OR OTHER OUTLET UNLESS THE BLADES CAN BE FULLY INSERTED TO PREVENT BLADE EXPOSURE. TO PREVENT FIRE OR SHOCK HAZARD, DO NOT EXPOSE THIS APPLIANCE TO RAIN OR MOISTURE. The lightning flash with arrow- WARNING: TO REDUCE THE head symbol, within an equi-... - Page 3 If, after reading this Manual, you experience any problems with the operation of this product, please refer to the instructions for obtaining service at the end of this Manual. Emerson and Emerson retailers are committed to your satisfaction. Once again, thanks for purchasing this Emerson audio product.
-
Page 4: Important Notes
IMPORTANT NOTES CLASS 1 LASER PRODUCT CLASS 1 LASER PRODUCT APPAREIL Á LASER DE CLASSE 1 PRODUCTO LASER DE CLASE 1 This product contains a low power Laser Device. • Avoid installing this unit in places exposed to direct sunlight or close to heat radiating appliances such as electric heaters, on top of other stereo equipment that radiates too much... -
Page 5: Preparation For Use
PREPARATION FOR USE Unpacking And Set Up • Remove the unit from the carton, and remove all packing materials from the unit. • Save the carton and packing materials in case the unit ever needs to be returned for service. Using the original carton and packing materials is the only way to safely repack the unit for shipment. -
Page 6: Power Source
Power Source This system is designed to operate on 120V AC 60Hz house current only. Connecting this system to any other power source may cause damage to the system and such damage is not covered by your warranty. NOTE: The system has polarized AC plug with one wide blade and one narrow blade. -
Page 7: Battery Back Up System
Battery Back Up System This unit uses a single 9-Volt battery (not included) to maintain the time and alarm settings in the event that it is accidentally unplugged, or you experience a temporary power failure. We recommend that you install a well-known brand of Alkaline battery for longest life and best performance. -
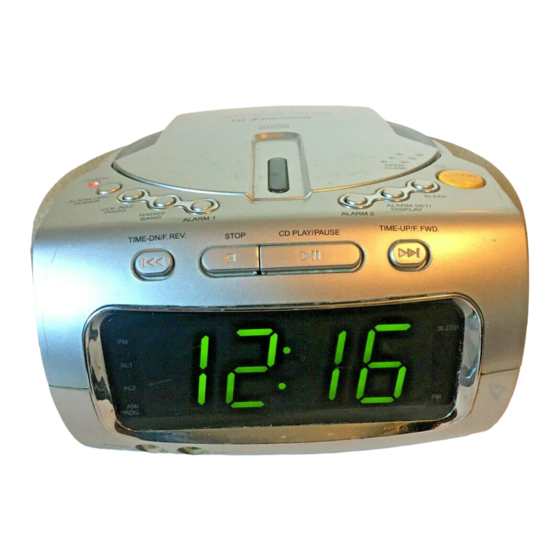
Page 8: Location Of Controls And Indicators
LOCATION OF CONTROLS AND INDICATORS Front Panel Top Panel CKD1100_052107.p65 21/5/2007, 10:44... - Page 9 1.) AM/PROG. (AM Radio ‘ On’ or CD Program Track) Indicator. 2.) AL2 (Alarm 2) ‘ On’ Indicator. 3.) VOLUME Control. 4.) AL1 (Alarm 1) ‘ On’ Indicator. 5.) PM Indicator. TIME-DN/F.REV Button. STOP Button. CD PLAY/PAUSE Button. TIME-UP/F.FWD D Button. 10.) SLEEP Indicator.
- Page 10 OPERATING INSTRUCTIONS Setting The Correct Time And Day NOTE: Connect the power cord to your AC outlet. Make sure to use an outlet that is always ‘ live’ . Do not use an outlet that is controlled by a wall switch. 1.) When the unit is plugged in for the first tim e, the clock display will begin flashing “12:00”...
- Page 11 8.) When the correct ‘ day’ (digit) appears on the display press the CLK.ADJ/PROG. button once more to exit the clock-setting mode. The display stops flashing and returns to the correct time and the clock begins to run. IMPORTANT: After you press the CLK.ADJ/PROG. button you must make your time adjustments within 10 seconds while the display is flashing.
-
Page 12: Listening To The Radio
Listening To The Radio 1.) Press the ALARM OFF/POWER button on the top panel to turn the unit ‘ On’ . The POWER LED indicator comes on. 2.) Press the RADIO/BAND button to select the Radio function. Either the AM/PROG or the FM indicator will come on to confirm which band is selected. Press the RADIO/BAND button again to repeatedly switch between the AM and FM bands. -
Page 13: Playing Compact Discs
Playing Compact Discs NOTE: Although this CD player can read CD-R and CD-RW discs, in addition to normal CDs, however the playability of CD-R/RW discs may be affected by the type of software that was used to create the discs, as well as the quality and condition of the blank media you are using. - Page 14 6.) Press the CD PLAY/PAUSE button to begin playback. The display will briefly show “ (Track 1) and playback on track 1 begins. After a few seconds the display returns to the correct time. 7.) To Pause briefly during playback press the The two dots “...
-
Page 15: High Speed Music Search
To Start Playback From A Specific Track Load your disc and wait until the display shows the total number of tracks. Press the buttons to select the desired track. While the track number is still appearing press the CD PLAY/PAUSE button. Playback will begin on the selected track and continue until the end of the disc. -
Page 16: Programmed Playback
Programmed Playback The CD player in this unit has a 20 track programmable memory which allows you to program any disc to play just the tracks you want to hear in the exact order that you want to hear them. You may program a track or tracks to play more than once if desired. - Page 17 6.) After you have programmed all the desired tracks press the PAUSE button to begin programmed playback. The AM/PROG. indicator stops flashing and remains ‘ On’ . Playback will begin on the first track you programmed and continue until all programmed tracks have been played. As each programmed track starts playing the display will briefly show the track number being played and then return to the correct time.
-
Page 18: Adjusting The Wake-Up Times
Adjusting the Wake-up Times This clock radio has two separate wake-up alarms that can be set and used independently. To set or adjust the wake-up times please proceed as follows: 1.) Depress and hold the ALARM SET/ DISPLAY button for at least two seconds until just the Hour digits and the AL1 (Alarm 1) indicator are flashing. - Page 19 6.) While the Alarm 2 Hour digits are flashing press the repeatedly to set the display to the correct wake-up hour. Example: 9:00 AM Observe the PM indicator to make sure you have set the wake-up hour correctly. If the PM indicator is ‘ On’ the wake-up time displayed is “PM”". If the PM indicator is ‘...
- Page 20 Setting The Alarms / Selecting The Wake-up Mode After you have adjusted the wake-up times on one or both alarms you must press the respective ALARM 1 and/or ALARM 2 buttons one, two or three times, to activate the alarms and select the wake-up mode. The color of the AL1 and AL2 indicators will change according to the wake-up mode that you select - Buzzer, Radio, or CD.
-
Page 21: Wake To Buzzer
Wake To Buzzer 1.) Check the wake-up time settings for Alarm 1, Alarm 2, or both alarms and adjust the wake up times if necessary. 2.) Press the ALARM 1 and/or ALARM 2 buttons once. The AL1 and/or AL2 indicators appear Red. 3.) At the selected wake up times the buzzer will turn on. - Page 22 Wake To CD 1.) Check the wake-up time settings for Alarm 1, Alarm 2, or both alarms and adjust the wake up times if necessary. 2.) Insert the desired CD in the CD player, start playback and adjust the VOLUME to the desired level.
-
Page 23: Dimmer Control
Canceling The Alarms To cancel the alarms completely press the respective ALARM 1 and/or ALARM 2 buttons until the AL1 and/or AL2 indicators disappear. Snooze/Repeat Alarm After the alarm turns on in the morning you can press the SNOOZE button for a few extra minutes sleep. - Page 24 Sleep To Music Timer You can use the sleep timer to fall asleep to the Radio or CD player up to 90 minutes and have the unit shut off automatically. 1.) Press the ALARM OFF/POWER button to turn the power ‘ On’ . Operate the Radio or CD player as usual.
- Page 25 Auxiliary Input Jack (Connection Cable Not Included) This unit includes an AUX input jack to allow you to connect external devices, such as an iPod ® or portable MP3 player, and listen to the music stored on your external device through the speakers of this radio. Connect the headphone jack of your external device to the AUX input jack located on the front panel of this unit.
- Page 26 Headphone (PHONES) Jack This unit includes a 3.5mm PHONES (headphone) jack on the front panel. This allows you to connect a set of stereo headphones (not included) for private listening without disturbing others. When headphones are connected the built-in speakers are automatically disconnected.
-
Page 27: Care And Maintenance
CARE AND MAINTENANCE Compact Disc Care • To remove a disc from its storage case, press down on the center of the case and lift the disc out, holding it carefully by the edges. • Fingerprints and dust should be carefully wiped off the disc’ s recorded surface with a soft cloth.Unlike conventional records, compact discs have no grooves to collect dust and microscopic debris, so gently wiping with a soft cloth should remove most particles. -
Page 28: Troubleshooting Guide
ALARM OFF/POWER button. TO FIND THE LOCATION AND PHONE NUMBER OF YOUR NEAREST SERVICE CENTER PERMITTED TO PERFORM WARRANTY... 1-800-695-0098 PLEASE CALL: 1-800-898-9020 Emerson Radio Corp., Consumer Affairs Dept., 5101 Statesman Drive, Irving, TX 75063. 21/5/2007, 10:44... - Page 29 For repair or replacement, pack your unit in a padded box, enclose your check or money order payable to Emerson Radio Corp. in the amount of $9.00 (not required by California residents) to cover shipping and handling costs, and enclose a copy of your proof of purchase.
- Page 30 CKD1100-052107-03 Printed in China CKD1100_052107.p65 21/5/2007, 10:44...
Need help?
Do you have a question about the CKD1100, CKD1100BL, CKD1100GN, CKD1100PK and is the answer not in the manual?
Questions and answers