Table of Contents
Advertisement
Advertisement
Table of Contents

Related Manuals for Eonon E0805


Summary of Contents for Eonon E0805
- Page 1 TOUCH SCREEN WITH AV/DVD/USB/GPS/BLUETOOTH INSTRUCTIONS...
-
Page 2: Table Of Contents
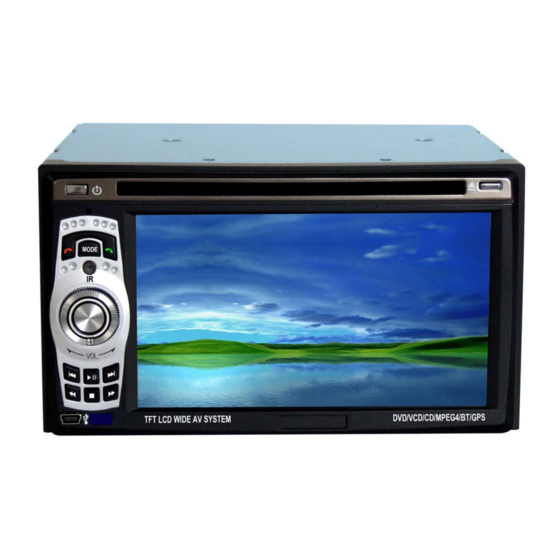
CONTENT 1、Chapter 1 Function Description…………………………………………………….. 2、Chapter 2 Basic Operation......................2.1 Remote control ........................2.1.1Remote control showing....................2.1.2 Remote control using Illustration………………………………………………… 2.2 Back out/input Illustration..................2.2.1 Back out/input Illustration................2.3 Keystoke Illustration....................3、Chapter 3 Main function illustration................3.1 Basic Operation..................3.2 Basic Operation of Touchscreen................ - Page 3 Chapter 1 Introduction 1. Function 1> Built-in DVD,FM.AM,TV,AV, Bluetooth AND connection outside GPS 2> Compatible for DVD, SVCD,VCD,DVCD,MP3,CD,CD-R,DVD-R,DVD-RW,DVD+RW,DIVX,XIVD and MPEG4 3> Adoption TFT LCD Monitor, 16:9 High Definition Wide Screen 4> Touch screen Could be individuation Operation for OSD 5> One Stereo Audio and two Video output, It’s convenience for connection input of front Audio of outside ( FR、FL、RR、RL) Combination whole Car entertainment system 7>...
-
Page 4: Basic Operation
1> Set up all spare parts same like as above picture 2> Check every connection if correct. 3> Use the tool to setting the screws. ▲ Attentions : Please try best to install the machine by professional. If you have difficulty in installation, please consult with your local authorized organization. - Page 5 2.2 Illustration for Remote Control Console...
- Page 6 1> “VOLUME” Button: control volume minish or accretion 2> “MODE” Button: Mode Switch DVD, FM/AV, TV, AV, USB, BT, GPS 3> “ ” Button: On/off for power 4> “ZOOM” Botton: Zoom in Only DVD mode 5> “ /Search” Botton: pass in and out disc 6>...
-
Page 7: Dvd Function
PAL-N、PAL-M; 3.2 DVD Function Touch icon, enter into below OSD-002 interface OSD-002 1> “ ” Open button: Press to open the inspection to put DVD dish. 2> “ ” Play/Pause Button: The DVD player will play /Pause and the screen will show The current state on the left. 3>... -
Page 8: Radio Fucntion
1> SYSTEM Shift SYSTEM Button: Shift systems upon yours needs. PAL I/DK/BG, NTSC, SECOM DK/BG/L/LL or PAL-N, PAL-M, NTSC-M 2> Mute Button: First touch icon, the system will turn to mute status, Second touch, it will resume the sound output. ( It has the same function on different interfaces) 3>... - Page 9 OSD-005 1> Connect well the “VIN、AIN-L、AIN-R” and so on AV cables 2> Go into main Menu, touch AV Icon or use remote control, or press Mode directly, the system will switch into AV status. 3.6 USB Functions Press on main Menu, go to USB input interface, as picture OSD-006, specific introduction is as follow OSD-006 ”...
-
Page 10: Bluetooth Function
3.8 Bluetooth Function Press on main menu interface, go to blue tooth function interface, as picture: OSD-007 OSD-007 1> Press “ ” icon: receive the phone. 2> Press “ ” icon: hang up the phone. 3> Press “ ” icon: match and cut off the connection with the Bluetooth mobile 4>... -
Page 11: Black Screen
1> Press “ ” icon, can increase or decrease the sound. 2> Press “ ” icon, can adjust the output of high sound. 3> Press “ ” icon, can adjust output of low sound. 4> Press “ ” icon, can adjust the track, can increase or decrease the speakers sound on front left/right and back front/back. - Page 12 3.10 DVD Operation Instruction Press the SETUP button on the remote control enter DVD menu, with direction buttons “ ” go to the section which you need to set, then press ENTER to confirm it. Press SETUP button again to exit DVD menu. 3.10.1 Language 1>...
- Page 13 1> When playing DVD, allow to select ON or OFF for the bourdon. 2> When playing DVD, allow to select OFF, PCM or ALL for the digital output. 3.10.4 Grade 1> The factory default password is 8888 2> Set the rating for video content playback. Limiting violent and sexually explicit contents playback when during unauthorized playback。...
-
Page 14: Illustration For Backward A Car
3.11 Illustration for Backward a Car 1> Connect well the back sight input line (CAM-VIN), the back sight power supply (CAM+12V) 2> Display the monitor. (can choice manual control or motorized) 3> Connect the power blue line +12V, when on any menu, will automatically appear the rear view condition in LCD screen when moving backward. -
Page 15: Problems During Dvd Playback
5. Troubleshooting _ Symptom Cause Action(see) No power. Lead wire connect mistake. Make Re-Confirm power supply wires Unit not able to operate sure Red (+) and black (-) connection. Fuse Blown Check fuse and replace fuse of identical rating if blown response Remote Remote control operation mode...
Need help?
Do you have a question about the E0805 and is the answer not in the manual?
Questions and answers