Duerkopp Adler 609 Instruction Manual
Hide thumbs
Also See for 609:
- Service instructions manual (36 pages) ,
- Instruction manual (22 pages) ,
- Parts list (22 pages)
Table of Contents
Advertisement
Quick Links
Postfach 17 03 51, D-33703 Bielefeld • Potsdamer Straße 190, D-33719 Bielefeld
Telefon +49 (0) 521 / 9 25-00 • Telefax +49 (0) 521 / 9 25 24 35 • www.duerkopp-adler.com
Ausgabe / Edition:
Änderungsindex
10/2007
Rev. index: 01.0
Spezialnähmaschine
Printed in Federal Republic of Germany
609
Betriebsanleitung
Instruction manual
Teile-Nr./Part.-No.:
0791 609741
D
GB
Advertisement
Table of Contents

Subscribe to Our Youtube Channel
Related Manuals for Duerkopp Adler 609


Summary of Contents for Duerkopp Adler 609
-
Page 1: Instruction Manual
Spezialnähmaschine Betriebsanleitung Instruction manual Postfach 17 03 51, D-33703 Bielefeld • Potsdamer Straße 190, D-33719 Bielefeld Telefon +49 (0) 521 / 9 25-00 • Telefax +49 (0) 521 / 9 25 24 35 • www.duerkopp-adler.com Ausgabe / Edition: Änderungsindex Teile-Nr./Part.-No.: 10/2007 Rev. - Page 2 Alle Rechte vorbehalten. Eigentum der Dürkopp Adler AG und urheberrechtlich geschützt. Jede, auch auszugsweise Wiederverwendung dieser Inhalte ist ohne vorheriges schriftliches Einverständnis der Dürkopp Adler AG verboten. All rights reserved. Property of Dürkopp Adler AG and copyrighted. Reproduction or publication of the content in any manner, even in extracts, without prior written permission of Dürkopp Adler AG, is prohibited.
- Page 3 Foreword This instruction manual is intended to help the user to become familiar with the machine and take advantage of its application possibilities in accordance with the recommendations. The instruction manual contains important information on how to operate the machine securely, properly and economically. Observation of the instructions eliminates danger, reduces costs for repair and down-times, and increases the reliability and life of the machine.
-
Page 4: General Safety Instructions
General safety instructions The non-observance of the following safety instructions can cause bodily injuries or damages to the machine. 1. The machine must only be commissioned in full knowledge of the instruction book and operated by persons with appropriate training. 2. -
Page 5: Table Of Contents
Content page: Preface and general safety instructions Part 1: Operating Instructions class 609 (Edition 10/2007) Product description ..........Designated use . -
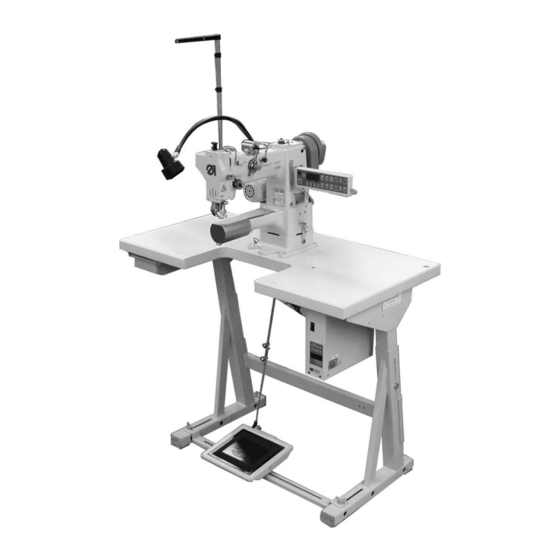
Page 7: Product Description
Product description The DÜRKOPP ADLER 609 is a single needle double lockstitch cylinder arm machine for attaching and basting works on jackets, coats, suit jackets and the like. The machine is equipped with an integrated DC direct drive and an operating panel for the programming of the sewing parameters. -
Page 8: Subclasses
As manufacturers of industrial sewing machines we proceed on the assumption that personnel who work on our products will have received training at least sufficient to acquaint them with all normal operations and any possible hazards which these may involve. Subclasses 609-100101 Single needle double lockstitch free-arm machine for... -
Page 9: Technical Data
5. Technical data Rated noise value Lc: Workplace-related emission value in accordance with DIN 45635-48-A-1-KL2 Lc = xx dB (A) Class: 609 Stitch length: manual Sewing foot stroke: 15 mm Speed: 800 [min Material: double Skai 1,6 mm 900 g/m DIN 53352 Needle system: 134-35... -
Page 10: Operation
Operation 6.1 Threading the needle thread Caution: Danger of injury! Turn off the main switch ! The needle thread may only be threaded with the sewing machine switched off. 6.2 Adjusting the needle thread tension Pre-tension In order to guarantee a safe function of the thread trimmer with the class 609, it is necessary that the needle thread is under residual tension when the main tensioner 2 is open. -
Page 11: Opening The Needle Thread Tensioner
Fig. A Correct thread loop in the center of the material Fig. B Needle-thread tension too low hook-thread tension too high Fig. C Needle-thread tension too high hook-thread tension too low 6.3 Opening the needle thread tensioner Electromagnetically The main tensioner 2 will be opened electromagnetically: ·... -
Page 12: Winding On The Hook Thread
6.4 Winding on the hook thread – Thread the hook thread as shown in the picture above. – Fit the bobbin 3 on the bobbin-winder shaft 2. – Wind approximately five coils of hook thread anti-clockwise onto the bobbin core. –... -
Page 13: Fitting The Hook-Thread Bobbin
6.5 Fitting the hook-thread bobbin Caution: Danger of injury! Turn off the main switch ! The hook-thread bobbin may only be changed with the machine switched off. Remove the empty bobbin – Turn the hand wheel, until the needle bar has reached its highest position. -
Page 14: Adjusting The Hook-Thread Tension
6.6 Adjusting the hook-thread tension Adjusting the braking spring 1 The braking spring 1 prevents the idle motion of the bobbin when the machine halts or during a jerky drawing of the hook thread for example when pulling the thread of the thread-pulling knife. –... -
Page 15: Inserting And Changing The Needle
6.7 Inserting and changing the needle Caution: Danger of injury! Turn off the main switch ! The needle may only be changed with the sewing machine switched off. – Turn the handwheel, until the needle bar 1 has reached its highest position. -
Page 16: Adjusting The Sewing Foot Stroke
6.8 Adjusting the sewing foot stroke Caution: Danger of injury! Turn off the main switch ! The sewing foot stroke may only be adjusted with the machine switched off. The height of the sewing-foot stroke is determined by the position of connecting rod 1. -
Page 17: Adjusting The Sewing Foot Pressure
6.9 Adjusting the sewing foot pressure max 25 mm – Loosen the counter nut 1. – The required sewing foot pressure can be adjusted with screw 2. To increase the sewing foot pressure = turn screw 2 clockwise. To decrease the sewing-foot pressure = turn screw 2 anti-clockwise. –... -
Page 18: Control Unit And Operating Panel
Control unit and operating panel ATTENTION! These operating instructions give the key functions and describe how operator-level parameter values are changed by the operator. For a detailed description of the control unit, please consult the enclosed current issue of the operating manual of the motor manufacturer. 7.1 General For the programming and the entering of sewing parameters, use the function keys of the control unit and the operating panel. -
Page 19: Control Unit Keys (Sewing Mode)
7.2.1 Control unit keys (sewing mode) If the operating panel C300 is connected, the setting done through the operating panel will have higher priority than settings done on the control unit. Switch free sewing**/ tacking / programmed Bartacking seam begin ON/ OFF seam segment Programming key Bartacking seam end* ON/OFF... -
Page 20: Operating Panel Keys (Type C300)
7.2.2 Operating panel keys (Type C300) Explanation of the important function keys for the operation of the class 609: Initial bartack. For the class 609, programming of a given number B of start stitches. Selection of the stitch setting A-B-C-D or E-F or G-H Setting and displaying the stitch settings A-H Thread trimming ON / OFF Needle position setting UP / DOWN... -
Page 21: Changing The Parameter Values
7.2.3 Changing the parameter values For checking purposes or after a reset the parameter values must be set according to the parameter sheet (Part No. 9800 370001 PB40) enclosed in the accessories. If required, the current parameter sheet can be downloaded from the website of the DÜRKOPP ADLER AG within the download area: www.duerkopp-adler.com. - Page 22 Operating and function sequence: Sewing process Operation / explanation Prior to sewing Starting position - Pedal in rest position - The machine is at a halt. - Needle up - Sewing foot in highest position Position material for starting the seam. - Place the material under the sewing foot At the seam start Sewing...
- Page 23 Sewing continuous seam without attaching stitches - Prerequisite: on the operating panel key has its LED OFF - Prerequisite: on the operating panel the key (one stitch basting) has its LED OFF - Push pedal forwards and keep it pushed. - The machine sews at the speed of rotation set by the pedal.
- Page 24 Notes:...
-
Page 25: Maintenance
Maintenance Caution: Danger of injury! Turn off the main switch ! Maintenance may only be carried out with the machine switched off! Maintenance work must be carried out no less frequently than at the intervals given in the tables (see ”operating hours” column). Maintenance intervals may need to be shorter when processing heavy-shedding materials. -
Page 26: Lubrication
9.2 Lubrication Caution: Danger of injury! Oil can cause skin eruptions. Avoid protracted contact with the skin. In the event of contact, thoroughly wash the affected area. ATTENTION! The handling and disposal of mineral oils is subject to legal regulation. Deliver used oil to an authorised collection point.
Need help?
Do you have a question about the 609 and is the answer not in the manual?
Questions and answers