
Subscribe to Our Youtube Channel
Related Manuals for Grundig GMSX900DABIP


Summary of Contents for Grundig GMSX900DABIP
- Page 1 DAB+ MICRO SYSTEM WITH DOCK FOR IPHONE GMSX900DABIP Toll Free Warranty and Service: 1800 509 394 The Gold Technical Support Line: 1902 215 259 (Charges will apply at $2.95 per minute for gold technical support only)
- Page 2 Introduction Thank you for buying this GRUNDIG product, which is designed to give you many years of trouble-free service. You may already be familiar with using a similar unit, but please take the time to read these instructions. Safety is important Your safety is very important.
-
Page 3: Safety Instructions
Safety Instructions Ensure that you read all of the safety instructions before operating this unit. Safety Considerations Ensure that the power cable and other connected cables are protected and are positioned so that they are not likely to be walked on, pinched or damaged. Do not position the unit in areas where it may experience humid or damp conditions. -
Page 4: Table Of Contents
Contents Safety Instructions …..…………………………………………………………………………….……………..Contents …..……..…..……………………………………………………………..…………….……………..Your DAB+ Micro System……………………………………………………………………….……………..Your DAB+ Micro System – Remote Control……………………………………..…………….……………... Using DAB+ Radio….……………………………………………………….……………...…………………….. Using FM Radio ………………………………………………….……………….……………...……………… Using iPod……….………………………………...……………………………….……………...……………… Using Aux-In...……………………..…………..……………………………………….……………...…………. System Setup…………………………………………………………………….……………...……………….. Product Specifications…………………………………………………………….……………...……………….. Troubleshooting………………………………………………………………….……………...……………….. Warranty…………………………………………………………………….……………...………………………... -
Page 5: Your Dab+ Micro System
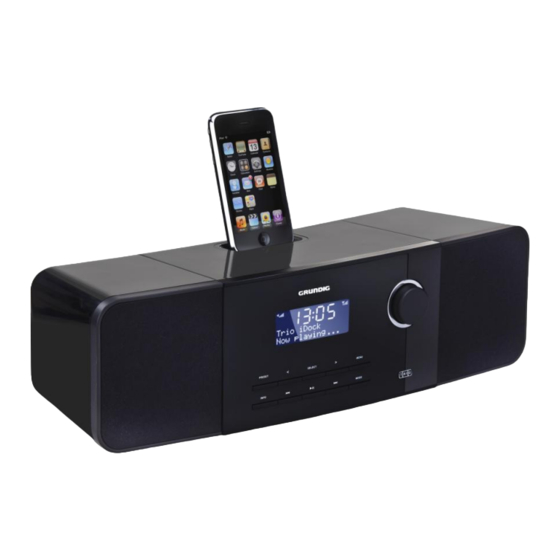
Your DAB+ Micro System Carefully remove your DAB+ Micro System from the box. You may wish to keep the packaging for future use. In the Box Inside the box you will find: DAB+ Micro System (Main Unit) Power Adapter ... - Page 6 Your DAB+ Micro System Volume Knob Optical Output Rewind Button LCD Display Composite Video Output Play/Pause Button Preset Button Audio Output (R/L) Fast Forward Button < Button Mode Button Headphone Output Select Button F-Type Antenna Auxiliary Input > Button Speaker Jacks DC Input Menu Button Speaker Jacks...
- Page 7 Your DAB+ Micro System Icon Function Press the Volume Knob to turn the unit on or off. To change the volume level, turn the Volume Knob up or down. Press the Preset Button to access your favourite DAB+ or FM stations quickly. PRESET Press the Navigation Buttons to scroll through the menu options, station list or other settings.
-
Page 8: Your Dab+ Micro System - Remote Control
Your DAB+ Micro System – Remote Control Your DAB+ Micro System Your DAB+ Micro System Icon Function Press the Standby Button to turn the on or off. Press the Mute Button to mute the sound (this will completely turn of the unit sound). Press again to turn sound back on. DAB+ Press the DAB+ Button to enter the DAB+ Digital Radio mode. - Page 9 Your DAB+ Micro System – Remote Control Press the Repeat Button to repeat play of the iPod. Press continually to scroll through repeat options. Press the Shuffle Button to select the shuffle option in iPod. Press the Snooze Button to activate the snooze function when the alarm goes off.
-
Page 10: Using Dab+ Radio
Scanning and Storing DAB+ Stations Your Grundig Trio DAB+ Digital Radio will automatically scan for all available DAB+ Digital Radio Stations. However it is recommended that every now and then you conduct a full scan to search for any new stations or to ensure you are receiving the best possible reception. -
Page 11: Preset Button
Using DAB+ Radio Using DAB+ Radio Using FM Radio Station Presets To store a Station Preset you must be playing the station you wish to set. Once you have tuned to this station, press and hold the <<|| and Preset Buttons on the unit, until the display shows Preset Store. Then you can either turn the Volume Knob to scroll through the preset selections or press the Shift and Numeric Buttons on the remote control to select the preset number you wish to store your favourite station to. -
Page 12: Using Fm Radio
Using FM Radio Using FM Radio FM Radio Mode Your FM Radio will receive all FM Radio Stations (relevant to your location) and will display RDS information depending on whether the broadcaster is currently broadcasting this type of information. To enter the FM mode, press the Mode Button on the unit until the display shows FM mode or press the FM Button on the remote control. -
Page 13: Scan Setting
Using FM Radio Using FM Radio Using FM Radio Using FM Radio To scroll through the information provided by the broadcaster, press the Info Button, repeatedly to view the program type, ensemble name, Mono/Stereo, Time and Date. To return to the original display, press and hold the Info Button. FM Radio Settings Scan Setting In FM mode you may come across weak signals when you are scanning, to ensure you only pick up strong signals... -
Page 14: Using Ipod
Using iPod or iPhone Your Grundig Trio Micro System has a dock for your iPod or iPhone and allows you full control and charging capabilities while you listen to your favourite tunes. You can control either your iPod or iPhone through your keypad or remote control. -
Page 15: Using Aux-In
Auxiliary Input Your Grundig Trio Micro System has an Auxiliary Input which allows you to connect your MP3 Player or any other Audio Output device. Aux In mode 1. Connect your external music device to the Auxiliary Input via the auxiliary cable make sure it is connected firmly. -
Page 16: Setting The Alarm
System Setup Automatically Setting the Time and Date To set the time automatically, enter the Time Menu and then select the Auto Update. In the option you will be able to choose from; Auto Update from Any, Auto Update from DAB+ or Auto Update from FM. Once you have chosen you selected format, Select Button to confirm. - Page 17 At the set time, the alarm will sound, gradually building up to the set volume. When the alarm sounds, the System Setup System Setup corresponding icon will flash. For example when Alarm 1 sounds the Alarm 1 icon will flash. Snooze When the Alarm sounds and you would like to sleep for a little longer you can select a snooze time, which will allow you to snooze for a period of either, 5, 10, 15 or 30 minutes.
-
Page 18: Software Update
Software Update As Grundig continually tries to improve our products to ensure you receive the highest quality product possible, there may be software upgrades available for this unit from time to time. The SW Update Option in the System Menu will allow you to conduct upgrades when required. -
Page 19: Product Specifications
Product Specifications Model Number GMSX900DABIP Speaker Power 2 x 10W RMS Power supply AC 100V-240V, 50/60Hz, DC 12V/3A Bandwidth FM radio with RDS, tuning range from 87.5MHz to 108MHz DAB+ radio, tuning range from 174MHz to 240MHz Inputs ... -
Page 20: Troubleshooting
Troubleshooting If a fault occurs, first check the points listed below before taking the radio for repair. If you are unable to solve a problem by following the below hints we suggest you consult you retailer or service professional. WARNING: Under no circumstances should you try to repair the unit yourself, as this would invalidate the warranty. PROBLEM POSSIBLE CAUSE SOLUTION... -
Page 21: Warranty
In the unlikely event that your product fails to work normally, please contact the GRUNDIG Warranty on 1800 509 394 (Australia) or 0800 450 259 (New Zealand) and have your receipt of purchase on hand. - Page 22 PO BOX 6287 Silverwater NSW 1811 www.grundig.net.au...
Need help?
Do you have a question about the GMSX900DABIP and is the answer not in the manual?
Questions and answers