
Subscribe to Our Youtube Channel
Related Manuals for American DJ FOZ/UQNQ


Summary of Contents for American DJ FOZ/UQNQ
- Page 1 English American DJ DMX-SOLO DMX-SOLO USER'S MANUAL American DJ DMX-SOLO DMX-SOLO 8 8 8 8 AUDIO MANUAL POWER RECORD/MODE STROBE PROGRAM RECEIVE SEND BLACK-OUT SPEED FADE+SPEED/DEL Please read before use...
-
Page 3: Table Of Contents
2.2 Record AS/AP Scenes 11 2.3 Run Programs 14 2.3.1 Manual Mode 14 2.3.2 Audio Mode 15 2.3.3 Auto Mode 16 2.4 Speed Setting 16 American DJ 2.5 Send File Dump 17 DMX-SOLO DMX-SOLO 2.6 Receive File Dump 18 2.7 Black-Out Mode 19... -
Page 4: Features
Features Thank you for your purchase of this American DJ product. This DMX-Solo features include: 96 DMX channels 9 chase programs & a AP program 9 strobe programs & a AS program Each chase/strobe program can record a maximum of 48 scenes... -
Page 5: General Instructions
General Instructions Read the instruction in this manual carefully and thoroughly, as they give important information regarding safety during use and maintenance. Keep this manual with the unit, in order to consult it in the future. If the unit is sold or given to another operator, make certain that it always has its manual, to enable the new owner to read about its operation and re lative instructions. -
Page 6: Overview
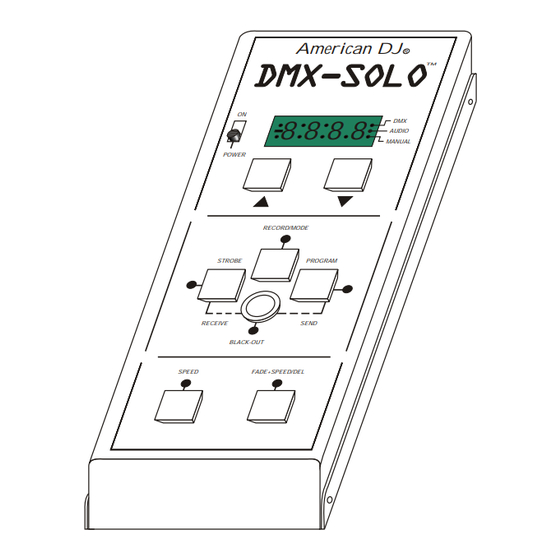
1. Overview 1.1 Front View American DJ DMX-SOLO DMX-SOLO 8 8 8 8 AUDIO MANUAL POWER RECORD/MODE STROBE PROGRAM RECEIVE SEND BLACK-OUT SPEED FADE+SPEED/DEL... - Page 7 1. Overview 1.1 Front View 1. Power Switch Move the slider to Up position to turn the power on. 2. Segment Display Shows the current activity or function state. 3. Up Button Tap the button to increase the display value. 4.
-
Page 8: Back View
1. Overview 1.2 Back View 1. DC Input DC 12V, 300mA min. 2. DMX In This connector accepts DMX signal from a DMX controller or receives file dump from last unit. This connector sends DMX signal through to the 3. DMX Out DMX fixture or sends file dump to the next unit. -
Page 9: Operation Guide
2. Operation Guide 2.1 Record Mode 2.1.1 Record Enable Press and hold down the Record/Mode button for five seconds, the LED above it lights indicating Record mode is active, the Segment Display shows the program and its scene of last time. The DMX LED will light when DMX signal is present. -
Page 10: Delete A Program
2. Operation Guide 2.1.2 Record Scenes 4. Tap the Record button to record scenes. Create a desired scene on your DMX controller. Once the scene is satisfactory, tap the Record/ Mode button to record this scene as the first step, all LEDs flash briefly indicating you've record this scene into the program and the Segment Display shows the current step. -
Page 11: Delete A Scene
2. Operation Guide 2.1.4 Delete a Scene NOTE: You must record scenes before you can delete the scenes. 1. Record enable. 2. Repeat steps 2-3 in Record Scenes to select the program that holds the scene you wish to delete. 3. -
Page 12: Add A Scene
2. Operation Guide 2.1.5 Add a Scene NOTE: You must record scenes before and the program holds less than 48 scenes. 1. Repeat steps 1-3 in Delete a Scene. 2. Tap the Up/Down button to select the scene which you wish to add a new scene before. 3. -
Page 13: Preview A Scene
2. Operation Guide 2.1.6 Change a Scene 3. Create a scene on your DMX controller, tap the Record button to change the step(scene), all LEDs flash briefly indicating the old scene is replaced by the new one. 2.1.7 Preview a Scene NOTE: You must record scenes before you can preview the scenes. -
Page 14: Exit Record Mode
2. Operation Guide 2.1.8 Exit Record Mode Tap the Black-out button until the Record LED p 3 0 0 goes out, this unit is out of Record mode. 2.2 Record AS/AP Scenes 1. Record enable. 2. Tap the Up/Down button to select AS or AP . (AS for strobe program, AP for chase program) a p 0 0 3. - Page 15 2. Operation Guide 2.2 Record AS/AP Scenes 4. Create a scene on your DMX controller, tap the Record button, all LEDs flash briefly indicating you've record a scene(step) into this program. 5. Continue recording scenes until you've got a desired program. You may record a maximum of 60 scenes into this AP/AS program.
- Page 16 2. Operation Guide 2.2 Record AS/AP Scenes 8. Tap Up/Down button to adjust the beat time or 3 2 5 fade time of the current step. 9. Tap the Program(for AP scenes) or Strobe(for AS a p 0 2 scenes) button to enter next step. 10.
-
Page 17: Run Programs
2. Operation Guide 2.3 Run Programs Every time you turn on this unit, it is always in Run mode, you may tap the Mode button to activate the programs with Audio/Manual/Auto mode. Be sure the programs have record scenes before you can run the programs. 2.3.1 Manual Mode 1. -
Page 18: Audio Mode
2. Operation Guide 2.3.2 Audio Mode 1. Tap the Mode button several times until the a dot LED near Audio lights. 2. Tap the Program or Strobe button to select s 2 0 2 chase program or strobe program. 3. Tap the Up/Down button to select the program s 3 0 5 you wish to run. -
Page 19: Auto Mode
2. Operation Guide 2.3.3 Auto Mode 1. Tap the Mode button several times until both Manual and Audio LEDs go out, that is, Auto mode is active. 2. Tap the Up/Down button to select the program p 3 0 6 you wish to run. -
Page 20: Send File Dump
2. Operation Guide 2.4 Speed Setting 2. Tap the Up/Down button to adjust the speed within 0.1-600 seconds, the Segment Display 2 0 5 shows the current speed. For Example: 1:00 represents 1 minute, 1.00 represents 1 second. s 2 0 2 3. -
Page 21: Receive File Dump
2. Operation Guide 2.5 Send File Dump 3. Tap the Fade+Speed button to send file dump. During the course of sending, all other operation doesn't work. 4. When this unit completes sending, the Segment Display shows "END". Tap any button to leave this mode. -
Page 22: Black-Out Mode
2. Operation Guide 2.6 Receive File Dump 3. Tap the Fade+Speed button to receive file dump, the Segment Display shows "IN". During the course of sending, all other operation doesn't work. 4. When this unit completes receiving, the Segment Display shows "END". Tap any button to leave this mode. -
Page 23: Initialization
2. Operation Guide 2.7 Black-out Mode 3. Tap the Fade+Speed button to change between "N-BO" and "Y-BO". 4. Tap the Program button to leave this P 2 0 2 mode. 2.8 Initialization All the programs are blank when this unit is packed. If you are not satisfied with your programs, you can initialize this unit to clear all memory. -
Page 24: Technical Specifications
DMX Out/In ........ 3 pin female & male XLR socket Audio Input ..........By built-in microphone Fuse(Internal) ..........F0.5A 250V 5x20mm Accessory ........... AC/DC adaptor x1PC Dimensions ............190X80X31mm Weight ................0.52 Kg American DJ ALL RIGHTS RESERVED 24-004-0609 Rev 1.1 Nov., 2000 E-mail: support@americandj.com Web Site: www.americandj.com...
Need help?
Do you have a question about the FOZ/UQNQ and is the answer not in the manual?
Questions and answers