Table of Contents
Advertisement
EMAIL:
Info@auroraaudio.net
Web Site: http://www.auroraaudio.net
Introduction:
Well done for purchasing a hand-built, all discrete class A circuitry GTQC channel strip!
It is designed to give you years of superb sounds and service.
Unpacking Instructions:
Carefully remove the unit from the custom foam packing and fit the fuse into the fuse-holder. For best
noise performance always use a grounded 3 core / 3 pin a.c. cord. If you connect the GTQC to an
unbalanced source or destination, either use the ¼" jacks or wire to the XLR pins 2 and 3 only. Leave pin
1 high. This will help prevent ground loops.
The rear jack socket behind the pre-amplifier is mono and should be connected with a mono jack. If a
balanced TRS jack is plugged in, there will be a 6dB loss as there would be no signal on the ring contact.
The rear jack socket behind the compressor is also a mono jack. This is the side chain linking connector to
enable the GTQC to link to other GTQC compressors and link their side chains together for multi-channel
compression.
Wiring of this connector is tip = dc control volts, and sleeve = 0v (ground) common.
Operating Guide:
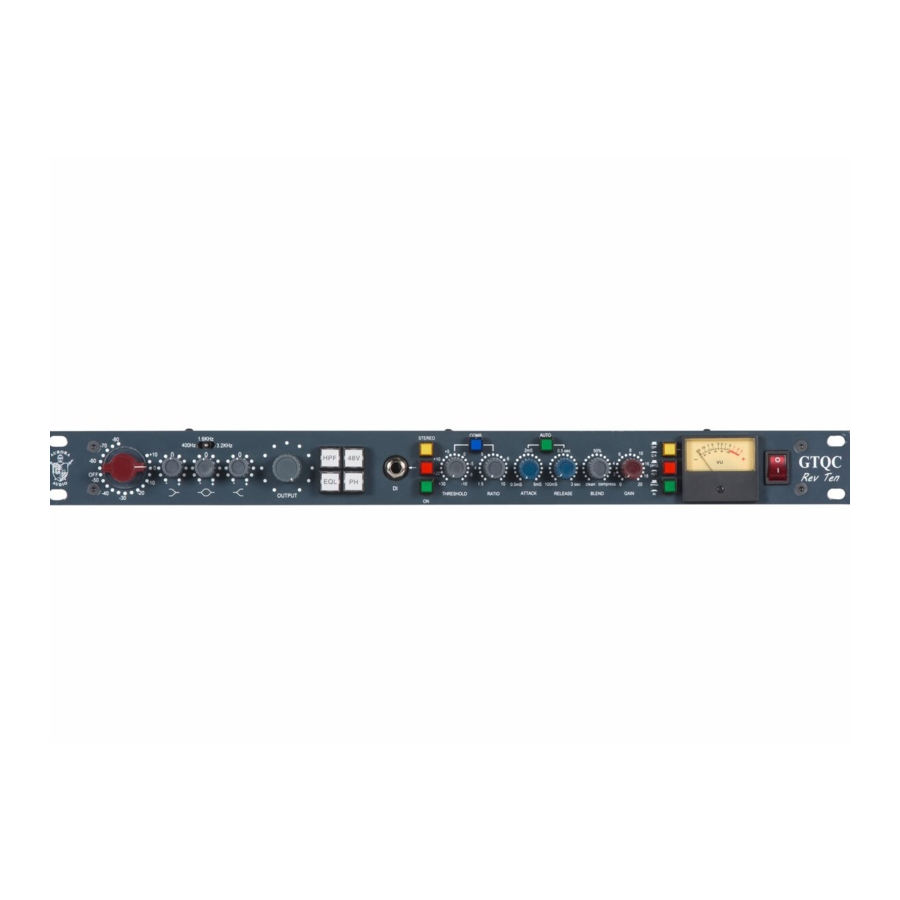
1. Preamplifier and Equalizer
The GTQC can accommodate any signal you care to throw at it, including high-level line inputs. The
sensitivity switch provides gain adjustment from +80dB to –10dB and the level pot allows for fine
adjustments. The level pot has an audio taper and is –20dB at half rotation. I would recommend using the
level pot between ¾ and full rotation and never below ½ rotation unless part of a deliberate fade. If you
have to turn the pot below ½ way, the sensitivity switch can be adjusted at least 4 clicks less! Operating
the unit in this fashion ensures that you keep the headroom in the designed 26dB region.
The D.I. input has 10 Megohm input impedance and around 10dB gain. It can be used (to great effect)
with musical instrument pickups, but works equally well with high-level signals like a D.A.T. or CD
player. The same gain structure rules apply.
AURORA AUDIO INTERNATIONAL
GTQC Instruction Sheet
1
1520 NORTH CAHUENGA BOULEVARD
HOLLYWOOD, CA90028
Telephone: 323 462 6136
Fax :
323 462 6137
Advertisement
Table of Contents

Related Manuals for Aurora Audio GTQC


Summary of Contents for Aurora Audio GTQC
- Page 1 Telephone: 323 462 6136 Web Site: http://www.auroraaudio.net Fax : 323 462 6137 GTQC Instruction Sheet Introduction: Well done for purchasing a hand-built, all discrete class A circuitry GTQC channel strip! It is designed to give you years of superb sounds and service.
- Page 2 The impedance switch on the rear panel selects either 300Ω or 1,200Ω input impedances. Most of the time you will find that the 1,200Ω input works best with dynamic and condenser microphones but very low impedance microphones (e.g. ribbon type) may work better with the 300Ω input. The 300Ω input provides 6dB additional gain if sourced from a low impedance, but if a higher impedance microphone is used (e.g.
- Page 3 A microphone normally needing 40dB gain would need 60dB gain and any peaks would drive both the pre-amplifier and the A to D into clipping. Not good! Depending on the reference level recommendations of the A to D manufacturer, the analogue levels on its input should be typically around –18dBf.
- Page 4 NB. The first item is with the switch off, the second with the switch on. Bypass/In (Green switch) :- With the switch deselected, there is a hard (relay switched) connection between the input and output XLRs. This also applies when the unit is switched off/powered down and means that it could be left in a circuit path without disturbing continuity.
- Page 5 depending on whether the red FET switch is selected. If the Combined switch is pressed, relays reconfigure the internal circuit paths so that both control elements are in circuit. The signal passes first through the opto path and is then applied to the FET path for additional control.
- Page 6 Side chain voltage = Typically between 0v minimum and +10v maximum (Greater d.c. voltages provide greater compression.) 6. Tips for users :- Ah, what to expect here?!!! I'm only the designer and feel sure sure that, with minimal practice, you will be able to email me with tips on good settings for particular instruments or vocals! I look on the unit as a tool with which I have provided more than adequate variations for you to sculpt the sound you desire! As a very general guide/starting point, I suggest the following :-...
- Page 7 GTQC Problem solving page The output sounds distorted and noisy! It may be that you have too much input gain and/or the output level control is turned back excessively. To check that you have set up for the correct gain structure, apply the input signal to the input of the pre- amplifier.
- Page 8 Warranty: ONE YEAR PARTS AND LABOR LIMITED WARRANTY Aurora Audio International warrants this GTQC unit against defects in workmanship for a period of one year and parts for a period of one year from receipt by the original end user. This warranty shall not apply...
Need help?
Do you have a question about the GTQC and is the answer not in the manual?
Questions and answers