Table of Contents
Advertisement
Quick Links
Advertisement
Table of Contents

Related Manuals for AEG 130 FG-m


Summary of Contents for AEG 130 FG-m
- Page 1 INSTRUCTION BOOK Combi Grill Fryer...
- Page 2 Your New Appliance Thank you for purchasing an AEG appliance. To enable you to use your new appliance efficiently and safely, please read this instruction book carefully before installing or using the appliance, and retain for future reference. Should the appliance be transferred to a new owner please ensure this instruction book is left with the appliance in order that the new owner can get to know the functions of the appliance and the relevant warnings.
- Page 3 Table of contents Contents For the user For the installer How to read the operating instructions: 1... 2...Step by step Safety information Page no Hint and tips Environmental information...
-
Page 4: Safety Information
Safety information These warnings are provided in the interests of your safety. Ensure your fully understand them before installing or using the appliance. Your safety is of paramount importance. If you are unsure about the meaning of these warnings contact the Customer Care Department for assistance. - Page 5 During use The appliance becomes dangerously hot during use, and remain so for a period of time. It should therefore be treated with due respect. Keep children away from the appliance. Never place plastic or paper, etc., on the appliance. If the appliance should be switched on by accident, the paper could burn, plastic melt, etc.
-
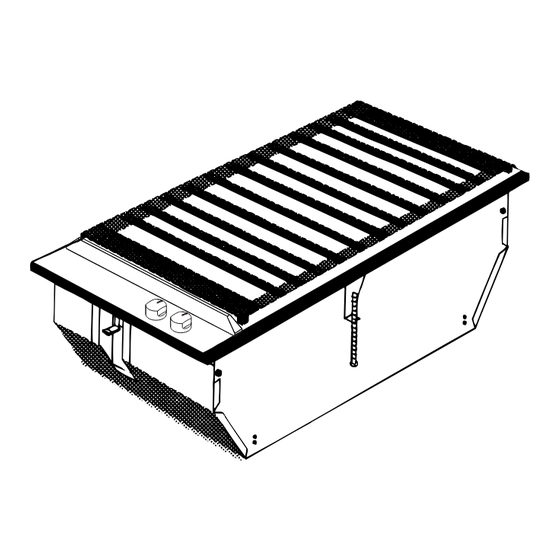
Page 6: Description Of The Appliance
Description of the appliance Steel cover Frying basket Max oil level Heating elements for grill Min oil level Control lamp Heating element for fryer Control knob... -
Page 7: Operating Instructions
Operating instructions Operation of the grill Control knob for grill. The grilling temperature is adjustable. "0" The grill is switched off "1" is on low setting "9" is on high setting Control lamp The control lamp is activated as long as the grill switch is turned on. - Page 8 Frying Make sure the heating element is positioned at the bottom. Oil is poured into the frying container. The “Min” mark must be observed. This corresponds to an oil content of 1,5 litres. Maximum amount of oil in the container is 3,5 litres. The grill elements stay turned down and the fryer may be switched on at the desired temperature setting.
-
Page 9: Tips On Grilling
Tips on grilling Use of the grill The numbers 1-12 are temperature settings. From 1-11 the heating is increased and regulated automatically. On 12, full power is achieved and the heating elements are glowing. This step is suitable for heating up the grill quickly and for cleaning the heating elements. - Page 10 Foods Heat setting Cooking time in minutes...
- Page 11 Tips on frying Select the desired temperature and wait for the fryer lamp to go out. The oil is now at the desired temperature. NB!! Remember that moist foodstuff should be dried before frying (ie. seafood, vegetables, fruit, fish). After frying the basket is lifted out and carefully shaken to remove excess oil (the basket may be hung on the fixing...
- Page 12 Foods Amount Temperature Time min.
- Page 13 Food residue left in the oil must be removed before the fryer is used again because of fire risk! If you should want to use both the grill and the fryer, for instance to make a beef steak with french fries, the following method may be used: 1.
-
Page 14: Maintenance And Cleaning
Maintenance and cleaning The heating elements and the oil will stay hot for a long time after the combi-grill has been turned off. Never pour water into the hot oil as the water will start boiling. Splashguard The splashguard can be removed to make it easier to clean the surface. - Page 15 Stainless steel surfaces Clean the appliance after use with a soft cloth well wrung out in warm water, use a small amount of liquid detergent for stubborn soiling. Stainless steel parts may become straw coloured with use, use a proprietary stainless steel cleaner to remove this straw discolouration.
- Page 16 Draining of the oil 1. Remove the safety shield from the drain cock. 2. Place a bowl under the drain cock. Make sure the bowl is large enough to hold the oil in the container. 3. Open the drain cock and let the oil run into the bowl.
-
Page 17: Technical Data
Technical data Element voltage 240 V Electrical connections 240 V, 1 phase, neutral + earth Total power consumption 2300 W This unit is labelled to indicate conformity with the low voltage directive ( 73/23/EEC ) and the EMC directive ( 89/336/EEC ). Unpacking Check that the appliance has no faults and is undamaged on delivery. -
Page 18: Installation
Installation The hob unit can be mounted in any type of kitchen with a table surface whose thickness is between 28 mm and 40 mm. Fixing Unscrew the fixing brackets just enough so they may be turmed. Fasten the brackets to the worktop with a screw driver. - Page 19 Mounting of attachment fitting on the sides of the combi-grill If the appliance is mounted in a 270 X 490 mm cutout, or if for other reasons there is no room for the side attachments, these should be removed before the appliance is set into the worktop.
- Page 20 The units externally measured length 145 mm: Cooker hood 290 mm: Two-burner ceramic-top electric hob Two-burner gas hob Grill Fryer Combi grill 580 mm: Four-zone ceramic-top electric hob Four-burner gas hob 725 mm: Four-zone ceramic-top electric hob...
-
Page 21: Electrical Installation
Electrical installation The electrical connection may only be performed by a qualified electrician/ competent person. The electrical connection must be carried out in accordance with prevailing regulations for appliances using heavy current. The connection must comply with any specific requirements specified by the local electricity supply authority. -
Page 22: Something Not Working
Something not working If the appliance is not working correctly, please carry out the following checks before contacting your local AEG Service Force Centre. IMPORTANT: If you call out an engineer to a fault caused by incorrect use or installation, a charge will be made even if the appliance is under guarantee. Sympton Grill/Fryer not working? Fuses constantly blowing? -
Page 23: Service And Spare Parts
Service & spare parts In the event of your appliance requiring service, or if you wish to purchase spare parts, contact your local AEG Service Force Centre by telephoning: Your call will automatically be routed to the Service Centre covering your post code area. -
Page 24: Guarantee Conditions
Guarantee conditions AEG offer the following guarantee to the first purchaser of this appliance: 1. The guarantee is valid for 12 months commencing when the appliance is handed over to the first retail purchaser, which must be verified by purchase invoice or similar documentation. - Page 25 Before you move please contact your nearest Customer Care centre, listed below, to give them details of your new home. They will then ensure that the local service organisation is aware of your move and able to look after you and your appliances.
Need help?
Do you have a question about the 130 FG-m and is the answer not in the manual?
Questions and answers