Table of Contents
Advertisement
Quick Links
Advertisement
Table of Contents

Subscribe to Our Youtube Channel
Related Manuals for Philips DTR500/05


Summary of Contents for Philips DTR500/05
- Page 1 NOTICE DTR 500.qxd 7/09/2004 15:24 Page 1...
- Page 2 Page 2 Welcome to digital television Congratulations on choosing the Philips DTR 500 digital terrestrial receiver. Using your Philips digital receiver will allow you to access Freeview digital terrestrial television, radio and interactive channels. With this product, you can enjoy advanced functions and features including:...
-
Page 3: Quick Installation
7/09/2004 15:24 Page 3 Quick installation Please read the safety section before connecting your receiver. Terrestrial Receiver to AC outlet RF Cable TV set PHILIPS PHILIPS VCR/DVD EXT 1 ANT IN EXT 2 EXT 1 EXT 2 ANT OUT For optimum configuration Requirements for fast and successful first installation are as follows: •... -
Page 4: Table Of Contents
NOTICE DTR 500.qxd 7/09/2004 15:24 Page 4 TABLE OF CONTENTS Quick installation Day to day operation Meaning of symbols Switch your receiver ON/OFF (standby) Safety instructions Select TV/Radio mode For safe operation and optimal Change channel lifetime 6.3.1 Using number buttons Mains connection 6.3.2 Using <P+>/<P->... - Page 5 NOTICE DTR 500.qxd 7/09/2004 15:24 Page 5 Timers Change the settings of your 7.5.1 Record/Remind receiver 7.5.2 Sleep General information Favourites 7.1.1 Basics about menu navigation 7.6.1 TV Channels 7.1.2 Change setting 7.6.2 Radio Stations 7.1.3 Cancel/Store changes Access Restrictions Preferences 7.2.1 Language...
-
Page 6: Meaning Of Symbols 6
The “Material recyclability symbol ” affixed on plastic parts means these parts are recyclable. The “Green point” affixed on cardboard means PHILIPS pays a financial duty to the “Avoidance and Recovery of Packaging Waste” organization. This receiver contains a large number of materials that can be recycled. If you are disposing of an old machine, please take it to a recycling centre. - Page 7 NOTICE DTR 500.qxd 7/09/2004 15:24 Page 7 Mains connection Before connecting the receiver to the mains, check that the mains supply voltage corresponds to the voltage printed on the rear of the receiver. If the mains voltage is different, consult your dealer. Important note This apparatus is fitted with an approved moulded BS1363 plug.
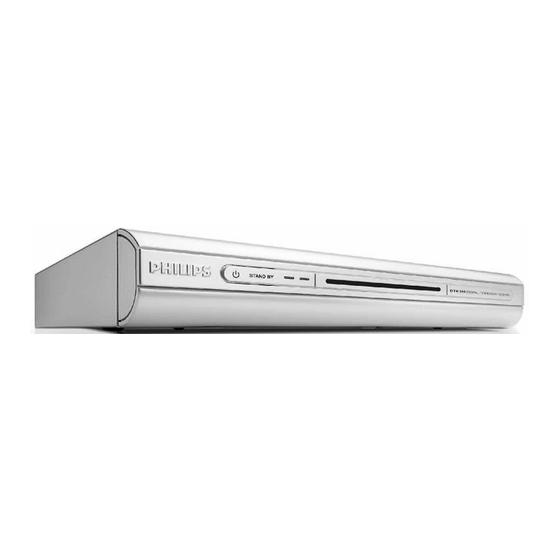
- Page 8 NOTICE DTR 500.qxd 7/09/2004 15:24 Page 8 Front view STANDBY button: Switch the receiver ON or to standby......LED1 (Red): Display receiver status (see status indicator table).
- Page 9 NOTICE DTR 500.qxd 7/09/2004 15:24 Page 9 Rear view AERIAL IN (*): Input to connect your UHF aerial......RF OUT (*): RF output to be connected to the aerial input of your .
- Page 10 NOTICE DTR 500.qxd 7/09/2004 15:24 Page 10 Remote control 3.1 Installing the batteries - Remove the back cover - Insert two batteries (type R06G/AA - 1.5 V) supplied. - Position them as shown in the diagram situated in the remote battery compartment. - Replace the cover.
-
Page 11: Using The Remote Control
NOTICE DTR 500.qxd 7/09/2004 15:24 Page 11 3.2 Using the remote control Mute Standby - Audio mute - Standby / ON RED, GREEN, YELLOW, BLUE - Action depending on context GUIDE - Open Electronic Programme Guide - Display available favourite lists SUBTITLE INFO - Display available subtitle... - Page 12 Incorporate your receiver in your existing installation as shown on the diagram or follow the instructions below. Terrestrial Receiver to AC outlet RF Cable TV set PHILIPS PHILIPS VCR/DVD EXT 1 ANT IN EXT 2 EXT 1 EXT 2...
- Page 13 NOTICE DTR 500.qxd 7/09/2004 15:24 Page 13 - Plug your aerial lead plug into the “AERIAL IN” socket of your digital receiver. - Connect the “RF OUT” socket of your digital receiver to the “ANT IN” socket of your VCR by means of the RF coaxial lead supplied with your digital receiver.
- Page 14 NOTICE DTR 500.qxd 7/09/2004 15:24 Page 14 Connecting to your HiFi/Audio receiver equipment. (Analogue/Digital) Depending on your HiFi / Audio receiver equipment, you might have several options to connect your digital receiver. to AC outlet Terrestrial Receiver Audio equipment AUDIO Analogue Digital input...
-
Page 15: Channel Scan
NOTICE DTR 500.qxd 7/09/2004 15:24 Page 15 First installation Requirements for fast and successful first installation are as follows: • You already have an aerial. • Your aerial is correctly pointed at the terrestrial transmitter corresponding to your area (1). •... -
Page 16: Scanning Failure
NOTICE DTR 500.qxd 7/09/2004 15:24 Page 16 Scanning failure No channels could be found. A scan failure message is displayed. Before starting a new scan It is recommended to perform the following checks: - connections to your receiver (see chapter 4), - signal quality (see paragraph 7.3.3), - antenna installation, - channel(s) available in the region corresponding to your... -
Page 17: Day To Day Operation
NOTICE DTR 500.qxd 7/09/2004 15:24 Page 17 Day to day operation Switch your receiver ON/OFF (standby) Your receiver is in standby mode (the red LED is on). To wake up your receiver: - Press one of the following remote control buttons: <P+>, <P>, <OK>... -
Page 18: Change Channel
NOTICE DTR 500.qxd 7/09/2004 15:24 Page 18 Change channel 6.3.1 Using number buttons You are watching digital TV or listening to a digital radio programme: - Press number button(s) to select the desired channel number 6.3.2 Using <P+>/<P-> You are watching digital TV or listening to a digital radio programme: - Press <P+>... -
Page 19: Channel Banner
NOTICE DTR 500.qxd 7/09/2004 15:24 Page 19 Channel banner Each time you select a new channel, a banner appears at the top of the screen, indicating: • Current channel number and name, • Start and end time of the current programme, •... -
Page 20: Change Temporarily The Subtitle Selection (Circular Toggle)
NOTICE DTR 500.qxd 7/09/2004 15:24 Page 20 Change temporarily the Subtitle selection (circular toggle) - Press the < > button. - Press the to move to the desired subtitle language. - Press <OK> to confirm your selection. Alternatively, select None to disable subtitling. Change temporarily the Audio language selection (circular toggle) - Press the <I/II>... -
Page 21: Deleting A Running Timer
NOTICE DTR 500.qxd 7/09/2004 15:25 Page 21 6.9.3 Deleting a running timer A timer is running and you are watching what you are recording. Recording is signalled by LED1 lit in red and LED2 lit in green. - Press key sequence “TIMER, 0” to delete the running timer. A timer is running and your receiver is in standby. -
Page 22: Change The Settings Of Your Receiver
NOTICE DTR 500.qxd 7/09/2004 15:25 Page 22 Change the settings of your receiver General information 7.1.1 Basics about menu navigation - In normal viewing mode, press <MENU> to display the Main Menu, including the Puck element. The Puck element is always present when the menu is displayed. -
Page 23: Preferences
NOTICE DTR 500.qxd 7/09/2004 15:25 Page 23 Notes: - To open a menu item signalled by a locker, you must enter your PIN code. - To avoid burning your TV screen on-screen messages/menus are automatically set off after 30 min. Preferences - Press the <MENU>... -
Page 24: System Settings
NOTICE DTR 500.qxd 7/09/2004 15:25 Page 24 7.2.3 System settings The selection is on the System settings item of the Preferences sub-menu. - Press the button to access the system settings. Note: if the parental control is active, you must enter your PIN code to access the relevant sub-items of this menu item. -
Page 25: Channel Banner
- Move to the address you want to select: 039 or 038. Default address is 039, which makes it possible to control your receiver using any Philips TV set remote control. - Press <OK> to confirm your selection. - Proceed as described in paragraph 9.1. -
Page 26: Rearrange Services
NOTICE DTR 500.qxd 7/09/2004 15:25 Page 26 7.3.1.1 Rearrange services This feature is used to install/uninstall services and move services within the installed services list. - First scroll to the service you want to uninstall/install/move. - Press <OK> to select the service.The service name appears in the Selected service zone. -
Page 27: Service Setup
NOTICE DTR 500.qxd 7/09/2004 15:25 Page 27 - Scroll to the station you want to listen to. Note: press <OK> to uninstall the selected station. Press <OK> again to cancel uninstallation. - Press to exit the screen and return to the Service lists sub-menu, or press the blue colour button to exit the menu. -
Page 28: Restore Factory Settings
NOTICE DTR 500.qxd 7/09/2004 15:25 Page 28 The selection is on RF channel. - Press to access the list of RF channels. - Scroll up or down the list to the RF channel you want to select. - Press <OK> to view the signal quality and strength for the selected channel. -
Page 29: Timers
NOTICE DTR 500.qxd 7/09/2004 15:25 Page 29 - Move the Puck to No if you want to be prompted when new software is available. - Press <OK> to confirm. - Press to exit the screen and return to the System software item, or press the blue colour button to exit the menu. -
Page 30: Sleep
NOTICE DTR 500.qxd 7/09/2004 15:25 Page 30 To edit an existing timer: - Scroll within the timer list to the timer you want to modify. - Press the button to access the setting values. - Modify the setting values as appropriate (see above for details). -
Page 31: Tv Channels
NOTICE DTR 500.qxd 7/09/2004 15:25 Page 31 7.6.1 TV Channels This item is used to create and edit TV favourite lists. - Press the button to access the favourite list settings - Scroll to the list you want to create or edit. - Press the button to access the setting values: •... -
Page 32: Menu Tree
NOTICE DTR 500.qxd 7/09/2004 15:25 Page 32 Menu tree Timers Record / Remind Sleep Favourites TV Channels List 1 to 4 Name Active Select TV channels Add all services Remove all services Radio Stations List 1 to 4 Name Select Radio stations Add all services Remove all services Preferences... - Page 33 NOTICE DTR 500.qxd 7/09/2004 15:25 Page 33 Access restrictions Set PIN code protection Maturity Rating TV channels Radio stations Parental Timers Change PIN code Enter system PIN code Enter new system PIN code Re-enter new system pin code Installation Service Lists Rearrange services View new TV channels Listen to new Radio...
-
Page 34: Advanced Settings
Changing the remote control setting If you have other items of equipment in your home and the remote control of the Philips receiver interferes with them, you can change the setting of the remote control. For this you must change the setting of both your receiver and remote control. -
Page 35: Digital Receiver And Vcr Settings
• Lost of Power • Locked channel Your Philips receiver can detect those errors during the recording, it will signal you those errors the next time you will use it by a means of an on-screen alarm. ADVANCED SETTINGS 35... -
Page 36: Troubleshooting Guide
NOTICE DTR 500.qxd 7/09/2004 15:25 Page 36 10 Troubleshooting guide Experiencing difficulty operating your digital receiver? Check the following points first! Problem Possible cause Action No picture, no sound and no front Receiver is not plugged into the Check mains connection and press panel indication. - Page 37 NOTICE DTR 500.qxd 7/09/2004 15:25 Page 37 Problem Possible cause Action You cannot select all of the Some channels have been selected Use the <FAV> button to select channels and the P+/- or Arrow as favourites and the favourites another Favourite list. Use the All up/down buttons do not always mode is on.
-
Page 38: Technical Specification
NOTICE DTR 500.qxd 8/09/2004 14:35 Page 38 11 Technical specifications This product is in conformity with the requirements of the 95/47/EC and 2002/21/EC directives. Video decoding Application system resources Accessories - MPEG-2 DVB compliant up to Processor clock speed 81 MHz - Remote control MP@ ML SDRAM - CPU/Video-Graphics 8/16 MB... - Page 39 NOTICE DTR 500.qxd 7/09/2004 15:25 Page 39...
- Page 40 NOTICE DTR 500.qxd 7/09/2004 15:25 Page 40...
Need help?
Do you have a question about the DTR500/05 and is the answer not in the manual?
Questions and answers