Table of Contents
Advertisement
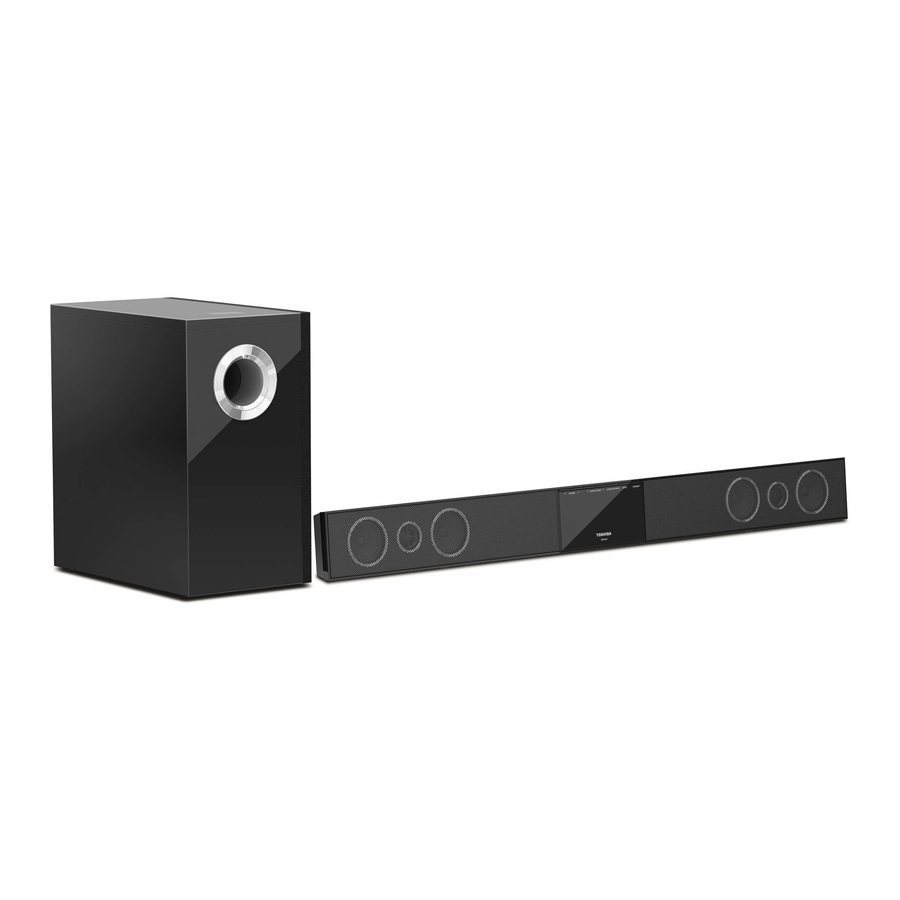
Sound Bar Speaker System
User's Guide:
SBX4250KN
If you need assistance:
Toshiba's Support Web site support.toshiba.com
Toshiba Canada Support Web site : www.toshiba.ca/support/ceg
Call Toshiba Customer Support Center:
Within the United States at (800) 631-3811
Outside the United States at (949) 583-3050
From Canada at (800) 268-3404
For more information see "Troubleshooting" on page 17 in this guide.
Owner's Record
The model number and serial number are on the back and underside of your Sound
Bar. Record these numbers in the spaces below. Refer to these numbers whenever
you communicate with your Toshiba dealer about this Sound Bar.
Model name____________________________
Serial number___________________________
SBX4250KN_IB_V1_R13.indd 1
1
2012/6/26 14:21:43
Advertisement
Table of Contents

Related Manuals for Toshiba SBX4250KN


Summary of Contents for Toshiba SBX4250KN
- Page 1 The model number and serial number are on the back and underside of your Sound Bar. Record these numbers in the spaces below. Refer to these numbers whenever you communicate with your Toshiba dealer about this Sound Bar. Model name____________________________ Serial number___________________________ SBX4250KN_IB_V1_R13.indd 1...
-
Page 2: Table Of Contents
Contents Introduction ..................6 Safety icons used in this manual............6 Sound Bar speaker system controls ............7 Remote control ................... 10 Sound Bar speaker system placement ..........12 Sound Bar speaker system connections ..........13 Troubleshooting .................. 17 Maintenance ..................18 Specifications .................. -
Page 3: Safety Precautions
TO PREVENT ELECTRIC SHOCK, MATCH WIDE BLADE OF PLUG TO WIDE SLOT OF AC POWER UTLET, THEN FULLY INSERT. CHANGES OR MODIFICATIONS MADE TO THIS EQUIPMENT, NOT EXPRESSLY APPROVED BY TOSHIBA, OR PARTIES AUTHORIZED BY TOSHIBA, COULD VOID THE USER’S AUTHORITY TO OPERATE THE EQUIPMENT. - Page 4 Interference and recommendations, TOSHIBA believes Bluetooth ® wireless This equipment has been tested and found to comply with the technology is safe for use by consumers.
- Page 5 OR INDIRECTLY FROM ANY TECHNICAL OR TYPOGRAPHICAL ERRORS OR OMISSIONS CONTAINED HEREIN OR FOR DISCREPANCIES BETWEEN THE PRODUCT AND THE MANUAL. IN NO EVENT SHALL TOSHIBA BE LIABLE FOR ANY INCIDENTAL, CONSEQUENTIAL, SPECIAL, OR EXEMPLARY DAMAGES, WHETHER BASED ON TORT, CONTRACT OR OTHERWISE, ARISING OUT OF OR IN CONNECTION WITH THIS MANUAL OR ANY OTHER INFORMATION CONTAINED HEREIN OR THE USE THEREOF.
-
Page 6: Introduction
Introduction Safety icons This guide contains safety instructions that must be observed to avoid potential hazards that could result in personal injuries, damage to your equipment, or loss of data. These safety cautions have been classified according to the seriousness of the risk, and icons highlight these instructions as follows: Indicates an imminently hazardous situation which, if not avoided, will result in death or serious injury. -
Page 7: Sound Bar Speaker System Controls
Sound Bar front panel Sound Bar speaker system controls (Sample Illustration) Front panel controls Item: Description: Function: Remote Sensor VOLUME button Press to adjust the volume level. BASS VOLUME button Press to adjust the bass volume level. SURROUND MODE button Press to select the Stereo/SRS TruSurround HD/SRS TruBass. INPUT button Press to switch between HDMI ®... - Page 8 Sound Bar back panel (Sample Illustration) Back panel connections Item: Description: Functions: OPTICAL IN jack (1) & (2) Connects the optical audio input to another device, see “Connecting to an Audio System” on page 14. AUX IN jack (L / R) Connects other AV devices through the AUX IN jack, see “Connect audio through an analog audio cable”...
- Page 9 Subwoofer (Sample Illustration) Subwoofer connections Item: Description: Functions: Bass port Subwoofer Speaker WIRELESS LINK button Press to pair the subwoofer with the Sound Bar. WIRELESS LINK indicator The indicator is red when the wireless link is activated. POWER switch Switch to turn ON/OFF the subwoofer. Power cord Connects to a standard AC outlet to supply power to the subwoofer.
-
Page 10: Remote Control
Remote control Item: Description: Operation: MUTE Press to turn the sound off. Press again to cancel. Press to turn the HDMI ® CEC on/off. VOLUME Press to adjust the volume level. Press to go to the last track or advance PRE/NEXT to the next track in Bluetooth ®... -
Page 11: Installing The Batteries
Installing the batteries Install the batteries (AAAx2), matching the polarity indicated inside the battery compartment of the remote control. 1 Open the battery cover. (Sample Illustration) Remote control - Opening the battery cover 2 Insert batteries. Make sure to match the polarity marks (+ / -) on the batteries to the marks indicated in the battery compartment. -
Page 12: Sound Bar Speaker System Placement
Sound Bar speaker system placement The Sound Bar can be placed freestanding on a table or mounted on a wall. For the best surround sound experience, place your subwoofer as shown below. Place the subwoofer at least 11.8” (300mm) away from the TV. 300mm Sound Bar Subwoofer... -
Page 13: Sound Bar Speaker System Connections
Sound Bar speaker system connections Connecting to a TV using an HDMI (ARC) cable. ® This feature enables the audio signal of the TV to be sent to the Sound Bar via the HDMI ® cable. The HDMI ® cable is not included and must be purchased separately. Be sure that the connected TV has an HDMI ®... -
Page 14: Connecting To An Audio System
Connecting to an Audio System. You can connect your Sound Bar to an audio system to play audio from other devices. Connect audio through a digital optical cable 1. You can connect a optical cable from the OPTICAL input jack on the Sound Bar to the OPTICAL output jack on the other device. - Page 15 2. Connect a 3.5mm cable (not included) from the LINE input jack on the Sound Bar to the other device. 3. Press the INPUT button to select the LINE IN mode and the display will show “LINE-IN”. Portable music player or not supplied other Audio Devices (Sample Illustration) 3.5mm connection to audio device...
-
Page 16: Subwoofer Wireless Connection
1. Press the INPUT button to select Bluetooth ® mode until the display is shown “BT”. 2. Once the Sound Bar is detected of your Bluetooth ® enable device. Select the “Toshiba Soundbar” on your device. 3. Enter the PIN code. -
Page 17: Troubleshooting
Troubleshooting Problem: Solution: The unit does not switch on. Make sure it is plugged in. Press the STANDBY/ON button located on the top of the Sound Bar, and check to see if the STANDBY/ON indicator turns off. Turn the subwoofer power switch to ON. No sound from the sound bar Press the VOL button of the Sound Bar. -
Page 18: Maintenance
Maintenance Servicing Please refer to relevant topics in “Troubleshooting & Maintenance” on page 17 & 18 before returning the product. If this unit becomes inoperative, do not try to correct the problem by yourself. There are no user- servicable parts inside. Turn off, unplug the power plug, and please call our helpline to locate an Authorized Service Center. -
Page 19: Specifications
Specifications These models comply with the specifications listed below. Designs and specifications are subject to change without notice. These models may not be compatible with features and/or specifications that may be added in the future. Main unit: Power requirements DC 27.5V 3.2A Power output 75 watts (per channel at 4 ohms, 1 kHz/THD10%) - Page 20 SBX4250KN_IB_V1_R13.indd 20 2012/6/26 14:21:45...
Need help?
Do you have a question about the SBX4250KN and is the answer not in the manual?
Questions and answers