Table of Contents
Advertisement
Quick Links
Advertisement
Table of Contents

Related Manuals for Eagle 12


Summary of Contents for Eagle 12
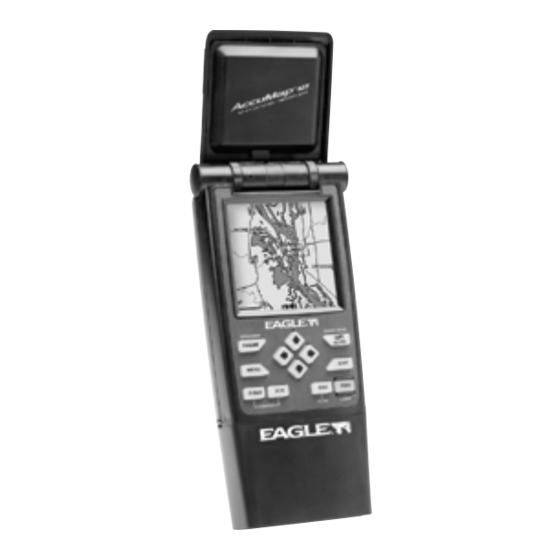
- Page 1 AccuMap 12 INSTALLATION AND OPERATION INSTRUCTIONS ®...
- Page 2 Copyright © 1996, 1997 Eagle Electronics All rights reserved. AccuMap 12™ is a trademark of Eagle Electronics Eagle™ is a registered trademark of Eagle Electronics IMS SmartMap™ is a trademark of Lowrance Electronics, Inc. WARNING! USE THIS MAPPING UNIT ONLY AS AN AID TO NAVIGATION. A CARE- FUL NAVIGATOR NEVER RELIES ON ONLY ONE METHOD TO OB- TAIN POSITION INFORMATION.
-
Page 3: Table Of Contents
COLD START ... 7 INITIALIZATION ... 8 ENTER BY MAP ... 8 ENTER MANUALLY ... 10 POSITION/NAVIGATION DISPLAYS ... 11 NAVIGATION SCREENS ... 12 CDI INDICATOR ... 13 MAPPING SCREENS ... 14 MAP CURSOR ... 15 AUTOZOOM ... 16 EARTH MAP OPTIONS ... 17 C-MAP OPTIONS ... - Page 4 DEFINITION OF TERMS/ABBREVIATIONS ... 55 WINDOW BOXES ... 56 WINDOW GROUPS ... 58 UPS RETURN POLICY ... 60 ACCUMAP 12 WARRANTY ... 62 DATABASE LICENSE AGREEMENT ... 63 DATABASES LIMITED WARRANTY ... 64 ACCESSORY ORDERING INFORMATION ... 65 HOW TO OBTAIN SERVICE - INTERNATIONAL ... INSIDE BACK COVER...
-
Page 5: Introduction
150 meters vertically 95% of the time. In other words, the position shown on your AccuMap 12 could be up to 100 meters in any direction from your actual position, and the altitude could be plus or minus 150 meters from what’s shown on the screen, 95% of the time. -
Page 6: Installation
INSTALLATION The AccuMap 12 operates from six AA batteries or from 6 to 35 volts DC. An optional cigarette lighter adapter is available (model CA-1) to plug into a vehicle’s electrical system. The AccuMap 12 automatically switches to external power when it’s plugged into the unit (provided that the external... -
Page 7: Battery Installation
To install the batteries, first turn the AccuMap 12 so that it is facing you. Now grasp the bottom part of the case and push it to the right until it ®... -
Page 8: Antenna
Slide the battery pack onto the unit and the AccuMap 12 is ready for use. ANTENNA Your AccuMap 12 has a removable antenna that folds over the display when the unit is not in use. -
Page 9: Map Cartridge Installation
Over 600 cartridges are available. To install a cartridge into the AccuMap 12, first make certain the unit is turned off. Never install or remove a cartridge with the unit turned on! You can damage your unit if you install or remove a cartridge with the unit turned on. -
Page 10: Removing Map Cartridge
MENU key. The Z-OUT and Z-IN keys zoom-out and zoom- in your view on the mapping screen. The ENT and EXIT keys let you enter or erase selections. The PWR key turns both the AccuMap 12 and its lights on and off. -
Page 11: Operation
However, if you don’t want to push buttons at this time, that’s fine. The AccuMap 12 will lock onto the satellites and give you a position without any input from you. This is called a “cold-start”. It simply means that the unit is searching without your help for the satellites that are in orbit. -
Page 12: Initialization
Anytime you see flashing numbers, it means the AccuMap 12 does not have a position! Do not rely on any data that is flashing! When the numbers stop flashing, the unit has locked on to the satellites and the position is good. - Page 13 Using the down arrow key, highlight the “Ini- tialize GPS Receiver” menu, then press the right arrow key. The screen shown below ap- pears next. This is the GPS initialization screen. The posi- tion, altitude, time, and date the GPS receiver is currently using to find the satellites is shown at the bottom of this screen.
-
Page 14: Enter Manually
If you can get it within one degree of your actual position, that will be fine.) When it’s set, press the ENT key. The AccuMap 12 accepts your entry and returns to the GPS setup menu. Now change the local time and date if they’re incorrect on this screen by highlighting the appropriate label and press- ing the right arrow key. -
Page 15: Position/Navigation Displays
DO NOT NAVIGATE WITH THIS UNIT UNTIL THE DATA STOPS FLASHING! POSITION/NAVIGATION DISPLAYS The AccuMap 12 has navigation, mapping, and windows group modes. These screens were designed to show data that is used most often. Many of the navigation, mapping, and windows screens can be customized to show data other than the ones chosen by the factory. -
Page 16: Navigation Screens
Navigation Screens There are two navigation screens. Nav screen number one shows a graphi- cal view of your trip, the other screen shows all navigation details in large digital numbers. Nav Screen #1 This screen is dominated by a compass rose. Your track (direction of travel) is indicated by an arrow pointing down toward the compass rose at the top center of the screen. -
Page 17: Course Deviation Indicator (Cdi)
course has nothing to do with your present position, except for your start- ing location.) It’s shown as a dotted line on the NAV 1 display. This is shown as a reminder so that if you deviate from your original course, you can easily return to it. -
Page 18: Mapping Screens
Mapping The AccuMap 12 has a ground map of the world built inside. This map has the majority of its detail in far southern Canada, the continental United States and Hawaiian islands, northern Mexico, the Bahamas, and Bermuda. -
Page 19: Map Cursor
MAP 1 MAP 2 MAP 3 To view the other mapping screens, press the PAGES key. Press the up or down arrow key to highlight the "MAP 1" label. Now press the right or left arrow key to select a different mapping screen. Press the EXIT key to erase the pages menu. -
Page 20: Autozoom
AUTOZOOM Generally, when you travel using a mapping receiver like the AccuMap 12, you spend some amount of time zooming in and out, looking at detail or the whole route between the start and destination. The AccuMap 12 has an autozoom feature that eliminates much of the button pushing that competitive units force you to make. -
Page 21: Earth Map Options
To use the autozoom feature, first set the AccuMap 12 up to navigate to a waypoint. (See the Navigation section for more details.) Next, simply press the MENU key, then use the up or down arrow keys to highlight the “AUTOZOOM OFF/ON”... -
Page 22: C-Map Options
This doesn’t erase the icons, it merely “hides” them. Detail Cartridge The AccuMap 12 has two cartridge slots in its back. Either one can hold a IMS SmartMap, Navionics, or C-MAP cartridge. The unit can only show detail from one type of cartridge at a time. In other words, you can’t show detail from an IMS SmartMap and a C-MAP cartridge at the same time. -
Page 23: Navionics Options
Press the EXIT key when you’re finished to erase this menu. Fill With Gray When the AccuMap 12 is first turned on, all water is filled with gray to distinguish it from land, which is clear. (See below) To make the land fill with gray and water remain clear, press the down arrow key until the “Fill... - Page 24 NORTH-UP TRACK-UP that keeps the map at the same orientation as your initial bearing to the waypoint. In the example above, we're travelling northeast towards waypoint num- ber 2. In the north-up view, the present position indicator appears to move towards the upper right corner of the screen.
-
Page 25: Plotter Options
PLOTTER OPTIONS Plot Trail The line extending from your present position is called a plot trail. This unit lets you custom- ize the plot trail with the following menu items. All of the items on the Plotter Options menu affect the plot trail. Plot Trail Flashing Since there can be many lines on the map- ping display, it’s helpful at to make the plot trail... - Page 26 Save Current Plot Trail You can save up to two plot trails in memory. The receiver saves these trails even if power is removed from the unit. To save your current plot trail, highlight the “Save Current Plot Trail” menu using the arrow keys.
-
Page 27: Icons
ICONS The AccuMap 12 has fifteen symbols or “icons” available. These icons can be placed anywhere on the mapping screens. These can be used to mark fishing spots, boat ramps, rest stops, airports, or whatever. You can place an icon at your present position, or at the cursor location. -
Page 28: Windows
Erase Icons To erase an icon from the screen, first press the MENU key, then select the “Icon Options” menu as shown at right. There are three methods used to erase icons from the screen. You can delete all of the icons, regardless of their position on the display, de- lete all of the icons of a certain type, or selec- tively erase individual icons. -
Page 29: Satellite Information Screen
Special Windows Although most of the windows used in the AccuMap 12 are self-explana- tory, there are several windows that have special features or can be used in unique ways. The following section describes these windows. -
Page 30: Clock
in or out, set options, and other functions on one map, without affecting the other. When you press the MENU, ZOOM IN or OUT, or ENT keys, a message appears asking you which display you want to affect. On the screen shown at right, the menu key was pressed. -
Page 31: Timers
Note: The AccuMap 12 must be on in order for the alarms to work. In other words, if you set the alarm to go off at 7:00 a.m., then the AccuMap 12 will have to be on at 7:00 a.m., also. -
Page 32: Reprogram Boxes
Using the right and left arrow keys, move the black box to the first number in the time that you want to set. (The time is in hours, minutes, and seconds) Now press the up or down ar- row keys until the desired number shows. Con- tinue until the time shown in the display is cor- rect, then press the ENT key. - Page 33 REPROGRAMMING BOXES SELECT “REPROGRAM BOXES” FROM MAIN MENU. THE FIRST BOX IS PLACED AT THE TOP. AFTER MESSAGES ERASE THEMSELVES, YOU’RE RETURNED TO THE BOX SELECTION SCREEN SHOWN IN STEP 2. THIS MESSAGE APPEARS AFTER THE LAST BOX IS SELECTED . IT AUTOMATI- CALLY ERASES.
-
Page 34: Waypoint Database
“System Setup” section. WAYPOINT DATABASE The AccuMap 12 gives you the capability of creating your own database of locations, called “waypoints”.. You can save your present position, cur- sor position, or enter a latitude/longitude and save it as a waypoint. The AccuMap 12 can store up to 250 waypoints. -
Page 35: Saving Present Position As A Waypoint (Select Waypoint #)
point number it just used. This also places you in the waypoint menu as shown at right. Wait a few seconds and the menu will clear automatically or press the EXIT key to erase the waypoint menu. Saving Your Present Position as a Waypoint (Select Number Method) The methods shown above don’t let you choose the waypoint number. -
Page 36: Edit Waypoint Lat/Lon
WAYPOINT NAMES The AccuMap 12 lets you assign a name to each waypoint. The name can have up to twelve char- acters. To name a waypoint, first select the way- point number that you wish to name. -
Page 37: Waypoint Icons
Press the up or down arrow keys to select the first letter in the name. Press the right arrow key to move the black box to the next position in the name. Re- peat this sequence until you’ve entered all of the letters in the waypoint name. -
Page 38: Distance Between Waypoints
10. Press the EXIT key to erase this screen when you’re finished. Distance Between Waypoints The AccuMap 12 can easily give you the distance between two user waypoints. To do this, first press the WPT key, select the User Waypoints menu, then highlight the “Next Page”... -
Page 39: Waypoint Options
You can connect several user waypoints together to form a route. When you recall the route, the AccuMap 12 will show you navigation information to the first waypoint in the route, then when you reach that waypoint, it switches to the next way- point, and so on until you reach the last waypoint in the route. -
Page 40: Select Waypoints - Waypoint List
press the left or right arrow keys until the desired route number appears. In this example, however, we’ll use route number one. Beneath the route number is the route name menu. If you wish to name the route, highlight the “NAME” field, then press the right arrow key. Use the arrow keys to name the route, then press the ENT key when you’re finished. -
Page 41: Select Waypoints - From Map
Continue selecting waypoints until the route is com- plete. As you add waypoints to the list, the bearing and distance from each waypoint to the one previ- ous is shown to the right of the waypoint’s name. In this example, the second waypoint in the list is 104 degrees and 30.75 miles from the first way- point in the list. -
Page 42: Following A Route
As you travel to the first waypoint, the unit shows navigation data to that waypoint. When you enter the radius around the waypoint set by the ar- rival alarm, the AccuMap 12 automatically switches to the next waypoint on the list, showing navigation data to that waypoint, and so on until the last waypoint on the route list has been reached. -
Page 43: Delete A Route
NAVIGATION Navigate To a Waypoint The AccuMap 12 makes it easy to navigate to any waypoint in two simple steps. First, select the des- tination from the database, then press the key next to the “NAV GO TO ...” label. The unit immediately shows navigation information to the selected loca- tion. -
Page 44: Navigate To Cursor Position
Navigating to a cursor location The AccuMap 12 lets you navigation to a location without storing it in the waypoint database by using the map and cursor. To do this, first switch to any map screen. Map number 1 shown at the top of the next page is used in this example. -
Page 45: Cancel Navigation
TRACK HOLDING Your AccuMap 12 has a special feature called "Track Holding" that pre- vents the unit from showing random numbers on the navigation screens when you're travelling less than 3 miles per hour. These random numbers are mostly caused by S/A (Selective Availability). -
Page 46: Gps Corrections
All datums are named. The GPS system is based on the WGS-84 datum, which covers the entire world. Other datums may also cover the entire world, or just a small portion. By default, the AccuMap 12 shows your position on the map using the WGS-84 datum. -
Page 47: Pcf (Position Correction Factor)
.047 minutes north latitude. Using the PCF feature, you can make the AccuMap 12 match the chart you’re using. If you move, the unit will continuously add the change to all posi- tion, navigation, and mapping displays. -
Page 48: Units Of Measure
EXIT key. Position Format The AccuMap 12 can show the position in degrees, minutes, and hun- dredths of a minute (36 28.700') or degrees, minutes, and seconds (36 28' 40.9". It can also show position in UTM’s or Universal Transverse Mer- cator projection. -
Page 49: Nmea/Dgps
Press the EXIT key to select the format and erase the menu. NMEA / DGPS The AccuMap 12 transmits data through the data port in the back of the unit using NMEA 0183 format, version 1.5 or 2.0. This data is used by other electronic devices such as marine autopilots for position and steer- ing information. - Page 50 (in bits per second). If you are using a Starlink receiver, turning the auto mode on causes the AccuMap 12 to auto-detect the fre- quency and bit rate. To change one of these settings, simply highlight...
-
Page 51: Dgps Receiver
NDC-1 TO ACCUMAP 12 ACCUMAP’S WIRES WHITE WIRE RED WIRE TO +12V SHIELD WIRE GROUND WIRES OTHER DEVICE’S WIRES OTHER DEVICE’S RECEIVE DATA WIRE NDC-1 TO ACCUMAP 12 ACCUMAP’S GREEN WIRE WIRES WHITE WIRE RED WIRE TO +12V SHIELD WIRE... -
Page 52: Serial Communication Setup
8 data bits. Press the EXIT key to erase this menu. RESET OPTIONS To return the AccuMap 12 to its original factory settings, press the up or down arrow keys until the “Preset Options” menu on the System Setup screen is surrounded by the black box. -
Page 53: Name Input
ENT key. You I.D. is saved in permanent memory. The name or number you save is written into the AccuMap 12 Sport’s permanent memory. You won’t be able to change it once you enter it, unless you return the unit to the factory. -
Page 54: Gps Update Rate
Eagle customer service department. Execute GPS Cold Start When the AccuMap 12 is turned on for the first time “out of the box”, it automatically does a “cold-start”. A cold start means the unit doesn’t have any information that helps it determine which satellites are available. -
Page 55: Alarms
ALARMS The AccuMap 12 has several alarms. You can set an arrival alarm to sound a warning tone when you cross a preset distance from a waypoint. For example, if you have the arrival alarm set to .1 mile, then the alarm will sound when you come within .1 mile of the recalled waypoint. -
Page 56: Messages
When turned on, the position message (shown at right) appears for a few seconds whenever the AccuMap 12 locks onto the satellites and shows a position. It also appears when the unit loses the lock onto the satellites and cannot navigate. Press- ing the EXIT key erases these messages. -
Page 57: Contrast
EXIT key to erase this menu. SIMULATOR A simulator is built into the AccuMap 12 that has several options. You can use nearly all of the unit’s features - even save and recall waypoints. This is useful for trip planning. - Page 58 “WPT#” label until the desired starting waypoint number appears. Now highlight the “SET AS SIM START” label and press the right arrow key. The AccuMap 12 returns to the Simulator Setup menu. Use Arrow Keys to Steer This option lets you change both the course and speed on the screen as the simulator is running.
-
Page 59: Batteries
BATTERIES When using the AccuMap 12 with batteries, the backlights automatically turn off after 30 seconds. (Remember, you can change the time interval.) Pressing the PWR key turns the lights on again. If the batteries become weak, the message shown at right appears on the display. -
Page 60: Window Boxes
WINDOW BOXES These boxes are used on Map 3 and Nav 1 only. -
Page 62: Window Groups
WINDOW GROUPS This is a listing of window groups A through T. -
Page 64: Ups Return Policy
There are six easy steps: 1. Call Eagle at the toll-free number on the back of this manual for a Return Authorization (RA) number and instructions about what acces- sories to return. Do not return a product to the factory without a Return Authorization (RA) Number! 2. - Page 65 2) LEI Extras, Inc. P.O. Box 129 Catoosa, OK 74015-0129 or call 800-324-0045 (USA orders only.) Eagle Electronics may find it necessary to change or end our shipping policies, regulations, and special offers at any time. We reserve the right to do so without notice.
-
Page 66: Accumap 12 Warranty
EAGLE ELECTRONICS FULL ONE-YEAR WARRANTY “We", “our”, or “us” refers to EAGLE ELECTRONICS, a division of LEI, the manufacturer of this product. “You” or “your” refers to the first person who purchases this product as a consumer item for personal, family, or household use. -
Page 67: Database License Agreement
THIS IS A LEGAL AGREEMENT BETWEEN THE END-USER WHO FIRST PURCHASES THIS PRODUCT AS A CONSUMER ITEM FOR PERSONAL, FAMILY, OR HOUSEHOLD USE (“YOU”) AND EAGLE ELECTRONICS (“WE”, “OUR”, OR “US”). USING THE PRODUCT ACCOMPANIED BY THIS LICENSE AGREEMENT CONSTITUTES ACCEPTANCE OF THESE TERMS AND CONDITIONS. -
Page 68: Databases Limited Warranty
DATABASES LIMITED WARRANTY “We”, “our”, or “us” refers to Eagle Electronics, the manufacturer of this product. “You” or “your” refers to the first person who purchases the product as a consumer item for personal, family, or household use. The Databases Limited Warranty applies to the one or more databases that your porduct may contain. -
Page 69: Accessory Ordering Information
(Canadian Customers Only) We back your investment in quality products with quick, expert service and genuine Eagle replacement parts. If you need service or repairs, contact the Eagle Factory Customer Service Department at the toll-free number listed below. A technician may be able to solve the problem and save you the inconvenience of returning your unit. -
Page 70: How To Obtain Service - U.s.a. Only
Your unit is covered by a full one-year warranty. (See page 62 inside this manual for complete warranty details.) If your unit fails and the failure is not covered by the original warranty, Eagle has a flat-rate repair policy that covers your unit and accessories packed with the unit at the factory.
Need help?
Do you have a question about the 12 and is the answer not in the manual?
Questions and answers