Table of Contents
Advertisement
Quick Links
BLU-RAY DISC & HDD RECORDER
SR-HD2500US
STANDBY/ON
INSTRUCTIONS
OPEN/
CLOSE
STOP
REV
PLAY
FWD
PAUSE
REC
H
D
D
REC
BD
R
E
C
REC
INPUT
MIDIA SELECT
DIRECT/
MODE
SELECT
HDD
BD/SD
MONITOR
RESET
HDV/DV IN
For Customer Use:
Enter below the Model No. and Serial
No. which are located on the rear of
cabinet. Retain this information for
future reference.
Model No.
Serial No.
.
LST1302-001A
Advertisement
Table of Contents

Related Manuals for JVC SR-HD2500US


Summary of Contents for JVC SR-HD2500US
- Page 1 BLU-RAY DISC & HDD RECORDER SR-HD2500US INSTRUCTIONS OPEN/ CLOSE INPUT MIDIA SELECT DIRECT/ STANDBY/ON MODE SELECT BD/SD MONITOR RESET STOP PLAY PAUSE HDV/DV IN For Customer Use: Enter below the Model No. and Serial No. which are located on the rear of cabinet.
-
Page 2: Safety Precaution
Safety Precaution Dear Customer, WARNING: Thank you for purchasing the JVC BLU-RAY DISC & HDD TO PREVENT FIRE OR SHOCK HAZARD, DO NOT EXPOSE recorder. Before use, please read the safety information and THIS UNIT TO RAIN OR MOISTURE. precautions to ensure safe use of your new unit. -
Page 3: Important Safety Instructions
Safety Precaution IMPORTANT SAFETY INSTRUCTIONS CAUTION: Changes or modifications not approved by JVC could void user’s 1) Read these instructions. authority to operate the equipment. 2) Keep these instructions. 3) Heed all warnings. Declaration of Conformity 4) Follow all instructions. - Page 4 Safety Precaution DISCLAIMER OF LIABILITY JVC shall not be liable for any loss relating to the unit’s failure to properly record, store or playback any content (video, audio or otherwise) for any reason whatsoever. Any applicable warranties shall only cover replacement or repair of the effected unit, and shall not apply to recovery or replacement of lost content.
-
Page 5: Table Of Contents
Contents Playing Still Images (JPEG) ..........58 Contents Changing Playback Settings ........... 59 Playback Settings Menu ..........59 Audio/subtitle settings ..........59 Safety Precaution Playback settings ............59 Video settings .............. 60 Contents Editing Getting Started Editing ................61 Key Features ..............6 Entering Characters ............ -
Page 6: Getting Started
Note : States precautions to be taken during operation. camcorders : Indicates the page numbers or items to refer to. In addition to AVCHD, HDV and DV, JVC Everio file formats are also compatible, and digital dubbing can be done. Memo: The displays of operable media are highlighted. -
Page 7: Other Precautionary Notes
Using this unit with dust accumulated inside may result in fire. It is particularly effective to perform servicing before the humid rainy season. Do not connect any video cameras that are not made by JVC to the USB terminal Doing so may result in malfunction. -
Page 8: Hard Disk Drive (Hdd)
Getting Started Hard Disk Drive (HDD) SD Cards Hard disk drive (HDD) Precautions for handling SD and SDHC cards The HDD rotates at a high speed whenever the power is turned “On”. Note: Pay particular attention to the following precautions when The disc operation display icon appears blinking and using this unit. -
Page 9: Discs
Getting Started Discs When using DVD-RW discs Formatting is required. Format the disc using this unit. Format using “VR MODE” or “VIDEO MODE”. BD recording formats BDAV mode Videos can be edited (chapter edit etc) and new videos can be added to the disc. This format is suitable for recording videos. -
Page 10: Getting Started
Getting Started Discs (Continued) Discs that enable both dubbing and playback Disc Type Recording Format Format Finalize Repeated Use (Reformat) BD-RE BDAV mode BDMV mode BD-R BDAV mode BDMV mode DVD-RW Video mode VR mode DVD-R Video mode VR mode Discs that enable playback only Disc Type Description... -
Page 11: Precautions On The Use Of Discs
DVD recording side of the dual disc. Use genuine JVC discs The best performance may not be obtained for some discs. It is recommended that genuine JVC discs be used to ensure the best results. Correct way to hold a disc Power Cable Do not unplug the cable during recording or playback. -
Page 12: On-Screen Displays
Getting Started On-screen Displays SDI time code display The time code is displayed during recording of SDI input signals. Status display You can specify whether to display the time code, and also where to display it. Displays the current settings and operating status (such as For details, refer to “TIME CODE INPUT SETTING”... -
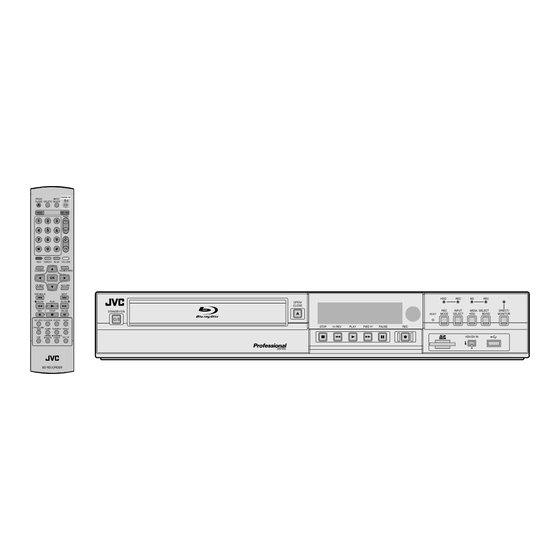
Page 13: Name And Function Of Parts
Getting Started Name and Function of Parts Front panel A [ A ] button N Playback control buttons Turn On/Off the power. [ I ] button B Disc tray Plays back the data. [ o ] button C [ M ] button Stops playback/recording. -
Page 14: Display Window
Getting Started Name and Function of Parts (Continued) Display window English messages appear for a number of operations. HDD/DISC remaining level display (Examples) Dubbing display : When the power plug is inserted HELLO Disc status display : When reading the disc READING HDMI output display ONSCREEN : Upon moving to the playback navigation... -
Page 15: Remote Control
Getting Started I [ J / K / H / I ] Remote control The cursor can be moved to select an item. J [OPTION] Displays the option screen. K [ S ] Move to the chapter just before the current chapter. L [ O ] Fast reverses the video and starts slow playback. -
Page 16: Remote Control Codes
Getting Started Name and Function of Remote control codes Parts (Continued) By setting a remote control code for the unit and remote control, you can prevent two recorders from operating simultaneously using the remote control for this unit. e [RETURN] (the setting for the unit and remote control at time of purchase Returns to the previous screen without applying the selection is “REMOTE CONTROL 3”.) -
Page 17: Preparation
Preparation Memo: Connecting a Monitor After connecting a component video cable, change the unit setting to “COMPONENT OUTPUT”. To display video images from this unit, connect it to a monitor. For more details, refer to “COMPONENT OUTPUT” (A page This unit supports connections using “HDMI cable”, 85) . -
Page 18: Connecting An Amplifier
Preparation Connecting a Video Deck Connecting using an SDI cable (BNC) or Other Equipment Connect using an SDI cable (sold separately). You can transmit both digital video and audio signals with a single cable. Connecting a video camera Connecting via the i.LINK terminal INPUT MIDIA SELECT DIRECT/... -
Page 19: Connecting External Devices
Preparation Connecting External Connecting the Power Devices Supply Connect the supplied power cable to this unit as follows. Connecting a wired remote control 1 Connect the supplied power cable to the AC IN terminal of this unit Using a wired connection enables stable control of this unit from an external device. -
Page 20: Setting And Displaying Date/Time
Preparation 4 Select “CLOCK SET”, and press the [OK] button Setting and Displaying The Clock Set menu screen appears. Date/Time Set the date/time of the built-in clock as follows. The recording date/time is stored on the disc. Setting the date/time Set the date/time of the built-in clock as follows. - Page 21 Preparation 6 After setting is complete, select “ENTER”, and 3 Select “CLOCK SET/DISPLAY”, and press the press the [OK] button [OK] button Doing so exits date/time setting, and returns to the initial The Clock Set/Display menu screen appears. screen. 4 Select “DATE DISPLAY”, and press the [OK] Memo: button The value for seconds cannot be set.
- Page 22 Preparation 4 Select “TIME DISPLAY CHOICE”, and press the Setting and Displaying [OK] button Date/Time (Continued) The Time Display menu screen appears. Memo: The date display style will be applied in the following information displays. Recording date of the title that is shown in the playback navigation screen (The recording date will be shown in place of the title if the title has not been input).
-
Page 23: Setting The Time Code
Preparation 4 Select “TIME CODE” or “DATE & TIME” Setting the Time Code You can add a time code while recording SDI input signals with this unit. Memo: If recording is performed with the time code added, the time code will be recorded together with the video. In this case, you cannot hide the time code display on the recorded movie. - Page 24 Preparation 4 Press the [ J ] or the [ K ] button to select the Setting “TIME CODE DISPLAY POSITION” display position 1 Press the [SET UP] button on the remote control unit The Settings menu screen appears. LOWER LEFT : Sets the time code display position to the bottom left.
-
Page 25: Dubbing/Importing
Make use of a BD/DVD disc that For MOV format videos, only videos in MOV format (SP supports high-speed recording. mode and HQ mode) taken using JVC ProHD camcorder Dubbing in a specific recording mode GY-HM700/100 are compatible. There is no guarantee for importing videos taken on devices by other company. -
Page 26: Dubbing Chart
“4:3”. MOV* : MOV files that are taken in SP mode and HQ mode using the JVC ProHD Camcorder GY-HM700/100 Dubbing the picture data from the HDD... -
Page 27: Formatting
Note: If a disc is formatted using an equipment not manufactured 3 Select “FORMAT” from “BD/DVD” by JVC, the disc may not be read correctly even though it corresponds to the chart below. DVD : A format selection screen appears. - Page 28 Dubbing/Importing Formatting (Continued) Cancel formatting 1 Press the [OPTION] button while formatting 5 Select “YES”, and press the [OK] button in the format confirmation screen 2 Select “STOP” and press the [OK] button A confirmation screen to stop formatting appears. Formatting starts.
- Page 29 Dubbing/Importing 4 Select “YES”, and press the [OK] button Formatting an SD Card 1 Insert the SD card to be formatted into the [SD SLOT] With the terminal side facing down, insert the SD card until a “click” sound is heard. Formatting starts.
-
Page 30: Recording Modes
Dubbing/Importing Recording Modes Maximum recording time for each recording mode You can specify a recording mode according to the intended use. Setting the video to a high picture quality shortens the maximum recording time, while setting to a lower picture quality lengthens the recording time. Refer to the following table for the maximum recording time in the respective modes. - Page 31 FR mode is displayed as the recording mode in the following cases. FR mode during import into HDD During import of SD-VIDEO (JVC Everio MPEG2 PS) titles via high-speed dubbing. During import of data via high- speed dubbing from DVD-VR discs recorded using other units.
-
Page 32: Importing Data From A Bd/Dvd To The Hdd
Dubbing/Importing Importing Data from a BD/ Full import DVD to the HDD 1 Select “FULL IMPORT” in the import selection screen, and press the [OK] button A check mark is added to the “FULL IMPORT” item. Data can be imported from a BD/DVD to the HDD as follows. 2 Select “NEXT”, and press the [OK] button File formats that can be imported : BD-MV, BD-AV, AVCHD, DVD-VR, DVD-... - Page 33 Dubbing/Importing 3 Select “RECORDING MODE”, and press the [OK] 5 Select “START”, and press the [OK] button button Importing of the titles starts. A pop-up menu appears. After titles are successfully imported, a “DUBBING IS COMPLETED” message appears on the monitor. 4 Select the “RECORDING MODE”...
- Page 34 Dubbing/Importing 1 Select “RECORDING MODE”, press the [OK] Importing Data from a BD/ button, and select “RECORDING MODE” from DVD to the HDD the recording mode selection screen Select the “RECORDING MODE” option. (Continued) 7 Select “START”, and press the [OK] button For more details, refer to “Recording Modes”...
-
Page 35: Importing Data From A Usb-Compatible Device To The Hdd
Copy the data from the camera’s internal memory or HDD onto the SD card. Full import If using a JVC camcorder that has two memory card slots: 1 Select “FULL IMPORT” in the import selection Put the memory card that has the required data in slot A. - Page 36 Dubbing/Importing 4 Select “START”, and press the [OK] button Importing Data from a USB- compatible Device to the HDD (Continued) Importing of the titles starts. After titles are successfully imported, a “DUBBING IS COMPLETED” message appears on the monitor. Importing of titles starts according to the sequence in the created title list.
-
Page 37: Importing Data From An Sd Card To The Hdd
For MOV format videos, only videos in MOV format (SP Importing of the titles starts. mode and HQ mode) taken using JVC ProHD camcorder After titles are successfully imported, a “DUBBING IS GY-HM700/100 are compatible. There is no guarantee for COMPLETED”... - Page 38 MOV* : MOV files that are taken in SP mode and HQ Select “CANCEL” from the menu, and press the [OK] mode using the JVC ProHD Camcorder GY- button to cancel importing of a title. HM700/100 Alternatively, you can press the [RETURN] button to cancel importing and return to the initial screen.
-
Page 39: Importing Data From An I.link-Compatible Device To The Hdd
3 Select “HDV/DVhHDD” in the importing screen, Doing so may result in loss or damage of the titles. For example, during full import of HDV content from JVC GY- and press the [OK] button HD100 via i.LINK connection, the beginning of the image may A check mark is added to the “HDV/DVhHDD”... - Page 40 Dubbing/Importing 3 Select “RECORDING MODE” and press the [OK] Importing Data from an button to display the pop-up menu i.LINK-compatible Device to Select “XP”, “SP”, “LP”, or “EP” from the “RECORDING MODE” option. the HDD (Continued) Select “XP”, “SP”, “LP”, or “EP” from the “RECORDING MODE”...
-
Page 41: Dubbing A Title From The Hdd To A Bd/Dvd
Dubbing can also be performed from the Playback When a BDAV/BDMV disc is created (high-speed Navigation screen. dubbing) by importing content captured in the JVC GY- ① Select the titles to dub, and press the [OPTION] HM700/100 SP mode and HQ mode. - Page 42 Dubbing/Importing Memo: Dubbing a Title from the Press the [MARK] button. A check mark will appear beside HDD to a BD/DVD the title. All titles with a check mark can be added to the list at the (Continued) same time. You can perform the following editing operations by Memo: selecting a title from the dubbing title list and pressing the...
- Page 43 Dubbing/Importing ② Select “REPEAT”, and choose either “OFF” or “ON” Memo: The background image of the disc menu can be selected “OFF” (only for DVD-Video and BD-MV). The disc will stop and the menu will be displayed after all The following sizes are recommended for still images. the titles are played back.
-
Page 44: Dubbing Still Images From The Hdd
Dubbing/Importing 4 Select “NEXT”, and press the [OK] button Dubbing Still Images from Memo: the HDD A message appears on the monitor when dubbing cannot be performed in the following cases. When this occurs, replace the disc or SD card with one that is usable. Still images stored in the internal HDD can be dubbed to a BD-RE or an SD card as follows. - Page 45 Dubbing/Importing 6 Select “START”, and press the [OK] button Dubbing from the Playback Navigation screen Dubbing can also be performed from the Playback Navigation screen. 1 Select the still images to dub, and press the [OPTION] button Dubbing starts. A progress bar is displayed during the dubbing process.
-
Page 46: Enabling Playback On Other Devices (Finalizing)
Dubbing/Importing Memo: Enabling Playback on To cancel the finalizing operation, select “NO” and press Other Devices (Finalizing) the [OK] button. 5 Setting the top menu items DVD-R and DVD-RW discs may need to be finalized before they can be played on other DVD players. Memo: Discs in the Video mode becomes a DVD-Video format with a title menu after finalizing. -
Page 47: Unfinalizing A Disc
Dubbing/Importing ③ Select “CHANGE DISC MENU BACKGROUND” to Unfinalizing a disc select a background image for the top menu Only DVD-RW discs that are finalized on this unit can be You can register and use a background image of your unfinalized. -
Page 48: Copying The Entire Disc
Dubbing/Importing 4 Select “NEXT”, and press the [OK] button Copying the Entire Disc The disc tray will open automatically. 5 Set the source BD or DVD on the disc tray Copying the entire disc allows all content on a BD (BDMV) or DVD (AVCHD, DVD-Video) to be copied onto another disc. -
Page 49: Recording Using External Inputs
Dubbing/Importing 9 Complete the entire disc copying Recording Using External After copy is complete the tray will open automatically, and Inputs copy of the entire disc ends. Videos on an external device that is connected to i.LINK (HDV/ DV) or video / S-video input can be recorded to the HDD. BD, DVD can be recorded from the [VIDEO]/[S-VIDEO] or SDI input. - Page 50 Dubbing/Importing RECORDABLE MEDIA RECORDING MODE RECORDABLE MEDIA DVD-R/RW BD-R/RE (VR format) (BD-AV format) AF (HD) AN (HD) AL (HD) AE (HD) XP (SD) SD-SDI/DV/L-1 SD-SDI/DV/L-1 SD-SDI/L-1 SP (SD) SD-SDI/DV/L-1 SD-SDI/DV/L-1 SD-SDI/L-1 LP (SD) SD-SDI/DV/L-1 SD-SDI/DV/L-1 SD-SDI/L-1 EP (SD) SD-SDI/DV/L-1 SD-SDI/DV/L-1 SD-SDI/L-1 DR1(HD) HD-SDI...
-
Page 51: Playing Back
“Importing Data from an SD Card to the HDD” (A page 37) . Operating Playback Navigation MOV* : MOV files that are taken in SP mode and HQ mode using the JVC ProHD Camcorder GY-HM700/100 Playing a video/still image Plays the selected video/still image. - Page 52 Playing Back Switching between thumbnail and list Switching between video and still image displays displays You can switch between the thumbnail display and list display You can switch the display between the video thumbnail list of a video. screen and still image thumbnail screen. When the video thumbnail list screen is displayed When the video thumbnail list screen is displayed Press the [RED] button to display the title list screen.
-
Page 53: Option Menu List
Playing Back EDIT INFO Using Playback Navigation Switches to the menu screen of the sub-items. (Continued) MODIFY TITLE NAME/MODIFY GROUP NAME Switches to the rename screen for the selected title/ 2 Select an operation option, and press the [OK] group name. button For details, refer to “Changing the Title/Group Name”... -
Page 54: Video Playback Operation
Playing Back Video Playback Operation Frequently used button operations [ I ] button If the stop position (resume point) is memorized in the selected video, pressing the button plays back the video from this position. The video may not resume playback depending on the media and settings used. -
Page 55: Video Playback Operation
Playing Back Video Playback Operation Useful button operations (Continued) [PB MODE] button Displays the Playback Settings screen, which enables you to modify the settings. [ v ] button For details, refer to “Changing Playback Settings”. During normal playback, 1.3x playback, slow motion [AUDIO] button playback, fast forward, or fast reverse, pressing the button moves the playback position forward by about 30 seconds. -
Page 56: Playing Videos On A Bd/Dvd
Playing Back Playing Videos on a BD/ Playing an EverioBackup Disc* EverioBackup* : Data disc containing high-definition videos that are recorded in the MPEG2 format using a DVD writer for Everio. Playback starts automatically after a BD/DVD is set. 1 Set the disc on the disc tray If the Auto Play feature is disabled, play the title using Playback Navigation. -
Page 57: Playing Videos On The Hdd
VIDEO, MOV*) in the SD card, press the [RED] button to select the format you want to display. MOV* : MOV files that are taken in SP mode and HQ mode using the JVC ProHD Camcorder GY- HM700/100 Videos can also be played back without starting up Playback Navigation. -
Page 58: Playing Still Images (Jpeg)
Playing Back Playing Still Images (JPEG) Enabled button operations during still image playback Still images stored on the HDD/BD/DVD/SD card can be [ I ] button played back using Playback Navigation. Pressing the button when a title/group is selected starts playback of the still images in the title/group in a slideshow. -
Page 59: Changing Playback Settings
Playing Back Changing Playback Playback settings Settings Displaying the playback settings menu 1 Press the [PB MODE] button on the remote control unit during the playback of a title The Settings Menu screen appears. The playback settings menu can only be displayed during the playback of a title. -
Page 60: Video Settings
Playing Back Video settings PROGRESSIVE OUTPUT The following items can be set. Setting Description Values AUTO1 Displays video images after they are converted according to the film material. AUTO2 In addition to the “AUTO1” option, support is also provided for progressive videos recorded at 30 frames per second. -
Page 61: Editing
Editing Editing Before editing This unit mainly edits video images stored on the HDD. To edit video images stored in a disc or SD card, do so after importing them to the HDD. Data on a finalized disc cannot be edited. To edit a finalized disc, you have to either unfinalize the disc, or do so after importing the data to the HDD. -
Page 62: Entering Characters
Editing Entering Characters Entering characters 1 Enter characters using the [0]-[9], [Z] or [#] Names can be changed or given to stored videos or groups. buttons You can enter characters while referring to the input on the 2 After character input is complete, press the monitor. -
Page 63: Grouping
Editing 5 Select “GROUP”, and press the [OK] button Grouping The selected titles and groups are now grouped together. Multiple titles stored on the HDD can be combined into a group. Memo: Only video data stored on the HDD can be grouped. Grouping 1 Press the [NAVIGATION] button on the remote control unit... - Page 64 Editing 4 Select “YES”, and press the [OK] button 3 Press the [OPTION] button on the remote control unit All titles within the selected group are ungrouped. A pop-up option list appears. 4 Select “DO NOT GROUP”, and press the [OK] button A confirmation screen for group exclusion appears.
-
Page 65: Changing The Title/Group Name
Editing Changing the Title/Group Deleting a Title/Group Name Titles/groups can be deleted. When you delete a group, all titles contained within the group are deleted. The saved title/group name can be changed as follows. Memo: Memo: When a title/group is deleted from the HDD, BD-RE, or A title/group name can be added to video data stored on DVD-RW, the remaining space on the media increases the HDD, BD-RE, BD-R, DVD-RW, or DVD-R, and the... -
Page 66: Turning On Title/Group Protection
Editing 4 Select “PROTECT”, and press the [OK] button Turning On Title/Group If only a single title was selected in step 2, a confirmation Protection screen for title protection will appear. Titles/groups can be protected. Editing and deletion cannot be performed on protected titles/ groups. -
Page 67: Turning Off Title/Group Protection
Editing 4 Select “UNPROTECT”, and press the [OK] button Turning Off Title/Group If only a single title was selected in step 2, a confirmation Protection screen for turning off protection will appear. Protection of a title/group can be turned off. Titles/groups can be edited and deleted after their protection is turned off. -
Page 68: Creating A Playlist
Editing 5 Edit the playlist accordingly by selecting Creating a Playlist chapters from the source title according to your preference A playlist can be created from the video titles on the HDD. Edit the playlist. Playlists can only be created for titles that are stored on the For details, refer to “Editing the playlist”. -
Page 69: Editing A Thumbnail
Editing 4 Select “CHANGE”, and press the [OK] button Editing a Thumbnail The displayed still image now becomes the thumbnail image. Thumbnails (index images) can be changed to a still image 5 Select “CONFIRM”, and press the [OK] button according to your preference. Doing so ends the editing of thumbnails. -
Page 70: Editing A Chapter
Editing Editing a Chapter Editing a chapter 1 Press the [EDIT] button on the remote control Creating a chapter mark for a saved title enables you to find a unit specific scene within the title. The Edit menu screen appears. Memo: 2 Select “CHAPTER EDIT”, and press the [OK] All chapter editing functions can be performed on titles... - Page 71 Editing Editing a Chapter Deleting a video chapter 1 Select the chapter for which you want to delete (Continued) the video from the chapter edit screen 2 Press the [DELETE] button on the remote control Chapter mark insertion (divide chapter) unit 1 Play the video, and press the [W] button to stop A confirmation screen for deleting the chapter appears.
-
Page 72: Dividing
Editing 6 Select “EXECUTE”, and press the [OK] button Dividing A confirmation screen for performing dividing appears. You can select a saved title and divide it into two titles. Memo: Dividing can only be applied to titles stored on the HDD. Titles that are protected cannot be divided. -
Page 73: Delete Scenes
Editing Dividing (Continued) Delete Scenes Memo: Unwanted scenes of a saved title can be deleted. To cancel the dividing operation, select “CANCEL” and Doing so helps to increase the free space on the disc. press the [OK] button. Memo: Alternatively, you can press the [RETURN] button to cancel Deleting scenes can only be applied to titles stored on the the divide operation and return to the initial screen. - Page 74 Editing 5 Select “EXECUTE”, and press the [OK] button ① Play the video, and press the [W] button at the point where you want to start the delete operation A confirmation screen for performing scene delete appears. ② Select “START”, and press the [OK] button 6 Select “EXECUTE”, and press the [OK] button Scene deletion starts.
-
Page 75: Changing The Disc Name
Editing Changing the Disc Name Changing the Shooting Date/Time The name of a BD or DVD disc can be changed as follows. 1 Set the BD or DVD for which the disc name is to The date/time of the stored video can be changed as follows. be changed on the disc tray The shooting date/time of videos stored on the HDD can be 2 Press the [MEDIA MANAGE] button on the... -
Page 76: Mode Conversion
Editing 5 Select “ENTER”, and press the [OK] button Mode conversion The modified shooting date/time is saved. Memo: You can convert HD quality video titles saved on the HDD if Alternatively, you can press the [RETURN] button to cancel they are recorded in the DR, AVC, AF, AN, AL, or AE mode. the shooting date/time modification and return to the initial : Seamless conversion can be performed to Seamless... -
Page 77: Settings Menu
Settings Menu Changing Settings of this AUTO MARKING ..........(A page 81) AUDIO ..............(A page 81) Unit DYNAMIC RANGE CONTROL ......(A page 81) Settings changed in the Settings Menu screen are stored on DOWN MIX ............(A page 81) this unit even when its power is turned off. -
Page 78: Setup
REMOTE CONTROL CODE The brightness of the display window can be specified using the “DIMMER (POWER ON)”, and “DIMMER (POWER OFF)” For remote control units compliant with JVC’s products, control items. different remote control codes can be specified for those that are used with this unit. -
Page 79: Playback Setting
Settings Menu DIMMER (POWER OFF) PLAYBACK SETTING For turning on/off the light of the display window when the power is turned “Off”. Setting Values Description Turns off the light. Turns on the light. QUICK STARTUP The quick startup setting can be specified as follows. Setting Description Values... -
Page 80: Record
Settings Menu RECORD RESUME The stop position can be stored when playback of a BD- Video, DVD-Video, BDMV, AVCHD, finalized discs, or SD card is stopped halfway. Setting Values Description Resume information is not stored. Stores resume information. Memo: Resume information is stored at all times for other discs as well as the HDD regardless of this setting. -
Page 81: Audio
Settings Menu DISC RECORDING AUDIO AUDIO For changing the settings of audio to be recorded to the disc when in the AF, AN, AE or AL mode. Setting Description Values AUTO Records “Stereo”, “Surround” or “Dual broadcast” audio sounds as they are. FIXED Records “Stereo”... -
Page 82: Digital Out
Settings Menu DTS-HD DIGITAL OUT For setting audio output to “BITSTREAM” or “PCM”. Set this item according to the device connected to the digital Setting Values Description audio output terminal (optical digital). PCM DOWN SAMPLING BITSTREAM Use this setting when connecting a device that is able to decode “DTS-HD”. -
Page 83: Display
Settings Menu DISPLAY CONNECTION ON SCREEN GUIDE MONITOR TYPE For displaying operation details. Setting Values Description For setting the aspect ratio according to the connected monitor. AUTO Appears for five seconds when an Setting Values Description operation is performed. 16:9 Set to this value when connected to Not displayed. - Page 84 Settings Menu HDMI OUTPUT RESOLUTION x.v.Color Setting Description Setting Description Values Values AUTO Automatically selects an appropriate AUTO Outputs x.v.Color information with HDMI resolution according to the connected when video images that include x.v.Color device. information are played back. 480p Fixes the resolution at 480p.
-
Page 85: Sdi Connection
Settings Menu SDI CONNECTION HDMI-CEC For setting the HDMI-CEC operation from the connected device. Setting Values Description Disables HDMI-CEC. Enables HDMI-CEC. COMPONENT OUTPUT For setting the resolution of video output from the [COMPONENT VIDEO OUT] terminals. Setting Values Description For specifying settings related to the SDI output terminal. 480i Sets output to “480i”. - Page 86 Settings Menu SDI AUDIO OUTPUT SETTING TIME CODE INPUT SETTING Set the channel (Lch, Rch) for outputting the SD-SDI/HD-SDI You can select whether to add a time code while recording audio. SDI input signals with this unit. Setting Description Setting Description Values Values...
-
Page 87: Others
Others Locking the Disc Tray Turning on the Mode Lock By turning on the lock for the disc tray, the tray cannot be Turning on the mode lock disables all operations using the opened or closed using the [M] button. buttons on the unit and remote control, except for “Play”... -
Page 88: Rs-232C Interface
Others RS-232C Interface Command Table Lower Order Higher Order Complete Error Cassette Target Play Stop Still Clear Sense Title Chapter Sense Chapter Title Date Clock Search Search Preset Preset Finalize Cancel- Disc MENU NEXT PREV Setup DOWN RIGHT LEFT Next Prev Remote Disc... -
Page 89: Command
Others Command Operation Commands Commands for operating functions such as PLAY and REC on the BLU-RAY DISC & HDD RECORDER Command Description Power On Plays the selected deck. Power Off Stops the selected deck. Resume will be Eject: Opens/Closes tray. (BD Deck) cleared when this is pressed while in the Stop FF: Functions only during playback. - Page 90 Others 80-8F 80 : Chapter Search 1st Byte 2nd Byte 3rd Byte Chapter Search Hundreds Tens Ones ASCII codes (30 - 39) 3* E.g. (012) E.g. : When searching the 12th chapter. 81 : Title Search under “ORIGINAL” 1st Byte 2nd Byte 3rd Byte 4th Byte Title Search (ORIGINAL) 30 Hundreds Tens Ones...
- Page 91 Others 9F : Remote Data The remote control codes for controlling the wired remote controller via RS-232C is as shown in the following table. The codes apply to all three HDD, BD and SD deck unless otherwise stated. Code Items Remarks CUSOR 0°...
- Page 92 Others COLOR KEY BLUE L1 Y/C INPUT SELECT HDD Deck only COLOR KEY RED L1 COMPOSITE INPUT HDD Deck only SELECT JOG-1/6 PLAYBACK SETTING JOG +1/6 DELETE JOG +1 INFORMATION INSTANT REPLAY CORRECT EDIT FWD FRAME COLOR KEY GREEN MODE LOCK COLOR KEY YELLOW NAVIGATION B8 : Input/Output Selection...
-
Page 93: Subtitle Selection
Others Subtitle Selection B8 : Subtitle Selection Byte Byte Byte Byte Byte Byte Byte Byte JAPANESE ENGLISH GERMAN FRENCH ITALIAN SPANISH DUTCH SWEDISH NORWEGIAN FINNISH DANISH “Language Code List” (A page 99) - Page 94 Others Audio Language Selection B8 : Audio Language Selection Byte Byte Byte Byte Byte Byte Byte Byte JAPANESE ENGLISH GERMAN FRENCH ITALIAN SPANISH DUTCH SWEDISH NORWEGIAN FINNISH DANISH “Language Code List” (A page 99)
- Page 95 CTL Data Sense: For acquiring the lapse counter when there is a media in the selected deck. (*) JVC Status Sense: Returns data from the unit. (*) VTR Ind: A command for checking whether the connected device is the external recorder.
- Page 96 Others Title/Track Sense under “ORIGINAL” 1st Byte 2nd Byte 3rd Byte 4th Byte Title/Track Sense (ORIGINAL) 30 Hundreds Tens Ones E.g. (345) E.g. : When the current title under “ORIGINAL” is the 345th title. Title/Track Sense in “PLAY LIST” 1st Byte 2nd Byte 3rd Byte 4th Byte Title/Track Sense (PLAY LIST) 38 Hundreds Tens Ones...
- Page 97 Others Status Data Sense For acquiring the remaining time in the current recording mode in hours, minutes and seconds for HDD/DVD. 1byte 1byte 1byte 2byte 3byte 4byte 5byte STATUS SENSE HDD/BD/SD HDD/BD/SD HDD/BD/SD HDD/BD/SD bit7 1 (Fixed) 1 (Fixed) 1 (Fixed) Video EE 0 (Fixed) During PLAY...
- Page 98 CTL Data Sense Hr (Tens) Hr (Ones) Min (Tens) Min (Ones) Sec (Tens) Sec (Ones) Frame (Tens) Frame (Ones) E.g. (01:23:45) E.g. : When time lapse counter is 1 hr 23 min 45 sec. Frame is fixed as 0. JVC Status Sense 1byte 2byte 3byte...
-
Page 99: Language Code List
Others Language Code List Code Language Code Language Code Language Afar Hindi Ossetian Abkhazian Hiri Motu Panjabi Afrikaans Hungarian Persian Akan Igbo Pali Albanian Icelandic Polish Amharic Portuguese Arabic Sichuan Yi Pashto Aragonese Inuktitut Quechua Armenian Interlingue Rhaeto-Romance Assamese Interlingua (International Romanian Auxiliary language Association) Avar... - Page 100 Others Divehi Luba-Katanga Tagalog Dutch Ganda Thai Dzongkha Macedonian Tibetan English Marshallese Tigrinya Esperanto Malayalam Tongan Estonian Māori Tswana Marathi Tsonga Faroese Malay Turkmen Fijian Malagasy Turkish Finnish Maltese French Moldavian Uighur Western Frisian Mongolian Ukrainian Fulah Nauruan Urdu Georgian Navajo Uzbek German...
-
Page 101: Country Code List
Others Country Code List Code Country Name Code Country Name Code Country Name Andorra Gambia Niue United Arab Emirates Guinea New Zealand Afghanistan Guadeloupe Oman Antigua and Barbuda Equatorial Guinea Panama Anguilla Greece Peru Albania South Georgia and South Sandwich Polynesia Islands Armenia... - Page 102 Others Cook Islands Saint Lucia Chad Chile Liechtenstein French Southern Territories Cameroon Sri Lanka Togo China Liberia Thailand Colombia Lesotho Tajikistan Costa Rica Lithuania Tokelau Cuba Luxembourg Turkmenistan Cape Verde Latvia Tunisia Christmas Island Libya Tonga Cyprus Morocco East Timor Czech Republic Monaco Turkey...
-
Page 103: Using The Hdmi Consumer Electronics Control (Hdmi Cec)
Using HDMI Consumer Electronics Control : MOV files that are taken in SP mode and MOV* (activating the function) HQ mode using the JVC ProHD Camcorder GY-HM700/100 1 Connect this unit to a TV that is HDMI CEC Procedures to create a seamless BDAV compatible using a HDMI cable 2 Change the setting of “HDMI-CEC”... -
Page 104: Troubleshooting
JVC Servicing Center. Power turns off The “AUTO POWER (OFF)” setting is Change the “AUTO POWER (OFF)”... - Page 105 Others Troubleshooting (Continued) Problem Symptom Action Reference Page Data cannot be The title to be dubbed is copyright Titles that are copyright-protected cannot (A page 25) imported protected. be dubbed. Select a title that is not copyright-protected. The number of titles stored in the HDD Delete or combine the titles in the HDD to (A page 65) has reached the maximum amount.
-
Page 106: Specifications
Others Specifications : 0.286 Vp-p, 75 K : 4-pin for HDV/DV IN : φ3.5 mm Jack General Remote Input Serial Command : D-SUB 9-PIN Power requirement AC 120 V H, 60 Hz Component video output: Power consumption : 1.0 Vp-p, 75 K : 41 W Power on CB/CR, PB/PR : 0.7 Vp-p, 75 K... - Page 107 Others...
- Page 108 Others...
- Page 109 Others...
- Page 110 Others...
-
Page 111: Index
Others Index P PICTURE QUALITY ........25, 30, 42, 60 PLAYBACK NAVIGATION ......15, 45, 51 PLAYBACK SETTINGS ......16, 55, 59, 79 A AUDIO CABLE ..........14, 18, 17 PROGRESSIVE OUTPUT ........... 60 AUDIO LANGUAGE ........59, 79, 94 AUDIO/SUBTITLE SETTINGS ........ - Page 112 LST1302-001A ©2012 JVC KENWOOD Corporation...
Need help?
Do you have a question about the SR-HD2500US and is the answer not in the manual?
Questions and answers