Table of Contents
Advertisement
Advertisement
Table of Contents

Related Manuals for WELLTECH SIP PHONE LP101


Summary of Contents for WELLTECH SIP PHONE LP101
-
Page 2: Table Of Contents
Chapter 1 Overview of the SIP-Phone ................. 4 1. Hardware Overview ....................5 1.Front View and Keypad function................. 5 2.Back View......................9 3.Specification of connector................... 9 2. Software Features and Specification ..............11 3. Physical specification & Environment ..............13 Chapter 2 Configuring the SIP-Phone through LCD Phone menus......... - Page 3 12. [sysconf] command....................47 13. [sip] command ...................... 47 14. [security] command....................49 15. [voice] command....................49 16. [tos] command ...................... 50 17. [bureau] command....................52 18. [rom] command..................... 52 19. [passwd] command....................54 Chapter 5 Upgrading Software on the SIP-Phone ............. 55 1.From LCD Phone Menu...................
- Page 4 Revision History Version Date Author Software Version Note LP_SIP_100 2004/03 Sabrina For test version First released for software only. test version. LP_SIP_100a 2004/04/07 Sabrina lp101/201sip.100 For first formal released software. SIP SIP-Phone Administration Guide...
-
Page 5: Chapter 1 Overview Of The Sip-Phone
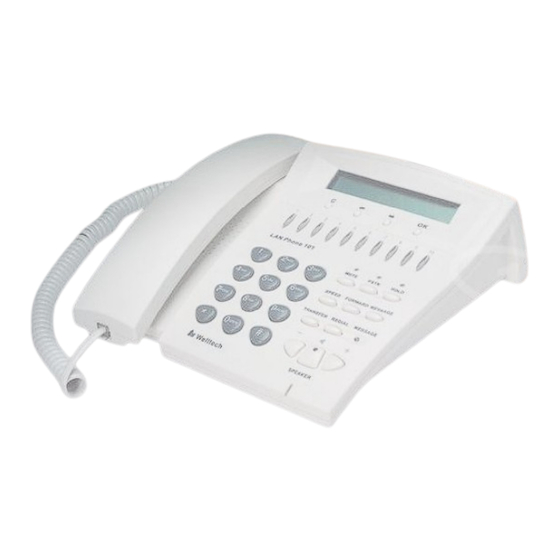
Chapter 1 Overview of the SIP-Phone SIP-Phone is a full-featured IP-based telephone set via Ethernet base communication. Over the office LAN connection, it provides IP-PBX solution such as station-to-station call, IP call and local PSTN/PBX Extension call via PSTN Gateway. SIP-Phone provides two 10/100BaseT switch/hub RJ-45 ports allow connecting to office LAN and PC simultaneously. -
Page 6: Hardware Overview
Note: (**): May be not available right now, please contact with your distributor. 1. Hardware Overview 1.Front View and Keypad function LCD: 2 lines, 24 character Dot Matrix display. C: Jump out current LCD menu. : Move to previous selection or clear previous data. ... - Page 7 according to phone book data from 1-10 (please refer to LCD configuration-3.Phone Book; Advanced Configurations via Telnet- 10.[pbook] command, or Web Configuration-Phone Book chapter. Number 1 –10, * and #: The function is the same as the general phone set. Corresponding list of keypad and symbol: (1) Character mode: “1”...
- Page 8 if standard telephone set in PSTN; in IP Phone mode, “PROXY ” characters will be displayed on LCD left bottom side. Note: 1. When SIP-Phone is in PSTN mode, only PSTN and SPEAKER function key can work. 2. On LCD will display ”…Incoming Call... ” to inform user when SIP-Phone has both IP and PSTN side incoming calls.
- Page 9 3. If A press TRANSFER and number of C, C is ringing, press TRANSFER again C will return to standby mode and A can retrieve call with B. 4. Before C picks up, A cannot hangs up the phone. 2. Change characters to be capital or lowercase: when pressing TRANSFER before press letters can switch input type of letters.
-
Page 10: Back View
2.Back View DC 9V: DC 9V power input outlet LAN: RJ-45 connector, connected directly to the Hub through the straight CAT-5 cable. PC: RJ-45 connector, connected directly to the PC through the straight CAT-5 cable Line: RJ-11 connector, connected directly to the PSTN analog line. Note: There are two LED indicated lights: LINK/ACT and 10/100 for LAN port and PC port. - Page 11 Ethernet connector LAN RJ-11connector RJ-11 connector is for connecting SIP-Phone with PSTN. RJ11connector SIP SIP-Phone Administration Guide...
-
Page 12: Software Features And Specification
2. Software Features and Specification Application: ISP/ITSP (Internet Telephony Service Provider) IP-PBX with office telephony services Multi-nation enterprise communication SOHO Telephony Calling Features Call Hold Call Transfer Call Forward (**) 10 sets last number Redial ... - Page 13 Provisioning and Configuration SIP (RFC3261) compliance LCD configuration password protection Provide Proxy Mode or Peer-to-Peer Mode (Non Proxy Server needed) selection Ring tone, Speaker and Handset volume adjustable Dial path selection (PSTN or IP mode) ...
-
Page 14: Physical Specification & Environment
3. Physical specification & Environment Dimension: 215mm(W) x 71mm(H) x 198mm(D) Weight: 834 grams (unit) Power Supply: DC 9V output adaptor, AC 120Vac input Operation Environment: Humidity: 10 to 90 % (Non-condensing) Operational Temperature: 0 to +40 C ... -
Page 15: Chapter 2 Configuring The Sip-Phone Through Lcd Phone Menus
Chapter 2 Configuring the SIP-Phone through LCD Phone menus Note: 1. After any configuration is made for the SIP-Phone , user has to do Reboot in the selection 7 “Reboot”. 2. We suggest user to set IP address via LCD menu 5 2.3.4.5 first, then go to chapter 3 to do other detail configurations via web browser. - Page 16 5. After pressing the PSTN button, the “Proxy” or “P2P” will be replaced by “PSTN”. Please notice that user must plug PSTN line in RJ-11 port when SIP-Phone is in PSTN mode. (**) IP-Phone PSTN 10:10:10 AM 6. Press or to enter configuration mode then press OK button to enter sub menus; press C can jump out current menu to previous level.
-
Page 17: Lcd Menu Configuration
2. LCD Menu Configuration User can set the following configurations by LCD keypad. Note: 1. Press TRANSFER before input data can switch characters to be capital or lowercase. 2. Press SPEED before input data can switch input mode as character mode or digit mode;... - Page 18 Enter a forwarded phone number to activate no response forward function. B. Deactivate Deactivate No Response Forward function. (3) Unconditional It is included the above two types. Whether the SIP-Phone is in which status, calls will be automatically forwarded to the assigned phone number.
- Page 19 5. Network Information User can press or to check current network status: (1) Mode: Display current network connection mode of SIP-Phone to be Static (Fixed IP), DHCP, or PPPoE. Note: When SIP-Phone is under DHCP mode, then change to Static mode, the following items: IP address, Subnet Mask, Default Gateway, will display empty, after reboot, user can see information again.
- Page 20 SNTP Configuration (1) SNTP Mode: User can set SNTP function to be on or off, which means SIP-Phone will capture current time from SNTP server or not. (2) SNTP Server: User can specify a SNTP server for SIP-Phone to capture current time. (3) Time Zone: User can set time zone via pressing ...
- Page 21 Select SIP connection mode to be peer-to-peer mode or Proxy mode. (2) Proxy A. Proxy Set Proxy IP address or Domain Name. B. Outbound proxy Set Outbound Proxy IP address or Domain Name. C. Proxy port Set Proxy port for SIP-Phone to send messages. D.
- Page 22 upgrading SIP-Phone new application rom file via FTP method. (5) File Name User has to press the file name of new application rom file prepared for upgrading (6) Application Version Show current version of application. (7) Start to Upgrade Select YES or NO to start upgrade. Note: Download via LCD command can only upgrade new application rom file.
-
Page 23: Chapter 3 Configuring The Sip-Phone Through Web Pages
Chapter 3 Configuring the SIP-Phone through Web Pages The HTTPD web management interface provides user an easier way to configure rather than command line method through TELNET. The configuration function and steps are similar with the way through command line. Please refer to the chapter 4-Configuring the SIP-Phone through Telnet command lines for more detail information. -
Page 24: Step 1. Browse The Ip Address Predefined Via Keypad
Step 1. Browse the IP Address predefined via Keypad Please enter IP address (user have to set via LCD menu first) of SIP-Phone in web browser. If user failed to set IP address via LCD menu, the default IP address of SIP-Phone is 10.1.1.3, user can try to connect to SIP-Phone via this default IP via web interface. -
Page 25: Step 2. Input The Login Name And Password
Step 2. Input the login name and password Login name: root / administrator Password (The same with TELNET): Null (just press confirm, no need to key in password in default value) Note: User can set password later in 8.PASSWORD via web interface. SIP SIP-Phone Administration Guide... -
Page 26: Step 3. Enter The Web Interface Main Screen
Step 3. Enter the web interface main screen After enter login name and password, user can see web interface main screen as below. Step 4. Start to configure Most important items are Network Interface, Information, and Phone Book (in Peer-to-Peer mode). -
Page 27: Network Interface
1. Network Interface Please refer to chapter 4.7 [ifaddr] command. IP Address: Set IP Address of SIP-Phone Subnet Mask: Set the Subnet Mask of SIP-Phone Default routing gateway: Set Default routing gateway of SIP-Phone Get IP Mode: User has to set SIP-Phone to use which network mode. 1. - Page 28 SIP SIP-Phone Administration Guide...
- Page 29 SNTP: Enable / Disable the Simple Network Time Protocol function SNTP Server Address: Set SNTP Server Address When SNTP server is available, enable SIP-Phone SNTP function to point to SNTP server IP address so that SIP-Phone can get correct current time. GMT: Set time zone for SNTP Server time User can set different time zone according to the location of SIP-Phone.
-
Page 30: Sip Information
2. SIP Information Please refer to chapter 4.13 [SIP] command Run Mode: Select SIP-Phone to work under Peer-to-Peer mode or Proxy mode. Proxy IP Address: Set Proxy IP Address or URL address (Domain Name Server must be configured. Please refer to Network Interface). Outbound Proxy: Set IP Address or URL address (Domain Name Server must be configured. - Page 31 string here. For example, if Account Name is 123, SIP-Phone will sent out messages as Account Name @”IP address of Proxy”, if user set prefix as abc, SIP-Phone will set out as abc123@”IP address of Proxy”. This function is for special proxy server.
-
Page 32: System Configuration
3. System Configuration Please refer to chapter 4.12 [sysconf] command Keypad DTMF Type: set DTMF type. User can select DTMF type SIP-Phone transmits. RFC2833 Payload Type: change RFC2833 Payload type. This is for special request from the other site, if RFC2833 payload types of 2 sites are different, it may cause some problem of connection. -
Page 33: Pppoe Configure
4. PPPoE Configure Please refer to chapter 4.11[pppoe] command User Name: Set PPPoE authentication User Name. Password: Set PPPoE authentication password. Reboot After Remote Host Disconnection: Enable/Disable auto reboot after PPPoE disconnection If user enables this function, after PPPoE being disconnected, SIP-Phone will automatically reboot to re-connect, and after reboot, if SIP-Phone still can’t get contact with server, SIP-Phone will keep trying to connect. -
Page 34: Voice Setting
5. Voice Setting Please refer to chapter 4.15 [voice] command Codec Priority: set codecs priority in order. Please notice that user can set from 1 to 5 codecs as their need. For example, user can only set first priority as G.723.1, and set the others as x, that means only G.723.1 is available. -
Page 35: Phone Book
6. Phone Book Please refer to chapter 4.10 [pbook] command Add Data: User can specify 20 sets of phone book via web interface. Please input index, Name, IP Address and E.164 number of the destination device. Delete Date: User can delete any configured phone book data by index. SIP SIP-Phone Administration Guide... -
Page 36: Dscp Configure
7. DSCP Configure Please refer to chapter 4.16 [tos] command Set Signal or RTP Packet DSCP value: Assured Forwarding (AF) PHB: Select Delay priority and Drop Precedence Expedited Forwarding (EF) PHB: Select TOS value as EF Default: Select TOS value as 0 User Assign Special DSCP Code: User can set other unspecified value here. - Page 37 DROP Precedence Class #1 Class #2 Class #3 Class #4 (AF11) (AF21) (AF31) (AF41) Low Drop Precedence 001010 010010 011010 100010 (AF12) (AF22) (AF32) (AF42) Medium Drop Precedence 001100 010100 011100 100100 (AF13) (AF23) (AF33) (AF43) High Drop Precedence 001110 010110 011110 100110...
-
Page 38: Password
8. Password Please refer to chapter 4.19 [password] command Change: First select login name as root or administrator, then enter current password, new password and confirm new password again to set new password. Abort: Press abort will clean all inputs. SIP SIP-Phone Administration Guide... -
Page 39: Rom Configuration
9. Rom Configuration Please refer to chapter 4.18 [rom] command FTP/TFTP Server IP Address: Set TFTP server IP address Target File name: Set file name prepared to upgrade Method: Select download method as TFTP or FTP FTP Login: Set FTP login name and password Target File Type: Select which sector of SIP-Phone to upgrade Note:... -
Page 40: Flash Clean
10. Flash Clean Please refer to 4.15 [flash] command. Press CLEAN will clean all configurations of SIP-Phone and reset to factory default value. Note: User must re-configure all commands all over again (except Network Configure) once execute this function, SIP SIP-Phone Administration Guide... -
Page 41: Reboot System
11. Reboot System Press reboot will reset SIP-Phone. Note: To execute reboot via web browser, SIP-Phone will automatically save all data before reboot. To execute reboot via TELNET command, please remember to do Commit Data before Reboot System. SIP SIP-Phone Administration Guide... -
Page 42: Chapter 4 Configuring The Sip-Phone Through Telnet Command Lines
Chapter 4 Configuring the SIP-Phone through Telnet command lines After setting the IP Address of SIP-Phone and reboot, (please refer to LCD Menu: 5-3.4.5), user can enter into Telnet command lines. Note: 1. After user enter SIP-Phone configuration via telnet, please use login: ”root”, password: null, press enter to enter command lines. -
Page 43: Quit] Command
2. [quit] command Type quit/exit/close will logout SIP-Phone and Telnet Program. 3. [debug] command This command is for engineers to debug system of SIP-Phone. User can add debug flag via command debug –add “debug flags”, and then start debug function via command debug –open. -
Page 44: Commit] Command
6. [commit] command Save any changes after configuring the SIP-Phone. 7. [ifaddr] command Configure and display the SIP-Phone IP information. 1. –print: print out all current configurations of ifaddr command. 2. -ip, -mask, -gate: Set SIP-Phone IP Address, subnet mask and default gateway respectively. -
Page 45: Time] Command
Note: Some Proxy servers support endpoint behind NAT function, in this case SIP-Phone doesn’t have to enable IP sharing function, please contact with your Proxy Server vendor. 8. –upnp: enable/disable UPnP function. If the IP sharing or NAT device supports UPnP, user can enable UPnP function so that SIP-Phone will automatically connect with NAT device without configuration in SIP Phone and NAT device. -
Page 46: Pbook] Command
10. [pbook] command This command is functional both in Proxy mode and Peer-to-Peer mode. In proxy mode, use speed dial or 10 DL button will dial out e.164 number in phone book. In the other hand, in peer-to-peer mode, SIP-Phone will dial out IP address. 1. -
Page 47: Pppoe] Command
11. [pppoe] command 1. -print: display all current configurations and information. 2. –id: to set PPPoE authentication user name. 3. –pwd: to set PPPoE authentication password. 4. –reboot: Choose enable or disable this function. If user enables this function, after PPPoE disconnected, SIP-Phone will automatically reboot to re-connect, and after reboot, if SIP-Phone still can’t connect with server, SIP-Phone will keep trying to connect. -
Page 48: Sysconf] Command
12. [sysconf] command 1. -print: display all current configurations. 2. -idtime: set the duration(in second) of two pressed digits in dial mode as timed out. If after the duration user hasn’t pressed next number, SIP-Phone will dial out all number pressed. 3. - Page 49 3. –px: set proxy server IP address or URL address (sip –px “IP address or URL of Proxy server”). 4. –pxport: set listening port of Proxy server. 5. –outpx: set IP address of outbound proxy server. After user set outbound proxy, all packets form SIP-Phone will be sent to outbound proxy server.
-
Page 50: Security] Command
14. [security] command 1. –print: display all current configurations. 2. -name: set user ID of SIP-Phone for registering. User can set user name and password for registering. If password is no need, please set user name the same as line number or SIP-Phone won’t register successfully. 3. -
Page 51: Tos] Command
5. -nscng: enable or disable sound compression and comfort noise generation. It is only for codec G.723.1. (0 for off, 1 for on) 6. -echo: enable or disable echo cancellation function . 7. -mindelay: set minimum delay of jitter buffer(0~150) 8. - Page 52 010010 ====> 18 (Decimal System) 011010 ====> 26 (Decimal System) 100010 ====> 34 (Decimal System) 2. Low Priority with DS-field: Assured Forwarding (AF) 001100 ====> 12 (Decimal System) 010100 ====> 20 (Decimal System) 011100 ====> 28 (Decimal System) 100100 ====> 36 (Decimal System) 001110 ====>...
-
Page 53: Bureau] Command
17. [bureau] command 1. -print: show all current configurations. 2. -hotline: set hotline table. User can set hotline function to specify one IP address for SIP-Phone to dial out directly. Once user picks up SIP-Phone, it will automatically dial out to the assigned IP address and number. (bureau –hotline “IP address”... - Page 54 After upgrade Application, please remember to execute flash –clean command, which will clean all configurations become factory values except IP address. 3. -boot2m: to upgrade 2mb rom file, which includes all firmware file mentioned in item 2. 4. -s: it is necessary to prepare TFTP/FTP server IP address for upgrading firmware rom file.
-
Page 55: Passwd] Command
19. [passwd] command For security protection, user has to input the password before entering application user/config mode. Two configurations of login name/password are supported by the system. 1. –set: set password of “root” users or “administrator” users. (passwd –set root/administrator “password”) 2. -
Page 56: Chapter 5 Upgrading Software On The Sip-Phone
Chapter 5 Upgrading Software on the SIP-Phone SIP-Phone supports three methods to upgrade the new version. All methods are necessary to prepare the TFTP or FTP program on the host PC as TFTP/FTP server. After installing TFTP/FTP program on one PC and connecting to network, SIP-Phone is ready to be upgraded. -
Page 57: Web Management
2. Web Management Please refer to chapter 4.18 [rom] command FTP/TFTP Server IP Address: Set TFTP server IP address Target File name: Set file name prepared to upgrade Method: Select download method as TFTP or FTP FTP Login: Set FTP login name and password Target File Type: Select which sector of SIP-Phone to upgrade Note:... -
Page 58: Remote Control: Telnet
3. Remote Control: Telnet Please refer to chapter 4.18 [rom] command 1. -print: show all current configurations and version information. 2. -app,-boot, -dsptest, -dspcore, -dspapp,: upgrade main boot code, main application code, DSP testing code, DSP kernel code, DSP application code, Ring Back Tone PCM file and Hold Tone . - Page 59 Command rom –print can show current version installed in SIP-Phone . SIP SIP-Phone Administration Guide...
Need help?
Do you have a question about the SIP PHONE LP101 and is the answer not in the manual?
Questions and answers