
Related Manuals for Asus AGP-V6600 MX


Summary of Contents for Asus AGP-V6600 MX
- Page 1 V6600 / V6800 Series 3D Graphics Cards USER’S MANUAL Hardware & Video Drivers AGP-V6800 Deluxe / 32MB AGP-V6800 (Pure) / 32MB AGP-V6600 Deluxe / 32MB AGP-V6600 (Pure) / 32MB AGP-V6600 MX...
- Page 2 Product warranty or service will not be extended if: (1) the product is repaired, modified or altered, unless such repair, modification of alteration is authorized in writing by ASUS; or (2) the serial number of the product is defaced or missing.
-
Page 3: Asus Contact Information
Marketing Address: Harkortstr. 25, 40880 Ratingen, BRD, Germany Fax: +49-2102-442066 Email: sales@asuscom.de (for marketing requests only) Technical Support Hotline: MB/Others: +49-2102-9599-0 Notebook: +49-2102-9599-10 Fax: +49-2102-9599-11 Support (Email): www.asuscom.de/de/support (for online support) WWW: www.asuscom.de FTP: ftp.asuscom.de/pub/ASUSCOM ASUS V6600/V6800 Series User’s Manual... -
Page 4: Table Of Contents
3. Software Setup ................16 Operating System Requirements ........... 16 Windows 98 ................16 Driver Setup ................... 17 Method 1: ASUS Quick Setup Program ........17 Method 2: Display Property Page ..........18 Method 3: Plug and Play ............19 Drivers ................... 20 Install Display Driver ............... - Page 5 CONTENTS Install VideoSecurity ..............31 Install ASUS Tweak Utility ............32 4. Software Reference ................ 33 Using the Utilities ................33 ASUS TWAIN Interface ............33 ASUS Live Utility ..............35 ASUS SmartDoctor ..............41 ASUS VideoSecurity .............. 44 ASUS Tweak Utility ............... 48 ASUS Control Panel ..............
- Page 6 Macrovision Corporation and other rights owners. Use of this copyright protec- tion technology must be authorized by Macrovision Corporation, and is intended for home and other limited viewing uses only unless otherwise authorized by Macrovision Corporation. Reverse engineering or disassemby is prohibited. ASUS V6600/V6800 Series User’s Manual...
-
Page 7: Introduction
AGP-V6600 deliver not only cutting-edge graphics performance but also image fidel- ity regardless of the CPU (central processing unit) your computer system is using. With the ASUS AGP-V6600/V6800, you will not only see but also experience dy- namic, realistic 3D worlds and characters. -
Page 8: Common Features
• Multiple video windows with hardware color space conversion and filtering (YUV 4:2:2 and 4:2:0) • Video ports supports ITU-R 656, VESA DDC2B+ DPMS • Integrated 350MHz RAMDAC supporting from 640x480 up to 2048x1536 in true color • Motion compensation for MPEG-2 decoding ASUS V6600/V6800 Series User’s Manual... -
Page 9: Hardware Installation
2. Hardware Installation ASUS V6600/V6800 Series User’s Manual... -
Page 10: Asus Agp-V6800 (Pure) Layout
2. Hardware Installation ® ASUS V6600/V6800 Series User’s Manual... -
Page 11: Asus Agp-V6600 Deluxe Layout
2. Hardware Installation ASUS V6600/V6800 Series User’s Manual... -
Page 12: Asus Agp-V6600 (Pure) Layout
2. Hardware Installation ® ASUS V6600/V6800 Series User’s Manual... -
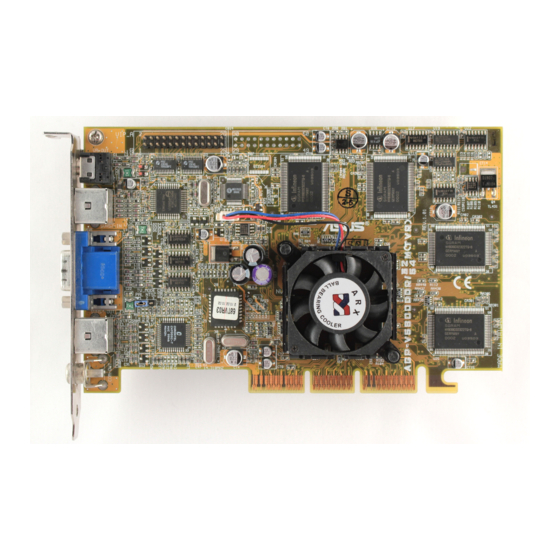
Page 13: Asus Agp-V6600 Mx Layout
2. Hardware Installation ASUS V6600/V6800 Series User’s Manual... -
Page 14: Asus Vr-100 Optional Upgrade Kit
VR Glasses Output Stereo Glasses Output Projector (Reserved) ASUS VR-100 3D Glasses (ASUS VR-100G) You must anchor the ASUS VR-100’s mounting bracket with a screw to a free ex- pansion slot in your computer chassis. ASUS V6600/V6800 Series User’s Manual... -
Page 15: Installation Procedures
1. Change your display driver to Standard VGA. 2. Shut down your computer and unplug all electrical cords. 3. Replace the existing VGA card with your graphics card. 4. Restart your computer. 5. Install the ASUS V6600/V6800 series display driver. ASUS V6600/V6800 Series User’s Manual... -
Page 16: Software Setup
Windows 98 includes VGARTD for the major chipsets but it is recommended that you install VGARTD from the ASUS AGP-V6600/V6800 Series CD to make sure that you have the latest version of VGARTD (see 3. Software Setup | Install GART Driver). -
Page 17: Driver Setup
3. Software Setup Driver Setup You can use one of three methods to install the Windows 98 drivers for your ASUS AGP-V6600/V6800 series graphics card. Method 2 and Method 3 will not install the appropriate AGP GART driver if your motherboard does not use the Intel AGPset. -
Page 18: Method 2: Display Property Page
OK. 10. The Update Driver Warning box appears. Click Yes to confirm the setting up of the ASUS enhanced display drivers and then follow the onscreen instructions to start the setup. 11. Setup will prompt you when it has finished installing all the necessary files on your computer. -
Page 19: Method 3: Plug And Play
NOTE: Before proceeding with these steps, replace first your old VGA card with an ASUS AGP-V6600/V6800 series graphics card. 1. Start Windows. 2. When Windows detects your ASUS AGP-V6600/V6800 series graphics card, the New Hardware Found dialog box appears. 3. Click Driver from disk provided by hardware manufacturer. -
Page 20: Drivers
Driver (Direct3D and OpenGL Driv- ers), DirectX runtime libraries, and VGART driver. Just follow the on- screen instructions to complete the installation. If you prefer to install the drivers individually, follow the steps on the following pages. ASUS V6600/V6800 Series User’s Manual... -
Page 21: Install Directx
DirectX 7. Make sure that your applications or games support DirectX 7 before installing the DirectX 7 runtime libraries. DirectX 7 currently cannot be uninstalled by regular means, such as outlined in 3. Software Setup | Uninstall Display Driver. ASUS V6600/V6800 Series User’s Manual... -
Page 22: Install Gart Driver
In- tel, AMD, VIA, SiS, or ALi chipsets. 3. The AGP VGARTD Driver Detec- tion box appears with the chipset detected on your motherboard. Click OK to install the appropriate driver for your AGPset. ASUS V6600/V6800 Series User’s Manual... - Page 23 Make your driver selection and click Install. 5. When the Welcome screen appears, click Next to continue. 6. Once the driver installation is fin- ished, click Finish. ASUS V6600/V6800 Series User’s Manual...
- Page 24 (This page was intentionally left blank.) ASUS V6600/V6800 Series User’s Manual...
-
Page 25: Install Asus Twain Driver
3. Software Setup Install ASUS TWAIN Driver ASUS TWAIN Driver is a frame capture driver for Adobe Photoshop®, an image editing software. With this driver, you can capture still images through Photoshop using the video input port of your card (Deluxe model only). -
Page 26: Uninstall Display Driver
2. Click Control Panel. 3. Double-click the Add/Remove Pro- grams icon. 4. Click the Install/Uninstall tab. 5. Click ASUS V6800 Series Display Driver from the list. 6. Click Add/Remove. 7. The system will prompt you to restart your computer. Click Yes to restart. -
Page 27: Run Asus Vga Live Update
3. Software Setup Run ASUS VGA Live Update The ASUS VGA Live Update is a utility that allows you to update your VGA card’s BIOS and drivers. The use of this utility assumes that you are properly connected to the Internet through an Internet Service Provider (ISP). -
Page 28: Utilities
3. Software Setup Utilities Install ASUS Live Utility The ASUS Live utility lets you view and capture video images from the card’s video input port. NOTE: Make sure that you have an ASUS graphics card with connec- VIDEO-IN tor before attempting to install the utility. -
Page 29: Install Acrobat Reader
CD-ROM drive. Click Utilities. 2. The Utilities box appears. Click In- stall Acrobat Reader. 3. When the Acrobat Reader x.x Setup box appears, click Next. To complete the installation, simply follow the on-screen instructions or prompts. ASUS V6600/V6800 Series User’s Manual... -
Page 30: Install Smartdoctor
The installation will abort. SmartDoctor works only with cards with a monitor IC. 3. When the Welcome box appears, click Next to start the installation. To complete the installation, simply follow the on-screen instructions or prompts. ASUS V6600/V6800 Series User’s Manual... -
Page 31: Install Videosecurity
CD-ROM drive. Click Utilities. 2. The Utilities box appears. Click In- stall VideoSecurity. 3. When the Welcome box appears, click Next to start the installation. To complete the installation, simply follow the on-screen instructions or prompts. ASUS V6600/V6800 Series User’s Manual... -
Page 32: Install Asus Tweak Utility
3. Software Setup Install ASUS Tweak Utility The ASUS Tweak Utility lets you control the core clock speed and the memory interface speed of your graphics card. WARNING! Use this option with caution. Using this inappropriately may dam- age your card and cause your system to be unstable. -
Page 33: Software Reference
Select ASUS Frame Capture Source. NOTE: You do not need to repeat this step for subsequent uses of the ASUS TWAIN module. If more than one TWAIN device is installed in your system and you want to switch devices, use Select TWAIN_32 Source command. -
Page 34: Other Options
4. Software Reference 2. When the ASUS TWAIN Driver util- ity appears, click Options and then Video Format. 3. In the Image Format list of the ASUS Video Format dialog box, click 24 bit RGB. 4. Click Options and then Video For- mat to select your video source. -
Page 35: Asus Live Utility
NOTE: You should already have installed DirectX 7 or higher to use ASUS Live (see 4. Software Reference Install DirectX) To run the utility, click Start and point to Programs and then ASUS Live and then click ASUS Live. You may also run ASUS Live by clicking or right-clicking the ASUS Control Panel icon (see 4. -
Page 36: Always On Top
Panel to the taskbar when viewing Show/Hide Video Source Option When first using ASUS Live, you must set up the video source. By clicking the Show/Hide Video Source Options button on the ASUS Main Panel, you can show or hide the video source setup screen. -
Page 37: Video Capture
When you install the Windows 98 Driver of your ASUS graphics card (only models with connector), the video capture driver will automatically be installed on your VIDEO-IN system. - Page 38 You must be in capture mode to capture images. To do this, click the Capture Mode button on the ASUS Main Panel. NOTE: ASUS Live will automatically detect and warn you if the capture driver installed in your system is not compatible with ASUS Live.
- Page 39 Frame Rate (fps) (de- fault: 30), Maximum Capture Time (default: 10 seconds) and File name and path (default: C:\CAPTURE.AVI) You are now ready to capture video images. ASUS V6600/V6800 Series User’s Manual...
- Page 40 Frames is useful in animation. To begin capturing, do the following: 1. Click the Capture Frames (F6) button on the ASUS Main Panel or press the key to open the Capture Frames box. 2. Click Capture to begin capturing the desired frame or frames on ASUS Live’s display screen and then click Done when finished.
-
Page 41: Asus Smartdoctor
4. Software Reference ASUS SmartDoctor ASUS SmartDoctor is designed to satisfy two major goals. One is to monitor the graphic chip status, alerting users about abnormal events, such as fan malfunction or chip overheat. The other, as the name “SmartDoctor” implies, is to “cool” down the graphic chip smartly when it is not necessary for it to be kept running at full speed. -
Page 42: Advanced Setup
Enable dynamic graphic cooling allows you to enable or disable the dynamic graphic cooling option. Enabling the graphic cooling option will cool down the graphic chip’s temperature when SmartDoctor detects that the graphic chip is idle. ASUS V6600/V6800 Series User’s Manual... - Page 43 The component in question will also have a flashing red value. If you enabled over- heat protection in Advanced Setup dialog, SmartDoctor will cool down the graphic chip in time to protect it from possible overheat damage. ASUS V6600/V6800 Series User’s Manual...
-
Page 44: Asus Videosecurity
4. Software Reference ASUS VideoSecurity NOTE: The ASUS VideoSecurity utility can only be used with the Deluxe model. ASUS VideoSecurity lets you detect intruders into your system and environmental changes and monitor a specified location or any incoming visitor. If VideoSecurity detects any deviation from the norm that you set, it may give an error message or not. - Page 45 4. Software Reference NOTE: The following descriptions are only for selected features of the ASUS VideoSecurity utility. For a full description of the features described in this manual and other features, refer to the ASUS VideoSecurity Online Help (HTML) for- mat included with your support CD.
- Page 46 VideoSecurity not only detects errors or problems in your card but also monitors or detects an intrusion. Use this to stop tracing or to choose the error processing method to use while tracing. This box appears when an error occurs. Error Processing Procedure Stop Detecting Setting ASUS V6600/V6800 Series User’s Manual...
- Page 47 Color, Video VideoSecurity will Connector, and monitor for errors or Video Standard intrusion. Shortcut Keys Exit VideoSecurity Open Online help Toggle VideoSecurity / Stop Watchdog function Open Setup menu Show error log box ASUS V6600/V6800 Series User’s Manual...
-
Page 48: Asus Tweak Utility
Using this inappropriately may dam- age your card, its components, and your system. To run the ASUS Tweak Utility, click Start and point to Programs, Asus, Tweak- ing Utilities, and then click Tweak. - Page 49 2. In Windows, click Start and point to Programs, Asus, Tweaking Utili- ties, and then click Tweak Safe Mode Recovery. 3. The ASUS Tweak Safe Mode Prop- erties box appears. Click the appro- priate settings. Timing Adjustment (Safe Mode) Select the Clear tweak settings and...
-
Page 50: Asus Control Panel
4. Software Reference ASUS Control Panel After installation of the display drivers, you will find an ASUS icon on the taskbar’s status area. Clicking or right-clicking this icon opens the ASUS Control Panel, showing a menu composed of shortcuts of the graphics board’s enhanced and other functions. -
Page 51: More Resolution
4. Software Reference More Resolution More Resolution lets you change the screen resolution of your monitor. 1. Click/right-click the ASUS Control Panel icon, point to More Resolu- tion, and then click the desired screen resolution. The system will automati- cally set the resolution selected with- out restarting your computer. -
Page 52: Color
D3D/Game lets you make your favorite Windows 98 desktop. color settings for D3D games. Video OpenGL Video lets you make your favorite color OpenGL lets you make your favorite settings for videos. color settings for OpenGL applications. ASUS V6600/V6800 Series User’s Manual... - Page 53 You may want to save a scheme that you created for some spe- cial situations, such as when you want to use the same settings when playing a certain game or a movie. ASUS V6600/V6800 Series User’s Manual...
-
Page 54: Important Notes
DirectDraw/Direct3D game. Video Only one overlay is allowed at a time with either ASUS AGP-V6600 or AGP-V6800. That is, when you click Video first and then run your favorite video player, you can only see the adjustments you made to the settings in the preview window because the video player cannot use the hardware acceleration function (overlay). -
Page 55: Display
Test and then click YES when prompted to add the new refresh rate into the list. Otherwise, the original refresh rate will be restored. Load default Restores the settings to their defaults. ASUS V6600/V6800 Series User’s Manual... - Page 56 DirectDraw. It is most useful when you are play- ing a full-screen game. To change the refresh rate 1. Click Change refresh rate. 2. In the Refresh Rate list under the DirectDraw tab, select the refresh rate you want to use. ASUS V6600/V6800 Series User’s Manual...
- Page 57 Displays the connection status of composite and S-Video. Scan type Sets the scan type of the TV display. Black Level Sets the brightness of the TV display. Contrast Sets the contrast of the TV display. Flicker Filter Sets the anti-flicker effect. ASUS V6600/V6800 Series User’s Manual...
-
Page 58: Advanced
Advanced Advanced provides some advanced settings for the ASUS VR-100G 3D Glasses (setting is available only with the ASUS Deluxe model or models with the ASUS VR-100 Optional Upgrade Kit) and Direct3D and OpenGL, which are software in- terfaces for your ASUS V6800 Series graphics cards. -
Page 59: On Screen Display (Asus Osd)
CTRL+ALT+D NOTE: The hot keys will be available only if you selected the Enable OSD check box and if you have either an ASUS Deluxe model or a model with the ASUS VR-100 Optional Upgrade Kit installed. ASUS V6600/V6800 User’s Manual... -
Page 60: Direct3D
Normally, you will want to keep this option enabled, unless your work absolutely requires a specific Z-buffer depth. Enable alternate depth buffering technique This option lets the hardware use a different mechanism for depth buffering in 16-bit applications. Enabling this setting can produce higher quality rendering of 3D images. ASUS V6600/V6800 Series User’s Manual... - Page 61 AGP heap size by an amount equal to the size of the command buffer. If you are experiencing stability problems with your system (especially with some Socket 7 motherboards), choose this option for best com- patibility. Performance is, however, poorer using this option compared with the PCI option. ASUS V6600/V6800 User’s Manual...
- Page 62 Reduce this value if you ex- perience, while playing games, a noticeable delay in the response of the input devices connected to your computer. ASUS V6600/V6800 Series User’s Manual...
-
Page 63: Opengl Vr
IMPORTANT: Before enabling OpenGL stereoscopic mode and using your ste- reoscopic or 3D glasses (ASUS VR-100G), make sure that you select a high reso- lution. The equivalent Stereo Mode resolution of a particular resolution is lower, thus:... -
Page 64: On Screen Display (Opengl Osd)
CTRL+ALT+D NOTE: The hot keys will be available only if you selected the Enable OSD check box and if you have either an ASUS Deluxe model or a model with the ASUS VR-100 Optional Upgrade Kit installed. ASUS V6600/V6800 Series User’s Manual... -
Page 65: Opengl
This option allows OpenGL to use anisotropic filtering for improved image quality. Enable alternate depth buffering technique This option lets the hardware use a different mechanis, for depth buffering in 16-bit applications. Enabling this setting produces higher quality rendering of 3D images. ASUS V6600/V6800 User’s Manual... -
Page 66: Vertical Sync
NOTE: This setting applies only to PCI display memory for texture storage de- adapters or to AGP display adapters running in pends on the physical memory PCI compatibility mode. installed on your system. ASUS V6600/V6800 Series User’s Manual... -
Page 67: Other
General Timing Formula (GTF) GTF is a standard used by most new hardware. Discrete Monitor Timings (DMT) DMT is an older standard still in use on some hardware. Select this option if your hardware requires DMT. ASUS V6600/V6800 User’s Manual... -
Page 68: Asus Vr Pictureviewer (Optional)
ASUS VR PictureViewer (optional) ASUS VR PictureViewer lets you view stereo images, size your stereo image, set the VR effect of your 3D glasses (ASUS VR-100G), and test your 3D glasses’ func- tionality. To run ASUS VR PictureViewer, click or right-click the ASUS Control Panel icon (see 4. -
Page 69: Testing The 3D Glasses
Note that the 3D effect is not shown in this picture). Changing the View 1. Click the Zoom menu and then click the desired zoom percentage. Testing the 3D Glasses 1. Click the Test 3D glasses and then follow the onscreen instructions. ASUS V6600/V6800 Series User’s Manual... -
Page 70: Asus Stereotv (Optional)
NOTE: The ASUS StereoTV utility can only be used with the Deluxe model. It can be used to view stereo video images with the optional 3D glasses (ASUS VR- 100G) using your monitor or TV as screen from traditional consumer devices, such as videocassette players, camcorders, digital cameras, and laser disc players through the onboard RCA or SVHS VIDEO-IN connectors. - Page 71 Use this button to select the video format (Options: NTSC, PAL-BGHI, PAL-4.43) and video source (Options: Composite, Video). Minimize Button Clicking this button minimizes the ASUS VR MoviePlayer. Exit Button Clicking this button closes StereoTV. ASUS V6600/V6800 Series User’s Manual...
-
Page 72: Install Windows Nt 4.0 Display Driver
Before installing the display driver in Windows NT 4.0, make sure that you have installed Windows NT 4.0 Service Pack3 or later, to take full advan- tage of the ASUS AGP-V6800 AGP features. (You may download service packs at http://www.microsoft.com/ntworkstation/downloads.) NOTE: The following steps assume your CD-ROM drive letter is D. -
Page 73: Resolution Table
140Hz 131.3 144Hz 135.2 150Hz 141.4 170Hz 162.9 200Hz 194.9 1280 x 960 60Hz 60.0 70Hz 69.9 72Hz 72.1 75Hz 75.2 85Hz 86.0 100Hz 101.7 120Hz 123.5 140Hz 145.1 144Hz 150.5 150Hz 157.2 170Hz 179.8 ASUS V6600/V6800 Series User’s Manual... -
Page 74: Color Depth
74.6 70Hz 87.4 72Hz 90.0 75Hz 94.0 85Hz 106.7 100Hz 126.7 1920 x 1440 60Hz 89.4 70Hz 104.9 72Hz 108.5 75Hz 112.5 85Hz 129.4 2048 x 1536 60Hz 95.5 70Hz 111.9 72Hz 115.3 75Hz 121.3 ASUS V6600/V6800 Series User’s Manual... -
Page 75: Troubleshooting
I can’t use VideoSecurity Composite CCDs. Any device used must be con- with my USB CCD or IEEE nected to an ASUS video card. 1394 CCD. I am using Video Security • This is a very important issue when you decide to and it seems my hard disk use VideoSecurity with the “never stop”... - Page 76 VideoSecurity and install a new copy. Make a way to recover my pass- sure that the password that you assigned can be eas- word? ily remembered. You may write down your password and store it in a safe place. ASUS V6600/V6800 Series User’s Manual...
Need help?
Do you have a question about the AGP-V6600 MX and is the answer not in the manual?
Questions and answers