Table of Contents
Advertisement
Available languages
Available languages
IMPORTANT
Do not return this product to the store.
Simply call our customer service department for any questions or concerns:
1-800-890-4076
(8:30am - 5:30pm E.S.T.)
DATED PROOF OF PURCHASE REQUIRED FOR WARRANTY SERVICE.
IMPORTANTE
No devuelva este producto a la tienda.
Sólo hay que llamar nuestro departamento de servicio
al cliente en caso de tener preguntas o inquietudes:
1-800-890-4076
(8:30am - 5:30 p.m. E.S.T.E.)
SE REQUIERE PRUEBA DE COMPRA CON FECHA PARA SERVICIO BAJO GARANTÍA.
ELECTRIC HEATER
CALENTADOR ELÉCTRICO
Due to constant improvements to our products, images may differ slightly from actual product.
Debido a la mejora continua de nuestros productos, las imágenes pueden variar ligeramente
del producto real.
Advertisement
Chapters
Table of Contents

Related Manuals for CAMBRIDGE 16716

Summary of Contents for CAMBRIDGE 16716
- Page 1 IMPORTANT Do not return this product to the store. Simply call our customer service department for any questions or concerns: 1-800-890-4076 (8:30am - 5:30pm E.S.T.) DATED PROOF OF PURCHASE REQUIRED FOR WARRANTY SERVICE. IMPORTANTE No devuelva este producto a la tienda. Sólo hay que llamar nuestro departamento de servicio al cliente en caso de tener preguntas o inquietudes: 1-800-890-4076...
-
Page 2: Table Of Contents
TABLE OF CONTENTS SECTION 1: QUICK REFERENCE GUIDE Special Characteristics ..........................3 Unpacking and Installing Your Electric Fireplace ..................3 SECTION 2: WARNINGS & PRECAUTIONS Important Safety Instructions........................4-5 Specifications ..............................6 Testing the Unit............................6 SECTION 3: UNDERSTANDING YOUR ELECTRICAL FIREPLACE Parts list ...............................7 SECTION 4: OPERATING INSTRUCTIONS Grounding Instructions ..........................8 Control Panel Operating Procedures .......................8-9... - Page 3 READ ALL INSTRUCTIONS BEFORE USING THIS APPLIANCE 1. Before permanently setting up your fireplace, make sure to plug it into a convenient outlet and verify the circuit breakers operate correctly. 2. The electric fireplace may emit a slight, harmless odor when first used. This odor is normal and is caused by the initial heating of internal fireplace parts.
-
Page 4: Section 1: Quick Reference Guide
SECTION 1 QUICK REFERENCE GUIDE 1.1 SPECIAL CHARACTERISTICS A) The smoldering glow of the flames are similar those observed in a real fireplace. This heater is ideal for year round use even when the central heating has been turned off. B) This fireplace produces a hot air current. -
Page 5: Section 2: Warnings & Precautions
Warning: When using this product, basic precautions should always be taken, including the following: Your Cambridge Electric Fireplace is classified as a moveable heater. As with any electrical appliance and particularly with electric heaters, basic precautions must be followed in order to reduce the risk of fire, burns, electrical shocks and/or other serious injuries or death. - Page 6 SECTION 2 WARNINGS & PRECAUTIONS 2.1 IMPORTANT SAFETY INSTRUCTIONS (CONTINUED) 10. Do not insert or allow foreign objects to enter any of the ventilation or circulation ducts as this may cause electric shock, fire or otherwise damage the unit. 11. The unit’s power cord must be connected to a properly grounded and protected, 120 V electrical outlet. Always use ground fault protection where required by the electrical code.
-
Page 7: Specifications
WARNINGS & PRECAUTIONS SECTION 2 2.2 SPECIFICATIONS TECHNICAL SPECIFICATIONS ITEM (MODEL) 16716 (HBL-15SDBP/M26) VOLTAGE 120V AC FREQUENCY 60 Hz POWER 1500 W NET WEIGHT 19.8 kg / 43.7 lbs UNIT DIMENSIONS 22.875” L x 15.5” W x 25.59” H 58.1 cm L x 39.4 cm W x 65 cm H 2.3 TESTING THE UNIT... -
Page 8: Section 3: Understanding Your Electrical Fireplace
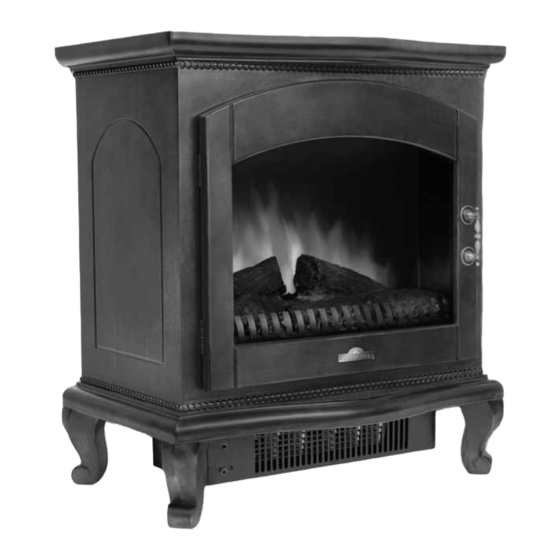
SECTION 3 UNDERSTANDING YOUR ELECTRICAL FIREPLACE 3.1 PARTS LIST Fig. 1 Top plate Door with transparent window Handle Foot Pilot light Hot air outlet Fig. 2 Control panel 2 spare replacement Back plate bulbs stored in the packaging foam Room air inlet... -
Page 9: Section 4: Operating Instructions
SECTION 4 OPERATING INSTRUCTIONS 4.1 GROUNDING INSTRUCTIONS This fireplace is for use on 120 V outlets. The cord has a 3 blade plug (See Figure 3-A). An adapter is available for connecting three-blade grounded-type plugs to two-slot receptacles (See Figure 3-C). The green grounding plug extending from the adapter must be connected to a permanent ground such as a properly grounded outlet box. - Page 10 OPERATING INSTRUCTIONS SECTION 4 4.2 CONTROL PANEL OPERATING PROCEDURES (CONTINUED) Flame Operation: 1. To switch on the flame, flip the FLAME POWER rocker switch to on. The red LED light on the switch turns on. 2. To adjust the brightness of the flame, turn the right-hand dial clockwise, marked FLAME, until it reaches the brightness you desire.
-
Page 11: Section 5: Maintenance
SECTION 5 MAINTENANCE 5.1 CLEANING YOUR FIREPLACE WARNING: Before cleaning the exterior of the appliance, disconnect the unit from the power supply and leave until cooled off. You can clean the exterior of the heater with a soft, damp, lint-free cloth. Do not use cleaning or polishing products. 5.2 CLEANING THE FRONT WINDOW PANEL WARNING: Before cleaning the exterior of the appliance, disconnect the unit from the power supply... -
Page 12: Replacing Flame Bulbs
MAINTENANCE SECTION 5 5.3 REPLACING FLAME BULBS Tools needed: Phillips screw driver Before you replace the flame bulbs, make sure that the unit is tuned off and the power cord is unplugged from the wall. Replacing flame bulbs should be carried out only by adults, children should not be allowed to do this operation. -
Page 13: Section 6: Troubleshooting
TROUBLESHOOTING SECTION 6 Problem Cause Solution Turn the main power supply switch Main power supply switch is off. to ON position. Too many appliances on this circuit, be sure that electrical supply Circuit breaker has tripped. for this unit is an individual circuit. Heater is unplugged Plug the cord into an outlet. - Page 14 SECTION 6 TROUBLESHOOTING Problem Cause Solution Call customer service Flame element isn’t seated Excessive noise properly. 1-800-890-4076. in the lower portion Call customer service of the heater. Motor is defective. 1-800-890-4076. Turn the heater power switch to the Heater power switch is off. ON position.
- Page 15 TROUBLESHOOTING SECTION 6 Problem Cause Solution The HEATER I and HEATER II Turn these two switches on. switches are not turned on. “TEMPERATURE CONTROL” Adjust this thermostat thermostat is set at low position. to High position. Fan runs but no heat comes out.
- Page 16 ÍNDICE SECCIÓN 1: GUÍA DE REFERENCIA RÁPIDA Características especiales .........................17 Desempaquetada e instalación de su chimenea eléctrica................17 SECCIÓN 2: ADVERTENCIAS Y PRECAUCIONES Importantes instrucciones de seguridad....................18-19 Especificaciones ............................20 Ensayo de la unidad ..........................20 SECCIÓN 3: CONOZCA SU CHIMENEA ELÉCTRICA Lista de partes ............................21 SECCIÓN 4: INSTRUCCIONES DE OPERACIÓN Instrucciones para conexión a tierra ......................22 Procedimientos de operación a partir del panel de control ..............23...
- Page 17 LEA TODAS LAS INSTRUCCIONES ANTES DE USAR ESTE APARATO 1. Antes de instalar permanentemente su chimenea, enchúfela en una toma de corriente adecuado para verificar \que los cortacircuitos de esa toma de corriente estén encendidos. 2. Al usarpor primera vez la chimenea eléctrica puede emitir un ligero olor que no implica peligro. Este olor es normal y es causado por el calentamiento inicial de las piezas internas de la chimenea y no volverá...
-
Page 18: Características Especiales
SECCIÓN 1 GUÍA DE REFERENCIA RÁPIDA 1.1 CARACTERÍSTICAS ESPECIALES A) El brillo ardiente de las llamas se puede distinguir difícilmente de aquel de una chimenea real. Este calentador es ideal para usar durante todo el año, incluso cuando se ha apagado la calefacción central. B) Esta chimenea produce corriente de aire caliente. -
Page 19: Importantes Instrucciones De Seguridad
Advertencia: Al usar este producto, siempre se debe seguir las precauciones básicas, incluyendo las siguientes: Su chimenea eléctrica Cambridge está clasificada como un calentador movible. Como con cualquier aparato eléctrico y particularmente con calentadores eléctricos, se deben seguir las precauciones básicas para reducir riesgos de incendios, quemaduras, electrocución y /o lesiones graves o la muerte. - Page 20 SECCIÓN 2 ADVERTENCIAS Y PRECAUCIONES 2.1 IMPORTANTES INSTRUCCIONES DE SEGURIDAD (CONTINUADO) 10. No inserte ni deje que entre objetos extraños en los ductos de ventilación o circulación puesto que esto puede causar electrocución, incendios u otros daños a la unidad. 11.
-
Page 21: Especificaciones
ADVERTENCIAS Y PRECAUCIONES SECCIÓN 2 2.2 ESPECIFICACIONES ESPECIFICACIONES TÉCNICAS ITEM (MODELO) 16716 (HBL-15SDBP/M26) VOLTAJE 120 V CA FRECUENCIA 60 Hz ENERGÍA 1500 W PESO NETO 19.8 kg / 43.7 lb DIMENSIONES DE LA UNIDAD 22.875” L x 15.5” A x 25.59” A 58.1 cm L x 39.4 cm A x 65 cm A... -
Page 22: Lista De Partes
SECCIÓN 3 INSTRUCCIONES DE OPERACIÓN 3.1 INSTRUCCIONES PARA CONEXIÓN A TIERRA Fig. 1 Placa superior Puerta con ventanilla transparente Manija Luz del piloto Salida de aire caliente Fig. 2 Panel de control 2 bombillos de repuesto adicionales Placa posterior empacados en bolsa de espuma Entrada de aire ambiente... -
Page 23: Instrucciones Para Conexión A Tierra
SECCIÓN 4 INSTRUCCIONES DE OPERACIÓN 4.1 INSTRUCCIONES PARA CONEXIÓN A TIERRA Esta chimenea es para usar en 120 voltios. El cordón tiene un enchufe (Vea la Figura 3-A). Hay un adaptador disponible para conectar los enchufes de tres patas con conexión a tierra a receptáculos de dos ranuras (Vea Figura 3-C). El enchufe verde que se extiende del adaptador debe conectarse a una puesta a tierra permanente como una caja de empalmes correctamente conectada a tierra. -
Page 24: Procedimientos De Operación A Partir Del Panel De Control
INSTRUCCIONES DE OPERACIÓN SECCIÓN 4 4.2 PROCEDIMIENTOS DE OPERACIÓN A PARTIR DEL PANEL DE CONTROL (CONTINUADO) Operación de las llamas: 1. Para encender el efecto de llamas de su chimenea, mueva el interruptor basculador FLAME POWER a ON. 2. Para ajustar el brillo de las llamas, gire el dial de mano derecha, marcado FLAME (Brillo de llamas) hasta que se alcance el brillo deseado. -
Page 25: Sección 5 Mantenimiento
SECCIÓN 5 MANTENIMIENTO 5.1 LIMPIEZA DE LA CHIMENEA ADVERTENCIA: Antes de limpiar la parte exterior de la unidad, desconecte la unidad de la fuente de corriente y deje que se enfríe. Ud. Puede limpiar la parte exterior del calentador con un trapo suave, húmedo, libre de pelusas. No use productos de limpieza o para brillar. -
Page 26: Reemplazar Los Bombillos De Flama
SECCIÓN MANTENIMIENTO 5.3 REEMPLAZAR LOS BOMBILLOS DE FLAMA Herramientas necesarias: Destornillador de estrella tipo “Phillips” Antes de reemplazar los bombillos de flama, asegúrese que la unidad esté apagada y que el cable de corriente esté desconectado del tomacorriente. El cambio de los bombillos de flama debe ser efectuado únicamente por adultos. Ningún niño debería efectuar esta operación. -
Page 27: Sección 6: Solución De Problemas
SOLUCIÓN DE PROBLEMAS SECCIÓN 6 Problema Causa Solución Coloque el interruptor principal El interruptor principal de corriente en la posición ON de corriente está apagado. (Encendido). No conecte demasiados aparatos a este circuito; asegúrese El cortacircuitos está saltado. que la corriente eléctrica para esta unidad venga por un circuito individual. - Page 28 SECCIÓN 6 SOLUCIÓN DE PROBLEMAS Problema Causa Solución El elemento de las llamas Llame el servicio al cliente Ruido excesivo no está encajado correctamente. 1-800-890-4076. en la parte baja Llame el servicio al cliente del calentador. El motor es defectuoso. 1-800-890-4076.
- Page 29 SOLUCIÓN DE PROBLEMAS SECCIÓN 6 Problema Causa Solución Los interruptores de HEATER I (Calentador en bajo) Encienda estos dos interruptores. y HEATER II (Calentador en alto) no están encendidos. El termostato El ventilador TEMPERATURE CONTROL Ajuste este termostato funciona, pero (Control de temperatura) en la posición alta.
Need help?
Do you have a question about the 16716 and is the answer not in the manual?
Questions and answers