
Related Manuals for PRESONUS FADERPORT - V2.0


Summary of Contents for PRESONUS FADERPORT - V2.0
- Page 1 FADERPORT USB DAW Controller User’s Manual Version 2.0 © 2008, PreSonus Audio Electronics, Inc. All Rights Reserved.
- Page 2 Some states do not allow limitations on how long an implied warranty lasts, so the above limitation may not apply to you. In no event will PreSonus be liable for...
-
Page 3: Table Of Contents
TABLE OF CONTENTS 1 OVERVIEW 1.1 Introduction ........................... 3 1.2 Features ..........................4 1.3 What is in the Box ......................... 5 1.4 System Requirements ......................6 2 OPERATION 2.1 Quick Start Up ........................7 2.1.1 Installation in Microsoft Windows ................7 2.1.2 Installation in Mac OS X .................... -
Page 5: Overview
OVERVIEW 1.1 INTRODUCTION Thank you for purchasing the PreSonus FaderPort. PreSonus Audio Electronics has designed the FaderPort utilizing high-grade components to insure optimum performance that will last a lifetime. The FaderPort puts the feel, vibe, and efficiency back into music recording and production. No more clicking through menus and drawing automation edits with a mouse. -
Page 6: Features
OVERVIEW 1.2 FEATURES The FaderPort is a powerful and affordable USB DAW controller. Featuring the same ultra high-quality Alps fader that is used in professional control surfaces and digital mixing console, the FaderPort utilizes a dual servo motorized drive belt system for fast-acting, accurate, and smooth operation. The FaderPort's 100mm long throw fader delivers 1024-step resolution for writing ultra-fine and accurate fades and adjustments. -
Page 7: What Is In The Box
1.3 What is in the Box Your FaderPort package contains the following: • FaderPort USB DAW Controller • 18” USB cable • 9V Power Supply • Driver installation disc • PreSonus Warranty Card P r e S o n u s 2 0 0 8... -
Page 8: System Requirements
OVERVIEW 1.4 SYSTEM REQUIREMENTS Below are the minimum computer system requirements for your FaderPort. Computer system requirements: • Windows XP/Vista (32bit only) or Mac OS X (10.4 +) with one available USB port Control Emulation: • HUI Emulation: Pro Tools M-Powered/LE/HD v.6+ Cubase LE1 Cubase SE/SL 3 Nuendo 2... -
Page 9: Operation
OPERATION 2.1 QUICK START UP 2.1.1 Installation in Microsoft Windows After inserting the Installation CD into your CD-ROM drive, the FaderPort installer will take you through each step of the installation process. Please read each message carefully – ensuring especially you do not connect your FaderPort early. -
Page 10: Installation In Mac Os X
OPERATION 2.1.2 Installation in Mac OS X The FaderPort Installer was written to be as simple and easy-to-follow as possible. Please read each message carefully to ensure the FaderPort is properly installed. Before continuing the FaderPort Installation Setup, please close all multimedia applications and disconnect your FaderPort from your computer. -
Page 11: Individual Daw Configuration Instructions
1. Go to Devices | Device Setup 2. In the Setup window, click on the “+” sign in the top left corner and select “PreSonus FaderPort” from the list of control surfaces 3. In the FaderPort Configuration menu to the right, set both the MIDI Input and the MIDI Output to “USB... -
Page 12: Cubase/Nuendo Hui Setup
"Devices List". Set the MIDI Input and Output to “USB Audio Device [Emulated]” (PC) “PreSonus FaderPort” (Mac) Click “OK”. Your FaderPort is now ready to use. Enjoy! 10 | P r e S o n u s 2 0 0 8... - Page 13 OPERATION PLEASE NOTE: Because the FaderPort was not designed to function specifically as a HUI device in these earlier versions of Cubase and Nuendo, the FaderPort will have limited functionality in these applications The following buttons have no functionality: • Output •...
-
Page 14: Digital Performer 4.5+ Setup
OPERATION 2.2.3 Digital Performer 4.5+ setup Once you have installed the FaderPort drivers and connected your FaderPort, launch Digital Performer to set up the FaderPort as a native controller OSX 10.4 (Tiger) users only, Leopard users please skip to Step 4 In Digital Performer go to Setup | Open Audio MIDI Setup 2. - Page 15 OPERATION 5. Click the gray “ + “ sign and select “PreSonus FaderPort” from the pull-down menu. Tiger users continue to Step 7. Leopard users only: 6. Under Unit select Native Mode Under MIDI select “FaderPort Device-1” Click OK to close the window. Enjoy! Tiger Set-up continued 7.
- Page 16 OPERATION User Defined Key Mappings You can define 5 custom key mappings (bindings). To do this: 1- Go to Setup | Commands. You will see a column labeled MAC KEY 2 2- On the row of the command you want to map - Click on the MAC KEY 2 column The commands are mapped by simultaneously holding down Shift, Control, Command, and Option keys and typing in a letter The following letters are mapped to these buttons on the FaderPort:...
-
Page 17: Live! Setup
OPERATION 2.2.4 LIVE! Setup Once you have installed the FaderPort drivers and connected your FaderPort, press the STOP button to change the FaderPort’s mode of operation. The “OUTPUT” and “UNDO” buttons will begin to flash. Press the “OUTPUT” button to enter LIVE mode, press the “UNDO” button to exit. Once you have pressed the “OUTPUT”... - Page 18 OPERATION Plug-in Mode Press the “TOUCH” button to assign the fader to the plug-in devices for the currently selected track in the main display. While in Plug-in Mode, the Left/Right arrow buttons will allow you to scroll through the available devices. A device can then be chosen to edit by pressing the “BANK”...
- Page 19 OPERATION Quick Guide to Special Functionality in LIVE! 17 | P r e S o n u s 2 0 0 8...
-
Page 20: Logic Pro/Express 7+ Setup
Please Note: If the FaderPort is already present in the control surface environment, your FaderPort is ready to use. No setup is required 3. Select “PreSonus FaderPort” from the list of control surfaces and click “Add”. Close the device list window. - Page 21 OPERATION Special button mappings in Logic: To enhance Logic work flow, the functions of several buttons have been assigned to control different parameters than what the silk screen indicates. These changes are as follows: Mix: Toggles the mixer window Proj: Toggles View Automation Trns: Toggles Auto Zoom on the Track...
-
Page 22: Protools Setup
OPERATION 2.2.6 ProTools Setup Once you have installed the FaderPort drivers and connected your FaderPort, launch ProTools to set up the FaderPort as a HUI device 1. Go to Setups | Peripherals 2. Create one HUI device under MIDI Controllers 3. -
Page 23: Samplitude/Sequoia 10+ Setup
Hardware Controller and click the “Add New” button. From pop-up menu, select PreSonus FaderPort (native) 3. Set the MIDI ports to USB Audio Device and close the dialog. Your FaderPort is now ready to use. Enjoy! 21 | P r e S o n u s 2 0 0 8... - Page 24 OPERATION Special button mappings in Samplitude/Sequoia: Output: Active Control Mode User: Metronome Active Control Mode: Enables the Fader to control the active element in the Mixer, Track Editor, or Plugin. Element is chosen for control with a mouse click. 22 | P r e S o n u s 2 0 0 8...
-
Page 25: Sonar 6+ Setup
USB Audio Device for both the Input Port and the Output Port 2. Go to Options | Control Surfaces and click the yellow plus sign 3. Select PreSonus FaderPort as Controller/Surface. 23 | P r e S o n u s 2 0 0 8... - Page 26 OPERATION 4. Select USB Audio Device for both Input Port and Output Port. Click “OK” and close the window. 5. Go to Options | Global… Click the “MIDI” tab and make sure both Key Aftertouch and Channel Aftertouch are checked. Click “OK”...
-
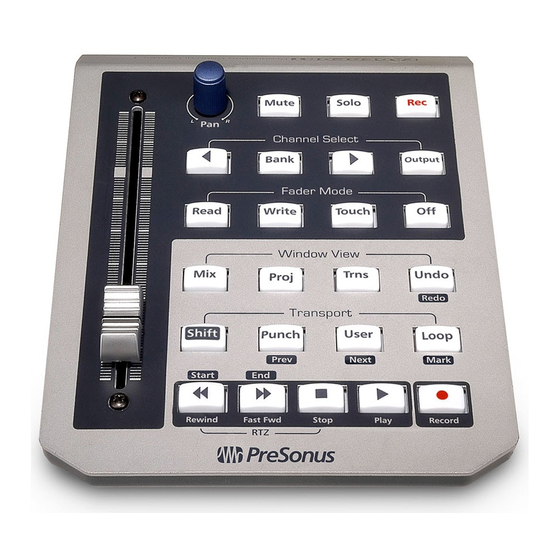
Page 27: Hardware Overview
HARDWARE OVERVIEW 3.1 FRONT PANEL LAYOUT 25 | P r e S o n u s 2 0 0 8... -
Page 28: Function Explanations
HARDWARE OVERVIEW 3.1.1 Function Explanations Fader Touch-sensitive, ultra-smooth, 100mm long-throw, motorized fader for writing volume automation of single channel and grouped channels. Please Note: The fader’s motor requires a dedicated 9v power supply. To use the motorized fader, the power supply must be connected, however, the fader will send volume control messages with or without the power supply. - Page 29 HARDWARE OVERVIEW Fader Mode Enables the selected track’s fader for read, write, and/or touch automation control, or turn the fader motor off with these controls. “Off” disables fader functionality and motor. Window View Open and close your DAW’s main windows, and quickly access the ‘Undo’...
- Page 30 HARDWARE OVERVIEW User User-definable button. In Native mode for Nuendo/Cubase this is assigned to turn post roll off and on. Shift + User NEXT: Moves the cursor to the next set marker. Loop Engages loop mode in transport. Selected section of project will replay automatically or “loop”...
- Page 31 HARDWARE OVERVIEW Play Engages playback Record Engages record on record-enabled tracks RTZ (return to zero) Press the REWIND and STOP buttons simultaneously to return to beginning of project. 29 | P r e S o n u s 2 0 0 8...
-
Page 32: Technical Information
No Fader Functionality Make sure that the “OFF” button is not engaged. PreSonus FaderPort does not show up in the device list in Logic If you have customized your Applications directory or if you have multiple versions of Logic installed, the installer may not be able to automatically install the FaderPort.bundle file to the correct path. -
Page 33: Specifications
USB ................ v1.1, provides FaderPort Logic Power Fader Motor Power Supply ................9VDC-1.2Amp As a commitment to constant improvement, PreSonus Audio Electronics, Inc. reserves the right to change any specification stated herein at any time in the future without notification.
Need help?
Do you have a question about the FADERPORT - V2.0 and is the answer not in the manual?
Questions and answers