HTC Dream Quick Start Manual
Quick start guide
Hide thumbs
Also See for Dream:
- User manual (222 pages) ,
- Service manual (113 pages) ,
- Quick start manual (56 pages)
Table of Contents
Advertisement
Quick Links
Advertisement
Table of Contents

Related Manuals for HTC Dream


Summary of Contents for HTC Dream
- Page 1 Quick Start Guide...
-
Page 2: Please Read Before Proceeding
Limitation of Damages TO THE MAXIMUM EXTENT PERMITTED BY APPLICABLE LAW, IN NO EVENT SHALL HTC OR ITS PROVIDERS BE LIABLE TO USER OR ANY THIRD PARTY FOR ANY INDIRECT, SPECIAL, CONSEQUENTIAL, INCIDENTAL OR PUNITIVE DAMAGES OF ANY KIND, IN CONTRACT OR TORT, INCLUDING, BUT NOT LIMITED... -
Page 3: Table Of Contents
Contents 1. Welcome to the HTC Dream Quick Start Guide ....5 2. Inside the Box ................5 3. Getting to Know the HTC Dream ..........6 4. Installing the SIM Card, Battery, and Storage Card...7 5. Charging the Battery ..............10 6. Starting Up ................... 10 7. - Page 4 Table of Contents 20. Taking Pictures ................34 21. Copying Multimedia Files to Your Device ......35 22. Listening to Music ..............36 23. Viewing Pictures ................ 37 24. Synchronizing Your Device ............ 38 25. Downloading Applications............ 39 26. Resetting Your Device ............. 40...
-
Page 5: Welcome To The Htc Dream Quick Start Guide
Quick Start Guide 5 1. Welcome to the HTC Dream Quick Start Guide Congratulations on your purchase of the HTC Dream. This Quick Start Guide will help you get started with your Android™ powered Touch Phone. The Quick Start Guide offers... -
Page 6: Getting To Know The Htc Dream
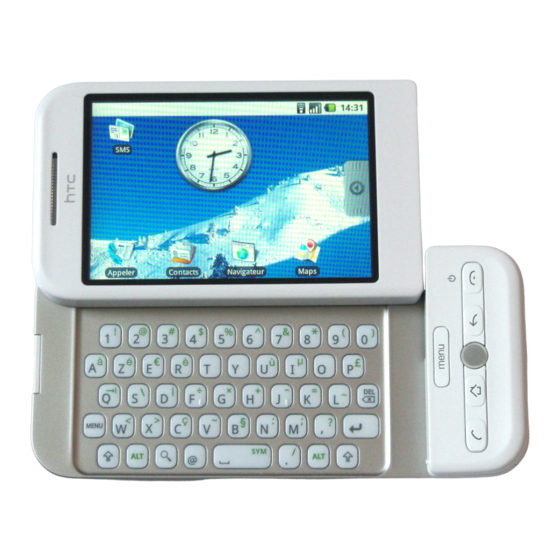
6 Quick Start Guide 3. Getting to Know the HTC Dream Earpiece Notification LED Touch Screen Keyboard MENU BACK HOME CALL END CALL/POWER TRACKBALL USB Connector/Earphone Jack Microphone VOLUME Speaker Megapixel Camera VOLUME DOWN Back Cover CAPTURE Storage Card Slot... -
Page 7: Installing The Sim Card, Battery, And Storage Card
Quick Start Guide 7 4. Installing the SIM Card, Battery, and Storage Card Make sure your device is turned off before installing the SIM card, battery, and storage card. You also need to remove the back cover before you can install the battery and SIM card. To remove the back cover Hold the device sideways with the control buttons on the right. - Page 8 8 Quick Start Guide To install the SIM card Locate the SIM card slot, then insert the SIM card with its gold contacts facing down and its cut- off corner facing out the card slot. Cut-off Slide the SIM card corner completely into the slot.
- Page 9 Quick Start Guide 9 To install the storage card Hold the device sideways with the control buttons on the right. Open the keyboard, then locate the storage card slot at the side of the control buttons. Pry open the storage card slot cover. Insert the microSD card into the slot with its golden contacts facing down until it clicks in place.
-
Page 10: Charging The Battery
10 Quick Start Guide 5. Charging the Battery New batteries are shipped partially charged. Before you start using your device, it is recommended that you install and charge the battery. To charge the battery Flip open the USB connector cover at the bottom panel of your device. - Page 11 Quick Start Guide 11 Create a Gmail™ account and sign in Read the set up information on the screen then touch Next. Touch Create. Notes • If you have an existing Gmail account, touch Sign in. Use the keyboard to enter your user name and password, then touch Sign in.
-
Page 12: The Home Screen
12 Quick Start Guide 7. The Home Screen The Home screen is your starting point for using the applications on your device. You can customize the Home screen to display application icons, shortcuts, folders, and widgets according to your preference. Signal strength Connection status Battery status... - Page 13 Quick Start Guide 13 To go to the left and right side of the extended Home screen The Home screen extends beyond the screen width to provide more space for adding icons, widgets, and more. Slide your finger horizontally across the screen to go to the left or right side of the extended Home screen.
-
Page 14: Accessing Device Applications And Settings
14 Quick Start Guide 8. Accessing Device Applications and Settings The Applications tab holds all pre-installed applications on your device. This tab will also hold the icons of applications that you download and install from Android Market. To open the Applications tab Press HOME, then touch On the Applications tab: •... - Page 15 Quick Start Guide 15 Control and customize device settings from the Settings screen. To open the Settings screen • On any application screen, press HOME > MENU, then touch Settings. • On the Home screen, touch the Applications tab, then touch Settings.
-
Page 16: Making Your First Call
16 Quick Start Guide 9. Making Your First Call To place a call Press the CALL ( ) button, then touch the Dialer tab. Touch the keys on the dialer to enter the phone number. If you touched a wrong number key, touch to erase each subsequent digit of a number. -
Page 17: Creating Contacts
Quick Start Guide 17 10. Creating Contacts Contacts gives you quick and easy access to people you frequently communicate with. You can view and create contacts on your device and sync these with your Gmail contacts on the web. You can also import contacts stored on your SIM card. - Page 18 18 Quick Start Guide Touch More info if you want to store additional information for the contact such as a postal address, an instant messaging ID, or additional phone numbers or e-mail addresses. When finished, touch Save. To import contacts from the SIM card Press HOME, then touch Contacts.
-
Page 19: Entering Information
Quick Start Guide 19 11. Entering Information Open and use the QWERTY keyboard to enter information on your device. To use the keyboard Hold your device sideways, with the control buttons on the right. Push the screen panel up to reveal the keyboard. To enter text, simply press the keys on the keyboard. -
Page 20: Basic Settings
20 Quick Start Guide 12. Basic Settings Customize your device settings to suit your personal needs. Volume Do any of the following to adjust the ringer and media volumes: • While on any screen or application (except during a call, or when playing music or watching a video), press the VOLUME UP or VOLUME DOWN button on the left panel of the device to adjust the ringer volume to your desired level. - Page 21 Quick Start Guide 21 Wallpaper You can change the Home screen wallpaper. On the Home screen, press and hold an empty area to open the Add to Home menu, then touch Wallpaper. Touch Wallpaper gallery. Touch a wallpaper thumbnail to view an enlarged version on the screen.
-
Page 22: Screen Lock
22 Quick Start Guide Enter the default SIM card PIN using the keyboard, then touch OK. To change the SIM card PIN, touch Change PIN code. Emergency calls can be placed at any time, without requiring a PIN. Screen lock Locking the screen turns off the display and disables the control buttons to prevent accidental screen touches and button presses when the device is in your bag, purse, or... - Page 23 Quick Start Guide 23 Read the information on the screen, then touch Next. Study the example pattern on the screen, then touch Next. Draw the screen unlock pattern by connecting at least four dots in a vertical, horizontal and/or diagonal direction.
-
Page 24: Screen Settings
24 Quick Start Guide Screen settings Conserve battery power by adjusting the screen brightness and setting a shorter idle time before the screen turns off. To adjust the screen brightness Press HOME > MENU, then touch Settings. Touch Sound & display, scroll down the screen, then touch Brightness. -
Page 25: Sending A Text Message
Quick Start Guide 25 13. Sending a Text Message Easily create and send text messages (SMS) from your device. Press HOME, touch the Applications tab, then touch Messaging > New message. Open the keyboard, then enter the mobile phone number of the message recipient in the To field. -
Page 26: Sending A Multimedia Message
26 Quick Start Guide 14. Sending a Multimedia Message Create and send multimedia messages (MMS) that contain pictures, slideshows, or audio clips. Press HOME, touch the Applications tab, then touch Messaging > New message. Open the keyboard, then enter the mobile phone number or e-mail address of the message recipient in the To field. -
Page 27: Using Wi-Fi
Quick Start Guide 27 15. Using Wi-Fi You can use Wi-Fi to connect your device to the Internet if you have access to a wireless network. To connect to an open Wi-Fi network Press HOME > MENU, then touch Settings > Wireless controls. -
Page 28: Sending E-Mails
28 Quick Start Guide 16. Sending E-mails Use Gmail™ to send and receive e-mails on your device. Note If you have not set up a Gmail account, you will be prompted to create a new one or sign in to an existing account before you can use Gmail. -
Page 29: Surfing The Web And Viewing Internet Videos
Quick Start Guide 29 For more information about creating and sending e-mails using Gmail or other e-mail services, refer to the “Exchanging Messages” chapter on the User Manual PDF. 17. Surfing the Web and Viewing Internet Videos Experience desktop-like web surfing when browsing the Internet. - Page 30 30 Quick Start Guide To launch YouTube and watch videos YouTube™ is a free online video streaming service that allows you to search and view videos which have been uploaded by YouTube members. Note Make sure you have an active data (GPRS/3G) or Wi-Fi connection before you open YouTube.
-
Page 31: Bluetooth
Quick Start Guide 31 18. Bluetooth Connect your device to a Bluetooth stereo headset for hands- free phone conversations. To connect your device with a Bluetooth stereo headset Make sure that both your device and the Bluetooth stereo headset are turned on and within close range, and that the headset is visible. -
Page 32: Managing Your Time
32 Quick Start Guide 19. Managing Your Time Use Calendar and Alarm Clock to create events and remind you of your upcoming appointments. To create an event Press HOME, touch the Applications tab, then touch Calendar. Press MENU and touch New event. Open the keyboard and enter the event name. - Page 33 Quick Start Guide 33 To set an alarm Press HOME, touch the Applications tab, then touch Alarm Clock. Touch a default alarm on the screen. Select the Alarm check box to turn the alarm on. Touch Time to set the alarm time, then touch Set when finished.
-
Page 34: Taking Pictures
34 Quick Start Guide 20. Taking Pictures Use the built-in 3.2 megapixel camera of your device to take pictures. Note Install a storage card before using the Camera. To take pictures Frame your subject on the screen. Press the CAPTURE button half-way to activate auto-focus. The auto-focus indicator appears in the upper-right corner of the screen and the device beeps to indicate that the subject is in focus. -
Page 35: Copying Multimedia Files To Your Device
Quick Start Guide 35 21. Copying Multimedia Files to Your Device Before using Pictures or Music, copy multimedia files to the storage card installed on your device. Connect the device to the computer using the USB cable. When the USB connected icon ( ) appears in the status bar, touch and hold the status bar, then slide your finger downward to open the notifications panel. -
Page 36: Listening To Music
36 Quick Start Guide 22. Listening to Music After you copied music files to the storage card, launch Music to play back music on your device. To play music Press HOME, touch the Applications tab, then touch Music. The Music library screen opens. Touch a music category. -
Page 37: Viewing Pictures
Quick Start Guide 37 23. Viewing Pictures After you copied pictures to the storage card, or after you captured a picture using the Camera, open Pictures to view, edit, assign, and share your pictures. To view pictures Press HOME, touch the Applications tab, then touch Pictures. -
Page 38: Synchronizing Your Device
38 Quick Start Guide 24. Synchronizing Your Device Google applications on your phone, such as Gmail, Calendar, and Contacts, give you access to the same personal information that you add, view, and edit using Gmail or Google Calendar on the web. Note By default, all personal information in Gmail, Calendar, and Contacts will sync whenever you make a change on a contact or event, or receive a new message. -
Page 39: Downloading Applications
Quick Start Guide 39 25. Downloading Applications Open Android Market to view, download, and install useful applications and fun games to your device. Note You need to have an active data (GPRS/3G) or Wi-Fi connection before you can download and install an application. To download and install an application Press HOME, touch the Applications tab, then touch Market. -
Page 40: Resetting Your Device
40 Quick Start Guide 26. Resetting Your Device If you experience some sluggishness with your device, you can perform a reset to shut down all programs and restart your device. To perform a soft reset Remove the back cover. Remove the battery for a few seconds. Reinstall the battery, replace the back cover, then turn on the device. -
Page 41: Important Health Information And Safety Precautions
Quick Start Guide 41 Intellectual Property Right Information Google, Gmail, Google Talk, Google Maps, YouTube, Android, and Android Market are trademarks of Google Inc. Important Health Information and Safety Precautions When using this product, the safety precautions below must be taken to avoid possible legal liabilities and damages. - Page 42 42 Quick Start Guide SAFETY PRECAUTIONS FOR POWER SUPPLY UNIT • Use the correct external power source A product should be operated only from the type of power source indicated on the electrical ratings label. If you are not sure of the type of power source required, consult your authorized service provider or local power company.
- Page 43 Quick Start Guide 43 Note: This product should be operated only with the following designated Battery Pack(s). • HTC, Model DREA160 • Take extra precautions • Keep the battery or device dry and away from water or any liquid as it may cause a short circuit.
- Page 44 NF EN 50332-1:2000 and/or NF EN 50332-2:2003 standards as required by French Article L. 5232-1. • Earphone, manufactured by HTC, Model HS S200. SAFETY IN AIRCRAFT Due to the possible interference caused by this product to an aircraft’s navigation system and its communications network, using this device’s phone function on board an airplane is against the law in most countries.
- Page 45 Quick Start Guide 45 ENVIRONMENT RESTRICTIONS Do not use this product in gas stations, fuel depots, chemical plants or where blasting operations are in progress, or in potentially explosive atmospheres such as fuelling areas, fuel storehouses, below deck on boats, chemical plants, fuel or chemical transfer or storage facilities, and areas where the air contains chemicals or particles, such as grain, dust, or metal powders.
- Page 46 46 Quick Start Guide SAFETY PRECAUTIONS FOR RF EXPOSURE • Avoid using your phone near metal structures (for example, the steel frame of a building). • Avoid using your phone near strong electromagnetic sources, such as microwave ovens, sound speakers, TV and radio. •...
- Page 47 Quick Start Guide 47 NONIONIZING RADIATION Your device has an internal antenna. This product should be operated in its normal-use position to ensure the radiative performance and safety of the interference. As with other mobile radio transmitting equipment, users are advised that for satisfactory operation of the equipment and for the safety of personnel, it is recommended that no part of the human body be allowed to come too close to the antenna during operation of the equipment.
-
Page 48: General Precautions
48 Quick Start Guide General Precautions • Avoid applying excessive pressure to the device Do not apply excessive pressure on the screen and the device to prevent damaging them and remove the device from your pants’ pocket before sitting down. It is also recommended that you store the device in a protective case and only use your finger when interacting with the touch screen. - Page 49 Quick Start Guide 49 • Avoid hot areas The product should be placed away from heat sources such as radiators, heat registers, stoves, or other products (including amplifiers) that produce heat. • Avoid wet areas Never use the product in a wet location. •...
-
Page 50: Regulatory Agency Identifications
50 Quick Start Guide • Use product with approved equipment This product should be used only with personal computers and options identified as suitable for use with your equipment. • Adjust the volume Turn down the volume before using headphones or other audio devices. •... - Page 51 Quick Start Guide 51 Telecommunications & Internet Association (TIA) safety information • Pacemakers The Health Industry Manufacturers Association recommends that a minimum separation of six inches be maintained between a handheld wireless phone and a pacemaker to avoid potential interference with the pacemaker. These recommendations are consistent with the independent research by and recommendations of Wireless Technology Research.
-
Page 52: Weee Notice
52 Quick Start Guide WEEE Notice The Directive on Waste Electrical and Electronic Equipment (WEEE), which entered into force as European law on 13th February 2003, resulted in a major change in the treatment of electrical equipment at end-of-life. The purpose of this Directive is, as a first priority, the prevention of WEEE, and in addition, to promote the reuse, recycling and other forms of recovery of such wastes so as to reduce disposal.
Need help?
Do you have a question about the Dream and is the answer not in the manual?
Questions and answers