Canon EOS 50D Manual
- Instruction manual (305 pages) ,
- Product manual (39 pages) ,
- Installation roadmap manual (22 pages)
Advertisement
Roadmap to the EOS 50D
Three words can describe Canon's 50D dSLR — fast, sleek, and fun. It fits easily and comfortably in the hand with a compact yet substantial heft. It responds with the speed of a gazelle delivering images at a rate of 6.3 frames per second (fps) and at a stunning 15.1-megapixels. The EOS 50D is packed with Canon's latest features and technologies that collectively deliver speedy and reliable performance and superior image quality. Whether you're new to digital photography or a veteran, the EOS 50D hits a sweet spot of high image resolution, speed, and creative control.
This chapter puts some of the new features and technologies of the EOS 50D into everyday perspective and offers a roadmap to navigating the camera controls and menus. Where possible, I offer paradigms for using the camera that help you spend less time remembering what control to use and more time shooting.
Key Technology
Before we begin, it's worthwhile to look at key technology that the 50D offers. The first, the15.1-megapixel image sensor at 4752 × 3168 pixels produces full-resolution prints at 15.5 × 10.7 inches at 300 ppi, or 19.4 × 13.4 inches at 240 ppi for inkjet prints. The new CMOS (complementary metal-oxide semiconductor) features Canon's newest technology including:
- "Gapless" microlens technology and increased ISO range. While the EOS 50D packs more and smaller pixels on a sensor that's the same size as the EOS 40D (4.7 versus 5.7 micron pixels sizes, respectively), the new sensor is engineered to increase each pixel's light sensitive area and to use a larger microlens over each pixel. The spaces between microlens on the sensor array are now gapless so that each microlens covers more of the pixel surface than in previous Canon digital SLR sensors. Thus the EOS 50D provides approximately 1 to 1.5 f-stops better digital noise performance at high ISO sensitivities than previous sensors. In everyday shooting, this translates into new opportunities for lowlight shooting particularly when you're using an Image-Stabilized (IS) lens.
- DIGIC 4 processor. Every new iteration of Canon's DIGIC processor improves the speed of image processing, and that's no less true with the fourth generation of Canon's on-board processor. The 14-bit DIGIC 4 processor offers 30 percent faster image processing than previous processors. It also offers increased functionality including full and variable resolutions; High ISO Noise Reduction options; Auto Lighting Optimizer with three selectable levels; and Peripheral Illumination Correction, or vignette control, for JPEG capture (and vignette control for RAW files using Canon's Digital Photo Professional program). And the faster processor results in a faster and more responsive autofocus system. Taken together, DIGIC 4 performs more processing with more selectable options for image correction — all with no appreciable loss of speed and performance.
Camera Features Overview
If you've had your EOS 50D for any amount of time, then you are likely familiar with most of the controls on the camera. However, the following sections are designed to provide a paradigm for using the controls in logical and effi cient ways because once you learn the overall design, you can make camera adjustments more effi ciently. And chances are that there are some buttons and controls that you haven't figured out yet, so these sections help you make full use of all the 50D has to offer.
 Note It's important to become familiar with the names of camera controls now because I refer to these names throughout this book.
There are three main controls that can be used together or separately to control most functions on the EOS 50D. Here is a quick synopsis of the controls and when to use them.
- Main dial and Quick Control dial. You use the Main and Quick Control dials to make changes for the for dual-function buttons located along the top LCD panel such as the AF-Drive button (Autofocus mode and Drive mode). Use the Main dial to change the first named function. So for the AF-Drive button, you turn the Main dial to change the Autofocus mode. For the second named function, you make changes using the Quick Control dial. So, you turn the Quick Control dial to change the Drive mode. This holds true for the
Metering mode-White Balance and ISO-Flash Compensation buttons on the camera as well. Some camera menu screens such as the Quality screen also use the Main and Quick Control dials for selecting different values on the screen. - Multi-controller. This eight-way control functions as a button when it's pressed, and as a joystick when it's tilted in any direction. With the new Quick Control screen, the Multi-controller is the primary control. Ironically, the Quick Control dial would seem to be the logical choice to activate the Quick Control screen, but, such is not the case. To activate the Quick Control menu, press the center of the Multicontroller, and then tilt the Multicontroller to move around the screen. Once an option is selected on the Quick Control screen, you can turn the Quick Control dial or Main dial to make changes.

1.1 The Main and Quick Control dials
![]()
1.2 The Multicontroller - Set button. The Set button is located in the center of the Quick Control dial, and you use it to confirm changes you make to many menu items and to open submenus. When you're using the Quick Control screen, you can select a setting, such as White Balance, and then press the Set button to display all the options for the setting, in this case, the White Balance screen showing all White Balance options.


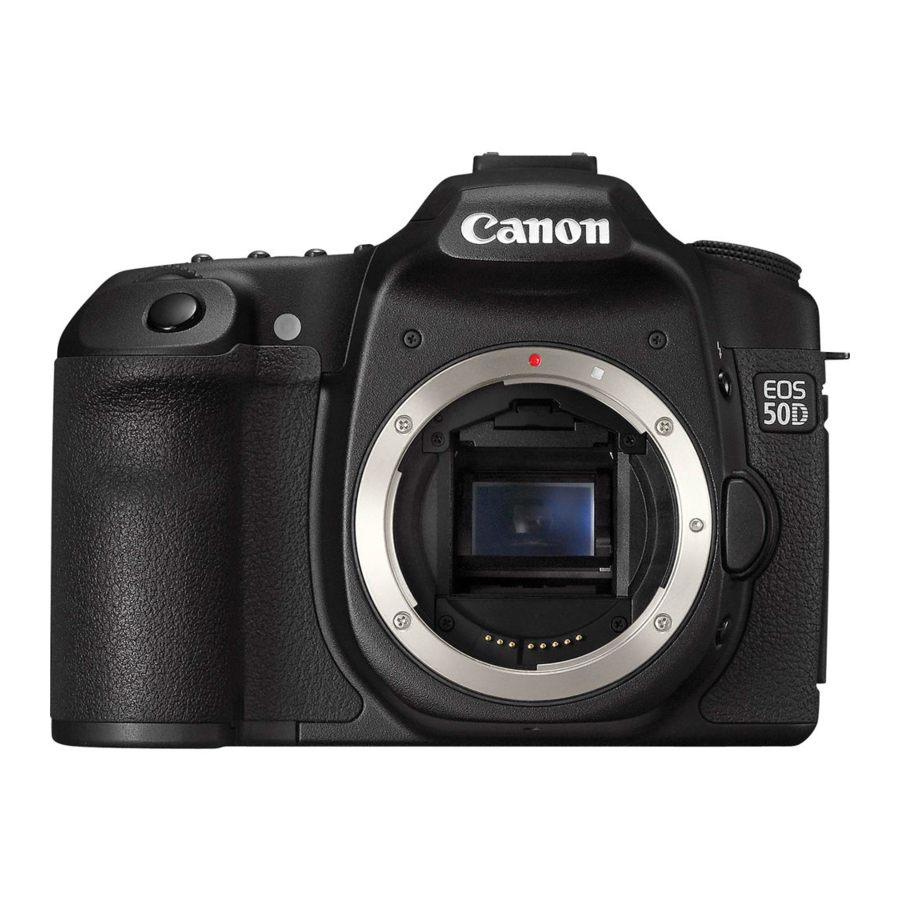
Front of the camera
While you, as the photographer, don't often see the front of the camera, it includes the nicely sculpted grip that increases control and balance when handling the camera, and it includes controls that you use often.
The front-of-the-camera features include, from left to right side, the following:
1.3 EOS 50D camera front

- Shutter button. The Shutter button is a two-step control. When you press the Shutter button halfway, the 50D meters the light in the scene and focuses on the subject using either the autofocus (AF) point that you've selected or at the AF point(s) that the camera's selected automatically. Completely pressing the Shutter button fi res the shutter to make the picture. In High-Speed or Low-Speed Continuous drive mode, pressing and holding the Shutter button starts burst shooting at either 3 frames per second (fps) or 6.3 fps, respectively. In Self-timer modes, pressing the Shutter button completely initiates the 2- or 10-second timer, and after the timer delay, the shutter fi res to make the picture.
- Red-eye Reduction/Self-timer lamp. When using the built-in fl ash with the Red-eye reduction option turned on, this lamp lights to help reduce pupil size to reduce the appearance of red in the subject's eyes if the subject looks at the lamp. In the two Self-timer modes, this lamp fl ashes to count down the seconds, either 2 or 10 seconds, to shutter release.
- Mirror. As you compose an image, the reflex mirror reflects light from the lens to the pentaprism so that you can see in the eyepiece of the viewfinder what will be captured by the imaging sensor. The viewfinder offers 95 percent frame coverage. In Live View shooting the mirror is flipped up to allow a live view of the scene. If you are using Live mode focusing, the mirror flips down to focus, thereby suspending Live View momentarily.
- Lens mount and contacts. The lens mount is compatible with Canon's EF and EF-S lenses. EF-S lenses are compatible with only the cropped image sensor size of the 50D and other Canon EOS digital SLR cameras. EF lenses are compatible with all EOS digital SLRs. The lens mount includes a red index marker that's used to line up EF-mount lenses and a white index mount marker that's used to line up EF-S lenses.
- Depth of field preview button. Pressing this button stops down the lens diaphragm to the currently selected aperture so that you can preview the depth of field in the viewfinder. The larger the area of darkness, the more extensive the depth of field will be. The button can be used in regular and Live View shooting. If the lens is set to the maximum aperture, the Depthof-field preview button can't be depressed because the diaphragm is already fully open.
- Lens Release button. This button releases the lens from the lens mount. To disengage the lens, depress and hold down the Lens Release button as you turn the lens so that the red or white index mark moves toward the top of the camera.
- Flash button. In P, Tv, Av, M, A-DEP, and C shooting modes, press this button to pop up and use the builtin flash. In automatic modes such as CA, Portrait, Landscape, and so on, pressing the Flash button has no effect because the camera automatically determines when to use the built-in flash.
Top of the camera
Dials and controls on the top of the camera provide access to frequently accessed shooting functions in addition to the hot shoe and diopter control. Here is a look at the top of the 50D.
1.4 EOS 50D top of the camera

- Mode dial. Turning this dial selects the shooting mode, which determines how much control you have over image exposures. Shooting modes are grouped into three zones including the Image, or automatic, Creative, and Camera User Settings zones. Automatic shooting modes are CA (Creative Auto), Full Auto, Portrait, Landscape, Close-up, Sports, Night Portrait, and Flash Off. Creative Zone shooting modes are P (Program AE), Tv (Shutter-priority AE), Av (Aperture-priority AE), M (Manual exposure), and A-DEP (Automatic depth-of-fi eld AE) modes. The third zone, Camera User Settings, encompasses C1 and C2, shooting modes that you can program with your favorite settings. Just turn the dial to line up the shooting mode that you want to use with the white mark to the right of the dial.
- Hot shoe. The hot shoe mounting plate with flash sync contacts is where you mount an accessory flash unit. The 50D hot shoe is compatible with E-TTL II auto flash with accessory Canon EX-series Speedlites and supports wireless multi-flash support. When using a 580 EX II Speedlite, the 50D offers flash configuration from the camera using the Set-up 3 (yellow) menu. The camera also provides Flash Exposure Compensation to decrease or increase the flash output by up to plus/minus 2 stops in 1/3- or 1/2-stop increments.
- Dioptric adjustment knob. Turn this control forward or backward to adjust the sharpness for your vision by -3 to +1 diopters. If you wear eyeglasses or contact lenses for shooting, be sure to wear them as you turn the dioptric adjustment control. To make the adjustment, point the lens to a light-colored surface such as a piece of white paper or a white wall, and then turn the control until the AF points are perfectly sharp and crisp for your vision.
- Focal plane mark. The mark indicates the equivalent of the film plane and is useful in macro photography when you need to know the exact distance from the front of the image sensor plane to the subject.
- LCD Panel Illumination button. This button is tucked to the far left of the buttons above the LCD panel. Pushing the LCD Panel Illumination button turns on an amber light to illuminate the LCD panel for approximately 6 seconds. This is a handy option for making LCD panel adjustments in lowlight or in the dark.
- Main dial. The Main dial selects a variety of options. Turn the Main dial to change first named option on the dual-function buttons, cycle through camera Menu tabs, cycle through autofocus (AF) points when selecting an AF point manually, set the aperture in Av and C modes, set the shutter speed in Tv and Manual (M) modes, and shift the exposure in Program (P) mode.
![information]() Note Although the features are discussed with the dials, you can check out Table 1.1 for a quick reference for using the Main dial and Quick Control dial with the LCD Panel buttons.
Note Although the features are discussed with the dials, you can check out Table 1.1 for a quick reference for using the Main dial and Quick Control dial with the LCD Panel buttons. - Metering mode/White Balance button. Press this button to change the Metering mode and/or the White Balance settings. To change the Metering mode, turn the Main dial, or to change the White Balance, turn the Quick Control dial. The options for each are as follows:
- Metering modes. The choices include Evaluative (35-zone TTL full-aperture metering), Partial (9 percent at center frame), Spot (3.8 percent at center frame), and Center-weighted Average.
- White Balance. Choices include Auto (3000-7000 degrees Kelvin (K)), Daylight (5200 K), Shade (7000 K), Cloudy (6000 K), Tungsten (3200 K), White Fluorescent (4000 K), Flash (6000 K), Custom (2000-10000 K), and K (Kelvin Temperature, 2500-10000 K).
- AF mode/Drive mode button. Pressing this button enables you to change the Autofocus mode using the Main dial, or to change the Drive mode using the the Quick Control dial. The options for each are listed here:
- AF modes. The choices are One-shot AF, AI Focus AF, and AI Servo AF.
- Drive modes. The Drive modes you can choose from are Singleshot, High-speed Continuous (6.3 frames per second, or fps), Low-speed Continuous (3 fps), and Self-timer (10- and 2-sec. delays).
- ISO/Flash Exposure Compensation button. Pressing this button enables you to change the ISO sensitivity setting using the Main dial or the Flash Exposure Compensation using the Quick Control dial. The options for each are as follows:
- ISO. You can choose from Auto, 100, 125, 160, 200, 250, 320, 400, 500, 640, 800, 1000, 1250, 1600, 2000, 2500, 3200, and with C.Fn I-3 turned on, you can also choose H1: 6400, and H2: 12800.
- Flash Exposure Compensation. You can choose to adjust this plus or minus 2 stops (EV) in 1/3-stop increments. Or you can make changes in 1/2-stop increments by setting C.Fn I-1 to Option 1.
Table 1.1
Using the Main and Quick Control Dials with the LCD Panel Buttons
| Main Dial | Quick Control Dial |
| LCD Panel Button: Metering Mode-WB (White Balance) | |
| Metering Modes: | White Balance Options: |
| Evaluative (35-zone TTL full-aperture metering) Partial (9 percent at center frame) Spot (3.8 percent at center frame) Center-weighted Average | Auto (3000-7000 K) Daylight (5200 K) Shade (7000 K) Cloudy (6000 K) Tungsten (3200 K) White Fluorescent (4000 K) Flash (6000 K) Custom (2000-10000 K) K (Kelvin Temperature, 2500-10000 K) |
| LCD Panel Button: AF-Drive (Autofocus mode/Drive mode) | |
| Autofocus Modes: One-shot AF (locks focus with a half-press of the Shutter button) AI Focus AF (half-pressing the shutter initiates AF subject movement tracking using the center AF point) AI Servo AF (monitors subject movement and switches to AI Servo if the camera detects subject movement) | Drive Modes: Single-shot High-speed Continuous (6.3 fps) Low-speed Continuous (3 fps) Self-Timer (10- and 2-sec. delays) |
| Main Dial | Quick Control Dial |
| LCD Panel Button: ISO-Flash Exposure Compensation | |
| ISO Options: | Flash Compensation: |
| Auto 100 125 160 200 250 320 400 500 640 800 1000 1250 1600 2000 2500 3200 H1: 6400 (with C.Fn I-3 Expansion turned on) H2: 12800 (with C.Fn I-3: ISO Expansion set turned on) | Plus/minus 2 stops (EV) in 1/3- or 1/2-stop increments (chosen using C.Fn I-1) |
Back of the camera
The back of the camera includes the 3-inch, 920,000 dots (VGA) LCD monitor that provides a very smooth display of multicolored menus and shooting information. The LCD includes a new multi-coating that reduces glare, reduces smudges, and protects against scratches. The coating is visible with the blue reflection on the monitor. Here is a look at the back of the 50D.
1.5 Back of the EOS 50D

- Menu button. Pressing the Menu button displays the most recently accessed camera menu and menu option. To move among different menu tabs, turn the Main dial or tilt the Multi-controller. The nine menus are detailed later in this chapter.
- Live View shooting/Print/Share button. When Live View shooting is enabled (using the Set-up 2 menu), pressing this button raises the camera's reflex mirror to display a live view of the scene on the LCD monitor. Or when the camera is connected to a printer and all print options are set, pressing this button starts image printing. The button blinks a blue light to indicate the print is being made. When the camera is connected to a computer, pressing this button displays the Direct transfer screen from which you can select which images to transfer to the computer and in what order. During image transfer, the button blinks a blue light. When the transfer is finished, the button is lit continuously in blue.
- Viewfinder eyepiece and Eyecup. The EOS 50D viewfinder is an eyelevel pentaprism with approximately 95 percent vertical and horizontal coverage, and that means that you see 5 percent less of the scene than the sensor captures. The viewfinder uses the Ef-A focusing screen. With the Eyecup pressed against your eye, the flexible rubber cup helps prevent stray light from entering the viewfinder.
- AF-On/AF start button. Canon also labels this button as the AF start button. Pressing the AF-On button initiates autofocusing in P, Tv, Av, M, and the C shooting modes in the same way as half-pressing the Shutter button. In automatic shooting modes such as Portrait and Landscape, pressing this button has no effect. When you're shooting in Live View, pressing this button focuses on the subject in any of the three Live View focusing modes.
- AE Lock/FE Lock/Index/Reduce button. When you're shooting, pressing this button sets and locks exposure at the selected AF point. When you're using the built-in or an accessory Speedlite flash, pressing this button sets and locks flash exposure at the selected AF point. When you're playing back images, pressing this button displays four images at a time, and pressing the button a second time displays an index of nine images on the LCD monitor. In Playback mode with an image magnified, pressing, or pressing and holding this button reduces the image magnification. When you're printing images, pressing this button reduces the size of the trimming frame.
- AF-Point Selection/Magnify button. During shooting, pressing this button and turning the Main dial enables you to select a single AF point or to have the camera automatically select AF point. (Automatic AF-point selection is indicated when all the AF points are lit in red.) You can also turn the Quick Control dial or tilt the Multicontroller to select AF points. The selected AF point or points are displayed in red in the viewfinder and by marks on the LCD panel. As you turn the Main dial, the camera cycles through the AF points in the direction you turn the dial. When playing back images on the CF card, pressing this button magnifies the image by 1.5 to 10x on the LCD monitor so that you can check focus or details in the image. To move around a magnified image, tilt the Multi-controller.
- Multi-controller. The eight-way Multi-controller functions as a button when pushed and as a joystick when tilted in any direction. During shooting, you can use it to select an AF point after pressing the AF-point Selection button. Or you can press the Multi-controller at the center to display the Quick Control screen — a screen that provides access to primary shooting and exposure options. Then tilt the Multi-controller to move through the functions on the screen. To change a setting, turn the Quick Control or Main dial, or press the Set button to access the function's setting screen. When working with camera menus, the Multi-controller is used to set White Balance shift settings and to select menu options.
![information]() Note If you set C.Fn III-3 AF-point selection method to use the Multi controller, then you cannot display the Quick Control screen.
Note If you set C.Fn III-3 AF-point selection method to use the Multi controller, then you cannot display the Quick Control screen. - Quick Control dial. The Quick Control dial selects a variety of settings if the power switch is set to the topmost position (the position above On). The Quick Control dial selects the second named function for the buttons above the LCD panel. When the camera menus are displayed, turning the Quick Control dial cycles through the options on each menu. When shooting, you can use the Quick Control dial to manually select an AF point after pressing the AF-point Selection button.
- Setting (Set) button. Pressing this button confirms menu selections, opens submenu screens, and, on the Quick Control screen, it opens function screens from which you can change settings such as the ISO, Exposure Compensation, and Exposure Bracketing.
- Access lamp. This light, located to the lower right of the Quick Control dial, lights or blinks red when any action related to taking, recording, reading, erasing, or transferring images is in progress. Anytime that the light is lit or blinking, do not open the CF card slot door, turn off the camera, remove the battery, or jostle the camera.
- Playback button. Pressing this button when images are stored on the CF card displays the last captured or viewed image. To cycle through images on the card, turn the Quick Control counterclockwise to view images from last to first, or turn the dial clockwise to view images from first taken to last.
- Erase button. Pressing the Erase button during image playback displays options to Cancel or Erase the currently displayed image as long as it has not had protection applied to it. Batches of images can be erased together by selecting and check marking images.
- Info button. During shooting, pressing the Info button displays the Info screen that details the current camera settings including the shooting mode registered for C1 and C2, color space, White Balance shift and bracketing settings, color temperature, auto power off setting, auto image rotation, Red-eye reduction status, image transfer status, free space on the CF card, and the date and time. When playing back images, pressing the Info button one or more times cycles through four different playback display modes.
Picture Style button. Pressing this button displays the Picture Style screen where you can choose one of six preset Picture Styles or three customizable styles that you can create and register. A Picture Style determines how an image is rendered in terms of color, saturation, and contrast. The Picture Style screen shows the currently selected Picture Style along with the sharpness, contrast, saturation, and color tone settings that are in effect. You can press the Info button to access the Detail Set. (settings) screen to adjust the settings. - FUNC. (Function) button. Pressing the Function button displays a screen where the LCD monitor brightness can be adjusted. This screen includes a thumbnail image stored on the CF card, as well as a gray scale chart on the right. To change the brightness, turn the Quick Control dial to the left to darken or to the right to brighten the screen, and then press the Set button to confirm the change. As you adjust the brightness, you should be able to clearly distinguish differences between each of the grayscale bars on the right. Custom Function IV-7: Assign FUNC. button, enables you to reset the Function button so that it displays the Image Quality, Exposure Compensation/Bracketing, Image Jump, or Live View Function settings screen instead.
- Power/Quick Control dial switch. The power switch offers three settings. Off does just what you expect it to do. The On setting turns on the power but limits the use of the Quick Control dial to make direct adjustments to some LCD panel functions. The topmost setting denoted by a hockey stick-type symbol enables direct use of the Quick Control dial for setting the Flash Exposure Compensation amount, drive mode, and so on, on the LCD panel and in the viewfinder.
Side of the camera
On one side of the EOS 50D is the CompactFlash (CF) card slot door. Opening the door reveals the slot for the CF card and the card eject button. The opposite side of the camera houses two sets of camera terminals under individual rubber covers. The rubber covers are embossed with descriptive icons and text to identify the terminals.
Here is an overview of each camera terminal.
1.6 EOS 50D terminals

- Digital terminal. This terminal enables you to connect the camera directly to a computer to download images from the camera to the computer, or to a PictBridgecompatible printer to print images from the CF card.
- PC terminal. This threaded, nopolarity terminal enables connection between the camera and studio flash units that have a sync cord. While Canon recommends using a sync speed of 1/30 to 1/60 sec., I've found that the camera syncs with my studio strobes at 1/125 sec. with no problem, although you should test your system first. With corded non-Canon flash units, the synch speed is 1/250 sec.
- Video Out terminal. Use this terminal when you want to connect the camera to a non-HD TV. Be sure to use only the supplied video cable to make the connection.
- Remote Control terminal. This N3-type terminal connects with the accessory Remote Switch RS-80N3 or other N3-type EOS accessory.
- HDMI mini Out terminal. This terminal, coupled with the accessory HDMI Cable HTC-100, enables you to connect the camera to an HD TV. You cannot use the HDMI mini Out terminal simultaneously with the Video Out terminal.
Bottom of the camera
The bottom of the camera houses the battery compartment cover, tripod socket, and the Extension system terminal for connection with the Wireless File Transmitter WFTE3/WFT-E3A.
1.7 EOS 50D bottom-of-the-camera components shown with the BP-511A battery pack

Lens Controls
Lens controls differ according to the lens that you're using. One aspect that all Canon lenses have in common is full-time manual focusing. You can switch to manual focusing light in the lower right side of the viewfinder lights steadily and the camera sounds a focus confirmation beep when sharp focus is achieved.
Additional lens controls may include the following depending on the lens.
1.8 Lens controls, as shown on an EF 70-200mm f/2.8L IS USM lens

- Focusing distance range selection switch. This switch limits the range that the lens uses when seeking focus. For example, if you choose the 2.5m to infinity focusing distance option on the EF 70-200mm, f/2.8L IS USM lens, then the lens does not seek focus at 2.5m and closer. Choosing the appropriate focusing range speeds up autofocus speed. The focusing distance range options vary by lens.
- Image stabilizer switch. This switch turns on or off optical image stabilization. Optical Image Stabilization (IS) corrects vibrations at any angle or at only right angles when handholding the camera and lens.
- Image stabilizer mode switch. On some telephoto lenses, this switch enables image stabilization for standard shooting and for stabilization when you're panning with the subject movement at right angles to the camera.
- Focusing ring. Turning the focusing ring enables manual focusing or focus tweaking at any time even if you're using autofocusing. If the lens switch is set to MF, turn this ring to focus on the subject.
- Zoom ring. Turning this ring zooms the lens to the focal length marked on the ring. On some older lenses such as the EF 100-400mm f/4.55.6L IS USM lens, zooming is accomplished by first releasing a zoom ring, and then pushing or pulling the lens to zoom out or in.
- Distance scale and infinity compensation mark. The distance scale shows the lens's minimum focusing distance through infinity. The scale includes an infinity compensation mark that can be used to compensate for shifting the infinity focus point that results from temperature changes.
Viewfinder display
The eye-level pentaprism viewfinder shows you 95 percent of the scene that the camera captures. The viewfinder includes nine AF points superimposed on the focusing screen, as well as key exposure and camera setting information.
Looking through the viewfinder during shooting allows you to verify that camera settings are as you want, or to alert you if they need to be changed. In addition, you are alerted when any exposure element you've chosen is beyond the exposure capability of the light in the scene. For example, if you see the aperture blinking in the viewfinder, it means that the image will be underexposed (too dark) and that you need to set a slower shutter speed or a higher ISO. Or if you were using Exposure Compensation for previous shots and don't need it for the current shot, the viewfinder is a reminder to reset the compensation.
The following diagram shows the viewfinder information and what each element represents.
1.9 EOS 50D viewfinder display

Camera menus
The EOS 50D offers nine menus grouped as tabs in the categories of Shooting, Playback, Setup, Custom Functions, and a customizable My Menu. Accessing the menus is as easy as pressing the Menu button on the back of the camera.
The first thing that's important to understand about the camera menus is that the menus and options change based on the shooting mode you select. In the automatic, or Basic Zone, shooting modes such as CA, Full Auto, Portrait, Landscape, and so on, the menus are abbreviated because you can make only limited changes to the exposure and camera settings. But in semiautomatic and manual modes such as Tv, Av, M, A-DEP, and the C modes, the full menus and options are available. If you find a technique described in this book, but you can't find the menu option mentioned on the menu, be sure to check which shooting mode you've set on the camera. By changing to a semiautomatic or manual mode, the option you need will be displayed.
Table 1.2
Camera Menus
| Commands | Options |
| Shooting 1 menu | |
| Quality | Large/Fine, Large/Normal, Medium/Fine, Medium/Normal, Small/Fine, Small/Normal, RAW, sRAW 1, sRAW 2, or RAW or sRAW and any of the JPEG image quality settings |
| Red-eye On/Off | Off /On |
| Beep | On/Off |
| Shoot without a card | On/Off |
| Review time | Off, 2 sec., 4 sec., 8 sec., Hold |
| Peripheral illumin. Correct. | Enable/Disable |
| Shooting 2 menu | |
| Expo. comp/AEB (Exposure Compensation/ Auto Exposure Bracketing) | 1/3-stop increments by default, up to plus/minus 2 stops of Exposure Compensation and up to plus/minus 4 stops of AEB |
| White Balance | Auto (AWB), Daylight, Shade, Cloudy, Tungsten, White Fluorescent, Flash, Custom (2500 to 10000K), Color Temperature (2500 to 10000K) |
| Custom WB | Set a manual White Balance |
| WB SHIFT/BKT (White Balance shift/bracketing) | White Balance correction using Blue/Amber (B/A) or Magenta/Green (M/G) color bias; White Balance Bracketing using B/A and M/G bias, available at plus/minus 3 levels in one-level increments |
| Color space | sRGB, Adobe RGB |
| Picture Style | Standard, Portrait, Landscape, Neutral, Faithful, Monochrome, User Defi ned 1, 2, and 3 |
| Shooting 2 menu | |
| Dust Delete Data | Locates and records dust on the image sensor so you can use the data in Canon's Digital Photo Professional program to erase dust spots on images |
| Playback 1 menu | |
| Protect images | Marks and protects selected images from being deleted |
| Rotate | Rotate the selected vertical image clockwise at 90, 270, or 0 degrees |
| Erase images | Select and erase images, All images in folder, All images on [CF] card |
| Print Order | Select images to be printed (Digital Print Order Format or DPOF) |
| Transfer order | Select images to download to a computer |
| External media backup | Available when the accessory Wireless Transmitter (WFT-E3/ E3A) is used along with external media such as a storage device or computer |
| Playback 2 menu | |
| Highlight alert | Disabled, Enable. When enabled, overexposed highlights blink in all image-playback displays |
| AF-point disp. | Disabled, Enable. Superimposes the AF point that achieved focus on the image during playback |
| Histogram | Brightness, RGB. Brightness displays a tonal distribution histogram. RGB displays separate Red, Green, and Blue color channel histograms |
| Slide show | Setup (Play time and Repeat (On/Off )), Start a slide show of all images on the CF card |
| Image jump with Main dial | Move through images by: 1, 10, 100 [images at a time], Screen, Date, or Folder |
| Set-up 1 menu | |
| Auto power off | 1, 2, 4, 8, 15, 30 minutes, Off |
| Auto Rotate | On for camera and computer, On for camera only, Off (Turns vertical images to upright orientation for the camera's LCD and computer display, or only for the camera's LCD display) |
| Format | Format and erase images on the CF card |
| File numbering | Continuous, Auto reset, Manual reset |
| Select folder | Create and select a folder |
| WFT Settings | Displays the wireless fi le transfer settings when an accessory Canon WFT-E3/E3A is in use |
| Recording func.+media select | Displayed when an accessory Canon WFT-E3/e3A is in use |
| Set-up 2 menu | |
| LCD brightness | Seven adjustable levels of brightness |
| Date/Time | Set the date (year/month/day) and time (hour/minute/ second) |
| Language | Choose from 25 language options |
| Video system | NTSC, PAL |
| Sensor Cleaning | Auto cleaning (Enable, Disable), Clean now, Clean manually |
| Live View function settings | Live View shoot—Options: Enable, Disable Expo. simulation—Options: Disable, Enable Grid display—Options: On, Off Silent shoot—Options: Mode 1, Mode 2, Disable Metering timer—Options: 4, 16, 30 sec., 1, 10, 30 min. AF mode—Options: Quick mode, Live mode, Live "L" mode referred to as face detection |
| Set-up 3 menu | |
| Info button | Normal disp., Camera set. (Camera Settings), Shoot func. (Shooting function); Normal display displays the Camera Settings screen when you press the INFO. button once, and the Shooting function screen when you press the INFO. button again; Selecting Camera set. option toggles only the Camera Settings screen when you press the INFO. button; the same behavior applies if you select the Shooting func. option |
| Flash control | Flash fi ring, Built-in fl ash func. setting, External fl ash func. setting, External fl ash C.Fn setting, Clear ext. fl ash C.Fn set |
| Camera user setting | Register or clear camera settings to C1 or C2 |
| Clear settings | Restores the camera's default settings, Delete copyright information; Does not restore Custom Function to their original default settings |
| Firmware Ver. (Firmware Version) | Displays the existing fi rmware version number, and enables you to update the fi rmware |
| Custom Functions menu | |
| C.Fn I: Exposure | Displays Custom Functions related to exposure such as exposure level increments, ISO increments, ISO expansion, bracketing auto cancel, bracketing sequence, safety shift, and fl ash sync speed in Av mode |
| C.Fn II: Image | Displays Custom Functions related to the image noise and tone including long exposure noise reduction, high ISO speed noise reduction, highlight tone priority, and Auto Lighting Optimizer |
| C.Fn III: Autofocus/Drive | Displays Custom Functions related to autofocus and drive operation including lens drive when AF is impossible, lens AF stop button function, AF-point selection method, superimposed display, AF-assist beam fi ring, mirror lockup, AF Microadjustment |
| C.FN IV: Operation/Others | Displays Custom Functions related to camera controls including Shutter button/AF-ON button, AF-ON/AE lock button switch, assign Set button during shooting, dial direction during Tv and Av modes, changing to a diff erent focusing screen, adding original data decision data, and assign FUNC. button |
| Clear all Custom Func. (C.Fn) | Restores all of the camera's default Custom Function settings |
| My Menu | |
| My Menu settings | Save frequently used menus and Custom Functions |
Documents / ResourcesDownload manual
Here you can download full pdf version of manual, it may contain additional safety instructions, warranty information, FCC rules, etc.
Advertisement


Need help?
Do you have a question about the EOS 50D and is the answer not in the manual?
Questions and answers