brennenstuhl PM 231 Manual
- Operating instructions (2 pages) ,
- Operating instructions manual (104 pages)
Advertisement

Read and keep these operating instructions.
Make note of and follow the safety instructions. Do not plug in an appliance with a load exceeding 16 Amp.
Always ensure that the plug of any appliance is fully inserted into the meter outlet.

Do not plug two or more meters together!
| The following pictograms are used in these operating instructions / on the device: | |
 | Read instruction manual! |
 | For use in dry rooms only. |
 | Observe caution and safety notes! |
Introduction

These operating instructions must be read carefully in full. They are part of your newly purchased power meter and contain important information concerning its operation and maintenance. All precautions are to be observed when using this product. If you have any questions concerning the use of this product, contact your dealer or our service office. These operating instructions are to be kept safely and if necessary passed on to third parties for easy reference.
Proper Use
The appliance is designed to measure the power consumption of electrical appliances and to calculate electricity and operating costs. Any other use or modification of the instrument constitute improper use and carry a serious risk of accident. The manufacturer is not liable for damage caused by improper use. The instrument is not intended for commercial use.
Package Contents
Immediately after unpacking, the contents of your power meter's package must be checked for completeness. Also check the meter itself for proper condition.
1 x Power Meter
1 x Operating Instructions
Technical Data
| Product: | Power Meter PM 231 |
| Type of protection: | IP20 |
| Nominal voltage: | 230 V ~ 50 Hz |
| Max. load: | 3600 W (230 V ~ 16 A) |
| Measuring range voltage: | 190 - 276 V AC |
| Measuring accuracy voltage: | +/-1% |
| Measured range current: | 0.01 - 16 A |
| Measuring accuracy current: | +/-1% or +/-0.01 A |
| Measuring range power: | 0.2 - 3600 W |
| Measuring accuracy power: | +/-1% or +/-0.2 W |
| Power consumption range: | 0 - 9999.9 kWh |
| Measuring range frequency: | 45 - 65 Hz |
| Clock accuracy: | +/- 1 minute per month |
| Power consumption: | < 0.5 W |
| Operating temperature: | -10 ºC to +40 ºC |
| Batteries: | 3 x 1.5 V LR44/AG13 button cells |
| Battery life: | approx. 3 months without AC power |
Application: This product is intended only for indoor use. The power socket has an integrated protective contact.
Operation
Safety Instructions for this Product

- All safety and operating instructions should be read before the power meter is operated.
- The safety and operating instruction should be retained for future reference.
- All warnings on the product and in the operating instruc-tions should be strictly observed.
- All operating instructions should be followed.
![]() Operate the power meter only in a dry indoor area. Do not install in humid areas like bathrooms, laundry rooms or outdoors.
Operate the power meter only in a dry indoor area. Do not install in humid areas like bathrooms, laundry rooms or outdoors.- Do not expose the power meter to an extreme variation of temperature, pressure, impact or intensive sunlight.
- Care must be taken so that objects do not fall and liquids are not spilled into the enclosure through openings.
- Load the socket outlet only with the maximum load al-lowed.
- Never leave connected heaters unattended.
- If not in use for a long time, disconnect the power meter from mains power supply and store it in a cool and dry place out of the reach of children.
- Stop using if the power meter or the integrated socket is damaged, disconnect it immediately from mains power supply and the appliance.
- Repairs to the product should only be carried out by a specialist.
- This power meter is not intended for use by persons (including children) with reduced physical, sensory, or mental capacities, or lack of experience and knowledge, unless they have been given supervision or instruction concerning the use of the appliance by a person responsible for their safety. Children should be supervised to ensure that they do not play with the power meter.
- Use the power meter only in buildings equipped under Installation Category II (CAT II) according to IEC 664. The maximum peak voltage must not exceed 2500 V ~. The main electricity supply for residential buildings usually falls under Installation Category II.
 Operate the power meter only in a dry indoor area. Do not install in humid areas like bathrooms, laundry rooms or outdoors.
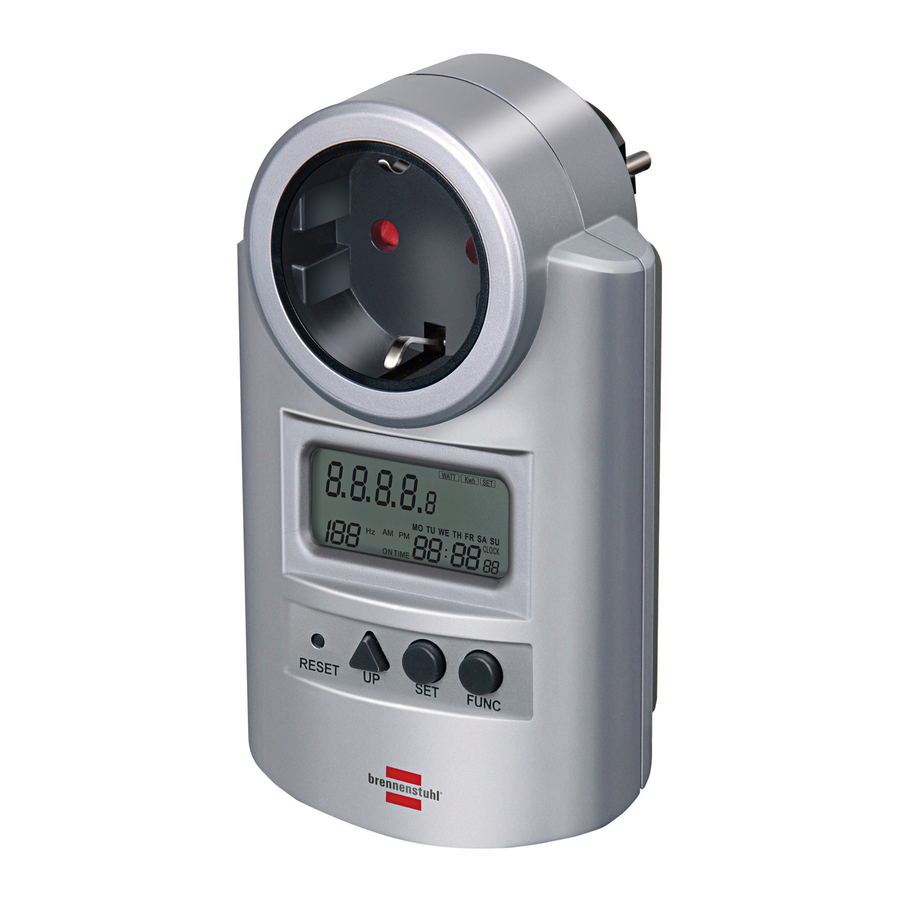
Front View

Display

Location of Controls, Functions and Display
| 1 | Battery compartment | The battery compartment is located at the rear of the unit. The 3 x LR44/AG13 button cells are already located in the battery compartment. Open the battery compartment and remove the contact strip. The polarity is indicated in the battery compartment. |
| 2 | Display | All values of set parameters and measurements are displayed here. |
| 3 | Reset button RESET | Press with pointed object to clear all data in memory including current time and all programs. |
| 4 | UP button | Set current time, price, price programs in combination with SET button. |
| 5 | SET button | Set current time, price, price programs in combination with UP button. |
| 6 | FUNC button | Press to change the display mode. |
| 7 | Power plug | Plug into an AC 230 V 50 Hz wall outlet. |
| 8 | Power socket | Connect your device here. |
- Display units for consumption values.
- Display AMP.
- Display WATT.
- Display kWh.
- Display SET.
- Display VOLTac.
- Display COST/kWh.
- Display MAX OVERLOAD WARNING.
- Display PRICE 1 and 2, TOTAL PRICE 1 and 2.
- Display day of the week MO, TU, WE, TH, FR, SA, SU.
- Display CLOCK.
- Display seconds (TOTAL ON TIME → minutes).
- Display minutes (TOTAL ON TIME → hours 0-99).
- Display hours (TOTAL ON TIME → hours >100).
- Display TOTAL ON TIME.
- Display AM, PM.
- Display Hz.
- Display value, power factor.
- Display POWER FACTOR.
Use Instructions
Plug the power plug (7) of the power meter into a standard 230 V 50 Hz wall outlet. The display (2) automatically turns on and displays the current time (20, 21, 22, 23), day of the week (19), line voltage (10, 15) and frequency (26, 27).
Set current time
Press the FUNC button (6) until CLOCK (20) is displayed in the bottom right corner on the LCD.
Press the SET button (5) once; the day of the week (19) starts flashing.
Press the UP button (4) to set the day of the week (19) to MO, TU, WE, TH, FR, SA or SU.
Press the SET button (5) again to confirm the day of the week setting; the hours (23) start flashing.
Press the UP button (4) to set the hours (23) of the current time.
Press the SET button (5) again to confirm the hour setting; the minutes (22) start flashing.
Press the UP button (4) to set the minutes (22) of the current time and press the SET button (5) again to confirm the time.
Now connect the appliance and turn it on. The power meter starts measuring the consumption.
Set and Display Cost/kWh / Display Metering Functions
Set and Display Cost/kWh
If VOLTAGE / AMP / WATT appears on the display, press and hold the FUNC button (6) for at least 1 second until Cost/kWh (16) is shown. If already 2 prices were entered these can be displayed in turn by pressing the FUNC button (6).
Set Cost/kWh (Price 1)
Press and hold the SET button (5) until the fist digit flashes to set the cost/kWh after the cost/kWh for price 1 (18) are displayed. Set the correct value for the first digit with the UP button (4). Now press the SET button (5) again until the second digit flashes and set the correct value with the UP button (4). Repeat the procedure for the third and the fourth digit.
You can move the decimal point by pressing the SET button (5) to start flashing and move it with the UP button (4) to the correct position.
Press the SET button (5) again, and the time display
(-: - -) behind ON TIME (24) for the entered price 1 (18) starts flashing. Press SET (5) to finish the setting procedure for price 1 if no second price is needed.
To enter a second price (e.g. day/night tariff) also set a starting point for price 1 first. While the time display is flashing behind ON TIME (24) for price 1 (18) press UP button (4) to set the day of the week for the starting point (see previous section). Now press the SET button (5) until the hour display starts flashing and press the UP button (4) to set the hours for the starting point. Repeat this procedure for the minute display. Finally press the SET button (5) to finish price 1 settings.
Set Cost/kWh (Price 2)
Setting the cost/kWh for price 2 is similar to price 1.
Ensure that at the beginning price 2 (18) is displayed. Press the FUNC button (6) to toggle the display to show price 2 (18) before starting the setting procedure with the SET button (5).
Display Metering Functions
Repeatedly press the FUNC button (6) to cycle through the following information: VOLTAGE, AMP, WATT – kWh - TOTAL PRICE (10, 18).
Press the FUNC button (6) to display the current draw of the connected appliance in the value field (10) on the LCD, AMP (11) is displayed in the unit section and the POWER FACTOR (27, 28).
Press the FUNC button (6) again to display the wattage of the connected appliance in the value field (10) on the LCD, WATT (12) is displayed in the unit section and the POWER FACTOR (27, 28).
Press the FUNC button (6) again to display the power consumption of the connected appliance in the value field (10) on the LCD. kWh (13) is displayed in the unit section and the POWER FACTOR (27, 28).
Press the FUNC button (6) again to display the TOTAL PRICE (10, 18) and the TOTAL ON TIME (21-24) in hours and minutes of the connected appliance.
Press the FUNC button (6) again to display the VOLTac. (15) and the Hz (26, 27).
If the total load is exceeded MAX OVERLOAD WARNING (17) will flash on the display (2).
Deleting measured values
Keep FUNC (6) pressed for at least 1 second while kWh or TOTAL PRICE is displayed. The measured value for the consumption (kWh), TOTAL PRICE and the TOTAL ON TIME are deleted.
Standby Mode
The display (2) returns approx. 10 seconds after pressing the buttons to standby mode and shows the current time (20, 21, 22, 23, 25), day of the week (19), line voltage (10, 15) and frequency (26, 27).
Reset Button
Press the reset button RESET with a pointed object to clear all data in the memory including the current time and all programs. For a few seconds the complete display (2) with all parameters is shown.
Change Batteries
The power meter comes ex factory with 3 x 1.5 V LR44/ AG13 button cells installed in the battery compartment. To exchange the batteries, please follow these steps: The battery compartment is located at the rear of the unit. Use a flat screwdriver to carefully lift the cover of the battery compartment. Remove the empty batteries and replace them with new ones. Observe the polarity (+/-) as indicated inside the cover (flat side (+) to the left). Carefully replace the cover again. Take care not to damage the terminals when closing the cover. The cover must be replaced before use.
During longer periods of non-use remove the batteries from the power meter to avoid battery leakage. Leaking batteries can cause electric shock and damage to the power meter.
Only change batteries if the power meter is disconnected from mains power supply. Only replace batteries with same type. Do not mix new and empty batteries.
Do not dispose off batteries with the household waste.
Return empty batteries to the respective collection points.
Maintenance and Care
This product is maintenance-free. Never open or disassemble the product. Before cleaning disconnect the power meter from the wall outlet and the appliance. Clean the exterior only with a clean and soft cloth.
Manufacturer
Hugo Brennenstuhl GmbH & Co. KG
Seestraße 1-3 ∙ D-72074 Tübingen
For further information we recommend Service/FAQ on our web-site www.brennenstuhl.com.
Documents / Resources
References
Download manual
Here you can download full pdf version of manual, it may contain additional safety instructions, warranty information, FCC rules, etc.
Advertisement


Need help?
Do you have a question about the PM 231 and is the answer not in the manual?
Questions and answers