
Related Manuals for SECURECOM SINGULAR W4G


Summary of Contents for SECURECOM SINGULAR W4G
- Page 1 SINGULAR WIFI, W2G, W4G SINGULAR WIFI, W2G, W4G Model: 4 Remotely manageable alarm monitoring communicators with Mobile App Installation and reference manual v2 SINGULAR Wifi/W2G/W4G 1 EN communicator v1.14...
-
Page 2: Table Of Contents
Content 1. Introduc on 1.1. Preferences 1.2. Main features............................3 1.3. Usage Areas............................3 2. Device parts and connectors 2.1. Status Signals............................5 3. Detailed descrip ons of func onality 3.1. Communica ng to monitoring sta on....................5 3.2. Sending messages to Smartphone......................6 3.3. Mobile data (2G, 3G or 4G ) as alternate for Wifi connec on..............6 3.4. -
Page 3: Introduc On
8.13. Upgrading device so ware........................23 9. Transparent forwarding of serial port 10. Technical data 11. Installa on and programming ps INTRODUCTION INTRODUCTION All informa on in this manual related to cellular data communica on are limited with a product type: SINGULAR Wifi= NO mobile data connec on;... -
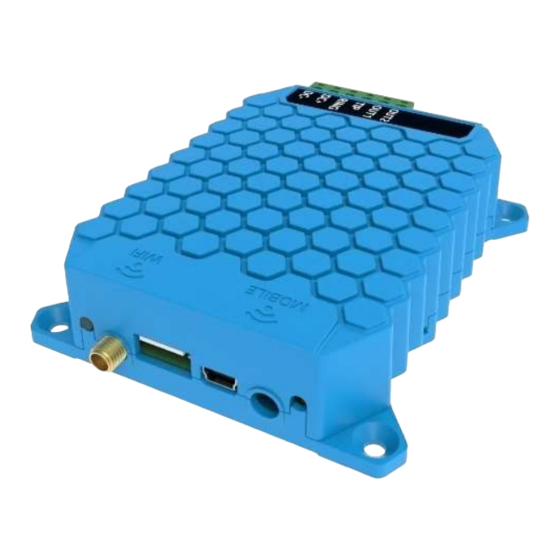
Page 4: Device Parts And Connectors
o Events filtering and displaying differently (alarm, arming, trouble, ...) o Displaying of alarm system status (armed, trouble, online, etc...) o Mul ple devices in one Smartphone account (home, office, weekend house, etc...) o Mul ple smartphone operators, more no fied persons at the same me. DEVICE PARTS AND CONNECTORS DEVICE PARTS AND CONNECTORS Pictured in green is the SINGULAR W2G model... -
Page 5: Status Signals
2.1. Status Signals The small LEDs, located next to an antenna connector is providing a device status informa on with following signals: ❾ ❻ Mobile network status WIFI network status Con nuous Red APN or SIM missing No network set Blinking Red Connec on in progress Faulty se ng... -
Page 6: Sending Messages To Smartphone
If repor ng to receiver has failed, or the “acknowledge” signal was not received, the communicator will not send the “kiss off” signal to the alarm panel, so it will repeat the Contact ID code transmission several mes. Alarm panel may hook off and dial again, to repeat CID code sending, and the procedure is repeated un l the “kiss off”... -
Page 7: Installa On
PCB. A er the connec on to Internet was established, device se ngs should be applied in correspondence on required features. Pictured in blue is the SINGULAR WIFI model For easier working with wires, terminals on the device are removable. Remove the terminal block from device, screw all wires to appropriate places in terminal block, and only a er all wires were fastened apply power to it and plug back the terminal block. -
Page 8: Configuring The Device
- Se ng of mobile network connec on (APN for W2G and W4G) - Se ng of WIFI connec on (required for SINGULAR WIFI, op onal for W2G and W4G) - Se ng of remote monitoring receivers (op onal, because the unit is opera onal standalone) A en on: validity of the modified se ng on the unit, require that the new variant is downloaded to the... -
Page 9: Se Ng Up The Wifi Connec On
If a WIFI network is available at the installa on, we recommend se ng up access to the network in the unit. However for se ng up of SINGULAR WIFI device the local WIFI network access is required, moreover access to 2 different WIFI networks can be set, thus further increasing func onal safety! 1. -
Page 10: Monitoring Sta On Se Ngs
Connec on with SIA DC-09 remote monitoring receivers (e.g. IPR-5000) requires the following se ngs: IP address IP address or domain name of the receiving sta on. (e.g. siatest.securecom.eu) End point of the IP address subnet, where the receiving computer is directed on the router... -
Page 11: Status Indicators
5.4. Status indicators The current status of the module is shown in the MODULE STATUS window. 1. SIM card status, and the name of the mobile provider 2. Signal strength of the mobile network (0-100) 3. Name of WIFI network 4. -
Page 12: Se Ng The Device Through Wifi Connec On
Open network selec on page on your smartphone or pc and check the available WiFi networks. A SECURECOM DEVICE network should be in the list. Connect your device to that network and disable the mobile data connec on. It is also useful to disable the mobile data connec on while you want to connect to Securecom device, to avoid opening of real web site instead of device web page. -
Page 13: Required Se Ngs Of The Security System
The primary connec on se ngs should be entered in the WIFI1 SETUP area, and the auxiliary connec on parameters in the WIFI2 SETUP. These se ngs can be made with following steps: List the available ( visible) networks -> click the SCAN bu on Select the desired network ->... -
Page 14: Smartphone Applica On
SMARTPHONE APPLICATION SMARTPHONE APPLICATION You can download the applica on from a play shop. Look for a PULOWARE CLIENT, with an icon looking like this: When you start the applica on first me, a setup wizard requires an operator name to be entered. This name is used for iden fica on in event list (who ac vated the output, i.e. - Page 15 The menu icon is placed on the top right corner. Clicking on it , 3 menu points are available: Operator ( to change the User name of the phone, i.e applica on authen ca on) Events ( to see the list of events in alarm system, along with iden fica on and customized event names) Se ngs : In this screen, You can see the device serial number, edit the device name, or change the “tab posi on”...
-
Page 16: Addi Onal Se Ngs And Features - Web Page On Puloware Service
ADDITIONAL SETTINGS AND FEATURES - WEB PAGE ON ADDITIONAL SETTINGS AND FEATURES - WEB PAGE ON PULOWARE SERVICE PULOWARE SERVICE An account must be created, and a er logging in to personal account, the site will provide a list of all devices that were added to that account. -
Page 17: Controll Icons
Warning: If you want the output to comply with “pushbu on” arming of alarm panel, the “nega ve impulse” mode should be selected. Every command (either from smartphone applica on or the web site) will turn on the output for 1 seconds, and return back to “off” status. ... -
Page 18: Monitoring Sta On Se Ngs
This area contains se ngs for the event codes that will be sent by Communicator to monitoring sta on, if the defined event has occurred. If the field is le blank, the event will not be reported. Se ng the appropriate value (that will be recognized in monitoring so ware), the monitoring sta on will be no fied when the communicator se ngs have changed, or when some output was turned ON and OFF. -
Page 19: Mobile Data Connec Vity Se Ngs
This dialog is not showing the valid se ngs in Securecom device. Fields are showing empty space, so a er adding a new value and a click to “save bu on, the new values will be loaded to the device. Therefore, this dialog is used just to CHANGE (load new) se ngs for Wifi... -
Page 20: Special Se Ngs
The “Assign MAC “ op on will lock the connec on to the selected access point. This should be used in case when the device is installed in a posi on where mul ple SSID with same names are visible. This way the device will always connect to same access point (node) a er every restart. -
Page 21: Event Filter
As the MS2 is the Backup receiver, all messages will be sent to MS1 first, and if the acknowledge fails, they will be sent to MS2. If both acknoledges fail, the status will be „stored” or „ meout”, depending on the source of event. -
Page 22: Handling Alarm Panel Users
and zone 001, „Mo on detected in sleeping room” for CID 130 in zone 003, „detector in kitchen tampered” for code 137 with zone 001, etc.) Most accurate way to rename some specific event from your alarm system is to create the required event in the alarm panel. - Page 23 This table also alows the limita on of rights fora specific operator ( smartphone), and clicking on the small red cross at the right end of each line ( it appears when a mouse is bringed to that line) the communicator can be removed from that smartphone applica on.
- Page 24 Run the so ware, select a free ( not used) COM port for your machine, and enter the device ID of the Securecom device that is connected with the serial port of the alarm panel that you want to program remotely.
- Page 25 Connected services PULOWARE IoT server h p://puloware.com SIA DC-09 virtual receiver ( for tes ng purposes only) h p://siatest.securecom.eu Android applica on h ps://play.google.com/store/apps/details?id=com.puloware.app Virtual serial port for remote programming h p://puloware.com/public/RemoteSerialSetup.exe SINGULAR Wifi/W2G/W4G...
Need help?
Do you have a question about the SINGULAR W4G and is the answer not in the manual?
Questions and answers