Table of Contents
Advertisement
Quick Links
Advertisement
Table of Contents

Related Manuals for Philips SP9841/32


Summary of Contents for Philips SP9841/32
- Page 1 S9000 Prestige フ ィ リップス 電動シェーバー 取 扱 説 明 書 SP9840/32, SP9841/32 品 番...
- Page 2 フィ リップス シェーバーをお買い上げいただき、 まことにありがとう ございます。 長い間ご愛用いただくために、 ご使用前にこの取扱説 明書をよくお読みのうえ、 正しくお使いください。 また、 お読みになった後は、 お使いになる方 がいつでも見られる ところに必ず保管してください。 商品のご確認 商品をご確認ください。 SP98xx/14 プレミアムポーチ ト リマー 充電アダプタ 本体 クイ ックク リーン クイ ックク リーン ポッ ドカー ト リ ッジ ポッ ド ※改良の為、仕様を予告なく変更することがあり ます。...
- Page 3 お買い上げのお客様へ 初めてご使用になる際は、 ご使用前に充電し て ください。 クイ ックク リーンポッ ド付きモデルお買い上げのお客様へ ●クイ ックク リーンポッ ドカー ト リ ッジに関し て フィリップスの専用クイッククリーンポッドカートリッジをご使用ください。 フィリップスの専用クリーニング液 (ボトルタイプ) を入れてご使用いただく ことはできません。...
- Page 4 目 次 ● は じ め に 商品のご確認 ・ 目次 必ずお守り ください ~ 各部の名称 ・ デジタル表示・ 表示について ・ 充電のしかた ● ご 使 用 方 法 シェービングのしかた ~ ト リマーの使いかた お手入れ方法 ~ クイ ックク リーンポッ ドの使いかた ~ 刃の交換 保管のしかた ● 廃棄について シェーバーを廃棄するとき ●...
- Page 5 安 全 上 の ご 注 意 必ずお守り ●ここに示した注意事項は、 安全に関する重要 く ださい な内容ですので、 必ず守っ てく ださい。 ●誤った取扱いをしたときに想定される内容を 「危険」 、 「 警告」 、 「 注意」 に区分けし ています。 ○絵表示について 危険 人が死亡または重傷を負う可能性が大きい内容。 警告 人が死亡または重傷を負う可能性が想定される内容。 人が傷害を負う可能性および物的損害のみの発生が想定 注意 される内容。 記号は、 「 危険、 警告、 注意」 を示します。 図の中や近くに具体的な注意 ○絵表示の例 内容 (左図の場合は高温注意) を示します。 記号は、 してはいけない 「禁止」 を示します。 図の中や近くに具体的な 禁止内容...
- Page 6 警 告 ●充電アダプタは必ず付属の専用アダ ●充電アダプタは、 完全に乾いているこ プタを使用してください。 また付属の とを確認してからコンセントに差して 専用アダプタで他の製品を充電しな ください。 濡れた状態で差し込むと いでください。 ショー ト、 異常発熱によ ショー ト・ 感電の原因になり ます。 る発火の原因になります。 破損、 故障 ●刃が破損または故障した場合は、 本 した場合は、 事故を避けるために必ず 製品を使用しないでください。 けが フ ィ リ ップス社製の同型充電アダプタ の原因になります。 交換の際には必 をお求めください。 ずフィ リップス社製の同型部品とお ●濡れた手で充電アダプ タを抜き差しし 取り替えください。 ないでください。 感電やけがをするこ ●電池が漏液した場合は、...
- Page 7 使 用 上 の ご 注 意 フ ィ リ ップスシェーバーを初めてお使いの方は、 剃りかたに慣れるまで ~ 週間かかることがあり ます。 本体のお手入れ、 水またはぬるま湯で行ってください。 ℃以上の熱湯では洗浄しないでください。 研磨パッドや研磨剤を含んだ洗剤またはエアダスターは使用しないでください。 シェービングユニッ トの清掃や着脱は、 必ず電源を にし てから行っ てください。 外刃は、 薄く仕上げてありますので、 刃部を強く押さえたり、 硬いものにあてないよう、 ていねいに扱っ てください。 切れ味が衰えてきたり、 刃が破損した場合は、 使用せず必ず新しい替刃と交換し てください。 直射日光の当たる場所には保管しないでください。 夏場、 車の中に放置しないでください。 シェービングユニッ トは、 クリーニング表示 (しずくマーク) が表示された場合、 お手入れ方法 ( ・ )...
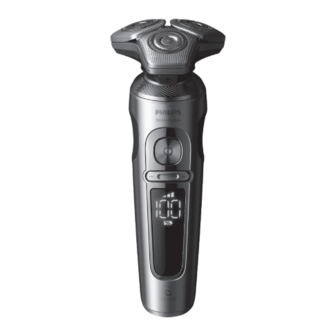
- Page 8 各部の名称 シェービング ユニッ ト シェービング ユニッ ト リ リース ト リマー ボタン 本体 電源ボタン パー ソナル コンフ ォー ト 設定 クイ ックク リーン ポッ ド デジタル表示 クイ ックク リーン ポッ ドカー ト リ ッジ 電源コネクタ受部...
- Page 9 ● シェービングユニット シェービングヘッ ド分解図 シェービング ヘッ ドホルダー 保持板 内刃 シェービング 外刃 ヘッ ドホルダー受部 SH91 (替刃品番: ) 充電アダプタ部 プレミアムポーチ 電源プラグ部 電源コネクタ部 充電アダプタ...
- Page 10 デジタル表示・ 初めてお使いになると きや、 長い間ご使用 にならなかったと きは、 表示が出るまでに 表示について 時間がかかる場合があり ます。 本体の主な表示 残量表示 充電残量はデ ィ スプレイ上に使用可能量 ( ) として表示されます。 電 ON/OFF 源の の際に数秒間点灯します。 充電表示 充電中は、 本体の充電残量 ( ) とバッテリーマークの表示が点滅し ます。 充電完了表示 充電が完了すると、 本体の充電残量 ( ) 表示が点灯し続けます。 満充電後しばらくすると消えます。 充電催促表示 充電残量が少なくなると、 バッテリーマークがオレンジ色に点滅しビ ープ音が鳴ります (電源を にすると、...
- Page 11 シェービングヘッ ド交換表示 シェービングヘッドの交換マークが点滅しビープ音が鳴ると、 交換時 期です。 シェービングヘッ ドを交換してください ( 参照) 。 ブロック表示 シェービングヘッドに長いヒゲがからまっていたりシェービングヘッド が破損していると、 「 ! 」 マークが赤く点灯し、 シェービングヘッ ドの交換 表示、 クリーニング表示が同時に点滅しビープ音が鳴ります。 この場 合、 電源を にすることができません。 シェービングヘッ ドをお手入れ するか、 交換してください ( ・ 参照) 。 ロック表示 (カギマークが表示されていると電源は入り ません) 電源ボタンを約 秒長押しするとカギマークが表示されます。 さらに電 源ボタンを押し続けると、 秒前からカウントダウンが開始され...
- Page 12 ●水場や浴室で充電をしないでく 充電のしかた ださい。 ●専用の充電アダプタ以外での充 電はしないでください。 注意 ●充電アダプ タは、 完全に乾いてい ることを確認してからコンセント ※充電しながらシェービングはできません。 に差し てください。 ●濡れた手で充電アダプタを抜き 差ししないでください。 初めてお使いになるときや、 長い間ご使用にならなかったとき、 または充電残量が少なく なったときは、 ご使 用前に充電し てください。 充電時間は約 時間です。 充電開始後数分間、 充電表示ランプが点滅しないこと 240V があり ますが、 そのまま充電すると充電表示ランプが点滅します。 海外 ( ~ ) でのご使用も可能で す。 ただし、 コンセン トの形状や電圧など現地で充分お確かめのうえご使用ください。 ※本製品はリチウムイ オン電池を使用しているため、 ご使用の都度充電をしても充電池の寿命には影響あり ません。 充電が完了すると充電表示ランプが白く...
- Page 13 シェービングの 肌が乾いた状態でのシェービングの しかた(ドライ) しかたです。 ●シェーバー本体は防水加工をしており、 水場や浴室でも使用できますが、 水や液 注意 体の中に浸けないでください (故障の原因となり ます) 。 ●ご使用前に刃に異常がないことを確認してください。 ●モーターの始動時、 微弱な振動がシェーバー本体に伝わり ますが、 問題はあり ません。 ●ほこりなどで肌が汚れている場合、 ふきとっ てからご使用ください。 ●ご使用の前に外刃の破れや変形がないか確認してください (外刃に破れや変形があると肌を傷つける原因になり ます) 。 ●ヒゲ剃り以外の目的 (頭髪など) には、 使用しないでください。 ●静止している本体を手に取るなどすると、 本体が振動を感知し、 充電残量の表示が白く光ります。 電源ボタンを押し、 電源を にします。 ※カギマークが表示されている場合はロ ッ ク機能 が になっ...
- Page 14 上手に 肌に強く押しつけるのではなく 、 軽く押しあてて 剃るには 円を描くよ うに回転させながら剃るのがコツです。 ほお あごの裏側 肌を伸ばし、 ヒゲを立たせるよ うに円を描く よ う 刃を肌に軽く あて、図のよ う にあごを上げて円を に小さ く回転させながら剃り ます。 描く よ う に小さ く 回転させながら剃 り ま す 。 ほおの奥から首筋 鼻の下 片方の手で肌を後ろに引っ張りながら剃りま 鼻の下を伸ばし、円を描く よ うに小さ く回転さ す。 せながら剃り ます。 フィリップスのシェーバーを初めてお使いの方は、...
- Page 15 シェービングフォームやシェービング シェービングの ジェルを使ったシェービングのしかた しかた(ウェ ッ ト) です。 剃った部分を実感しながら、 なめ らかなシェービングができます。 ●シェーバー本体は防水加工をしており、 水場や浴室でも使用できますが、 水や液 注意 体の中に浸けないでください (故障の原因となり ます) 。 ●ご使用前に刃に異常がないことを確認してください。 ●モーターの始動時、 微弱な振動がシェーバー本体に伝わり ますが、 問題はあり ません。 ●ご使用の前に外刃の破れや変形がないか確認してください (外刃に破れや変形があると肌を傷つける原因になり ます) 。 ●ヒゲ剃り以外の目的 (頭髪など) には、 使用しないでください。 ●石けんもお使いいただけますが、 肌の上での滑りをよ くするため、 シェービングフ ォームやジェルの使用をお勧めします。 ●静止している本体を手に取るなどすると、 本体が振動を感知し、 充電残量の表示が白く光ります。 顔を濡らし、...
- Page 16 ト リマーはヘアーライ ン、 もみあげ、 トリマーの使いかた ヒゲなどを整えるのに便利です。 シェービング ユニ ッ トのはずしかた シェービング ユニ ッ トのつけかた シェービングユニッ トを本体からはずし ト リ マーをはずし (図 ) 、 シェービングユニ ます。 ッ トの突起部 (図 ) をシェーバー上部の ※シェービングユニット 溝 (図 ) に合わせ、 カチ ッ と音がするまで は、回さずにまっすぐ 押し込み (図 )...
- Page 17 お手入れ方法 ● 本製品や部品を食器洗浄機で洗わないでください。 ●お手入れの際は、 電源を にし てから水洗いし てく ださい。 注意 ●シェービングユニ ッ トは水洗いできますが、 本体は水中に浸けないでく ださい。 ●シェービング ユニ ッ トを乾燥させる時に、 タオルやテ ィ ッシ ュ ペーパーを使用しないでく ださい。 刃を傷めたり思わぬけがをすることがあ り ます。 シェービングユニッ トのお手入れ方法 ※研磨パッ ドや研磨剤を含んだ洗剤、 またエアダスターは使用しないでください。 ※ ぬるま湯 ( ℃前後) でのお手入れをおすすめします。 臭いのもととなる皮脂や汗などが取れやすくなり ます。 ただし、...
- Page 18 シェービングユニッ トのお手入れ方法(分解+水洗い) ※ カ月に 度、 またはシェーバーの切れ味が落ちてきたら、 シェービングヘッ ドを分解して水洗いすることをおす すめします。 リリースボタンを押して、 シェービン 内刃を外刃から取 り 外し、 流水で洗いま す 。 グユニットを開きます。 水を切り ます。 内刃と外刃をシェービングユニッ トに取 シェービングヘッ ドホルダー内側とシェー り付けます。 詳しい手順については、 「刃 の交換」 ( ) をご参照ください。 ビングヘッドホルダー受部の汚れを水 で洗い流します。 シ ェ ービ ング ヘ ッ ドホルダ ーの金具をシ ェ ー ビングヘッ...
- Page 19 ト リマーのお手入れ方法 ※詰ま りや損傷を防ぎ切れ味を保つため、 使用後は必ずト リマーをク リーニングしてください。 トリマーを取り付けた状態でシェーバーの電源を に し、 ぬるま湯または水ですすぎ洗いをします。 シェーバーの電源を にし、 トリマーを充分に乾燥させ てください。 ※ト リマーはタオルやテ ィ ッシュペーパーなどでふかないでください。 刃を傷めたり思わぬけがをすることがあります。...
- Page 20 クイッククリーンポッドの 使いかた ●クイ ックク リーンポッ ドカー ト リ ッジ内のク リーニング液を万一飲み込んだり、 目に 入ったり した場合は応急処置を行い医師に相談してください。 警告 ●クイ ックク リーンポッ ドカー ト リ ッジはお子様の手が届かない場所に保管してくだ さい。 クイ ッククリーンポッ ドの準備 クイ ッククリーンポッドのキャップを回し クイ ッククリーンポッ ドカー ト リ ッジのつま て取り外します。 みの円状の部分を押し て、 つまみのツ メを 外します。 クイ ックク リ ーンポッ ドカー ト リ ッジのキャ ッ プを回して取り外します。...
- Page 21 クイ ッククリーンポッ ドの使いかた ※ シェービングフ ォームやシェービングジェルの使用後に、 クイ ックク リーンポッ ドで洗浄をされる場合は、 事前 にシェービングユニッ トをぬるま湯または水でしっかり と洗い流してください。 ※ クイッククリーンポッドには、 専用のクイッククリーンポッドカートリッジ以外は使用しないでください。 専用のクイ ックク リーンポッ ドカー ト リ ッジに水を足されたり専用のクイ ックク リーンポッ ドカー ト リ ッジの代わ りに水や他の液を使用すると、 故障の原因となり ますのでお止めください。 ※ フ ィ リ ップスの専用クイ ッククリーンポッ ドカー ト リ ッジをご使用ください。 フ ィ リ ップスの専用クリーニング液 (ボトルタイ...
- Page 22 クイ ッククリーンポッ ドカー ト リ ッジの交換 クイッククリーンポッドにクイッククリーンポッドカートリッジ 交 換 お知らせ が 表 示されるか、 以 下 の 表 に示す 交 換 時 期 が 来 たら、 クイ ッククリーンポッ ドカー ト リ ッジを交換してください。 クイッククリーンポッド 使用頻度 使用回数 カートリッジの交換時期 毎日 約 回 月に 回 週に...
- Page 23 刃の交換 SH91 替刃 ( ) の交換 ※シェービング性能を維持するために、 刃は 年ごとに交換することをおすすめします。 SH91 ※交換する際は、 必ずフィリップス社製の専用の替刃 (品番: ) とお取り替えください。 ※刃を交換する際は、 電源を にしてください。 シェービングユニッ トのリ リースボタンを 保持板をシェービングヘッ ドに再度取り 押し て、 シ ェ ービ ング ユニ ッ ト を開き、 シ ェ ー 付け、時計回りに回します。 ビングヘッ ドホルダーを引き抜きます。 各 保 持 板には、 シェービングヘッドホ ルダーの突起部分にぴったりとはまる...
- Page 24 シェーバーを保管する前にきちんと乾 保管のしかた 燥させて ください。 ※シェーバーはプレミアムポーチに入れて保管してください。 ※室温 ℃~ ℃の環境で保管してください。 ※直射日光の当たる場所には保管しないでください。 ※夏場、 車の中には放置しないでください。...
- Page 25 シェーバーを 廃棄すると き ※お客様による充電池の 修理交換はできません。 リチウムイオン充電池のリサイ クルについて このシェーバーはリチウムイオン充電池を使用しています。 Li-ion リチウムイオン充電池はリサイ クル可能な貴重な資源です。 ご使用済みの製品の廃棄に際しては、 リチウムイ オン充電池を取り出 し、 各自治体の処理方法に従い、 リサイ クル協力店にお持ちください。 ●製品を廃棄すると き以外は、 絶対に本体を分解しないでく ださい。 ●本体内部の金具は鋭いので、 ご注意く ださい。 ●安全上の理由から、 一度分解した製品は絶対に再使用しないでく ださい。 注意 ●完全に放電し てから、 充電池を取り外し てく ださい。 ●電池が漏液した場合は、 液が目や皮膚に触れない様に注意してください。 万一目に 入った時は、 こすらずに水道水で十分洗浄し医師の治療を受けてく ださい。 皮膚や衣 服についた場合は水道水で十分洗い流し...
- Page 26 故障かな ? 故障かな?と思ったら、 と思ったら お調べ く ださい。 だんだん切れ味が悪くなった ▶シェービングヘッド部が汚れていないか確認してください。 ▶シェービングヘッド部が損傷または摩耗していないか確認してください。 損傷または摩耗し ていると きは、 シェービングヘッ ドを交換し て ください。 SH91 (替刃品番: ) ▶シェービングヘッドに長いヒゲがからまっていないか確認してください。 ▶ 専用クイッククリーンポッドカートリッジが汚れていないか確認してください。 汚れているときは、 新しいクイッククリーンポッドカートリッジに交換してください。 充電しても使用時間が極端に短い ▶シェーバーが完全に止まるまで作動させてから、 もう一度充電してください。 それでも改善されないときは、 充電池の寿命です。 シェーバーの電源ボタンを押しても作動しない ▶ 充電がされていない場合は約 時間、 充電をしてください。 ▶ カギマーク が表示される場合はロックを解除してください。 ▶ 3つのマーク が一度に点滅する場合は刃が動かなくなるほど汚れて...
- Page 27 充電できない ▶ シェーバー本体に充電アダプタのコー ドがきちんと差し込まれているか確認し てください。 HQ8505 ▶ 充電アダプタの電源コー ドが断線し ている場合は新しい充電アダプタ (品番 : ) を お買い求めく ださい。 クイッククリーンポッドを使用してもシェーバーがあまりきれいにならない ▶ シェーバー本体が正しくセットされているか確認してください。 ▶ クイッククリーンポッドカートリッジが使用されているか確認してください。 ▶ クイッククリーンポッドカートリッジが古くなっていないか確認してください。 ▶ クイッククリーンポッドカートリッジが空になっていないか確認してください。 クイッククリーンポッド本体から洗浄液がこぼれる ▶ クイッククリーンポッド使用前に水洗いした場合は、 余分な水を落としてからセッ トしてください。 ▶ シェービングフォームやシェービングジェルを使用してシェービングした後にクイッ ククリーンポッドで洗浄をされる場合は、 事前にシェーバーのシェービングユニッ トをぬるま湯または水でしっかりと洗い流してください。 ▶ カートリッジから洗浄液が溢れ、 クイッククリーンポッド内に洗浄液が溜ることが ありますが、 故障ではありません。 以上の点検により、...
- Page 28 English SP9840/32, SP9841/32 English...
-
Page 29: General Description (Fig. 1)
English Introduction Congratulations on your purchase and welcome to Philips! To fully benefit from the support that Philips offers, register your product at www.philips.com/ welcome. Please read this user manual, as it contains information about the features of this shaver as well as some tips to make shaving easier and more enjoyable. - Page 30 Unplug the appliance before cleaning it with water. Do not use a damaged appliance. Replace damaged parts with new Philips parts. Do not use the supply unit in or near wall sockets that contain an electric air freshener to prevent irreparable damage to the supply unit.
- Page 31 This is normal and not dangerous because all electronics are enclosed in a sealed power unit inside the shaver. Only use original Philips accessories or consumables. Only use detachable supply unit HQ8505. Charge, use and store the product at a temperature between 5 °C and 35 °C.
-
Page 32: Battery Fully Charged
English The display Note: Remove any sticker or protective foil from the display before using the product. Charging When the shaver is charging, the battery charge indicator on the shaver flashes white. The battery charge is indicated by the battery charge percentage flashing on the display, which is shown when the shaver is moved. - Page 33 English Personal comfort settings The shaver has a feature that allows you to personalize your settings. Depending on your personal shaving needs, choose between three settings, from low to high: comfort, dynamic or efficiency. When you press the button on the left or right of the display, the segment of the personal comfort settings bar lights up to indicate the selected setting.
-
Page 34: Quick Charge
English Notification symbol Overheating If the shaver overheats during charging, the notification symbol flashes. When this happens, the shaver automatically stops charging. Charging continues once the temperature of the shaver has decreased to the normal level after approx. 10 minutes. Blocked shaving heads If the shaving heads are blocked, the notification symbol continuously lights up red. -
Page 35: Using The Shaver
English 2 Put the small plug in the shaver and put the supply unit in the wall socket. The display of the shaver indicates that the shaver is charging. 3 After charging, remove the supply unit from the wall socket and pull the small plug out of the shaver. Note: When the battery is full, the display switches off automatically after 15 minutes. - Page 36 English new shaving system. To allow your skin to adapt to this new appliance, we advise you to shave regularly (at least 3 times a week) and exclusively with this appliance for a period of 3 weeks. Shaving tips For the best results on skin comfort, pre-trim your beard if you have not shaved for 3 days or longer.
-
Page 37: Using Click-On Attachments
English 3 Rinse the shaving unit under the tap to ensure that the shaving unit glides smoothly over your skin. 4 Switch on the shaver. 5 Move the shaving heads over your skin in circular movements to catch all hairs growing in different directions. -
Page 38: Using The Precision Trimmer Attachment
English Using the precision trimmer attachment You can use the precision trimmer attachment to touch up your beard, sideburns and moustache. 1 Attach the attachment to the appliance (‘click’). 2 Switch on the shaver. 3 Hold the precision trimmer perpendicular to the skin and move it downwards while exerting gentle pressure. -
Page 39: Cleaning And Maintenance
English Cleaning and maintenance Regular cleaning guarantees better shaving results. Never clean, remove or replace the shaving unit while the shaver is switched on. Do not apply pressure to shaving head guards. Do not touch shaving heads with hard objects as this may dent or damage the precision-made slotted guards. - Page 40 English 3 Lift the tab on the seal and pull it by the corner to remove the seal from the Quick Clean Pod Cartridge. 4 Press the small circular piece on the handle of the Quick Clean Pod Cartridge to break the snap hook on the handle.
- Page 41 English Always shake excess water off the shaver before you place it in the Quick Clean Pod. 1 Place the shaver upside down into the Quick Clean Pod. The shaver automatically detects that it is in the Quick Clean Pod. 2 Switch on the shaver to start the cleaning program.
-
Page 42: Thorough Cleaning
4 Place a new Quick Clean Pod Cartridge into the Quick Clean Pod (see 'Preparing the Quick Clean Pod for use'). Scan the QR code to the left or visit www.philips. com/cleaning-cartridge to order replacement Quick Clean Pod Cartridges. Thorough cleaning... - Page 43 English 4 Turn the retaining ring counterclockwise and lift it off the shaving head. Repeat this process for the other retaining rings. Place them aside in a safe place. 5 Remove the shaving heads from the shaving head holder. Each shaving head consists of a cutter and guard.
-
Page 44: Cleaning The Trimmer Attachment
English 11 Align the arrows on the retaining ring with the projections in the shaving head holder. Turn the ring clockwise until it clicks to indicate that the ring is fixed. 12 Attach the shaving head holder to the bottom part of the shaving unit (‘click’). - Page 45 English Always replace the shaving heads with original Philips 2yrs shaving heads (see 'Ordering accessories'). Replacement reminder The replacement reminder indicates that the shaving heads need to be replaced. The shaving unit symbol lights up continuously, the arrows flash white and you hear a beep when you switch the shaver on or off.
-
Page 46: Ordering Accessories
Ordering accessories To buy accessories or spare parts, visit www.philips.com/parts-and-accessories or go to your Philips dealer. You can also contact the Philips Consumer Care Center in your country (see the international warranty leaflet for contact details). The following accessories and spare parts are available:... - Page 47 English the wall socket and that the battery is completely empty. Take any necessary safety precautions when you handle tools to open the shaver and when you dispose of the rechargeable battery. 1 Remove the click-on attachment from the appliance. 2 On top of the appliance insert a screwdriver between the black cylinder and silver ring.
-
Page 48: Warranty And Support
7 Lift out the printed circuit board with the rechargeable battery. 8 Bend the battery tags aside with a screwdriver. 9 Remove the rechargeable battery. Warranty and support If you need information or support, please visit www.philips.com/support or read the international warranty leaflet. -
Page 49: Warranty Restrictions
This chapter summarizes the most common problems you could encounter with the appliance. If you are unable to solve the problem with the information below, visit www.philips.com/support for a list of frequently asked questions or contact the Consumer Care Center in your country. - Page 50 English Problem Possible cause Solution I replaced the You have not reset the Reset the appliance by shaving heads, appliance. pressing the on/off button for but the display approx. 7 seconds. still shows the replacement reminder. A shaving unit This symbol reminds Replace the shaving heads (see symbol has you to replace the...
- Page 52 ● 日本国以外のフ ィ リ ップスサービス部門においても保証期間内及び保証期間の経過後の アフ ターサービスを受けることができますが、 この場合多少日数を要することもあり ます。 ● 海外にてアフ ターサービスを受けられる場合は、 現地のフ ィ リ ップスサービス部門に お問い合わせください。 尚、 お困りの点がございましたら下記までご連絡ください。 Philips Service Department P.O.Box20100, 9200 CA DRACHTEN, The Netherlands, Fax+31 512 594316 For email visit:www.philips.com/support 【お客様の個人情報のお取り扱いについて】 http:// ● お受けしましたお客様の個人情報は、 株式会社フ ィ リ ップス・ジャパンのホームページ...
- Page 53 便 利 メ モ お買い上げ お買い上げ日 年 月 日 店 名 TEL. ( ) ご使用の時、 このよ うな症状はあり ませんか ? ●本体にさわると時々電気を感じる。 ●こげく さい臭いがする。 ●電源コー ド部を動かすと通電したり、 しなかったりする。 ●その他の異常、 故障がある。 このよ うな症状の時は、 故障や事故防止のため、 電源を にし、 充電アダプタをコンセントから外して、 必ずフィ リップスサポートセ ンターにお問い合わせください。 仕 様 SP9840/32 SP9841/32 品 番 SP9840 SP9841 ハ...
- Page 55 従って保証書を発行している者 (保証責任者) 、 及びそれ以外の事業者に対する お客様の法律上の権利を制限するものではあり ません。 保証期間経過後の修理についてご不明の場合は、 フ ィ リ ップスサポー トセンター にお問い合わせください。 ※ 保証期間経過後の修理 ・ 補修用性能部品の保有期間について詳しくは取扱 説明書の保証とアフターサービスの項目をご覧ください。 ※ お客様にご記入いただいた個人情報 (保証書の控え) は保証期間内のサービス 活動及びその後の安全点検活動のために利用させていただく場合がございます。 ご了承ください。 また個人情報は、 株式会社フ ィ リ ップス ・ ジャパンのホームページ http://www.philips.co.jp/ に掲載されている 「プライ バシーに関する通知」 に基 キ リ づき適切に管理いたします。 ト リ 線...
- Page 56 受付時間 : : ~ : (年末年始除く) My Philips 登録のご案内 フ ィ リ ップスでは、 製品をよ り快適にご使用いただくために 製品登録をおすすめし ており ます。 My Philips キ では製品の保証書や購入証明書の写真も保管でき、 リ 万が一購入証明書を紛失された場合にも安心です。 ト リ http://www.philips.co.jp/myphilips-about 線 3000.103.7470.1 (06.23) この印刷物は再生紙を使用しており ます。 ©2023 Koninklijke Philips N.V. Koninklijke Philips N.V. 記載されている製品名などの固有名詞は、 またはその他の会社の商標または登録商標です。...
Need help?
Do you have a question about the SP9841/32 and is the answer not in the manual?
Questions and answers