Table of Contents
Advertisement
Available languages
Available languages
Advertisement
Table of Contents

Related Manuals for Philips NORELCO SP9841


Summary of Contents for Philips NORELCO SP9841
- Page 1 Tripleheader shaver SP9841, SP9840 www.philips.com/support/ifu-lux...
- Page 4 empty page before TOC...
- Page 5 English 6 Español 31...
-
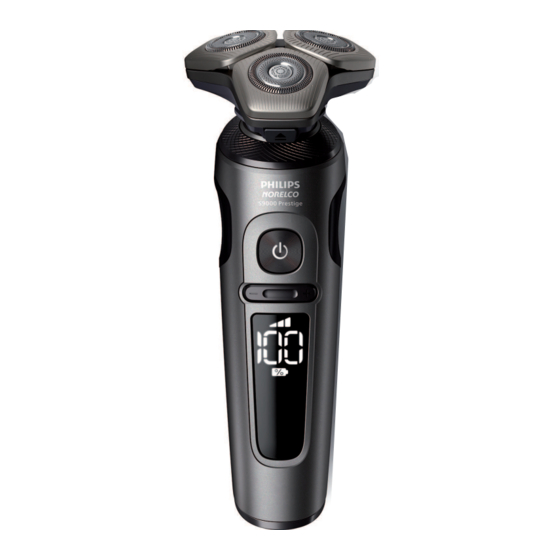
Page 6: General Description (Fig. 1)
English Introduction Congratulations on your purchase and welcome to Philips Norelco! To fully benefit from the support that Philips Norelco offers, register your product at www.norelco.com/register. General description (Fig. 1) 1 Click-on precision trimmer attachment 2 Shaving unit with hair chamber... - Page 7 - Use this product only for its intended household use as described in this manual. Misuse can lead to hazards or serious injuries. Do not use attachments not recommended by Philips North America LLC.
- Page 8 IMPORTANT: The power plug contains a transformer. Do not cut off the power plug to replace it with another plug as this will cause a hazardous condition. - Only use original Philips accessories or consumables. Only use detachable power cord HQ8505.
- Page 9 (e.g. coins, hairpins, rings). Do not wrap batteries in aluminum foil. Tape battery terminals or put batteries in a plastic bag before you discard them. Philips Norelco Quick Clean Pod Cartridge fluid - Do not take internally. - Avoid contact with the eyes. In case of eye contact, thoroughly flush with cold water.
- Page 10 English The display Note: Remove any sticker or protective foil from the display before using the product. Charging When the shaver is charging, the battery charge indicator on the shaver flashes white. The battery charge is indicated by the battery charge percentage flashing on the display, which is shown when the shaver is moved.
-
Page 11: Remaining Battery Charge
English Remaining battery charge The remaining battery charge is indicated by the battery charge percentage shown on the display. Personal comfort settings The shaver has a feature that allows you to personalize your settings. Depending on your personal shaving needs, choose between three settings, from low to high: comfort, dynamic or efficiency. -
Page 12: Replacement Reminder
Replace damaged shaving heads immediately. Always replace the shaving heads with original Philips shaving heads. The shaver is equipped with a replacement reminder which reminds you to replace the shaving heads. The shaver beeps, the... - Page 13 English Notification symbol Overheating If the shaver overheats during charging, the notification symbol flashes. When this happens, the shaver automatically stops charging. Charging continues once the temperature of the shaver has decreased to the normal level after approx. 10 minutes. Blocked shaving heads If the shaving heads are blocked, the notification symbol continuously lights up red.
-
Page 14: Quick Charge
English Quick charge After approx. 5 minutes of charging the shaver contains enough power for one shave. Charging with the supply unit 1 Make sure the shaver is switched off. 2 Put the small plug in the shaver and put the supply unit in the wall socket. -
Page 15: Switching The Shaver On And Off
English Note: This shaver is waterproof. It is suitable for use in the bath or shower and for cleaning under the tap. For safety reasons, the shaver can only be used without cord. Switching the shaver on and off 1 To switch on the shaver, press the on/off button once. -
Page 16: Dry Shaving
English Dry shaving 1 Switch on the shaver. 2 Move the shaving heads over your skin in circular movements to catch all hairs growing in different directions. Make sure each shaving head is fully in contact with the skin. Exert gentle pressure for a close, comfortable shave. -
Page 17: Using Click-On Attachments
English 3 Rinse the shaving unit under the tap to ensure that the shaving unit glides smoothly over your skin. 4 Switch on the shaver. 5 Move the shaving heads over your skin in circular movements to catch all hairs growing in different directions. -
Page 18: Using The Precision Trimmer Attachment
English 3 Insert the lug of the attachment into the slot in the top of the shaver. Then press down the attachment to attach it to the shaver (‘click’). Using the precision trimmer attachment You can use the precision trimmer attachment to touch up your beard, sideburns and moustache. -
Page 19: Deactivating The Travel Lock
English While you activate the travel lock, the travel lock symbol lights up briefly and the shaver 3 sec. produces a short sound.When the travel lock is activated, the travel lock symbol flashes. If you try to switch on the shaver while the travel lock is active, the travel lock symbol flashes. - Page 20 English How do I use the Quick Clean Pod? What does the icon on my Quick Clean Pod mean? Icon Behavior Meaning Becomes visible on the The Quick Clean Pod Cartridge Quick Clean Pod needs to be replaced. Preparing the Quick Clean Pod for use 1 Twist and remove the top of the Quick Clean Pod.
- Page 21 English 5 Place the Quick Clean Pod Cartridge into the Quick Clean Pod. 6 Put the top of the Quick Clean Pod back onto the base and turn it clockwise until you hear a click. Do not tilt the Quick Clean Pod to prevent leakage.
- Page 22 English Replacing the Quick Clean Pod Cartridge Replace the Quick Clean Pod Cartridge immediately when the cartridge replacement icon on the Quick Clean Pod becomes visible or follow the table below. Frequency of use Cycles When to replace the Quick Clean Pod Cartridge Every day About 30...
-
Page 23: Thorough Cleaning
4 Place a new Quick Clean Pod Cartridge into the Quick Clean Pod (see 'Preparing the Quick Clean Pod for use'). Scan the QR code to the left or visit www.philips.com/cleaning-cartridge to order replacement Quick Clean Pod Cartridges. Thorough cleaning... - Page 24 English 4 Turn the retaining ring anticlockwise and lift it off the shaving head. Repeat this process for the other retaining rings. Place them aside in a safe place. 5 Remove the shaving heads from the shaving head holder. Each shaving head consists of a cutter and guard.
-
Page 25: Cleaning The Trimmer Attachment
English 12 Attach the shaving head holder to the bottom part of the shaving unit (‘click’). Cleaning the trimmer attachment Never dry the trimmer with a towel or tissue, as this may damage the trimming teeth. Clean the precision trimmer attachment after each use. - Page 26 English Always replace the shaving heads with original Philips shaving heads (see 'Ordering accessories'). Replacement reminder The replacement reminder indicates that the shaving heads need to be replaced. The shaving unit symbol lights up continuously, the arrows flash white and you hear a beep when you switch the shaver on or off.
-
Page 27: Ordering Accessories
Ordering accessories To buy accessories or spare parts, visit www.philips.com/parts-and-accessories or go to your Philips dealer. You can also contact the Philips Consumer Care Center in your country (see the international warranty leaflet for contact details). -
Page 28: Full Two-Year Warranty
Full Two-Year Warranty Philips North America LLC warrants this new product (except cutters and combs) against defects in materials or workmanship for a period of two years from the date of purchase, and agrees to repair or replace any defective product without charge. -
Page 29: Day Money-Back Guarantee
*Read enclosed instructions carefully. 45-DAY MONEY-BACK GUARANTEE To enjoy the closest and most comfortable shave from your new Philips Norelco Men’s Shaver, the shaver should be used exclusively for 3 weeks. This allows your hair and skin enough time to adapt to the Philips Norelco Shaving System. - Page 30 We cannot be responsible for lost mail. The product must be postmarked no later than 45 days after the date of purchase. Philips reserves the right to verify the purchase price of the product and limit refunds not to exceed suggested retail price.
-
Page 31: Descripción General (Fig. 1)
Introducción ¡Felicitaciones por su compra y bienvenido a Philips Norelco! Para beneficiarse completamente del soporte que ofrece Philips Norelco, registre el producto en www.norelco.com/register. Descripción general (Fig. 1) 1 Accesorio de la cortadora de ajuste de clic 2 Unidad de afeitado con cámara de acumulación de vello 3 Símbolo de notificación... - Page 32 El uso inadecuado puede causar posibles riesgos o lesiones graves. No use accesorios que no estén recomendados por la corporación Philips North America LLC. Nunca utilice este producto si el cable o el enchufe de carga están dañados, si no funciona correctamente, si se cayó, si está...
- Page 33 Cubra las terminales de las baterías con cinta o colóquelas en una bolsa de plástico antes de desecharlas. Líquido para cartucho del Quick Clean Pod de Philips Norelco No ingerir. Evita el contacto con los ojos. En caso de que entre en contacto con los ojos, enjuaga bien con agua fría.
-
Page 34: Batería Completamente Cargada
Español CONSERVE ESTAS INSTRUCCIONES La pantalla Nota: Quite cualquier adhesivo o lámina protectora de la pantalla antes de usar el producto. Carga Cuando la afeitadora se está cargando, el indicador de carga de batería destella en color blanco. El porcentaje de carga destellante en la pantalla indica la carga de la batería, este se muestra cuando se mueve la afeitadora. - Page 35 Español Carga de batería disponible El porcentaje de carga de la batería que se muestra en la pantalla indica la capacidad de carga disponible en la batería. Ajustes de comfort personalizados La afeitadora tiene una característica que le permite personalizar sus ajustes. Según sus necesidades de afeitado personales, elija de entre tres ajustes, de bajo a alto: comfort, dinámico o eficaz.
-
Page 36: Recordatorio De Reemplazo
Reemplace los cabezales de afeitado dañados inmediatamente. Siempre reemplace los cabezales de afeitado con cabezales originales de Philips. La afeitadora está equipada con un recordatorio de reemplazo que le recuerda reemplazar los cabezales de afeitado. -
Page 37: Carga Rápida
Español Carga Cargue la afeitadora antes de usarla por primera vez y cuando la pantalla indique que la batería está casi agotada. La carga toma aproximadamente 1 hora. Una afeitadora completamente cargada otorga un tiempo de afeitado de hasta 60 minutos. Luego de aproximadamente 5 minutos de carga, la afeitadora tiene suficiente energía para una afeitada. -
Page 38: Encendido Y Apagado De La Afeitadora
Español Este símbolo indica que la afeitadora puede utilizarse en el baño o en la ducha. Utilice esta afeitadora para el uso doméstico que se describe en este manual. Por motivos de higiene, la afeitadora debe emplearse únicamente por una persona. El recorte es más fácil cuando la piel y el vello están secos. - Page 39 Español Afeitado seco 1 Encienda la afeitadora. 2 Mueva los cabezales de afeitado sobre la piel con movimientos circulares para llegar a todos los vellos en las diferentes direcciones de crecimiento. Asegúrese de que cada unidad de afeitado esté siempre en contacto total con la piel. Ejerza una suave presión para una afeitada al ras y cómoda.
-
Page 40: Uso De Los Accesorios De Ajuste De Clic
Español 5 Mueva los cabezales de afeitado sobre la piel con movimientos circulares para llegar a todos los vellos en las diferentes direcciones de crecimiento. Asegúrese de que cada unidad de afeitado esté siempre en contacto total con la piel. Ejerza una suave presión para una afeitada al ras y cómoda. -
Page 41: Activación Del Sistema De Bloqueo
Español 1 Coloque el accesorio en el dispositivo ("haga clic en"). 2 Encienda el aparato. 3 Sostenga la cortadora de precisión perpendicular a la piel y muévala hacia abajo ejerciendo una presión suave. 4 Desconecte el dispositivo y limpie el accesorio después de usarlo. -
Page 42: Limpieza Y Mantenimiento
Español Limpieza y mantenimiento Una limpieza frecuente garantiza los mejores resultados de afeitado. Nunca limpie, retire ni reemplace la unidad de afeitado cuando la afeitadora esté encendida. No aplique presión a las protecciones del cabezal de afeitado. No toque los cabezales de afeitado con objetos duros, debido a que podría deformar o dañar las protecciones que cuentan con ranuras de precisión. - Page 43 Español 3 Levante la lengüeta del sello y jálela de la esquina para retirar el sello del cartucho del Quick Clean Pod. 4 Presione la pequeña pieza circular en el mango del cartucho del Quick Clean Pod para romper el broche de presión del mango.
- Page 44 Español Cada programa de limpieza toma aproximadamente un minuto. 1 Deje que la afeitadora se seque completamente al aire en el Quick Clean Pod antes de guardarla. Reemplazo del cartucho del Quick Clean Pod Reemplace el cartucho del Quick Clean Pod inmediatamente cuando el ícono de reemplazo del cartucho del Quick Clean Pod se vuelva visible, o bien, siga las indicaciones que se muestran en la siguiente...
-
Page 45: Limpieza A Fondo
Quick Clean Pod (ver 'Preparación del Quick Clean Pod para el uso'). Escanea el código QR que se encuentra a la izquierda o visita www.philips.com/cleaning-cartridge para pedir cartuchos de repuesto del Quick Clean Pod. Limpieza a fondo Le aconsejamos que limpie los cabezales de afeitado a fondo una vez al mes o cuando la afeitadora ya no afeite tan bien como antes. - Page 46 Español 5 Quite los cabezales de afeitado del soporte del cabezal de afeitado. Cada cabezal de afeitado consiste de un cortador y un protector. Nota: No limpie más de un cortador y protector a la vez, ya que todos son pares. Si accidentalmente coloca una cuchilla en el protector de afeitado equivocado, tardará...
-
Page 47: Reemplazo De Los Cabezales De Afeitado
12 meses. Reemplace los cabezales de afeitado dañados inmediatamente. Siempre reemplace los cabezales de afeitado con cabezales originales de Philips (ver 'Pedido de accesorios'). Recordatorio de reemplazo El recordatorio de reemplazo indica que los cabezales de afeitado necesitan ser reemplazados. -
Page 48: Pedido De Accesorios
Para comprar accesorios o piezas de repuesto, visite www.philips.com/parts-and-accessories o acuda a su distribuidor de Philips. También puede ponerse en contacto con el centro de atención al cliente Philips en su país (consulte el folleto de garantía internacional para encontrar los datos de contacto). -
Page 49: Garantía Total De Dos Años
Español Asistencia Para asistencia, visite nuestro sitio web: www.philips.com/support o llame al número gratuito 1-800-243-3050. Desecho Este producto posee una batería recargable de litio- ión que debe desecharse apropiadamente. Comunícate con los funcionarios locales o de la ciudad para obtener más información acerca del manejo final de la batería. - Page 50 No asumimos ninguna responsabilidad por los paquetes perdidos. El paquete del producto debe contar con matasellos que no supere los 45 días a partir de la fecha de compra. Philips se reserva el derecho a verificar el precio de...
- Page 51 Español compra del producto y limita los reembolsos al precio de venta minorista sugerido. Para obtener el servicio de garantía de devolución de dinero, visite www.PhilipsMoneyBack.com. La entrega del cheque de reembolso ocurrirá de 6 a 8 semanas después de la recepción del producto devuelto.
- Page 55 Empty page before back cover...
- Page 56 Manufactured for/fabricado por: Philips Personal Health a division of/una división de Philips North America LLC P.O. Box 10313, Stamford, CT 06904 This symbol on the product’s nameplate means it is listed by Underwriters’ Laboratories, Inc. Este símbolo en la placa del nombre del producto indica que está...
Need help?
Do you have a question about the NORELCO SP9841 and is the answer not in the manual?
Questions and answers
How do I detach the shaving head and atach the grooming tool
To detach the shaving head and attach the grooming tool on the Philips Norelco SP9841:
1. Ensure the shaver is switched off.
2. Detach the shaving head: Pull the attachment straight off the shaver. Do not twist the attachment while pulling it off.
3. Attach the grooming tool: Insert the lug of the grooming tool into the slot at the top of the shaver. Press down on the attachment until it clicks into place.
This answer is automatically generated