Table of Contents
Advertisement
Quick Links
Thank you for purchasing this Panasonic product.
■ This manual is common to all the models regardless of suffixes of the Model No.
z D: for India
z T: for Taiwan
■ Before operating this product, please read the instructions carefully, and save this manual
for future use.
■ Before using your projector, be sure to read "Read this first!" (
W0922NL0 -PT
Operating Instructions
LCD Projector
Model No.
Functional Manual
Commercial Use
PT-TMZ400
PT-TMW380
PT-TMX380
Æ
pages 4 to 15).
ENGLISH
DPQP1440ZA/X1
Advertisement
Chapters
Table of Contents

Related Manuals for Panasonic PT-TMW380


Summarization of Contents
Features of the Projector
Large and highly visible images without shadows
Highlights SOLID SHINE laser, short throw lens, high contrast, and Daylight View for bright, shadow-free images.
High reliability
Focuses on the SOLID SHINE laser light source's long-term operation of 20,000 hours.
Compact design, light weight and flexible setup
Emphasizes the projector's 4.9 kg body and flexible installation capabilities.
Excellent extensibility
Notes support for 4K signal input, optional wireless module, and CEC-compatible HDMI.
Quick Steps
Set up your projector.
Guides through the initial projector setup process, referencing page 32.
Connect with external devices.
Details connecting external devices, referencing page 38.
Connect the power cord.
Explains how to connect the power cord, referencing page 41.
Power on.
Covers the projector power-on procedure, referencing page 43.
Make initial settings.
Details initial setup steps, referencing page 43.
Select the input signal.
Explains how to select the input signal, referencing page 49.
Adjust the image.
Covers image adjustment procedures, referencing page 51.
Precautions for use
Intended use of the product
Defines the projector's purpose: projecting image signals from video and computers.
Cautions when transporting
Provides guidelines for safely transporting the projector and its accessories.
Cautions when installing
Details important considerations for installing the projector, including location and method.
Focus adjustment
Recommends waiting 30 minutes after power-on before adjusting focus for stability.
Security
Security when using the wireless LAN product
Highlights risks like data interception and illegal access with wireless LAN.
Notes regarding the wireless LAN
Provides information on wireless LAN connection and potential interference.
Cautions on use
To get a good picture quality
Recommends preparing the environment by controlling light for optimal image contrast.
Projection Lens
Advises against touching the lens surface and wiping it during operation.
LCD panel
Notes potential pixel issues and residual images on the precision-made LCD panel.
Optical parts
Warns about shorter replacement cycles for optical parts in harsh environments.
Light source
Describes laser diode characteristics and potential luminance decrease.
Computer and external device connections
Recommends careful reading of manual regarding power and shielded cables.
About your projector
Remote control
Provides an overview of the remote control buttons and their functions.
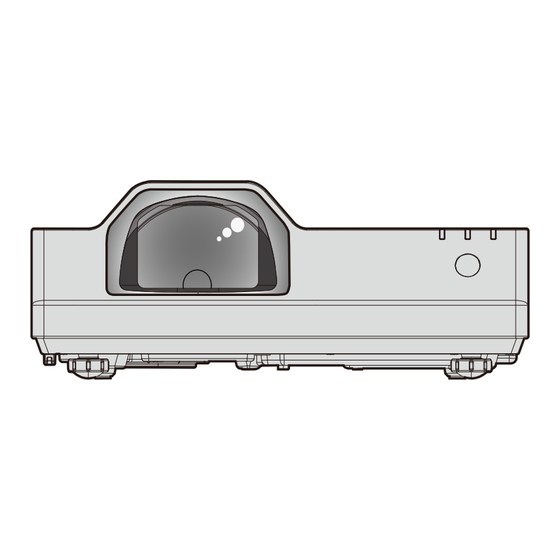
Projector body
Details the physical layout and components of the projector body.
Projector body
Projection Lens
Describes the projector's projection lens and its adjustments.
Adjustable feet
Explains the function of adjustable feet for positioning and angle adjustment.
Connecting terminals
Details the various terminals available on the projector for connectivity.
Focus ring
Explains how to use the focus ring to adjust image sharpness.
Control panel
Describes the buttons and functions on the projector's control panel.
Preparing the remote control
Inserting and removing batteries
Provides instructions for inserting and removing batteries from the remote control.
When using the system with multiple projectors
Explains how to operate multiple projectors with a single remote control using ID numbers.
Setting up
Installation mode
Details four methods for setting up the projector, including desk and ceiling mounting.
Angle sensor
Explains the function of the built-in angle sensor for automatic orientation detection.
Projection distance
When the screen aspect ratio is 16:10
Table detailing throw ratio, projection distance, and maximum distance for 16:10 aspect ratio.
When the screen aspect ratio is 16:9
Table detailing throw ratio, projection distance, and maximum distance for 16:9 aspect ratio.
When the screen aspect ratio is 4:3
Table detailing throw ratio, projection distance, and maximum distance for 4:3 aspect ratio.
Connecting
Before connecting
Provides pre-connection checks and cautions for external devices.
Connecting example: AV equipment
Illustrates connection examples for AV equipment like DVD players and audio systems.
Connecting example: Computers
Shows connection examples for computers and USB memory.
Switching on/off the projector
Connecting the power cord
Instructs on attaching and removing the power cord securely.
Power indicator
Explains the status indicated by the projector's power indicator light.
Switching on the projector
When the initial setting screen is displayed
Describes the initial setup screens displayed upon first use or after initialization.
Initial setting (display language)
Guides on selecting the display language during the initial setup process.
When the administrator account setting screen is displayed
[PASSWORD POLICY]
Outlines the recommended password policies for the administrator account.
Projecting
Selecting the image input for projection
Guides on selecting the image input source for projection.
Switching the input directly with the remote control
Describes how to switch input sources using the remote control's dedicated buttons.
Operating with the remote control
Using the shutter function
Explains how to temporarily turn off the image and audio using the shutter button.
Using the mute function
Describes how to temporarily mute the projector's audio output.
Adjusting the volume
Covers controlling the volume of the built-in speaker or audio output.
On-screen menu
Navigating through the menu
Provides instructions for navigating the projector's on-screen menu system.
Resetting adjustment values to the factory default
Explains how to restore menu item settings to their original factory defaults.
Main menu
Lists the primary menu categories available on the projector.
Sub menu
Details the sub-menu items available within each main menu category.
[PICTURE] menu
[PICTURE MODE]
Allows switching between picture modes for optimal image source and environment.
[CONTRAST]
Enables adjustment of the color contrast for the projected image.
[BRIGHTNESS]
Allows adjustment of the dark (black) parts of the projected image.
[DYNAMIC CONTRAST]
Setting the light off condition of the light source
Configures conditions for automatically turning off the light source based on brightness.
[POSITION] menu
[REALTIME KEYSTONE]
Automatically corrects vertical trapezoidal distortion when the projector is tilted.
[SCREEN ADJUSTMENT]
Corrects image distortion and extends projection distance.
[LANGUAGE] menu
Switching the display language
Allows selection of the on-screen display language from a variety of options.
[DISPLAY OPTION] menu
[ON-SCREEN DISPLAY]
Controls on-screen display elements like input guides and warning messages.
Setting [INPUT GUIDE]
Configures the display of input guides when switching sources.
Setting [OSD POSITION]
Sets the position of the on-screen display (OSD) and individual adjustment screens.
Setting [OSD SIZE]
Adjusts the size of the on-screen menu (OSD).
[WARNING MESSAGE]
Controls the display or hiding of warning messages.
[HDMI SIGNAL LEVEL]
Adjusts HDMI signal level settings when image projection is incorrect.
[SCREEN SETTING]
Sets the screen size and adjusts image position for the screen in use.
[P-TIMER]
Setting the mode
Sets the presentation timer mode to count up or count down.
Setting the countdown timer
Allows setting a specific time for the presentation timer's countdown.
[OTHER FUNCTIONS]
Using the auto setup function
Automates adjustment of dot clock, phase, and position for analog RGB signals.
Using the freeze function
Allows pausing the projected image and muting sound temporarily.
[PROJECTOR SETUP] menu
[STATUS]
Displays the current status of the projector, including signal, runtime, and version.
[PROJECTOR ID]
Sets an ID number for individual or simultaneous control of multiple projectors.
[INITIAL START UP]
Configures the projector's startup method after power connection.
[ECO MANAGEMENT]
Setting [AUTO POWER SAVE]
Enables energy conservation settings like ambient light and signal detection.
Setting [LIGHT POWER]
Adjusts light power settings to balance brightness, runtime, and noise.
[RS-232C]
Setting the communication condition of the terminal
Configures communication settings like baud rate and parity for RS-232C control.
Using the control command for the existing projector
Explains how to use control commands for older Panasonic projectors via the serial terminal.
[AUDIO SETTING]
Adjusting the volume
Details how to adjust the volume level of the projector.
Setting the mute status
Explains how to set the audio to mute or unmute.
[FILTER COUNTER]
Setting [TIMER]
Sets the cycle time for air filter cleaning or replacement notifications.
Setting [FILTER COUNTER RESET]
Resets the air filter usage time counter.
[HDMI CEC]
Operating a CEC-compatible device
Explains how to operate CEC-compatible devices using the projector's remote control.
Changing the menu code
Details how to change the menu code setting for CEC-compatible devices.
Setting the link control
[PROJECTOR -> DEVICE]
Sets power link control from the projector to CEC-compatible devices.
[DEVICE -> PROJECTOR]
Sets power link control from CEC-compatible devices to the projector.
[SECURITY] menu
[PASSWORD]
Enables or disables the security password entry requirement.
[PASSWORD CHANGE]
Provides steps to change the security password for the projector.
[NETWORK] menu
[WIRED LAN]
Configures network connection settings for wired LAN.
[PROJECTOR NAME]
Allows changing the projector's name for network identification.
[ADMINISTRATOR ACCOUNT]
[PASSWORD POLICY]
Outlines the recommended password policies for the administrator account.
[NETWORK SECURITY]
[COMMAND PROTECT]
Configures connection authentication for command control.
Status notification
[Error alert notification]
Enables push notifications for errors or status changes.
[Notification IP address]
Specifies the IP address for receiving status notifications.
[Notification port]
Specifies the port number for receiving status notifications.
[PJLink]
[PJLink PASSWORD]
Sets the password for PJLink security authentication.
[PJLink CONTROL]
Enables or disables the PJLink protocol control function.
[SET SLIDE]
[SLIDE TRANSITION EFFECT]
Sets transition effects for slideshow slide changes.
[SORT ORDER]
Sets the order in which images are played in the slideshow.
Projecting with MEMORY VIEWER input
What you can project with the Memory Viewer function
Lists supported image file formats and their descriptions for the Memory Viewer.
Cautions on using USB Memory
Provides essential safety warnings and handling precautions for USB memory.
Attaching the USB memory
Instructs on correctly attaching the USB memory to the projector's terminal.
Removing the USB memory
Details the procedure for safely removing the USB memory from the projector.
Executing the slide
SLIDE TRANSITION EFFECT
Sets transition effects for slideshow slide changes.
SORT ORDER
Sets the order in which images are played in the slideshow.
Projecting with NETWORK input
Application that can be used
Lists image transfer applications like Presenter Light and Wireless Projector.
Connecting the device
Guides on connecting devices using image transfer applications via LAN.
Ending the connection with the device
Explains how to properly disconnect devices after network projection.
Network connection
Web control
Enables projector settings and status display via a web browser.
Multi Monitoring & Control software
Monitors and controls multiple display devices on an intranet.
Image transfer application software
Allows transferring images and audio via LAN using specific applications.
PJLink
Supports PJLink protocol for controlling and querying projector status from a computer.
Command control
Enables projector operation and status queries using control commands via LAN.
Connecting via wired LAN
Example of a general network connection
Illustrates a typical network setup for wired LAN connection.
Projector settings
Guides on configuring projector settings for wired LAN connection.
Operating the computer
Provides instructions for operating the computer for network connection.
Connecting with wireless LAN
Connection example
Shows a connection example for wireless LAN using the optional wireless module.
Preparation and confirmation of the projector
Details projector preparation steps for wireless LAN connection.
Using the QR code
Compatible devices
Lists compatible smartphones for QR code connection.
Displaying the QR code in OSD
Explains how to display the QR code in the projector's on-screen menu (OSD).
Displaying the QR code in the network input idle screen
Shows how to display the QR code on the network input idle screen.
About Presenter Light
Download the “Presenter Light” to your computer
Guides on accessing the web browser to download the Presenter Light software.
Web control function
Setting and adjustment of the projector
Allows performing settings and adjustments via web control.
Displaying projector status
Enables viewing the projector's current status through web control.
Sending E-mail messages when there is a problem with the projector
Supports sending email alerts for projector issues.
Computer that can be used for setting
Lists compatible operating systems and web browsers for web control.
Accessing from the web browser
Provides steps to access the projector's web interface using a browser.
Projector status
Error information page
Displays detailed error and warning information for troubleshooting.
Network status
Basic control
Provides basic projector controls like input, volume, picture mode, shutter, and power.
Detail control
[POSITION]
Operates field angle-related settings for image position and distortion correction.
[PICTURE]
Operates picture quality settings, including contrast, brightness, and color.
Network security
[COMMAND PROTECT]
Configures connection authentication for command control.
Status notification
[Error alert notification]
Enables push notifications for errors or status changes.
[Notification IP address]
Specifies the IP address for receiving status notifications.
[Notification port]
Specifies the port number for receiving status notifications.
E-mail set up
[ENABLE]
Selects to enable the email function for alerts.
[SMTP SERVER NAME]
Enters the IP address or server name of the SMTP server.
[MAIL FROM]
Enters the projector's email address for sending alerts.
[MEMO]
Enters descriptive text for the email sender.
[MINIMUM TIME]
Sets the minimum interval between temperature warning emails.
[INTAKE AIR TEMPERATURE]
Sets the temperature threshold for sending air intake warning emails.
[E-MAIL ADDRESS 1], [E-MAIL ADDRESS 2]
Specifies email addresses for receiving projector alerts.
Settings of the conditions to send E-mail
Selects conditions for sending emails, such as errors or temperature warnings.
Set up password
[Administrator]
Used to change the setting of the administrator account.
[User]
Used to change the setting of the standard user account.
[PJLink]
Used to change the setting of the PJLink account.
[Next]
Displays the screen to change the setting of the password.
Using HDMI-CEC function
Connecting a CEC-compatible device
Illustrates connecting CEC-compatible devices via HDMI terminals.
Setting the projector and CEC-compatible device
Guides on enabling HDMI-CEC on both the projector and connected devices.
Operating the CEC-compatible device with the projector remote control
Explains how to control CEC devices using the projector's remote via HDMI-CEC.
About the link control
The link control setting of [PROJECTOR -> DEVICE]
Details link control settings for projector to device power management.
The link control setting of [DEVICE -> PROJECTOR]
Details link control settings for device to projector power management.
Light source and temperature indicators
When an indicator lights up
Explains how to interpret and remedy issues indicated by light source and temperature indicators.
Maintenance/replacement
Before performing maintenance/replacement
Emphasizes turning off power before any maintenance or replacement procedures.
Maintenance
Covers maintenance procedures for the outer case, lens, and air filter unit.
Outer case
Provides instructions for cleaning the projector's outer case.
Lens front surface
Details how to clean the projector's lens surface carefully.
Air filter unit
Explains how to check, clean, and maintain the projector's air filter unit.
Replacement
Air filter unit
Advises replacing the air filter unit if cleaning is ineffective.
Troubleshooting
Power does not turn on.
Lists potential causes and checks for power-related issues.
No image appears.
Troubleshoots common issues causing no image display.
Image is fuzzy.
Provides checks for fuzzy image issues, including focus and lens dirt.
Color is pale or grayish.
Troubleshoots color cast issues by checking color and tint settings.
No audio.
Lists checks for audio issues, including connections and volume settings.
Remote control does not work.
Troubleshoots remote control issues like battery depletion or obstructions.
Buttons on the control panel do not work.
Checks for issues with the projector's control panel buttons.
Image does not display correctly.
Addresses issues with incorrect image display or signal incompatibility.
Image from a computer does not appear.
Troubleshoots issues with displaying computer images.
Video from HDMI compatible device does not appear or it appears jumbled.
Guides on troubleshooting HDMI video display issues.
Audio from HDMI compatible device is not output.
Provides guidance for resolving HDMI audio output issues.
No power supplied from terminal
Troubleshoots power supply issues from the USB terminal.
[SELF TEST] display
Measure for error and warning
Provides measures to resolve errors and warnings indicated by alphanumeric symbols.
Technical information
Using the PJLink function
Explains how to use the PJLink protocol for projector control and status querying.
PJLink commands
Lists the PJLink commands supported by the projector for communication.
Control commands via LAN
When connecting in protected mode
Details the connection method for protected mode using network security.
Command data format
Describes the data format used for sending and receiving control commands.
Transmitted data
Explains the format for transmitting data and commands.
Connection
Illustrates the connection between the projector and a computer via serial cable.
Pin assignments and signal names
Details the pin assignments and signal names for the serial terminal.
Communication conditions (Factory default)
Specifies factory default communication settings for the serial terminal.
Basic format
Explains the basic format for transmitting commands via the serial terminal.
Control command
Projector control command
Lists commands for controlling projector functions like power and input selection.
Specifications
Display system
Describes the projector's display system technology.
Display device
Lists specifications for the display device, including pixel count and size.
Projection lens
Details specifications of the projection lens, such as focus and focal length.
Screen size
Specifies the compatible screen size range for the projector.
Light output*1
Provides the light output specifications under various setting conditions.
Contrast ratio*1
States the contrast ratio specifications under specific settings.
Center to corner zone ratio*1
Specifies the center to corner brightness ratio.
Speaker
Details the speaker specifications, including size and wattage.
Displayable scanning frequency
Lists the horizontal and vertical scanning frequencies supported.
Input compatibility
Details compatible signal resolutions and dot clock frequencies for HDMI and computer inputs.
Precautions for attaching the Ceiling Mount Bracket
Screw hole specifications for ceiling mount (Bottom view)
Provides screw hole specifications for ceiling mounting the projector.
Screw hole dimensions for ceiling mount (Bottom view)
Details the screw hole dimensions for ceiling mount brackets.
Need help?
Do you have a question about the PT-TMW380 and is the answer not in the manual?
Questions and answers