
Related Manuals for Eltako TF61J-230V


Summary of Contents for Eltako TF61J-230V
- Page 1 GFA5 APP SHADING ACTUATORS SET-UP INSTRUCTIONS FOR SHADING ACTUATORS AND GFA5 APP QUICK SETUP GUIDE...
-
Page 2: Table Of Contents
CONTENT 1. Actuator types 2. Teach-in 3. Setting runtime in the GFA5 app 4. Basic information on runtime 5. Setting runtime in the actuator 6. Setting runtime in the GFA5 app later 7. Operation and device properties 8. Scenes and group control 9. -
Page 3: Actuator Types
1. THESE ACTUATOR TYPES ARE COMPATIBLE WITH MINISAFE2: FSB61 / FSB14 / TF61J-230V / FJ62 / FSB71 / FTA65J / FTA55J / TF-TA65J / FRM60 will not be dealt with in detail here since their end positions are set on the motor. -
Page 4: Setting Runtime In The Gfa5 App
3. SETTING RUNTIME IN THE GFA5 APP At the end of the teach-in process, determine and enter the runtime. The runtime is measured from bottom to top since it always takes longer than the runtime in the opposite direction. This time also includes the time taken for the lamella (slats) to close. -
Page 5: Setting Runtime In The Actuator
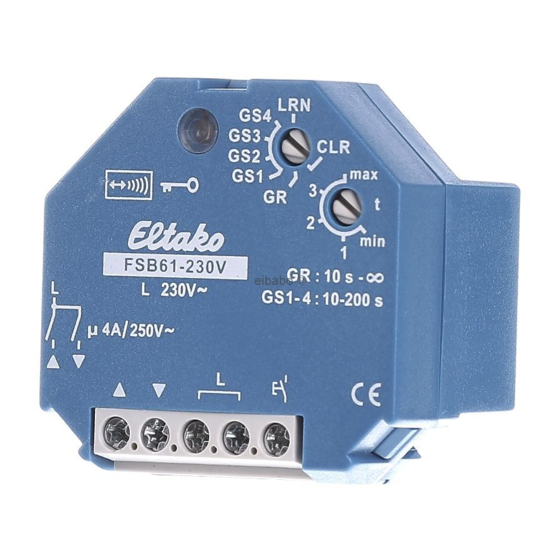
The middle rotary switch determines the turning function and the lower rotary switch selects the operating mode (recommended: position 2 or 3). FSB61: The runtime setting on this actuator is based on the teach-in procedure. The lower rotary switch sets the runtime duration measured from bottom to top. -
Page 6: Setting Runtime In The Gfa5 App Later
6. SETTING RUNTIME IN THE GFA5 APP LATER After setting the time on the actuator, check again the runtime setting in the GFA5 app under SETUP/ROOMS/ROOM NAME/DEVICE NAME. This time should be the actual runtime from bottom to top stopped with the push-button. It can be changed and corrected at any time. -
Page 7: Operation And Device Properties
7. OPERATION AND DEVICE PROPERTIES In the start menu, you can operate devices by using the DEVICES ROOMS tiles. The three dots at the top right open an extended view where you can also select a percentage target position. At the end of each run, the current position of the shading element is displayed as a percentage. -
Page 8: Schedules (Time Or Astro With Calendar Functions)
9. SCHEDULES (TIME OR ASTRO WITH CALENDAR FUNCTION) Automatic time functions for shading actuators are executed by means of a task function. Go to the MAIN MENU and select TASKS to create copy and edit tasks. To trigger a task at a fi xed time, select the trigger (time) or TIMER ASTRO... -
Page 9: Task Parameters In The Gfa5 App
10. TASK PARAMETERS IN THE GFA5 APP Create automatic functions in the control function. This section TASK describes the structure of parameters and how to handle them. ACTION The top section lists the days when each task is executed together with their start and end dates. -
Page 10: Lock-Out Protection
11. LOCK-OUT PROTECTION (DIRECT OR IN TASKS) If wireless window contacts are taught directly into shading actuators, you can provide additional lock-out protection (for example, at the patio door). This prevents an automated control in a command from accidentally "Central Down" locking out an occupant who may be outside. -
Page 11: Resetting To Factory Settings
You can reset the factory settings on the device using the following procedures: Eltako FSB61: Turn the upper rotary switch to CLR. The LED fl ashes rapidly. Turn the upper rotary switch to right stop (turn clockwise) and back 3 times within 10 seconds. - Page 12 Technical support: +49 711 943 500 25 technical-support@eltako.de Commercial support: +49 711 943 500 00 export@eltako.de Eltako GmbH Hofener Straße 54 D-70736 Fellbach +49(0)711 943 500-00 eltako.com 03/2022...
Need help?
Do you have a question about the TF61J-230V and is the answer not in the manual?
Questions and answers