Table of Contents

Related Manuals for mediatechnologies Metro


Summarization of Contents
Wood Frame Shelving: Single Faced Assembly
Step 1: Attaching Bottoms to Sides
Attaching the bottom frame to the end panel using bolts and washers.
Step 2: Attaching Backs
Slipping the back panel into the grooves of the side panels and bottom frame.
Step 3: Attaching 'Z' Brackets
Fastening 'Z' brackets to the sides of the unit using bolts.
Step 4: Attaching Tops
Positioning and fastening the top of the unit to the 'Z' brackets.
Step 8: Attaching Bottom Shelf
Positioning and securing the bottom shelf onto the toe frame.
Step 9: Installing Shelves
Inserting shelf clips and placing shelves into the unit.
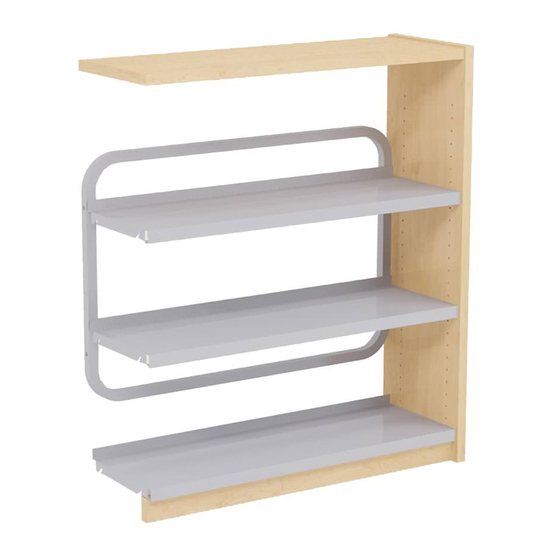
Step 10: Installing Magazine Shelves
Installing special shelves designed for magazines.
Wood Frame Shelving: Double Faced Assembly
Step 1: Attaching Bottoms to Sides
Attaching bottom frames to end panels for double-sided units.
Step 2: Attaching Backs
Slipping the back panel into grooves for double-sided units.
Step 3: Attaching 'Z' Brackets
Fastening 'Z' brackets to the sides of double-sided units.
Step 4: Attaching Tops
Positioning and fastening the top of double-sided units.
Step 8: Attaching Bottom Shelf
Securing the bottom shelf for double-faced units.
Step 9: Installing Shelves
Installing shelves into double-faced units.
Steel Frame Shelving Assembly
Step 1a: Attaching Side Panels to Steel Frames
Attaching steel frames to end panels using connector bolts.
Step 1b: Attaching Side Panels to Back Panels
Connecting side panels to back panels using cam studs and cams.
Step 2: Attaching the Toes
Attaching toe/bracket assemblies to the side panels.
Step 3: Attaching the Tops
Securing tops to the side panels using cam studs and cams.
Step 4: Installing Fixed Shelves
Installing fixed shelves using Varianta screws on taller units.
Step 5: Installing Shelves
Installing standard shelves using shouldered pins.
31 Series Magazine Shelf Installation
Installing special shelves designed for magazines.
31 Series Mobile Shelving Assembly
Assembling mobile shelving units with casters.
Carrel Assembly: Panel End
Step 1: Attaching Levelers
Screwing levelers into the bottom edge of panels.
Step 2: Attaching Panels to Back Panels
Connecting panels to back panels using Mod-eez studs and clips.
Step 3: Attaching Angle Brackets
Fastening angle brackets to panels using bolts.
Step 4: Attaching Worksurfaces
Positioning and securing worksurfaces onto 'Z' brackets.
Step 5: Leveling Carrels
Adjusting levelers to ensure carrels are stable and level.
Carrel Assembly: Hex
Step 1: Prepping Posts
Screwing levelers and Mod-eez studs into posts.
Step 2: Assembling Central Hub
Attaching panels to posts to form the central hub.
Step 3: Installing Power/Data Units
Sliding power/data units into panels and securing them.
Step 4: Attaching Hub Top
Screwing 'Z' brackets and placing the hub top.
Step 5: Attaching Side Panels
Securing wing panels to the hub using clips.
Step 6: Attaching Angle Brackets
Fastening 'Z' brackets to side panels for wire space.
Step 7: Attaching Worksurfaces
Positioning and securing worksurfaces onto 'Z' brackets.
Step 8: Leveling Carrels
Adjusting levelers for stability and levelness.
Wood Tables Assembly
Wood Table Leg, Apron & Support Keel Assembly
Assembling general wood table components.
Charleston Table Assembly
Step-by-step instructions for assembling the Charleston table.
Newspaper Rack Assembly
Instructions for assembling a newspaper rack.
Steel Frame Tables Assembly
SST Table Assembly
Instructions for assembling the SST table.
Vector Table Assembly
Instructions for assembling the Vector table.
Z Table Assembly
Instructions for assembling the Z table.
WCT, Steel Frame Assembly
Instructions for assembling the WCT steel frame table.
WCT, Panel End Assembly
Instructions for assembling the WCT panel end table.
Corner WCT, Leg Base Frame Assembly
Assembling the leg base frame for a corner WCT table.
Need help?
Do you have a question about the Metro and is the answer not in the manual?
Questions and answers