Table of Contents
Advertisement
Quick Links
INSTALLATION INSTRUCTIONS | DIRECTIVES D'INSTALLATION | INSTRUCCIONES DE INSTALACIÓN
BEFORE BEGINNING
Please read all instructions carefully.
■
Follow all safety precautions
■
(see "SAFETY PRECAUTIONS").
Familiarize yourself with all parts
■
(see "CONTENTS") and check quantities.
© 2018 ClosetMaid LLC | Ocala, FL 34471 | 1-800-874-0008 | www.closetmaid.com
01-19067-00
12/18
AVANT DE COMMENCE
Prière de lire avec soin toutes les
■
directives fournies.
Respecter toutes les consignes
■
de sécurité (voir « CONSIGNES DE
SÉCURITÉ »).
Se familiariser avec les pièces
■
nécessaires à l'installation
(voir « PIÈCES ») et vérifier les
quantités présentes.
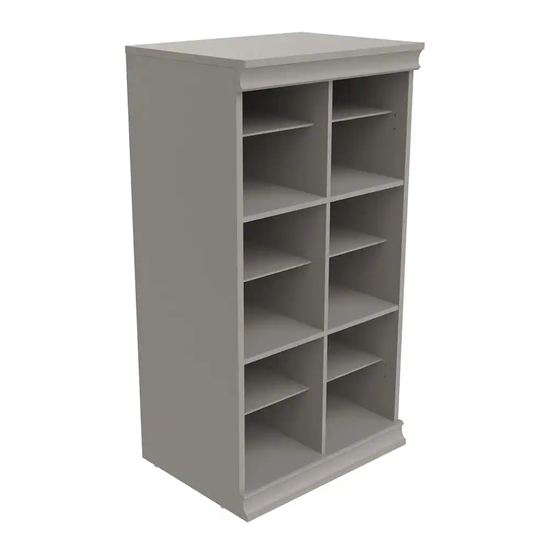
Divided Unit
Unité divisée
Unidad dividida
ANTES DE EMPEZAR
Lea todas las instrucciones
■
cuidadosamente.
Siga todas las precauciones de
■
seguridad (vea "PRECAUCIONES
DE SEGURIDAD").
Familiarícese con todas las
■
piezas (vea "PIEZAS") y verifique
las cantidades.
What you will need:
Vous aurez besoin de:
Va a necesitar:
4560 | 4597
Advertisement
Table of Contents

Related Manuals for ClosetMaid 4597


Summarization of Contents
Divided Unit Installation Overview
Getting Started: Before Assembly
Essential initial steps: read instructions, follow safety, and check all parts.
Product Identification and Model Numbers
Identifies the Divided Unit by model numbers 4560 and 4597.
Critical Safety and Warranty Information
Important: Follow Instructions Carefully
Emphasizes the need to strictly adhere to all assembly instructions.
Manufacturer Support and Warranty Details
Provides information on product assistance, warranty claims, and customer service contact.
Comprehensive Safety Precautions
General Safety Warnings for Unit Use
Covers risks: small parts, tipping, overloading, climbing, and improper mounting.
Preventing Furniture Tip-Over Hazards
Guidance to avoid serious or fatal injuries caused by furniture tip-over.
Hardware Components List
Detailed Hardware Identification
Catalog of all screws, dowels, locks, and other hardware with quantities.
Product Parts Identification
List of Main Unit Components
Identifies each major panel and part of the divided unit with labels A through I.
Step 1: Assemble Side Panels
Prepare Side Panels with Cam Posts and Dowels
Install cam posts (H1), cam locks (H2), and dowels (H3, H4) into side panels A & B.
Step 2: Assemble Top and Bottom Panels
Prepare Top/Bottom Panels with Hardware
Install cam posts (H1), cam locks (H2), and dowels (H3, H4) into panels C & D.
Step 3: Assemble Vertical Dividers
Insert Dowels into Vertical Dividers
Insert short dowels (H3) and long dowels (H5) into vertical divider panels (E).
Step 4: Install Middle Panels
Connect Middle Panels to Dividers
Attach middle panels (F) to vertical dividers (E) using the pre-inserted long dowels.
Step 5: Install Final Vertical Divider and Bottom Panel
Attach Last Divider and Bottom Panel
Connect the remaining vertical divider (E) and bottom panel (D) using short dowels.
Step 6: Install Side Panels (A & B)
Secure Side Panels to Bottom Panel
Align and fasten side panels (A & B) to the bottom panel (D) using cam locks.
Step 7: Install Top Panel
Secure Top Panel to Side Panels
Align and fasten the top panel (C) to the side panels (A & B) using cam locks.
Step 8: Install Back Panel and Feet
Attach Back Panel using Small Nails
Position and nail the back panel (G) to the unit frame with small nails (H6).
Attach Nail-On Feet (Optional)
Gently tap nail-on feet (H7) near corners, skip if stacking unit.
Step 9: Install Trim
Attach Trim Pieces to Unit Edges
Install trim (H) using cam posts and locks, consider edge thickness for placement.
Step 10: Install Removable Shelves
Insert Shelf Support Pins
Push shelf pins (H15) into the pre-drilled holes on the unit frame.
Place Removable Shelves onto Pins
Slide shelves into the frame and position them onto the installed shelf pins.
Step 11: Install Stacking Brackets (If Applicable)
Attach Stacking Brackets for Stability
Secure stacking brackets (H13) to the back of the unit for safe stacking.
Step 12: Final Assembly and Wall Securing
Install Cover Caps on Cam Locks
Press the cover caps (H8) into the cam lock holes for a finished look.
Secure Unit to Wall for Safety
Use back anchors, screws, and zip tie to prevent unit from tipping.
Need help?
Do you have a question about the 4597 and is the answer not in the manual?
Questions and answers