Table of Contents
Advertisement
Quick Links
.
HD MEMORY CARD CAMERA RECORDER
GY-HM890U/GY-HM890E
GY-HM890CHU/GY-HM890CHE
GY-HM890RE/GY-HM890RCHE
GY-HM850U/GY-HM850E
GY-HM850CHU/GY-HM850CHE
GY-HM850RE/GY-HM850RCHE
INSTRUCTIONS
.
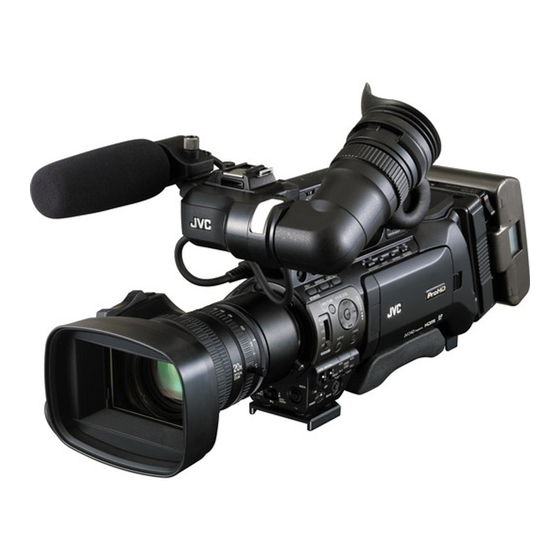
In this illustration, the supplied viewfinder, microphone, and lens are attached to the GY-HM890U/GY-
HM890E/GY-HM890RE.
The lens is not supplied for GY-HM890CHU/GY-HM890CHE/GY-HM890RCHE and GY-HM850CHU/
GY-HM850CHE/GY-HM850RCHE.
The specifications and appearance of this product are subject to changes for further improvement
without prior notice.
Please check the latest version of the INSTRUCTIONS from the following Mobile User Guide. You can
also download the PDF from the Mobile User Guide.
Mobile User Guide
When you are outside, you can refer to the instructions from your Android phone or iPhone.
http://manual3.jvckenwood.com/pro/mobile/global/
You can view the Mobile User Guide using the browser on your Android phone or iPhone.
For Customer Use:
Enter below the Serial No. which is located
on the body.
Retain this information for future reference.
Model No.
GY-HM890U / GY-HM890CHU
GY-HM850U / GY-HM850CHU
Serial No.
IM 1.04
Please read the following before getting started:
Thank you for purchasing this product.
Before operating this unit, please read the
instructions carefully to ensure the best
possible performance.
In this manual, each model number is
described without the last letter (U/E) which
means the shipping destination.
(U: for USA and Canada, E: for Europe)
Only "U" models (GY-HM890U/GY-HM890CHU/
GY-HM850U/GY-HM850CHU) have been
evaluated by UL.
LST1584-001B
Advertisement
Table of Contents

Related Manuals for JVC GY-HM850RE


Summarization of Contents
INSTRUCTIONS
Mobile User Guide
Information on accessing the JVC manual via mobile devices and web browser.
Safety Precautions
Storage and Usage Locations
Guidelines for suitable storage conditions and usage environments for the device.
Carrying the Camera
Instructions on how to safely transport the camera recorder to prevent damage.
Power Saving
Guidance on setting the power switch to 'OFF' to reduce power consumption.
Maintenance
Instructions for cleaning the camera recorder's external cabinet with a soft cloth.
Recommended Batteries
Lists recommended battery models (Dionic90, Endura-HL9) for the camera recorder.
Regular Inspection (Maintenance)
Guidance on fan replacement after 9000 hours and checking fan usage time.
GPS Information
Notes on GPS satellite management, positioning, and signal interruption.
LCD Monitor and Viewfinder Precautions
Information on black spots, character persistence, lag, and screen care.
SDHC/SDXC Cards
Details on using Class 6/10 SD cards and compatibility.
Handling of SD Cards
Precautions for SD card usage, storage, insertion, and data backup.
Encryption in Network Connection
Information on the encryption function used for wireless LAN connections.
Main Features
F11 Sensitivity, 1/3-inch Full HD 3CMOS Sensors
Details on the camera's 1/3-inch 2.07M pixels full HD 3CMOS sensor system.
Fujinon 20x Interchangeable Zoom Lens
Information on the 20x Fujinon zoom lens with AF/OIS capabilities.
4-Position ND Filter
Details on the camera's built-in 4-position ND filter for light adjustment.
JVC FALCONBRID High Quality Imaging Engine
Explanation of the proprietary imaging engine for high-quality image processing.
MPEG2 and H.264 Codec Support
Details on supported recording formats like MPEG-2, H.264, and AVCHD Progressive.
50 Mbps High-Resolution Recording Mode
Information on the 50 Mbps recording mode in H.264 format for high-resolution video.
QuickTime, MP4, and AVCHD File Formats
Details on file formats like AVCHD, QuickTime, and MP4 for direct editing.
Two SDHC/SDXC Card Slots
Explanation of dual, backup, and series recording using two SD card slots.
Diverse Simultaneous Recording Combinations
Details on simultaneous recording of HD/SD and HD/Proxy video.
Variable Frame Recording
Information on recording slow motion and quick motion effects with variable frame rates.
Pre Rec and Interval Rec Functions
Details on Pre Rec (up to 10 sec) and Interval Rec functions.
SDI/HDMI Simultaneous Output
Explanation of simultaneous HD/SD SDI and HDMI output.
Genlock and Time Code Terminals
Information on genlock input and time code input/output terminals for studio use.
Professional Switch Layout and Video Parameters
Details on the professional switch layout and video parameter adjustments.
Viewfinder and LCD Display
Specifications for the 1.22MP viewfinder and 1.15MP LCD, including Focus Assist.
4-Channel Audio Recording
Details on 4-channel audio support in MPEG-2/H.264 recording.
XLR and Mini Jack Audio Inputs
Information on 2-channel XLR inputs and mini jack input for wireless mics.
Wired Remote Control Support
Details on support for JVC's 6-pin and Φ2.5mm stereo jack remote terminals.
Built-in GPS Function
Explanation of the built-in GPS for recording positional information as metadata.
Diverse Network Functions
Details on remote control, viewing, metadata and proxy file transfer via network.
Professional-spec Battery Support
Information on support for broadcast station batteries like Anton/Bauer and IDX.
Application Software Provided
Details on included software like JVC ProHD Clip Manager for copying and checking clips.
Operation Modes
Camera Mode
Description of the camera shooting mode, including standby and recording.
Media Mode
Mode for playing back or deleting recorded clips from the SD card.
USB Mode
Mode for connecting to a PC to transfer files from the SD card.
Remote Edit Mode
Mode for accessing clip lists via web browser for editing metadata.
Names of Parts
Side Control Panel
Details of the buttons and controls on the side of the camera recorder.
Viewfinder
Description of the viewfinder components and adjustment rings.
LCD Monitor
Details of the LCD monitor controls and their functions.
Side Terminal Section
Description of the various input/output terminals on the side of the camera.
SD Slot
Information about the camera's SD card slots (A and B) for recording.
Rear Terminal
Description of the rear terminals, including shoulder belt mounts and accessory connections.
Lens Section (B90/850)
Details of the lens components and controls, including zoom and focus rings.
Settings and Adjustments Before Use
Attaching the Lens (Supplied)
Step-by-step instructions for attaching the supplied zoom lens to the camera.
Adjusting the Grip Belt
Guidance on adjusting the grip belt for secure attachment and stability.
Attaching the Microphone (Supplied)
Instructions for attaching the supplied microphone to the microphone holder.
Attaching the Viewfinder (Supplied)
Step-by-step guide for attaching the supplied viewfinder to the camera.
Opening/Closing the Lens Cover
Instructions on how to use the lens cover open/close switch to protect the lens.
Attaching/Detaching the Hood
Guide for aligning markings and turning the hood to attach or detach it.
Attaching the Anti-reflective Film
Instructions for applying the anti-reflective film to the LCD monitor for better visibility.
Power Supply
Using AC Power (DC IN Power)
How to operate the camera recorder using an AC adapter and connecting it to the DC INPUT terminal.
Built-In Battery
Information on the built-in battery for date/time and time code data storage.
Using a Battery Pack
Instructions for attaching and detaching recommended battery packs (U/E models).
Attaching/Detaching the Battery (E Model)
Steps for attaching and detaching the Endura-HL9 (IDX) battery.
Viewfinder and LCD Monitor Power Status
How power status is indicated on the display screen and menu screen.
Display Screen Power Status
Examples of display screens showing power status in Camera and Media modes.
Turning On/Off the Power
Warnings by Lamp and Warning Tone
Explanation of warning indications from tally lamps and warning tones.
Turning On the Power
Steps for turning on the camera recorder and starting up in Camera mode.
Camera Mode Operation
Details of camera mode, standby, and recording procedures.
Media Mode Operation
How to play back or delete clips recorded on the SD card.
USB Mode Operation
Instructions for connecting to a PC and transferring files via USB.
Remote Edit Mode Operation
Accessing clip lists via web browser for editing metadata on devices.
Turning Off the Power
Steps for turning off the camera recorder and removing power sources.
Initial Settings
Changing the Display Style
How to change the date/time display style on the menu.
Date/Time Display in Operation Modes
Explanation of date/time display in Camera and Media modes.
Displays on the LCD Monitor and Viewfinder
Display Screen Overview
Information on displaying camera status, media info, and markers on the screen.
Display Screen (VF/LCD) in Camera Mode
Explanation of the three screen types and switching with the DISPLAY button.
Display Screen (VF/LCD) in Media Mode
Details on screen switching for clip playback in Media Mode.
Status Screen
How to check current settings displayed according to operation mode.
USB Mode Screen
Screen display indicating the camera is in USB mode.
Remote Edit Mode Screen
Screen display for accessing clip lists via web browser for editing.
Warning Display
Display of warning messages in Camera or Media mode on the screen.
LCD Monitor and Viewfinder Screen Displays
How LCD and viewfinder screens display based on settings like LCD+VF.
Adjusting the LCD Monitor and Viewfinder
Adjusting the LCD Monitor
Instructions for adjusting LCD monitor angle, brightness, contour, and contrast.
Adjusting the Viewfinder
Instructions for adjusting viewfinder brightness, contour, and contrast.
Displaying Viewfinder in Black and White
How to set the viewfinder screen to display in black-and-white.
Adjusting the Monitor Speaker
Guidance on adjusting the monitor speaker volume and rotation.
Assignment of Functions to User Buttons
Tally Lamp
Explanation of the tally lamp indicator for recording and warning.
SD Card
Usable Cards
Information on compatible SD card classes and performance.
Estimated Recordable Time of SD Cards
Guide to recording times for different SD card formats and battery conditions.
Write-Protect Switch on SD Card
Instructions on how to use the write-protect switch to enable or disable writing.
Inserting an SD Card
Steps for inserting an SD card into the two available card slots.
Card Slot Status Indicator
Explanation of the status indicator lamps (red, green, off) for each slot.
Removing the SD Card
Procedure for safely removing an SD card from the slot.
Switching the SD Cards
How to switch between active card slots using the SLOT SELECT button.
Formatting (Initializing) SD Cards
Steps for formatting SD cards using the camera recorder menu.
Restoring and Updating the SD Card
Procedure to restore the SD card if data abnormalities occur.
Clips Recorded to SD Cards
Information on folders used for recording clips based on System and Format settings.
Clip Data and Clip Name
Explanation of how clips are recorded and how clip names are generated.
Recorded Clips
Notes on playing back split files and recording across multiple cards.
Basic Shooting Procedures
Preparations for Shooting
Steps for attaching accessories, supplying power, and inserting SD card.
Video and Audio Input Settings
Configuring video settings (brightness, white balance) and audio levels for shooting.
Core Shooting Operations
Details on zoom operation and manual focus adjustment.
Selecting a Recording Format
Selecting a Recording Format
Steps to select video resolution, file format, and video format.
Zoom Operation
Using the Zoom Lever at the Grip
Instructions for operating zoom using the grip lever in SERVO mode.
Using Zoom Ring at the Lens Section
How to adjust the angle of view by turning the zoom ring in MANUAL mode.
Using the Zoom Lever at the Handle
Operation of the handle zoom lever when the supplied lens is in use.
Saving/Recalling Preset Zoom Position
How to register and recall up to three preset zoom positions.
Focus Operation LENS
Adjusting Focus Manually
Steps for manually adjusting focus using the focus ring.
Adjusting Focus Automatically
How to set the AUTO FOCUS/11 switch to ON for automatic focus adjustment.
One Push Auto Focus
Function to automatically set focus at the center of the frame.
Auto Focus Temporarily (Push Auto Focus)
Temporarily switches to Autofocus mode when the RET button is pressed.
AF Assist Function
Shifting the auto focus point during AF by turning the focus ring.
Focus Assist Function
How to add color to focused image contours for easier focusing.
Setting Focus Assist to User Button
Assigning the Focus Assist function to a user button for quick access.
Expanded Focus Function
Magnifies the image center for precise focus establishment.
Adjusting the Focus by Face Detection F
Selecting Specific Person (Face Detection)
How to select a specific person for focus when multiple faces are detected.
Adjusting the Brightness
Adjusting Brightness Automatically
Automatic adjustment of Iris, Gain, Shutter, and ND filter by FULL AUTO switch.
Adjusting Brightness Manually
Manual adjustment of Iris, Gain, and Shutter speed when FULL AUTO is OFF.
Adjusting the Iris
Manual Iris (Manual Adjustment) Mode
Manually setting the aperture value (F-number) of the lens.
Auto Iris (Automatic Adjustment) Mode
Automatic iris adjustment based on object brightness using the IRIS A/M switch.
One Push Auto Iris
Adjusts iris according to subject brightness by pressing the IRIS button.
Push Auto Iris
Temporarily switches to Auto Iris when the IRIS button is pressed and held.
Setting the Gain
Manual Gain Mode
Selecting gain level using the GAIN L/M/H switch.
Automatic Gain Mode
Automatic gain adjustment by setting the FULL AUTO switch to ON.
Setting the Electronic Shutter
Manual Shutter Mode
Switching between shutter modes and speeds using Set and cross-shaped buttons.
Switching Shutter Mode
Turning the electronic shutter ON or OFF using the Set button.
Switching Shutter Speed
Setting shutter speed according to video format and variable frame rate settings.
Automatic Shutter Mode (Automatic Shutter Adjustment)
ND Filter Warning Display
Prompt to select ND filter when iris diameter becomes too small.
Adjusting the White Balance
Manual White Balance Mode
Selecting white balance using WHT.BAL B/A/PRESET switch.
Preset Mode (PRESET)
Switching between two registered color temperature settings using AWB user button.
Setting Preset and Alternative Temperature Values
Changing color temperature settings in Preset mode via the menu.
Memory A/B Modes
Setting white balance saved in Memory A or B.
Auto White Balance Error Messages
Displays error messages if auto white balance adjustment fails.
White Paint Adjustment
Fine-tuning white balance by adjusting R/B components in AWB mode.
Automatic White Balance (FAW)
Using FAW feature to automatically adjust white balance based on lighting.
FAW Paint Adjustment
Fine-adjusting white balance automatically adjusted in FAW mode.
White Shading Adjustment
Process to correct greenish/yellowish image shifts due to lens characteristics.
Setup Prior Adjustment
Steps for obtaining white balance and setting lens controls before adjustment.
Adjusting the White Shading
Automatic and manual adjustment of white shading using evaluated level meter.
Adjusting the Camera Image
Using the Image Stabilizer
How to turn the image stabilizer ON or OFF to reduce camera shake.
Audio Recording
Setting Number of Recording Channels
Setting the number of recording channels for slot A and slot B.
Selecting Audio for Each Channel
Selecting audio input for CH-1/CH-2 and CH-3/CH-4.
Setting for INPUT1/INPUT2 Input Channel
Selecting LINE, MIC, or MIC+48V for input terminals.
Adjusting Audio Recording Level
Manually or automatically adjusting audio recording levels for channels.
Time Code and User’s Bit
Displaying Time Code and User’s Bit
How time code and user's bit are displayed on viewfinder/LCD during playback.
Time Code Operation Mode
Presetting the Time Code
Setting time code and user's bit data from the internal generator.
Required Settings Before Preset
Specifies settings needed before performing preset time code.
Presetting the Time Code
Setting the time code (hour, minute, second, frame) using the cross-shaped buttons.
Setting Time Code Generator
Setting Time Code without Opening Menu
Setting time code directly using the TC DISPLAY and TC GENE. switches.
Recording Time Code Continuation
Using REGEN mode to record time code in continuation of existing data.
Setting the User’s Bit
Selecting Recording Mode for User's Bit
Setting user's bit to record date/time information.
Presetting the User’s Bit
Recording arbitrary information (8-digit hex) to the user's bit.
Setting User's Bit without Opening Menu
Setting user's bit directly using TC DISPLAY and TC GENE. switches.
Synchronizing the Time Code with an External Time Code Generator
Connection Setup (External Time Code)
Setting up the external time code generator as a master device.
Camera Recorder Settings and Operation
Steps for setting the camera recorder and running the time code.
Phase Items to Synchronize
Table showing phase synchronization variations based on video and sync signals.
For Digital Signals (SDI) Input
Inputting SDI signals to synchronize camera video with external signal.
Adjusting H Phase
Adjusting the H Phase of video signals with respect to external synchronizing signals.
Specify Zebra Pattern Brightness Levels
Setting maximum and minimum brightness limits for Zebra 1 and Zebra 2 patterns.
Using the Histogram
Set Histogram Display Limits
Setting the upper and lower brightness limits for histogram display color.
Dual Rec
Setting to Dual Rec Mode
Setting the Slot Mode to 'Dual' for simultaneous recording on both slots.
Backup Rec
Start Backup Recording (Slot B)
Starting backup recording into slot B using the menu or user button.
Special Recording
Pre Rec Function
Starting recording video/audio before actual recording starts.
Clip Continuous Rec
Consolidating multiple start/stop recordings into one clip.
Frame Rec Function
Recording a specified number of frames per press of REC button.
Interval Rec Function
Repeatedly recording and pausing at specified time intervals.
Variable Frame Rec Function
Achieving smooth slow motion or quick motion by changing frame rate during recording.
Playing Recorded Clips
Operation Buttons for Playback
Description of buttons used to operate the thumbnail screen.
Thumbnail Screen Overview
Explanation of Standard and Detailed screens for thumbnail display.
Detailed Screen
Items common with Standard screen and additional details.
Playing back
Using the operation buttons to play back recorded clips.
Audio Output during Playback
Checking playback sound via monitor speaker or earphone.
Time Code Playback
Displaying time code or user's bit on LCD monitor and viewfinder.
Displaying Information during Shooting
Switching between camera info, GPS, shutter, and white balance displays.
Deleting One Clip
Deleting a single clip pointed by the cursor from the menu.
Selecting and Deleting Multiple Clips
Refer to selecting/performing operations on multiple clips.
Deleting All Clips
Deleting all displayed clips using the action selection screen.
During Thumbnail Screen (OK Mark)
Appending or deleting an OK mark on a clip using the OIS/1 button.
During Playback or Pause Screen (OK Mark)
Appending or deleting an OK mark during clip playback or pause.
Appending/Deleting OK Mark for Multiple Clips
Refer to 'Selecting and Performing Operations on Multiple Clips'.
Selecting Multiple Clips Randomly
Selecting multiple clips by pressing MARKER/2 button on clips without check marks.
Selecting Multiple Clips Consecutively
Selecting a range of clips using the LOAD FILE/3 button and Set button.
Trimming Recorded Clips
Perform Trimming
Pressing the LOAD FILE/3 button to perform the trimming operation.
Basic Operations in Menu Screen
Operation Buttons for Menu Navigation
Using cross-shaped buttons to navigate and operate menus.
Display and Description of the Menu Screen
Selecting Menu Items
How to navigate and select items using the cursor and buttons.
Changing Setting Values
Text Input with Software Keyboard
Using the software keyboard for entering subnames and network settings.
Entering a Subname
Entering a subname for setup files using the software keyboard.
Entering the [Clip Name Prefix]
Entering up to 4 characters for the clip name prefix using the software keyboard.
Settings under [Network] -> [Settings]
Configuring network settings like IP address and DNS server.
Camera Function Menu
Bars
Setting whether to output color bars and audio test signals.
OIS
Setting whether to enable image stabilizer and its level.
Flicker Correction
Setting to adjust image flicker occurring under fluorescent light.
Flash Band Correction
Reducing unnatural images caused by flash bands.
Shutter
Specifying shutter-related settings like Step, Variable, EEI.
AE Level
Setting the convergence level during AE (Auto Exposure).
AE Speed
Setting the convergence speed during AE (Auto Exposure).
ALC Limit
Setting the maximum gain value of ALC for automatic brightness.
Auto Iris Limit (OPEN)
Setting the limit value of the OPEN end when auto iris is enabled.
Auto Iris Limit (CLOSE)
Setting the limit value of the CLOSE end when auto iris is enabled.
EEI Limit
Setting the shutter speed control range for Automatic Shutter mode.
Smooth Trans
Setting shock reduction function for sudden changes.
FAW
Assigning the FAW (Full Auto White Balance) feature to the WHT.BAL switch.
GAIN L, GAIN M, GAIN H
Setting the gain value for each position on the GAIN L/M/H switch.
AE LEVEL SW
Specifying operation of the cross-shaped button for AE Level or VFR.
Handle Zoom Speed
Setting zoom speed for the handle zoom lever when FIX is selected.
AF Speed
Setting the auto focus operation speed.
AF Assist Function
Setting whether to shift auto focus point when focus ring is turned.
Remote Func. Change
Enabling focus operation when zooming via wired remote control.
Lens REC
Setting the function of the REC button on the lens.
User Switch Set
Specifying user button related settings.
Lolux
Increasing sensitivity in dim surroundings by setting Lolux mode.
Clip Review
Setting operation of clip review using user button.
Spot Meter
Setting operation of the spot meter using user button.
Face Detect
Selecting control to track results of face detection.
Preset Zoom Speed
Setting the speed to shift to preset zoom position assigned to user button.
Expanded Focus
Setting the operation of expanded focus using user button.
Changing the Settings via a Web Browser
View Remote
Accessing live image and performing remote control operations via web browser.
Camera Control
Accessing web browser for remote control of camera functions.
Changing View Remote Function Settings
Performing settings for using the View Remote function.
Changing Connection Setup
Changing connection settings for preset items on the Wizard screen.
Importing Metadata
Preparing Metadata
Recording metadata types: Title1, Title2, Creator, Description.
Configuring the Server for Downloading
Specifying FTP server settings for metadata download.
Importing Metadata
Downloading metadata settings file (XML format) from FTP server.
Uploading a Recorded Video Clip
Configuring the FTP Server for Uploading
Specifying FTP server details for uploading recorded clips.
Uploading Video Clip
Uploading recorded clips from SD card to a preset FTP server.
Selecting and Uploading Multiple Clips
Selecting and uploading multiple clips via FTP.
Uploading All Video Clips
Uploading all clips to the FTP server.
Editing Metadata
Planning Metadata
Editing camera recorder metadata via web browser.
Clip Metadata
Editing metadata for recorded clips via web browser.
Switching from a web browser
Changing camera mode to Remote Edit Mode via web browser.
Switching from the camera
Changing camera mode to Remote Edit Mode via camera unit.
View Remote Feature
Registering/Deleting Preset Zoom
Registering and deleting up to 3 preset zoom positions.
Camera Control Function
REC
Performing recording start or recording pause operation.
CAMERA
Enabling operations related to camera functions.
ZOOM
Enabling zooming operations.
FOCUS
Enabling focusing operations.
USER SWITCH
Enabling or disabling user buttons assigned with functions.
MENU
Showing/hiding display and menu characters on external monitor.
Changing the Settings via a Web Browser
View Remote
Settings for operations on the View Remote function.
Connection Setup
Network-related settings for the Wizard screen.
Metadata Server
Settings for the server to import metadata.
Clip Server
Settings for the server to upload recorded clips.
Live Streaming
Settings for streaming audio and video via the network.
Changing View Remote Function Settings
[Camera Name]
Setting the name that appears at the top left of the view screen.
[Restrictions]
Disabling buttons on the View screen while in locked mode.
Changing Connection Setup
Type of Adapter Connected
Specifying the adapter type for network connection.
Mode of Wireless LAN Connection
Setting the mode for wireless LAN connection.
[Search Access Point] Button
Displaying a list of detected access points.
Settings during the use of wireless LAN
Configuring IP address and proxy settings for wireless LAN.
IP address settings
Configuring IP address settings for DHCP or manual.
Settings when using a cellular adapter
Configuring connection phone number, username, and password.
Saving the Connection Settings File
Connection Setup
Accessing the connection setup menu.
Store
Saving the current connection settings.
Reading the Connection Settings File
Connection Setup
Accessing the connection setup menu.
Load
Loading saved connection settings.
Performing Live Streaming
Supported Formats
Lists supported video and audio formats for live streaming.
Setting Distribution
Set items related to the distribution protocol
Setting protocol details like UDP/TCP, RTSP/RTP, ZIXI.
Starting Distribution
Performing necessary settings for decoder/PC application for live streaming.
Error Messages and Actions
Troubleshooting
Guidance for resolving common operational issues.
List of FTP Transfer Errors
Displays errors encountered during FTP upload or metadata download.
List of Live Streaming Error Displays
Displays errors related to incorrect live streaming settings or lost connection.
Specifications
General
General specifications including power, mass, temperature, and humidity.
Terminal Section
Details of video/audio terminals like SDI, HDMI, XLR, and audio outputs.
Lens Section
Specifications for the lens, including aperture and filter diameter.
Camera Section
Specifications for camera components like image pickup device and sensitivity.
Storage Section
Information on supported media (SDHC/SDXC) and slots.
Video/Audio
Details on video recording file formats and audio specifications.
Need help?
Do you have a question about the GY-HM850RE and is the answer not in the manual?
Questions and answers