
Related Manuals for Plastica Westminster


Summary of Contents for Plastica Westminster
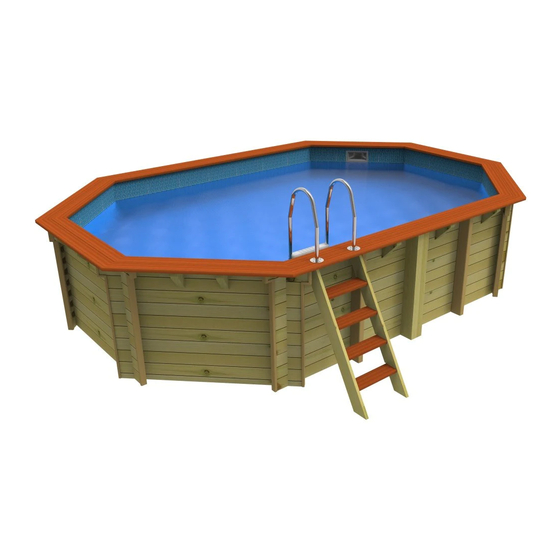
- Page 1 Self Build Install Instructions Stretched Pools (Belgravia, Bayswater, Westminster) Octagonal Pools (Knightsbridge, Hampstead, Kensington) WP 002 March 2016 Edition www.plasticapools.com...
-
Page 2: Table Of Contents
Contents Introduction: Recommendations for Storage after Delivery General Safety Precautions Required Tools Kit Contents Preparation of the Base Section A: Option I: Subsoil Base Option II: Concrete Base Assembly of the Shell Section B: Decide on the Layout of your P ool Assemble the Pool Walls Install the Return and Low Suction Install the Skimmer... - Page 3 Notes...
-
Page 5: Introduction
Introduction A DVD is available upon request that illustrates In the event of any problems please contact your many stages in this book. The film shows a project dealer immediately. Warranty claims will not be from start to finish as an informative guide which entertained if there is delay in reporting a problem or supplements this book. -
Page 6: Preparation Of The Base
SECTION A: Preparation of the Base OPTION I: Subsoil Base • Although the recommended base is concrete (see • Lay the braces on your dug out area in the positions indicated on the layout drawing. Mark Option II below) you may choose to construct your pool on undisturbed subsoil. -
Page 9: Option Ii: Concrete Base
OPTION II: Concrete Base • The recommended minimum base is a 100mm (4”) • If you are installing 4 or 6 braces make sure they are lined up with each other. thick concrete pad. Using a steel reinforcing grid in the concrete will greatly increase its strength and •... -
Page 10: Decide On The Layout Of Your Pool
SECTION B: Assembly of the Shell Decide on the Layout of your Pool • Refer to the laminated Pool Layout drawing • If you are planning to use an underwater light decide which side to install it on. A light would suitable for your sized pool. - Page 12 Fitting the End Capping Channel • Locate the “U” section end capping channels and fixing pins. • Cut a small section of end capping channel to suit the end of each extended plank wall top plank. Nail into position with the nail passing through the hole left free in the metal corner brace..
- Page 13 • Find the 4 bottom half planks that have a flat • At this stage and after every couple of plank layers under side and two tongues facing upwards. Place check that the pool shell is correctly aligned on the these flat side down on your pool base as shown concrete base...
-
Page 14: Install The Return And Low Suction
• At this stage check what type of skimmer has been supplied. If it is a preassembled (one piece) type fit the skimmer between the planks now. If the skimmer “throat” is separate it can usually be fixed into place when the pool wall is complete. In both cases refer to the instructions supplied with the skimmer. - Page 15 SECTION F: Fitting the Ladders and End Capping Channel Fitting the External Wooden Ladder • Offer up the wooden ladder to your chosen pool • Use a 10mm drill to make holes through the ladder wall and position by laying a spirit level on a ladder and top shelving bracket/vertical support plank.
- Page 16 Fix the Top Shelving Corner Brackets Option 2 – Hidden Fixings • Once all the pellets are located, use a sharp chisel upside down to trim off the excess pellet which is • Use the wooden pellets supplied to hide the still exposed.
-
Page 17: Install The Skimmer
Install the Skimmer • If a one part skimmer has been supplied it will • Drill four holes in each corner of the skimmer [see need to be fitted during assembly of the pool walls. figure B13] Locate the screws from the pool fixings kit and secure the skimmer into the pool wall [see •... -
Page 18: Build The External Wooden Ladder
Build the External Wooden Ladder • Locate the wooden ladder treads and wooden • Place one ladder side on a flat surface with slots ladder sides. [See Figure B16] facing upwards. You may wish to protect the wood surface by padding it with cardboard or similar. [See Figure B19] Figure B16 •... - Page 19 Fill the Pool and Fit the Cover • When the pipe work has been completed and the • Float the solar cover on the water, bubbles facing glue set the pool can be filled. downwards. • The usual operating level is the water level half •...
- Page 20 • Fit a Male Threaded Union to the filter valve marked “pool” or “return”. • If you are using a heater fit a Male Threaded Union to the heater inlet. [See Figure D07] Figure D10 • If you are not using any heating fit the valve just after the filter and run pipe directly to the return inlet union.
-
Page 21: Fitting The Wooden Vertical Support Planks
Fitting the Wooden Vertical Support Planks • Locate the 45mm thickness wooden vertical • It will be easiest to fit the vertical supports by support planks and 5mm x 100mm screws. having one person in the pool and another outside holding each support. -
Page 22: Fitting The Top Shelving Support Brackets
Fitting the Top Shelving Support Brackets • The Top Shelving that runs around the perimeter is • Locate the top shelving brackets and place them supported by Top shelving brackets. These on top of the pool wall in approximately the triangular brackets are fixed with the “sharp”... - Page 23 Plumbing the Pipe Work • Fit a Double Union Ball Valve (red handle) on pipe • Bring pipe work from the low suction valve and the work leading from the low suction that you have skimmer union into two connectors on a “T” fitting. fitted into the pool wall.
- Page 24 SECTION D: Filtration Equipment General Description • To keep your swimming pool water clear and • The pipe work kit supplied is generous so fitting healthy it needs to be filtered and treated with variations are possible to suit your exact chemicals.
-
Page 25: Fitting The Liner
SECTION C: Fitting the Liner Fitting the Linerlock • Linerlock is the white plastic extrusion that the pool • Use the 3.5mm x 40mm screws from your fixings liner hangs from. kit to fix the linerlock to the inside of the wall. [See •... -
Page 26: Fixing The Wall Foam Underlay
Fixing the Wall Foam Underlay • Cut the foam away from the skimmer, low suction, • Thoroughly clean the inside of the pool and ensure return and optional light. [See Figures C05 & C04] no objects can fall into the pool. Any objects or dirt that remain in the pool when the liner is fitted can •... - Page 27 • Take the remaining screws and using the premade • Tighten the screws evenly so that the faceplate is screw holes in the faceplate as a guide pierce the flat against the liner forming a water proof seal. liner with them and tighten to just tension the liner •...
- Page 28 • It is advisable to stay in the pool while first filling • Refit the liner where the vacuum hose was making adjustments as required. positioned. • Keep the vacuum switched on until the water • Do not continue filling the pool until the flow fittings reaches about 50mm / 2”...
-
Page 29: Laying The Floor Felt Underlay
Laying the Floor Felt Underlay • Ensure the pool floor is still clean and that no objects can fall into the pool. Any objects or dirt that remain in the pool when the liner has been fitted can be unsightly for years to come and even damage the liner. -
Page 30: Preparation For Liner Fitting
Preparation for Liner Fitting • The liner will be much easier to fit on a warm • Take 4 skimmer screws and fit them in the pre- sunny day as this makes the liner much more made holes at each corner. Do not fit all the supple. -
Page 31: Fitting The Liner
Fitting the Liner • It is absolutely essential that ALL foreign bodies are excluded from between the liner and the underlay, which means that the underlay and the liner should be thoroughly cleaned (vacuumed) before installation. • Before fitting the liner ensure each fitting (low suction, return, skimmer &...
Need help?
Do you have a question about the Westminster and is the answer not in the manual?
Questions and answers