
Related Manuals for Bionics BPM-1200


Summary of Contents for Bionics BPM-1200
- Page 1 BIONICS Patient Monitor Series Operation Manual BPM-1200(PATRON) /1010(MATRON) Patient Monitor (Ver 1.0) 2012.10.04 www.ebionics.co.kr...
-
Page 2: Table Of Contents
CONTENTS ◆ Before using the product ---- ◆ ECG Measurement ------------ ◆ Contacts ---------------- ▶ How to Connect ECG Cable ------- ◆ Product Guarantee -------- ▶ Change of ECG Lead ------------ ◆ Symbols in the Manual ------ ▶ Arrhythmia setting --------------- ◆... -
Page 3: Before Using The Product
For any questions about use or setup of the product, please contact the following number. Technical Support : BIONICS Co.,Ltd. Tel: 82-2-714-2962 * For reporting defects or abnormalities, please note the model name, product serial number, purchasing date, and abnormal points before contacting us. -
Page 4: Product Guarantee
Product Guarantee The product you have purchased comes with a 1-year warranty from the purchasing date covering inferior materials and the manufacturing process. For the disposable products, a warranty is given for 6 months from the purchasing date or 6 months from its first use covering inferior materials and the manufacturing process. -
Page 5: Symbols In The Manual
Symbols in the Manual Some symbols are used in this manual to help users or patients use this product safely and appropriately and to prevent any risk to patients or damage to materials. Please read and understand all warnings and precautions. Each Symbols mean : WARNING The “Warning”... -
Page 6: Precautions For Use
Precautions for Use Do not operate or store the equipment under the following environments. - Page 7 ▶ Standard operational conditions are as follows. Temperature : 10℃ ~ 45℃ (50 ~ 113℉) Altitude : 70 ~ 106Kpa Humidity : 30 ~ 85% ▶ Standard storage and transportation conditions are as follows. Temperature : -10℃ ~ 50℃ (14 ~ 122℉) Altitude : 50 ~ 106Kpa Humidity : 20 ~ 95%...
- Page 8 CAUTION ◈ Interpretation of the measurement value of arterial blood pressure should be performed by medical professionals. ◈ Arterial blood pressure may be influenced by the patient’s posture, physical condition and other factors such as a patient’s movement. ◈ The product may not work well when it is kept or operated beyond the temperature and humidity specified.
- Page 9 CAUTION ◈ Leakage, heating, firing or disruption of the battery may cause fire or injury. u Do not use batteries beyond those specified in this manual. u Do not short-circuit the battery and do not heat, integrate, or dispose of it in a fire. u Do not use the battery currently in use with a new battery, another kind of battery, or batteries from other suppliers.
-
Page 10: Precautions For Electrical Safety
Precautions for Electric Safety. Please check the following points before use. l Is the product supplied with the appropriate power? (100-240V~) l Are all connecting parts (power cables or the product) properly connected? l Is the product completely grounded? (If not, noise may occur.) l Before turning the power on, is the accessory for measuring the target parameter well connected to the product? NOTE... - Page 11 Characteristics and Principles of BPM-1200(1010) BPM-1200(1010) is a Patient-monitoring equipment. BPM-1200(1010) measures the patient’s ECG, blood pressure (invasive and noninvasive at two points), end-tidal partial pressure respiration (EtCO2), body temperature(Temp), oxygen saturation of arterial blood and pulse (SpO2). Information on the patient’s condition is displayed as numeric values and waveforms.
-
Page 12: Characteristics And Principles 11 ◆ Composition(Accessory)
Composition of BPM-1200(1010) (Accessories) Standard Accessories ECG Cable Main 1 set 5 lead type (1EA) Finger Probe 3M Electrode (1EA) (5PCS/1set) NIBP Hose (1EA) Adult Cuff (1EA) Operation Manual Power Cord (1EA) (1EA) Optional ECG Cable 3 lead type TROLLEY ECG Cable 10 lead type Wall Mount SpO2 extension Cable... -
Page 13: How To Set Bpm-1200(1010)
How to Set BPM-1200(1010) (1) Precautions for Settings Pay attention when setting BPM-1200(1010) for the following points - Use BPM-1200(1010) under conditions of 10℃∼45℃ of circumstantial temperature and 30%∼85% humidity. - Check the connection status of the power cord. - Do not connect multiple cords to the power supply. - Place the main body on a flat area. - Page 14 ◎ Precautions Before Use SpO2 ① Do Not use product near dynamo, X-ray equipment, broadcast equipment. ② Keep the patient motionless with comfortable position while measuring. ③ Sterilize sensor periodically. ◎ Precautions Before Use Temp ① Do Not use product near dynamo, X-ray equipment, broadcast equipment.
-
Page 15: Maintenance And Cleaning After Use
◎ Precautions Before Use EtCo ① Do Not use product near dynamo, X-ray equipment, broadcast equipment. ② Keep the patient motionless with comfortable position while measuring. ③ Do not twist cable ◎ Precautions Before Use CO ① Do Not use product near dynamo, X-ray equipment, broadcast equipment. - Page 16 ① Sterilize the Probe periodically after using. ② Store the cable without twisting. ◎ Maintenance and Cleaning after using Temp ① Sterilize the Probe periodically after using. ② Discard the disposable covers in designated locations. ③ Store the cable without twisting. ◎...
-
Page 17: Precautions For Use
(2) Precautions for Use ① Precautions for Equipment ⅰ. Avoid the damp locations, and do not operate the equipment with wet hands. ⅱ. Use BPM-1200(1010) under conditions of 10℃∼45℃ of circumstantial temperature and 30%∼85% humidity. ⅲ. Do not use the locations where moisture level could go up considerably or where air is not ventilated properly. - Page 18 ⅲ. Interpretation of the measurement value of arterial blood pressure should be performed by medical professionals. ⅳ. Arterial blood pressure may be influenced by the patient’s posture, physical condition and other factors such as a patient’s movement. ⅴ. Since the use of the inappropriate sensors such as a sensor that is too tightly wrapped with adhesive tape or use of additional adhesive tape, lack of a periodical check, or inappropriate setting of sensors may lead to skin injuries and...
-
Page 19: Components Of Bpm-1200
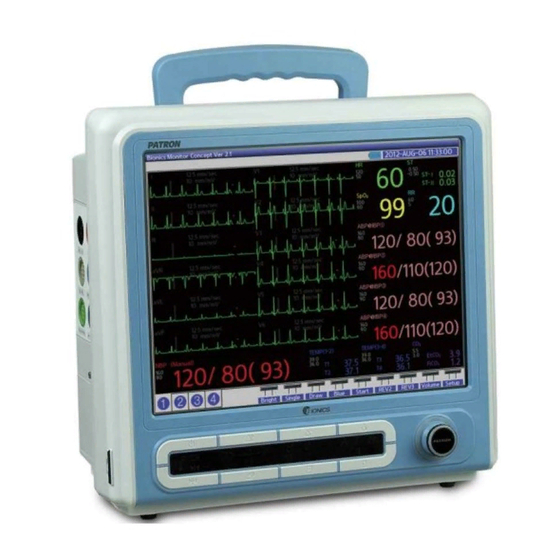
Components of BPM-1200(1010) (1) Front & Operation Panel ① ② ③ ④ ⑤ ⑥ ⑦ ⑧ ⑨ ⑩ ⑪ ① Power Button ⑦ NIBP START/STOP Button ② Freeze Button ⑧ EXIT Button ③ ALARM ON/OFF Button ⑨ Information status LED ④... - Page 20 ① ② ③ ④ ⑤ ⑥ ⑦ ⑧ ⑨ ① AC power LED ② Battery LED ③ Wave Go/ Freeze mark ④ Alarm ON/Mute/OFF mark ⑤ SCREEN CHANGE ⑥ Event Mode makr ⑦ Print operating (manual/auto) mark (1) 우측면 ⑧ NIBP Measurement mark(GO/STOP/AUTO)
-
Page 21: Right Side
(2) Right Side PRINT FEED button PRINT ERROR LED PRINT POWER LED RS-232C PORT LAN PORT VGA PORT Speaker... -
Page 22: Left Side
(3) Left Side (1) ECG/RESP Connection Terminal (2) IBP 1/2 Connection Terminal (Option) (3) SpO2 Connection Terminal (4) TEMP Connection Terminal 1/2/3/4(Option) (5) EKG Connection Terminal (Option) (6) IBP 3/4 Connection Terminal (Option) (7) GAS Module Connection Terminal (Option) (8) ICO Connection Terminal (Option) (9) NIBP Connection Terminal (10) SD Card(Option) -
Page 23: Back Side
(4) Back Side ① ② ③ ④ ⑤ PORTABLE HANDLE MAIN POWER SWITCH GROUNDING PORT Battery Cover AC POWER PORT... -
Page 24: Symbols
Description of Product Symbols Icon Comments Icon Comments Type CF Product, Alarm On/Off Defibrillation protected Type BF Product, Screen Change Defibrillation protected (Screen) Stop Waveforms Power stand-by switch (Freeze) Attention, consult Non Invasive Blood Accompanying Pressure Manual documents Measurement(NIBP) Ground Start Printing (Printer) SYSTEM POWER I / O... -
Page 25: Initial Screen
(1) Initial Screen ⑬ ⑥ ① ⑤ ⑦ ⑧ ② ③ ⑨ ④ ⑩ ⑪ ⑫ (1) ECG Wave(Depending on the ECG CABLE can be selected MAX: 12Wave) (2) SpO Wave (3) IBP Wave (Depending on IBP Wave CH can be selected MAX: 4Wave) (7) SpO (4) EtCo &... - Page 26 NOTE ◈ BPM-1200(1010) provides 4 different screens to use “SCREEN CHANGE” button. - 4 screens are as follows. A. Full Parameters Screen (Main Screen) 4 Waves(select) and 4개 Parameters(select) Screen 2 Waves(select) and Parameters(select) Screen TREND Screen...
- Page 27 (Table 1). Explanation of Screen Icons Icon Meaning How to display NIBP Auto pressurization Fixed. Fixed Battery in use Fixed Non-Fixed Alarm Status (1-second interval) Non-Fixed NIBP Measurement mark.(G o) (1-second interval) NIBP Measurement mark.( Stop) Non-Fixed Non-Fixed Printer Action mark.(Go) (1-second interval) Printer Action mark.(Stop) Non-Fixed...
-
Page 28: How To Use Bpm-1200(1010)
How to Use BPM-1200(1010) (1) How to Use Install on the main power switch at the back of the product. Step 1 Check the light-on status of the AC LED in the front, and push the power switch 1~2 seconds to turn it on. (if any problems occur, refer to the “How to solve the problems”... -
Page 29: Alarm
(2) Alarm Different alarms are provided in BPM-1200(1010) for the sake of the user’s convenience. Please read carefully the contents of this section in order to learn how to interpret and react appropriately to the alarms. Note ◈ The alarms in the product conform to the international standard “IEC 60601-1-8 (2006). -
Page 30: Step 1
How to set the alarm To change the alarm setting, touch the screen once to Step 1 wave or display. And touch the Bottom Alarm. ▶ Alarm Range Setting range Parameter HIGH ECG [bpm] 50 ~ 300, OFF OFF, 30 ~ 280 21 ~ 99, OFF OFF, 20 ~ 98 Systolic... -
Page 31: Trend
(3) Trend Note ◈ BPM-1200(1010) Trend Data provides 43260 data in total at an interval of 1minute for 720 hours.(30Day) To check the Trend date for the patient being measured, touch the File Load in Trend Screen. Can be selected After Trend Data Load Check Day/Hour/Minute to touch operation. -
Page 32: Setup Setting
① ② ③ ① (그림2. Trend 화면) ① Parameter name for measurement ② Time of the storage ③ Standard wave measurement parameter NOTE ◈ If you are touched ‘Play, Stop, Left navigation and Right navigation’, function will be executed. (4) Setup Setting The setting of system setup, time, print, unit selection can be changed at the user’s convenience. -
Page 33: Print Setup (Optional)
▶ By operating as detailed above, you can change the setting of each SETUP menu. Setting List Subsection System Setup BED Number 1 ~ 99 Demo On / Off Patient Mode Adult / Neonate Nurse Call On / Off Clock Set Time Change Setting Time Format... - Page 34 ▶ By operating as detailed above, you can select the function you want for the Printer mode. Setting Mode Range of change Explanation When “Alarm” is selected, the date is Sync. Alarm / Manual automatically printed out if the data is out of range Wave+Trend / Wave Print the waveform and Trend Data/...
-
Page 35: Power & Battery Specifications
Power & Battery Specifications Both AC and DC power is used for BPM-1200(1010). Basically, AC power is used and a rechargeable battery is available for portable use. 1. AC Power (110~240VAC) If the AC power is connected to the main body of the product, a blue color lights up on the AC LED on the front. - Page 36 CAUTION ◈ When the battery is disconnected, all data (Trend, Setup values time etc.) saved memory within PATRON/MATRON(BPM-1200/1010) for about 3 days. If the product is kept off of the battery for more than 3 days, all the data may be deleted. C.
-
Page 37: Ecg Measurement
ECG Measurement (1) How to Connect the ECG Cable WARNING ◈ With the use of an electric pacemaker, do not touch the patient, table, or other equipment. ◈ Check if the ECG cable is damaged before taking the ECG measurement. (A damaged ECG cable cannot protect the patient.) ◈... -
Page 38: Change Of Ecg Lead
단계 2 Attach the patient’s electrode to the sites shown blow. LA: Black LA: Black RA: White RA: White V: Brown RL: Green LL: Red LL: Red <IF 5 lead are attached> <IF 3 lead are attached> Color of Lead Attaching site electrode RA (R) -
Page 39: Arrhythmia Setting
Arrhythmia on ECG is provided the function of the analysis that Ventricle has problems or not. The diagnosis program “A” of BIONICS Arrhythmia is provided the function of the 3 kind’s arrhythmia analysis affecting the fatal injury of the patient. -
Page 40: St Segment Setting
According to clinical study, all ST Level value should be examined. The program of BIONICS ST Level analyzes each ST Level value regarding the LEAD I and LEAD II. It displayed fixed screen CH-1 to LEAD 1 and CH-2 to LEAD II. - Page 41 ST Level Setup...
-
Page 42: Respiration Measurement
Respiration Measurement Changes in the chest impedance resulting from the patient’s respiration is measured and displayed as a waveform and the values will appear on the screen. (1) How to Measure Respiration NOTE ◈ Respiration is measured with the ECG and HR etc., using the ECG cable. -
Page 43: Change Of Respiratory Mode
(2) Change of Respiration Mode ▶ To change the setting of respiratory waveform, touch the RSP Wave once to select Config. ▶ By operating as detailed above, you can select each function of the RESP mode. Setting Range for Change Explanation Mode SIZE... -
Page 44: Blood Pressure Measurement
Blood Pressure Measurement (1) How to Measure Blood Pressure WARNING ◈ Do not use the NIBP Cuff for other purposes than blood pressure measurement. Blood pressure cannot be measured on the upper arm of the patient, the artificial infusion set or catheter is inserted at the site. -
Page 45: Change Of Nibp Mode
The cuff too tight or too loose on the measuring site may Step 2 cause errors in the value. (2) Change of NIBP Mode ▶ To change the setting of NIBP mode, push the Menu button once to select NIBP. ▶... - Page 46 CAUTION ◈ The automatic measurement mode (AUTO pressing) is cancelled in the following cases: ■ When the blood pressure measurement fails 3 consecutive times. ■ When overpressure occurs. (Cuff pressure over 300 mmHg) ■ When the power is On/Off. ◈ When the automatic measurement mode is cancelled, the user should reset the AUTO pressing to let it operate normally.
-
Page 47: Spo2 Measurement
Measurement The concentration of oxygen saturation means the saturation level of hemoglobin which can transport the oxygen of the arterial blood. The current transport level for the capacity of hemoglobin to transport the oxygen is expressed as a percentage. (1) How to Measure SpO2 WARNING ◈... - Page 48 단계 1 Connect the SpO Probe to the connection terminal of the measurement module. SpO2 Probe Step 2 The probe to the finger, (if measured with NIBP at the same time, the SpO probe should be positioned on the opposite arm.
-
Page 49: Change Of Spo2 Mode
(2) Change of SpO Mode ▶ To change SpO Mode, touch the SpO2 Wave once to select Graph. ▶ By operating as detailed above, you can select each function of the SpO2 mode. Set Mode Range for Change Explanation Size X 0.25, x 0.5, x 1, x 2, x 4 Set the size of SpO wave... -
Page 50: Body Temperature Measurement
Body Temperature Measurement Changes in impedance according to the change in the patient’s body temperature is perceived by the temperature sensor, and then displayed numerically on the screen after a series of calculations. (1) How to Measure Body Temperature NOTE ◈... -
Page 51: Press Measurement (Optional)
Press Measurement (Optional) (1) Press Setting CAUTION ◈ Only the transducer specified by the company can be used. A transducer which can be protected from electric shock and electrical impulses should be used. It can be used during the electric operation of the device. - Page 52 Step 2 In a clean environment, open the package to check if all parts are well connected and if the handle of the stopcock is positioned properly. All side ports of the stopcock are protected by the outlet plugs and may not be removed till the system is full and the foam have been removed.
- Page 53 Connecting area of transducer Monitor interface cable 3. To remove the converter from the cable, push the tap gently inside the clear cover and then separate the reusable interface cable. Step 4 Hold both sides of the flush operator and pull upward gently. Do not revolve the operator and take care not to put the power on one side.
- Page 54 Step 5 Priming and Tips Priming should be done slowly! – Slow priming will lessen the effort to remove air bubbles afterward. Prime using gravity! – Pressing may result in leakage of liquid or bubbles by forcing the liquid to flow into the system. If small bubbles flow too slowly inside the system, lift up the supply bag.
- Page 55 clear cuff. Flush the system for 2~3 seconds. Check for the presence of air bubbles which may result from a fast flush. Now, the system is ready for zero point setting and measuring. Place the stopcock in a 90 degree position to let it off state. Be sure to never position it at 45 degrees.
-
Page 56: Change Of Ibp Mode
If the fix plate is used, fix it as below < Table for labels according to the site of measurement > Arterial blood pressure Artery group throughout the whole body (systemic) Central venous pressure Central vein / atrium group Intracranial pressure Intracranial group Pulmonary arterial pressure Pulmonary artery group... - Page 57 ▶ By operating as detailed above, you can select each function of the IBP mode. Set Mode Range for Change Explanation Set the level according to the ABP, FEM, PA, CVP, LA, measurement site of BP. Mode RA, ICP, SP Change the alarm setting range according to level.
-
Page 58: Etco2 Measurement (Optional)
EtCO Measurement (Optional) (1) CO Gas Measurement The Resprionics of CO2 Module can be fitted onto BPM-1200(1010). The Respironics CO Provides the function of EtCO , and the function to measure respiratory CO and respiration number using the Side Stream/Main Stream. WARNING ◈... - Page 59 Co2 module connector portion connected "click" until you hear the connections. (PHASEIN_Co2) Co2 module connector portion connected "click" until you hear the connections.
-
Page 60: Sidestream Co2
(2) Sidestream CO A. Connect on side of the gas outlet to the gas outlet of BPM- 1200(1010), and the other side to the air elimination system of the hospital. B. Open the spring-type door and connect the Filter-line appropriately to the equipment. The other end is then connected to the patient. -
Page 61: Co2 Calibration
using the menu. CAUTION ◈ Waste from SideStream/MainStream and CO2 filter should be treated as fatal biological materials for the human body. (3) CO2 CALIBRATION The accuracy calibration for the Respironics CO2 is performed once a year or when the measurement results are not accurate. NOTE ◈... - Page 62 (It doesn’t measure during this period.) Check Adaptor Not connected to the accessory Zero Require Need the Calibration * During calibration mode Massage Explanation Zero In Progress Progressing the CALIBRATION...
- Page 63 CT = correction factor for injectate warming Catheter's the Edwards Swan -Ganz Standard Thermodilution Pulmonary Artery Catheter Use. WARNING ◈ Edward is validated in the company, Bionics other products in the supply cable or the sensor should not be used ICO...
- Page 64 Connection method ICO cable in connect to the ICO Terminal. Swan-Ganz Standard Thermodilution Pulmonary Artery Catheter Thermistor connector cable to connect to the ICO of the Catheter. Thermistor Connector ICO screen the feature is activated (ICO automatic measurement)
- Page 65 1) ICO injection quantity and the temperature and constant. 2) ICO's measurements, and edit and save information about the measure.
-
Page 66: Before Requesting After - Sale Service
Before Requesting After-Sales Service This section shows how to treat simple problems encountered during use. Please check the following points before requesting after-sales service. ▣ Problems in Display Sign How to treat The power of the product is Check if the AC power is supplied. not turned on. - Page 67 ▣ Problems in SpO2 Measurement Sign How to treat 1. Check if the probe is affected by strong light in the area. 2. Check if the connection is normal; if the red light of the sensor flickers or does not turn on, it is an inferior probe.
- Page 68 ▣ Problems in IBP Measurement Sign How to teat Blood pressure Pour out the contents of the tube carefully and measurement remove the bubble, then shorten the tubing length. unstable. Severe noise or bias in Do not shake or touch the connection area of the the waveform.
-
Page 69: Product Specifications
Product Specifications 1) Measurement Parameter ECG, SpO2, NBP, 4IBP, RESP, 4TEMP, EtCO2, Multi Gas, ICO, HRV, OXY-CRG, APG detect analysis, ST level display, mini trend, ECG Recall, Drug Dose, Color change, Temp TD, NIBP Text trend. 2) Monitor Performances Specifications (Display Method) FT Color LCD Display Waveform Display Method : Scrolling Method Display Size : 12.1inch (10.4inch) - Page 70 Gain : 2.5, 5, 10, 15, 20 mm/mV QRS Detection range : -0.5mVpp ~ + 5mVpp ST-Level : -0.2mV ~ +0.2mV(Max : 0.01mV~0.99mV , Min : -0.99mV~ 0.01mV) Alarm Range : High alarm limit : 10~300bpm , Low alarm limit : 5~295bpm ARRHYHMIA Detect ①...
- Page 71 Alarm Range : High limit - 21 ~ 99%, OFF SpO Low limit - OFF, 20 ~ 98% SpO Pulse Range : 0 ~ 300bpm Pulse measurement Accuracy : ±2 bpm Low Perfusion : 0.1% up to 6) NIBP (Non-invasive Blood Pressure Measurement) Measurement Method : Oscillometric, Automatic measurement Display Value : Systolic, Diastolic, Mean Pressure Measurement Range :...
- Page 72 8) IBP (Invasive Blood Pressure) – Optional Measurement Range : -50 ~ 400mmHg Accuracy : ± 2mmHg Measurement Sensitivity : 1mmHg Alarm Range Display High Systolic 40 ~ 295, OFF OFF, 30 ~ 290 Diastolic 30 ~ 285, OFF OFF, 25 ~ 280 [mmHg] Mean 35 ~ 290, OFF...
- Page 73 11) Multi Gas – Optional - Transducer Type: Mainstream CO Sensor - Range(Accuracy) : Co2 : 0~15% ±(0.2% +2% of reading) N20 : 0~100% ±(2% +2% of reading) HAL, ISO, ENF : 0 ~ 8% ±(0.15% +5% of reading) SEV : 0~10% ±(0.15% +5% of reading) DES : 0~22% ±(0.15% +5% of reading) - Measurement Temperature : 0~45℃...
- Page 74 14) Trend Parameter : Heart Rate, SpO , Pulse Rate, NIBP, IBP, Temperature, EtCO 720 Hours (1 minute step : Saving data 43,200ea) 15) Interface - RS-232C port (SW Update) - SD Port (SW Update or Trend Data Backup) - LAN Port (Central Monitor) VGA Port (Display Transferring) 16) Physical Specifications - Size: 310 ×...
- Page 75 19) Option ECG Cable (3 lead type) ECG Cable (10 lead) Extension Cable Press Measuring Kit Printer Module Roll Paper EtCO Kit set (EtCO when installing) 3M Electrode (50 PCS/1SET) Battery TROLLEY (=CART) Wall Mount SKIN/ TEMP PROBE DISPOSABLE SpO2 SENSOR NIBP CUFF for Child NIBP CUFF for Neonate...
-
Page 76: Product Warranty
Tel) Fax) Name of Distributor Name of Manufacture BIONICS Co., Ltd. ● Thank you for using BPM-1200(1010). ● Only the products that have Passed our extensive and thorough quality tests are offered to our customers. ● This product is a medical device.
Need help?
Do you have a question about the BPM-1200 and is the answer not in the manual?
Questions and answers