
Related Manuals for ROLY RL-S380U


Summary of Contents for ROLY RL-S380U
- Page 1 Operating Manual Laser projector Thank you for purchasing this product. Before using this product, please read this manual carefully, and save this manual for future use.
-
Page 2: Table Of Contents
Table of Contents Important safety notice Timer button Precautions for use Image mode button Part name and function Aspect ratio button Terminal panel Display button Top control panel Menu operation Indicator Direct operation Remote control Auto adjustment Remote control operating range Horizontal position Placing the projector Vertical position... -
Page 3: Important Safety Notice
Important safety tips Important safety notice! Warning : This equipment must be grounded. Warning : To prevent damage that may result in fire or electric shocks, do not expose this appliance to rain or moisture. This device cannot be used in a direct field of view in a visual display workplace. To avoid causing disturbing reflections in the visual display workplace, it is strictly forbidden to place this device in the direct field of view. - Page 4 Important safety tips! Warning: Do not look directly ino the light emitted from the lens while using the projector. Mark on the projector Laser statement: This projector falls into the Class I laser products of IEC/EN 60825-1:2014. 2.This projector is comply with Class II laser products of IEC 64271-5: 2015 3.According to GB72471-2012“Safety of Laser Products Part 1: Classification of equipment, Requirements”this product comply...
- Page 5 Important safety tips! Warning: Power The wall outlet or the circuit breaker shall be installed near the equipment and shall be easily accessible when problems occur.. If the following problems occur, cut off the power supply immediately. Continued use of the projector in these conditions will result in fire or electric shocks or visual impairment.
- Page 6 Important safety tips! On use/installation Do not place the projector on soft materials such as carpets or sponge mats. Doing so will cause the projector to overheat, which can cause burns, fire, or damage to the projector. Do not set up the projector in humid or dusty places, or in places where the projector may come into contact with oily smoke or steam.
- Page 7 Important safety tips! Installation work should only be carried out by a qualified technician, such as lifting the projector to the ceiling. Improper fixing during installation may result in personal injury or electric shocks. ●Accessories Do not use or handle the batteries improperly, and refer to the instructions below. Failure to observe this will cause burns, batteries to leak, overheat, explode, or catch fire.
- Page 8 Important safety tips! Turn off the power and disconnect the power plug from the wall outlet before replacing the projector lens. ●Accidental projections may cause eye damage. ●If the projector lens is replaced without disconnecting the power plug, electric shocks will result.
- Page 9 Important safety tips! Accessories When not using the projector for an extended period of time, remove the batteries from the remote control. Failure to observe thiswill cause the batteries to leak, overheat, catch fire or explode, which may result in fire or contamination of the surrounding area.
- Page 10 Important safety tips! Lens protection material To protect the projector lens from vibration during handling, the lens protection material has been covered to the product at the time of purchase. Remove the lens protection material before use and save it for future use. Move the lens to its original position and cover it with the lens protection material when handling.
- Page 11 ●Screw locking torque: 4 ± 0.5 N.m. Front leg adjusters RL-A400X RL-A500X RL-A400W RL-A500W RL-A500U Screw holes for ceiling installation (M4) RL-S380X RL-S600X RL-S380W RL-S600W Screw holes for ceiling installation (M4) RL-S380U RL-S600U Front leg adjusters Position of screw holes for ceiling installation and front leg adjusters...
-
Page 12: Precautions For Use
Important safety tips! Do not stack multiple projectors. ●Do not use the projector with the top as the support. ●Do not block the projector's ventilation openings (air intake and exhaust ports). ●Avoid blowing hot and cold air from the air conditioning system directly to the ventilation openings (air intake and exhaust ports) of the projector. - Page 13 Important safety tips! Please note that these phenomena are not failures. In addition, when the same image is projected for long periods of time, the afterimage may remain on the LCD panel, in which case the entire white picture may appear for 1 hour or longer.
-
Page 14: Part Name And Function
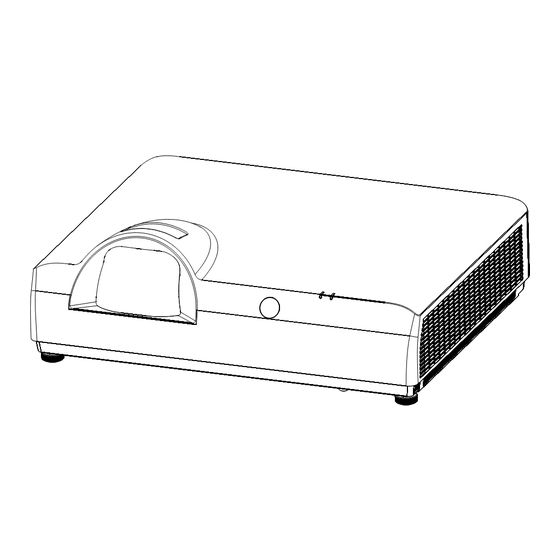
part name and function Zoom ring Focusing ring Remote control window Lens Air inlet Adjustable foot Air outlet Status indicator Safety bar Adjustable foot Air inlet Control panel Horn hole Power socket Rear remote control window Safety lock Caution Do not place anything around he vents. Otherwise, it may cause internal heat accumulation. - Page 15 part name and function Zoom ring Focusing ring Remote control window Lens Air inlet Adjustable foot Air outlet Status indicator Safety bar Adjustable foot Air inlet Control panel Horn hole Power socket Rear remote control window Safety lock Caution Do not place anything around he vents. Otherwise, it may cause internal heat accumulation.
-
Page 16: Terminal Panel
part name and function Terminal panel 3 4 5 6 7 10 11 10 11 12 Connect the computer's RGB output signal RS-232C compatible control interface. to this terminal. Connect the RS-232C interface of the computer to the RS-232C straight-through cable. - Page 17 part name and function Rear control panel ① Turn the projector on or off. ② ▲▼ VOL+,VOL- - Select an item or adjust the data in the on-screen menu. - Adjust the volume. ③ AUTO SETUP button Perform various auto settings, including “Input Source Search”. ④...
-
Page 18: Indicator
part name and function Indicator WARNING POWER Indicator Indicator POWER WARNING Indicator Indicator Standby The projector is plugged in and in standby mode. (red on) (off ) Power-on state The projector is ready to project. ( green on) (off ) Sleep mode Enter sleep mode after no signal input for a period of time. -
Page 19: Remote Control
part name and function Remote control ⑨ Exit button ① ② ③ Return to the previous menu. ⑩ Energy saving button Enter the energy saver mode. ④ ⑤ ⑦ Keystone correction button ⑥ Perform keystone correction. ⑧ ⑨ ⑩ Default setup button Enter the default mode. -
Page 20: Remote Control Operating Range
Remote control operation To ensure safe operation, observe the following : ● Use 2 AAA alkaline batteries. ● Replace two batteries at the same time. ● Do not use a new battery and an old battery at the same time. ●... - Page 21 Inch diagonal 1.431m ” XGA series 1.138m 63” LCD Panel 120 ” 0.943m 100 ” 0.845m 90 ” 0.747m 80” 0.552m 60” 0.455m 50” A : B=64 : 1 (centre) 50" 60" 80" 90" 100" 120" 150" Screen Size (W x H) m 1.016 X 0.762 1.219 X 0.914 1.625 X 1.219...
- Page 22 Remote control operation To ensure safe operation, observe the following : ● Use 2 AAA alkaline batteries. ● Replace two batteries at the same time. ● Do not use a new battery and an old battery at the same time. ●...
- Page 23 30" 80" 100" 150" 200" 300" Screen Size (W x H) m 609 x 0 626 x 1 032 x 1 048 x 2 064 x 3 096 x 4 0.89 2.41 4.54 9.10 3.02 6.06 Zoom min 1.07 2.90 3.63 5.46 7.29...
- Page 24 Connection Cable for connection ● USB storage device* ● RS232 serial interface cable * (*:This projector is not equipped with this cable.) ● HDMII cable* Audio equipment VGA cable Computer HDMI cable Blue-ray VCD with HDM I interface Serial HDMI cable Audio (straight...
-
Page 25: Network Connection
Network connection 1) Equipment: Computer, projector, cable Projector for connection Computer 2) Connection steps: Connect the projector to a LAN router or switch with a straight-through or crossover LAN cable. If the projector and computer are connected directly, use the straight-through LAN cable. LAN cable LAN cable If they cannot be connected, it is... -
Page 26: Connecting The Ac Power Cord
Connecting the AC power cord The projector uses a standard voltage of 100-240V AC power, which automatically adapts to different input voltages. This unit uses a single-phase power system with a Caution: neutral grounding The AC power outlet should be close to the projector and easily plugged and unplugged. -
Page 27: Turning On The Projector
Turning on the projector Video equipment Power socket Computer Before turning on the projector, first complete the connection of the external device. Connect the projector's AC power cord to an AC power outlet. The power indicator lights up in red. Pressthe button to turn on the projector. - Page 28 When projecting a computer image, switch the computer output to an external display. Switching output methods vary depending on the type of computer. (Example) Adjust the focus and size of the projected image Focusing zoom Focus zoom Focus...
- Page 29 Caution When adjusting the lens shift, do not look directly into the lens. When rotating the horizontal lens shift dial, the lens shift may move up and down; when rotating the vertical lens shift dial, the lens shift may move right and left. In this case, use each dial to readjust the lens shift.
- Page 30 Turn on the projector Please complete the connection of the peripheral devicefirst (with computer and video recorder, etc.)Before turning on the projector Connecting the projector's AC power cord to an AC outlet/socket, the power indicator lights up red, and the open the lens cover Please press the power button on the rear control panel or remote control, the power indicator lights The display disappears...
-
Page 31: How To Operate The On-Screen Menu
How to operate the on-screen menu menu Remote control You can adjust or set up the projector through the on-screen menu. The menu has a multi-layer structure, and each main menu is divided into a number of sub-menus, which are divided into a number of secondary sub-menus. For the steps of each adjustment and setting, refer to the corresponding section of this manual. -
Page 32: Menu Bar
Menu bar ① ① Signal menu After VGA signal input, perform auto adjustment, image display mode adjustment, hori zontal position, vertical position, phase adjustment, and clock adjustment. ② Image menu Image mode can be selected as standard, cinema, dynamic, DICOM, color version - red, color version - green, color version - blue, color version - yellow, user. -
Page 33: Auto Setup Function
Auto setup function This function can automatically execute various settings of “Auto Setup” in the setup menu (including “Input Source Search”) by simply pressing the “AUTO SETUP” button on Remote control the remote control or the “AUTO SETUP” button on the rear control panel. -
Page 34: Keystone Correction
Keystone correction If keystone distortion occurs in the projected image, manually correct the image as follows. Press the keystone correction button of the remote control and the “Keystone correction” prompt box will appear (including: Keystone correction up and down, keystone correction left and right, four-corner correction, and reset to default settings). -
Page 35: Volume Adjustment
Volume adjustment Rear control panel Operate directly, and it is recommended to use the remote +/-button control to complete the operation. Press the voice mode button on the remote control to switch between standard, presentation, user, music, etc. Volume Press +/- on the rear control panel or the VOL +/VOL - button on the remote control to adjust the volume. -
Page 36: Remote Control Operation
Remote control operation For some common operations, it is recommended to use the remote control to operate by pressing one button without the need to call the on-screen menu. Input source button Freeze Black screen button Freeze button button Press the Freeze button on the remote control to make the screen image still. -
Page 37: Black Screen Button
Black screen button Remote control Press the black screen button on the remote Input source button control, the picturedisappears and a black screen appears. Press the black button again and the picturewill return to normal. Each time the black button is pressed, the screen changes as follows: Black screen →... -
Page 38: Menu Operation
Menu operation Press the input source button on the remote control to display the input source menu. Press▲▼ buttons Input to select the input source icon, then press button or the OK button to select the input source VGA. Video Remote control Input source button Direct operation... -
Page 39: Auto Adjustment
Auto adjustment The “Auto Adjustment” function can automatically adjust the horizontal position, vertical position, phase adjustment, and clock adjustment to match your computer. Menu operation Auto computer adjustment menu Press the input source button on the remote control, press the ▲▼ button to select the input source VGA icon, and then press ►... -
Page 40: Phase Adjustment
Phase adjustment When picture jitter or picture contour blurring occurs, adjustments can be made to get the quality picture. 1)Press to select [Phase]. 2)Press the <OK> button。 3)Press to adjust the level. The adjustment range is 0 - +31. Adjust to the status of minimum interference. picture size 1)... -
Page 41: Image Display Mode
Screen size adjustment The projector has an image screen size reset function that allows the user to display the desired Image display mode image size. Press the aspect ratio button on the remote control to display the image display mode menu. -
Page 42: Video System Selection
Video system selection Input Press the input source button on the remote Video control to display the input source menu. Press▲▼ buttons to select the input source icon, then press ► button or the OK button to select the AV input. The projector can automatically detect the input video system and adjust itself to its optimum state. -
Page 43: Setup
Setup The projector has a “Setup” menu, and you can set other functions as described below. Press the Menu button on the remote control to display the menu. Press buttons to select the setting, then press buttons or the OK button to enter the sub-menu item. Press the ▲▼... - Page 44 High altitude The projector provides fan control function in the “Setup” menu. Select the operating speed of the cooling fan according to the following altitude status of the projector... Faster than the “Off” mode. When using this projector at high Highland 1 altitudes (600m –...
- Page 45 Keystone correction KeystoneUpDown Keystone correction up and down..Correct in the vertical direction. Keystone correction left and right ..Correct in the horizontal direction. KeystoneLR Four-corner correction ..Correct the four corners. Reset to default settings..Cancel the horizontal, vertical, and four-corner correction settings and restore to the original state.
- Page 46 Startup screen The startup screen uses the default as the startup screen. No... No startup screen. Default ..Display the background color of the screen. Sleep mode Off... Sleep mode is off. 5 minutes ..When there is no signal input, the projector enters sleep mode after 5 minutes.
- Page 47 Remote control lock Off ..The remote control is not locked. On ..The remote control is locked. AC direct startup On ..Plug in the power and turn it on directly. Off ..Plug in the power and the startup function is turned off. Standby mode This function can be used when operating the projector by the network in standby mode.
- Page 48 Auto setup Input source search, auto keystone correction, and auto computer adjustment Caution can be performed by pressing the AUTO SETUP button on the top control panel Only the last selected input source can or the Auto Setup button on the remote be checked.
-
Page 49: Network Control Use
Network control use Function: This function is applicable to remote control of the projector by a computer in a LAN. Preparation stage 1 Required equipment: Projector, computer, network cable; 2 Connection process: Connect the projector to a router or switch in the LAN with a straight-through or crossover cable. -
Page 50: Security Password
Security password Enter the password to enter the security password settings. The factory default password is “0000”. On Startup password lock Off..Not locked. On..Each time the projector is turned on, you will need to enter your password. Change Password You can change the password to the four digit number you want. - Page 51 Please clean the filter or replace the filter components under the following condition When displaying the change information. Network Cleaning cycle shows full 500 hours. Filter Information The internal temperature of the projector rises due to blockage, and the warning indicator lights up constantly, causing the projector to turn off.
- Page 52 部件更换 Replacement of the filter components Turn off the projector and unplug the AC power cord from the power socket Removing the dust from the projector surface and around the suction hole Handle Removing the filter components Pull the Electrostatic dustproof net ...
- Page 53 Information Displaythe model name, serial number, Signal Video Audio Setup Advanced current signalsource, signal format, Network projector usage time and software Filter version, etc. Information Adjust Select Select Back Model name : Display the model number of the machine Serial number: Machine series number Signal source: The input source selected Model name by the projector...
- Page 54 Protocol operating projector USE PJLink This projector is suitable PJLink 1Class standard。 PJLink The protocol used to control the projector command is shown below. return To control the content instruct power supply OK(correct )or ERR(mistake)3 control OK(correct )or ERR(mistake)3 Power status query 0 :standby mode 1 :Power on 2 :standby mode(refrigeration)...
- Page 55 USB VIE When the USB memory is inserted into the projector, the USB viewer function can project the pictures in the memory. USB Device compatibility Appliance storage maxi USB VIEWER(USB The Viewer)The function does not support displaying Chinese fonts。 Folder names and filenames show only alphanumeric characters. Do not use USB storage accidental storage devices, can cause a failure.
- Page 56 Images broadcast Top to bottom 1024X768 Directory play 5 second The picture playback control button is as follows: Play/pause Switch to the previous image Switch to the next image Rotating images。 Image resolution Top to bottom Directory play 5 second Play/pause: Select the play button, press OK to pause, then press continue to play, Press ok to pause and loop.
- Page 57 Image Playing playing the images from top to bottom; 5seconds Playlist The image playingmethods: Remote control▼button on the control panel,and then please rotate the picture playback mode. Optional: playing the imagefrom top to bottom, bottom to top, left to right, right to left, top left to bottom right, top right to bottom left, bottom left to top right, bottom right to top left, andexpanding the image from center to up and down, center to left and right, up and down to center, left and right to center,changing...
- Page 58 USB Video play Please Press the input signal button on the remote control to display the input source menu.According to indicate icon ▲▼indicate buttonto select input source (as picture show), and then press indicate button ► and OK button to choose USB input. Please enter the USB document file, select video, and then play it.
-
Page 59: Cleaning The Projector
部件更换 Cleaning the projector lens Cleaning the projector enclosure When not using the projector, put the projector in a carrying case to avoid dust accumulation or scra tches. The filter is used to prevent dust accumulation on the surface of the projector's internal lens components. -
Page 60: Specification Parameters
Specification parameters RL-A400X RL-A500X RL-A400W RL-A500W RL-A500U Model Display technology Liquid Crystal Display LCD panel 3x0.63” (4:3) 3x0.59” (16:10) 3x0.64” (16:10) Brightness 5000 lm 4000 lm 5000 lm 4000 lm 5000 lm WUXGA Resolution XGA (1024x768) (1920x1200) WXGA (1280x800 ) Contrast ratio 500000:1 Picture uniformity... - Page 61 Specification parameters RL-S380X RL-S600X RL-S600W RL-S380U RL-S600U RL-S380W Model Display technology Liquid Crystal Display LCD panel 3x0.63” (4:3) 3x0.64” (16:10) 4000 lm Brightness 4000 lm 5000 lm 5000 lm 4000 lm 5000 lm Resolution XGA (1024x768) WUXGA (1280x800) WUXGA (1920x1200 )
-
Page 62: Ceiling Moun Hole
External size Unit: mm 12.6 Safety measures for lifting brackets Installation of the lifting bracket should b The manufacturer shall not be responsible for the hazards and damage caused by the use of the lifting bracket that is not purchased from the franchisee even during the warranty period. - Page 63 External size Unit: mm 181.5 Safety measures for lifting brackets Installation of the lifting bracket should b The manufacturer shall not be responsible for the hazards and damage caused by the use of the lifting bracket that is not purchased from the franchisee even during the warranty period.
-
Page 64: Compatible Input Signal *1
Compatible input signal *1 Video signal HDMI and DVI... -
Page 65: Compatible Input Signal *2
Compatible input signal VGA signal • When inputting a signal that is not in the table, the image may not be displayed properly. • When the screen resolution of the input signal is different from that of the panel, the signal will not be displayed at its initial resolution. - Page 66 Indicator and projector status Check the indicators to find out the status of the projector. Indicator Projector status POWER WARNING Green/red Yellow The projector is in “Off” state (the AC power cord The projector is in standby mode, press the standby button The projector is in the normal on state.
- Page 67 RS232 control mode 1. A serial port connection 1.1 Port setting item Item Set value Communication method asynchronous communication Communication speed 19200 Long digits 8 location odd-even check stop bit traffic control 1. 2 Wired way can only use RS232 Serial cross cable connection PC and the prjector。 ...
- Page 68 Order Options Order Options User trellis diagram INPUT VGA Mute open INPUT HD BASET Mute off Screen frozen open INPUT HDMI Screen freeze off INPUT DVI Automatic search signal INPUT VIDEO adjustment INPUT USB volume volume lateral view ( blank screen ) Exit zero lateral view KEYSTONE...
- Page 69 Failure detect Check the following items again before requesting assistance from your distributor or service center: Failure Solution Power does not turn on – Insert the projector's power plug into an AC power outlet – Confirm whether the power indicator turns red. –...
- Page 70 – Color is abnormal Check the input signal, color system, video system or computer system mode. – Make sure the value of saturation in “Image Mode” is appropriate. – Auto computer adjustment function Check the input source signal. The auto computer adjustment function is is invalid invalid when selecting 480P, 576p, 720p, 480i, 576i, 1080P or 1080i.
Need help?
Do you have a question about the RL-S380U and is the answer not in the manual?
Questions and answers