Table of Contents
Advertisement
SPLIT-TYPE, HEAT PUMP AIR CONDITIONERS
SERVICE MANUAL
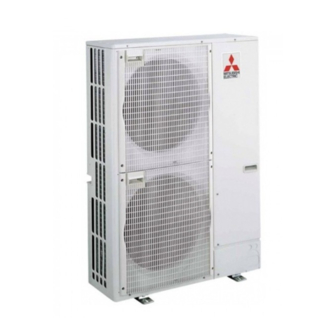
Outdoor unit
[Model Name]
PUHZ-SP100VHA
PUHZ-SP125VHA
PUHZ-SP140VHA
PUHZ-SP100YHA
PUHZ-SP125YHA
PUHZ-SP140YHA
PUHZ-SP100VHA.UK
PUHZ-SP100YHA.UK
R410A
[Service Ref.]
PUHZ-SP100VHA.UK
PUHZ-SP125VHA.UK
PUHZ-SP140VHA.UK
PUHZ-SP100YHA.UK
PUHZ-SP125YHA.UK
PUHZ-SP140YHA.UK
CONTENTS
10. TROUBLESHOOTING .................................. 24
11. FUNCTION SETTING ................................... 81
12. EASY MAINTENANCE FUNCTION ............. 91
14. DISASSEMBLY PROCEDURE ................... 102
REVISED EDITION-A
Revision:
Modified some descriptions
•
in "8-1. FIELD ELECTRICAL
WIRING" and "8-2. SEPARATE
INDOOR UNIT/OUTDOOR
UNIT POWER SUPPLIES" in
REVISED EDITION-A.
• Some other descriptions have
been also modified.
• Please void OCH566.
Notes:
• This manual describes service
data of the indoor units only.
• RoHS compliant products have
<G> mark on the spec name
plate.
1. REFERENCE MANUAL ................................. 2
2. SAFETY PRECAUTION ................................. 2
3. FEATURES ..................................................... 6
4. SPECIFICATIONS .......................................... 7
5. DATA ............................................................... 9
6. OUTLINES AND DIMENSIONS ................... 12
7. WIRING DIAGRAM ...................................... 14
8. WIRING SPECIFICATIONS .......................... 17
9. REFRIGERANT SYSTEM DIAGRAM .............. 22
PARTS CATALOG (OCB566)
January 2015
No. OCH566
Advertisement
Table of Contents

Related Manuals for Mitsubishi PUHZ-SP125VHA


Summarization of Contents
1 Reference Manual
Indoor Unit Service Manual
Details for the indoor unit's service operations.
2 Safety Precautions
Always Observe for Safety
Crucial safety guidelines and precautions before and during repair.
Cautions Related to New Refrigerant
Specific warnings and guidelines for using R410A refrigerant.
Cautions for Service
Guidelines for performing service operations safely and correctly.
Additional Refrigerant Charge
Procedures and considerations for adding refrigerant.
Service Tools
Lists necessary tools for R410A refrigerant handling.
Cautions for Refrigerant Piping Work
Thickness of Pipes
Specifications for pipe thickness to ensure safety and performance.
Dimensions of Flare Cutting and Flare Nut
Details on flare cutting dimensions and flare nuts for R410A.
Tools for R410A
Table indicating usability of conventional tools with R410A.
3 Features
Chargeless System
Explanation of the pre-charged refrigerant system for simplified installation.
4 Specifications
Outdoor Unit Refrigerant Piping
Specifications related to piping for outdoor units.
5 Data
Refilling Refrigerant Charge (R410A : kg)
Table showing refrigerant charge amounts by piping length.
Compressor Technical Data
Technical specifications for compressor winding resistance.
Noise Criterion Curves
Graphs showing sound pressure levels across different frequencies.
Standard Operation Data
Standard operating data for various models and modes.
6 Outlines and Dimensions
Free Space (Around the unit)
Recommended clearance space around the unit for installation.
Service Space
Required space for maintenance and service access.
Foundation Bolts
Requirements for securing the unit with foundation bolts.
Piping-Wiring Directions
Information on possible directions for piping and wiring connections.
Piping Knockout Hole Details
Specifications for knockout holes for piping connections.
8 Wiring Specifications
Field Electrical Wiring (Power Wiring Specifications)
Detailed specifications for field electrical wiring and power supply.
Separate Indoor Unit/Outdoor Unit Power Supplies
Connection patterns for separate power supplies for indoor and outdoor units.
Indoor – Outdoor Connecting Cable
Guidelines for indoor-outdoor connecting cable specifications and lengths.
M-NET Wiring Method
Instructions and precautions for M-NET wiring.
M-NET Address Setting
Procedure for setting M-NET addresses for central control.
Refrigerant Address Setting
How to set refrigerant addresses for indoor units.
Regulations in Address Settings
Rules and considerations for address settings in multi-unit systems.
10 Troubleshooting
Available Functions and Settings for PLA-BA
Troubleshooting (Summary)
Overview of troubleshooting based on recurring or non-recurring issues.
Check Point Under Test Run
Key checks to perform before starting a test run.
Test Run for Wired Remote Controller
Instructions for test run using the PAR-31MAA wired remote controller.
Checking the Error Information
Procedures for checking error details and history.
Error History
Viewing and deleting error history records.
Test Run for Wired Remote Controller
Test run procedures using the PAC-YT52CRA wired remote controller.
Test Run for Wireless Remote Controller
Steps for performing a test run using a wireless remote controller.
How to Proceed "Self-Diagnosis"
Guide to performing self-diagnosis with the PAR-31MAA controller.
Self-diagnosis
Guide to performing self-diagnosis with the PAR-31MAA controller.
Remote Controller Check
Diagnosing issues with the PAR-31MAA remote controller.
Self-diagnosis
Performing self-diagnosis using the PAC-YT52CRA controller.
Remote Controller Check
Checking the remote controller's functionality with the PAC-YT52CRA.
Self-diagnosis
Performing self-diagnosis with a wireless remote controller.
[Output Pattern A] Errors Detected by Indoor Unit
Error codes and symptoms detected by the indoor unit.
[Output Pattern B] Errors Detected by Unit Other Than Indoor Unit
Error codes and symptoms detected by outdoor units.
10-4. Self-Diagnosis Action Table
Table correlating check codes with diagnosis and actions.
EA (6844)
Indoor/outdoor unit communication error detection and actions.
Eb (6845)
Miswiring of indoor/outdoor unit connecting wire issues.
EC (6846)
Start-up time over error detection and resolution.
U1 (1302)
High pressure errors and their causes/actions.
U2 (1102)
High discharging temperature errors and their causes/actions.
U3 (5104)
Open/short circuit of discharge temperature thermistor errors.
U4 (TH3:5105)...
Open/short of outdoor unit thermistor errors.
U5 (4230)
Heatsink temperature abnormality errors.
U6 (4250)
Power module abnormality errors.
U8 (4400)
Outdoor fan motor abnormality errors.
U9 (4220)
Overvoltage, undervoltage, and input current errors.
UF (4100)
Compressor overcurrent interruption errors.
UH (5300)
Compressor current sensor or input current errors.
UL (1300)
Low pressure errors and their causes.
Ud (1504)
Overheat protection errors related to thermistors.
UP (4210)
Compressor overcurrent interruption errors.
E0 or E4
Remote controller communication errors.
E1 or E2
Remote controller control board errors.
E3 or E5
Remote controller transmission/signal errors.
E9 (6841)
Indoor/outdoor unit communication error (transmitting).
Ed (0403)
Serial communication errors between boards.
E8 (6840)
Indoor/outdoor unit communication error (receiving).
P8 (1110)
Pipe temperature errors in cooling and heating modes.
A0 (6600)
Duplicate address definition errors in M-NET communication.
A2 (6602)
Hardware errors in the transmission processor.
A3 (6603)
BUS BUSY errors indicating communication bus issues.
PL (1514)
Abnormal refrigerant circuit errors.
A6 (6606)
Communication errors between processors.
A7 (6607)
NO ACK signal errors in communication.
A7 (6607) - Continued
NO ACK signal errors in communication (continued).
A8 (6608)
M-NET NO RESPONSE errors.
10-5. Troubleshooting of Problems
General troubleshooting steps for common problems.
Symptoms: "PLEASE WAIT" is Kept Being Displayed on the Remote Controller
Troubleshooting guide for "PLEASE WAIT" display issues.
Symptoms: Nothing is Displayed on the Remote Controller. 1
Steps to diagnose when the remote controller display is blank.
Symptoms: Nothing is Displayed on the Remote Controller. 2
Further diagnostic steps for a blank remote controller display.
Symptoms: Nothing is Displayed on the Remote Controller. 3
Final diagnostic steps for a blank remote controller display.
Before Repair
Common customer inquiries and how to respond to them.
Sound comes out from the air conditioner.
Explanations for various sounds heard from the unit.
Something is wrong with the blower…..
Issues related to blower operation and fan speed.
Something is wrong with the airflow direction….
Problems related to airflow direction control.
The air conditioner starts operating even though any buttons on the remote controller are not pressed.
Troubleshooting unexpected unit starts.
The air conditioner stops even though any buttons on the remote controller are not pressed.
Troubleshooting unexpected unit stops.
A white mist is expelled from the indoor unit.
Explanation for white mist formation in the indoor unit.
Water or moisture is expelled from the outdoor unit.
Reasons for water or moisture expulsion from the outdoor unit.
The display of wireless remote controller gets dim or does not come on.
Troubleshooting dim or non-functional wireless remote displays.
10-6. How to Check the Parts
Procedures for checking various components using a tester.
Check Method of DC Fan Motor (Fan Motor/Outdoor Controller Circuit Board)
Steps to check DC fan motor and controller board connections.
10-7. How to Check the Components
Thermistor feature charts and resistance values.
(1) Operation Summary of the Linear Expansion Valve
Summary of linear expansion valve operation via pulse signals.
(2) Linear Expansion Valve Operation
Graphical representation of linear expansion valve position vs. pulse number.
(3) How to Attach and Detach the Coil of Linear Expansion Valve
Instructions for attaching and detaching the linear expansion valve coil.
10-8. Emergency Operation
Procedures for operating the unit in emergency mode.
(5) Operation Data During Emergency Operation
Data values used during emergency operation.
10-9. Test Point Diagram
Diagrams showing test points on the outdoor controller circuit board.
Outdoor Noise Filter Circuit Board
Diagram of the outdoor noise filter circuit board.
Outdoor Power Circuit Board
Diagram of the outdoor power circuit board with test points.
10-10. Function of Switches, Connectors and Jumpers
Explanation of DIP switch, connector, and jumper functions.
(1) Function of Switches
Explanation of DIP switch functions and settings.
(2) Function of Connectors and Switches
Details on connector functions and special settings like low-level sound priority.
(1) Normal Condition
LED indicators for normal operation status.
(2) Abnormal Condition
LED indicators and check codes for abnormal conditions.
11 Function Setting
Setting various functions of the unit using the remote controller.
11-1. Unit Function Setting by the Remote Controller
How to set unit functions using the wired remote controller.
Need help?
Do you have a question about the PUHZ-SP125VHA and is the answer not in the manual?
Questions and answers