Yamaha YSP-CU3300 Service Manual
Hide thumbs
Also See for YSP-CU3300:
- Quick reference manual (2 pages) ,
- Owner's manual (80 pages) ,
- Owner's manual (98 pages)
Table of Contents
Advertisement
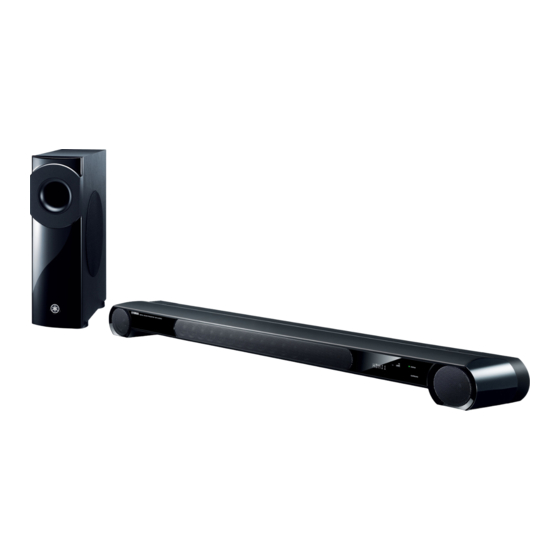
DIGITAL SOUND PROJECTOR
CENTER UNIT
WIRELESS SUBWOOFER
The YSP-4300 consists of the YSP-CU4300 and NS-WSW160.
The YSP-3300 consists of the YSP-CU3300 and NS-WSW160.
YSP-4300 は、YSP-CU4300 および NS-WSW160 で構成されています。
YSP-3300 は、YSP-CU3300 および NS-WSW160 で構成されています。
This manual has been provided for the use of authorized Yamaha Retailers and their service personnel.
It has been assumed that basic service procedures inherent to the industry, and more specifi cally Yamaha Products, are already known
and understood by the users, and have therefore not been restated.
WARNING:
IMPORTANT:
The data provided is believed to be accurate and applicable to the unit(s) indicated on the cover. The research, engineering, and service
departments of Yamaha are continually striving to improve Yamaha products. Modifi cations are, therefore, inevitable and specifi cations
are subject to change without notice or obligation to retrofi t. Should any discrepancy appear to exist, please contact the distributor's
Service Division.
WARNING:
IMPORTANT:
■ CONTENTS
TO SERVICE PERSONNEL ............................................2
SYSTEM COMPOSITION / システム構成 .......................3
FRONT PANELS .........................................................4-6
REAR PANELS ......................................................... 7-15
REMOTE CONTROL PANELS ..................................... 16
SPECIFICATIONS / 参考仕様 ................................. 17-22
INTERNAL VIEW ..........................................................23
SERVICE PRECAUTIONS / サービス時の注意事項 .....24
DISASSEMBLY PROCEDURES / 分解手順 ...........25-36
UPDATING FIRMWARE /
ファームウェアのアップデート ............................37-53
システムモデル名と仕向け先の書き込み ..............54-56
1 0 1 2 5 2
YSP-CU4300/YSP-CU3300
IMPORTANT NOTICE
Failure to follow appropriate service and safety procedures when servicing this product may result in personal injury,
destruction of expensive components, and failure of the product to perform as specifi ed. For these reasons, we advise
all Yamaha product owners that any service required should be performed by an authorized Yamaha Retailer or the
appointed service representative.
The presentation or sale of this manual to any individual or fi rm does not constitute authorization, certifi cation or
recognition of any applicable technical capabilities, or establish a principle-agent relationship of any form.
Static discharges can destroy expensive components. Discharge any static electricity your body may have
accumulated by grounding yourself to the ground buss in the unit (heavy gauge black wires connect to this buss).
Turn the unit OFF during disassembly and part replacement. Recheck all work before you apply power to the unit.
Copyright © Yamaha Corpration All rights reserved.
This manual is copyrighted by Yamaha and may not be copied or
redistributed either in print or electronically without permission.
YSP-4300/YSP-3300
NS-WSW160
SERVICE MANUAL
ダイアグ(自己診断機能) .....................................57-80
DISPLAY DATA .......................................................81-82
IC DATA ................................................................. 83-107
BLOCK DIAGRAM ...............................................108-111
PRINTED CIRCUIT BOARDS ............................. 112-125
PIN CONNECTION DIAGRAMS ................................. 126
SCHEMATIC DIAGRAMS ................................... 127-137
REPLACEMENT PARTS LIST ............................ 139-165
REMOTE CONTROL ........................................... 166-169
ADVANCED SETUP .................................................... 170
P.O.Box 1, Hamamatsu, Japan
'12.11
Advertisement
Table of Contents

Related Manuals for Yamaha YSP-CU3300


Summarization of Contents
TO SERVICE PERSONNEL
Critical Components Information
Details on components with special characteristics and their replacement requirements.
Leakage Current Measurement (For 120V Models Only)
Procedure to verify insulation of exposed conductive surfaces after servicing.
Labels
U, C models
Label information for U and C model variants.
T model
Label information for T model variant.
K model
Label information for K model variant.
A model
Label information for A model variant.
B, G, F models
Label information for B, G, and F model variants.
SPECIFICATIONS / 参考仕様
Amplifier Section / アンプ部
Detailed specifications for the amplifier section, including rated output and harmonic distortion.
HDMI Section / HDMI 部
Specifications related to HDMI connectivity, content protection, audio, and video formats.
FM Tuner Section / FM チューナー部 [YSP-CU4300]
FM tuner specifications including tuning range and frequency step.
Speaker Section / スピーカー部
Specifications for subwoofer and tweeter drivers, including frequency response and impedance.
General / 総合
Power and Consumption
Details on power supply voltage, operation, and standby power consumption.
Dimensions (W x H x D) / 寸法(幅 × 高さ × 奥行き)
Physical dimensions of the YSP-CU4300 and YSP-CU3300 units.
Finish / 仕上げ
Available color finishes for the unit models.
Accessories / 付属品
List of items included with the product.
DISASSEMBLY PROCEDURES / 分解手順
1. Removal of Rear Cover
Step-by-step instructions for removing the rear cover, including screw and IR bar removal.
2. Removal of Bottom Panel
Instructions for removing the bottom panel by unscrewing and lifting it.
UPDATING FIRMWARE / ファームウェアのアップデート
Method / 方法
Details on the three methods for writing firmware: USB, CD, and PC (RS-232C).
Confirmation of firmware version and checksum
Procedure to check firmware version and checksum using the self-diagnostic menu.
Initializing the back-up IC
Steps to initialize the back-up IC (EEPROM) after firmware update for proper setting storage.
Updating the main microprocessor firmware
Connection
Connecting PC to unit for firmware update via RS-232C conversion adaptor.
Switches Setting / スイッチ設定
Setting the switches on the RS-232C conversion adaptor for firmware writing mode.
Updating the AirWired microprocessor firmware
Connection
Connecting PC to unit for firmware update via RS-232C conversion adaptor.
Switches Setting / スイッチ設定
Setting the switches on the RS-232C conversion adaptor for firmware writing mode.
WRITING SYSTEM MODEL NAME AND DESTINATION / システムモデル名と仕向け先の書き込み
Preparation
Steps to disconnect power and remove specific parts before writing model name and destination.
Operation procedure
Steps to write model name and destination using self-diagnostic and SET INFORMATION menu.
SELF-DIAGNOSTIC FUNCTION / ダイアグ(自己診断機能)
No. Main menu No. Sub-menu
List of main and sub-menu items for self-diagnostic functions, covering DSP, test signals, and display checks.
PORT DETECTION
Sub-menu for checking port status, including PORT CHECK and EMC TEST.
PROTECTION HISTORY
Displays history of protection function activation, categorized by history number.
SET INFORMATION
Menu to write model name and destination to EEPROM.
MICROPROCESSOR INFORMATION
Displays firmware version and checksum for microprocessors, DSP, HDMI/OSD, and AirWired.
Details of Self-Diagnostic Function menu
1. DSP THROUGH
Menu to select volume level and output signal in digital full bit.
7. LOOPBACK CHECK
7-1. RS-232C TxRx DATA
Checks transmission and reception of RS-232C data.
7-2. RS-232C HARD FLOW
Checks operation of RS-232C flow port.
7-3. AirWired UART
Checks transmission and reception of AirWired data.
7-5. SUBWOOFER PRE OUT
Checks subwoofer PRE OUT by connecting to analog input and detecting signal.
9. AD DATA CHECK
9-1. KEY
Displays the voltage at pin KEY1 of microprocessor IC701.
9-2. DC
Checks DC voltage protection value of speaker output for center channel.
9-3. DIGITAL AMP
Checks power supply voltage for digital amplifier (+26D, +5VP_A, +3.3D).
p. SET INFORMATION
p-1. SYSTEM MODEL NAME and DESTINATION
Procedure to write model name and destination to EEPROM using remote control keys.
p-2. FIRMWARE VERSION
Displays the current firmware version of the unit.
q. MICROPROCESSOR INFORMATION
q-1. MICROPROCESSOR VERSION
Displays firmware version for the microprocessor (IC701).
q-2. MICROPROCESSOR CHECKSUM
Displays checksum value for the microprocessor (IC701).
q-5. HDMI/OSD VERSION
Displays firmware version for the HDMI/OSD controller (IC101).
q-7. USB VERSION (YSP-CU4300)
Displays firmware version for the USB HOST (IC302).
■ DISPLAY DATA
● PIN CONNECTION
Diagram showing pin assignments for the V901 component on the POWER P.C.B.
● GRID ASSIGNMENT
Diagram illustrating the grid assignment for the display segments.
■ IC DATA
IC101: SII9573CTUC (DIGITAL P.C.B.) HDMI port processors
Data for IC101, the HDMI port processor, detailing pin functions.
■ BLOCK DIAGRAMS
AUDIO Section Block Diagram
Block diagram illustrating the audio signal flow and component connections.
■ PRINTED CIRCUIT BOARDS
DIGITAL (Side A)
Component layout diagram for the DIGITAL PCB (Side A).
■ PIN CONNECTION DIAGRAMS
• ICs
Pin connection diagrams for various integrated circuits.
• Transistors
Pin connection diagrams for transistors.
• Diodes
Pin connection diagrams for diodes.
■ SCHEMATIC DIAGRAMS
DIGITAL 1/4
Schematic diagram for the DIGITAL section, covering input and control circuitry.
■ REPLACEMENT PARTS LIST
ELECTRICAL COMPONENT PARTS
List of electrical components with part numbers, descriptions, and remarks.
■ ADVANCED SETUP
TURN ON VOLUME
Sets the volume level when the unit is powered on.
MAX VOLUME
Sets the maximum allowable volume level for the unit.
INPUT LOCK
Enables or disables the INPUT key functionality on the front panel.
FW UPDATE
Allows confirmation of firmware version and updating the firmware.
INITIALIZE
Resets all unit settings to their factory default values.
Need help?
Do you have a question about the YSP-CU3300 and is the answer not in the manual?
Questions and answers