Yaesu FT-250R - ANNEXE 824 Manual
Hide thumbs
Also See for FT-250R - ANNEXE 824:
- Operating manual (44 pages) ,
- Technical supplement (33 pages)
Table of Contents
Advertisement
Quick Links
FT-250R
O
M
PERATING
ANUAL
VERTEX STANDARD CO., LTD.
4-8-8 Nakameguro, Meguro-Ku, Tokyo 153-8644, Japan
VERTEX STANDARD
US Headquarters
10900 Walker Street, Cypress, CA 90630, U.S.A.
YAESU UK LTD.
Unit 12, Sun Valley Business Park, Winnall Close
Winchester, Hampshire, SO23 0LB, U.K.
VERTEX STANDARD HK LTD.
Unit 1306-1308, 13F., Millennium City 2, 378 Kwun Tong Road,
Kwun Tong, Kowloon, Hong Kong
VERTEX STANDARD AUSTRALIA PTY., LTD.
Tally Ho Business Park, 10 Wesley Court, East Burwood, VIC, 3151
Advertisement
Table of Contents

Related Manuals for Yaesu FT-250R - ANNEXE 824


Summary of Contents for Yaesu FT-250R - ANNEXE 824
- Page 1 4-8-8 Nakameguro, Meguro-Ku, Tokyo 153-8644, Japan VERTEX STANDARD US Headquarters 10900 Walker Street, Cypress, CA 90630, U.S.A. YAESU UK LTD. Unit 12, Sun Valley Business Park, Winnall Close Winchester, Hampshire, SO23 0LB, U.K. VERTEX STANDARD HK LTD. Unit 1306-1308, 13F., Millennium City 2, 378 Kwun Tong Road, Kwun Tong, Kowloon, Hong Kong VERTEX STANDARD AUSTRALIA PTY., LTD.
-
Page 2: Table Of Contents
Contents Introduction .......... 1 Memory Operation ......18 Controls & Connectors ......2 Memory Storage ........18 Storing Independent Trasmit Accessories & Options ......3 Frequencies (“Odd Splits”) ..18 Basic Operation ........4 Memory Recall ......... 18 Battery Pack Installation and Removal ..4 Memory Offset Tuning ...... - Page 3 VOL K RANSMISSION WITCH OWER WITCH AND Rotate the VOL/PWR knob to turn the Speak into the microphone radio on and adjust the Audio Volume in a normal voice level while Level. pressing the PTT switch. DIAL K REQUENCY Rotate the DIAL Knob to select the operating frequency.
- Page 4 VERVIEW Press [ F/L ] + Key Press Key Frequency entry digit “1.” Activates the CTCSS or DCS Operation. Frequency entry digit “2.” Selects the CTCSS tone or DCS code number. Frequency entry digit “3.” Selects the desired transmit power out- put level.
-
Page 5: Introduction
The liquid crystal display shows seven frequency digits, memory selection, CTCSS tone frequency, and includes a bargraph S/PO meter. Yaesu’s power saver system can be set by the operator for optimum sampling/standby ratio, or can be turned off for packet opera- tion. -
Page 6: Controls & Connectors
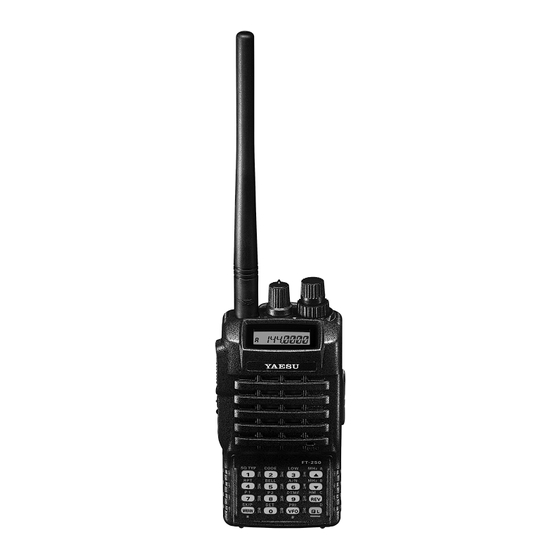
Controls & Connectors VOL/PWR Knob BUSY/TX Indicator Lamp ANTENNA Jack DIAL Rotary Selector SQL Control LCD (Liquid Crystal Display) PTT Button MIC/SP Jack Monitor (T.CALL) Button EXT DC Jack LAMP Button Speaker Microphone Keypad Battery Pack Latch Tone Encoder/Squelch Enabled Digital Coded Squelch Priority Channel Scanning DTMF Memory Mode... -
Page 7: Accessories & Options
Soft Case Availability of accessories may vary: some accessories are supplied as standard per local regulations and requirements, others may be unavailable in some regions. Check with your Yaesu dealer for additions to the above list. FT-250R O PERATING ANUAL... -
Page 8: Basic Operation
Basic Operation ATTERY NSTALLATION AND EMOVAL To install the battery, hold the transceiver with your left hand, so your palm is over the speaker and your thumb is on the top of the belt clip. Insert the battery pack into the battery compartment on the back of the radio while tilting the Belt Clip outward, then close the Battery Pack Latch until it locks in place with a “Click.”... -
Page 9: Antenna Installation
Basic Operation Important Notes! Do not connect an improper AC Adapter. Use only the supplied PA-38 AC Adapter. Do not charge an improper battery (one not specifically designed for use in the PA-38/CD-30). Disconnect the pack from the CD-30 Desktop Charger, and unplug the PA-38 AC Adapter from the AC line outlet, when charging is completed. -
Page 10: Switching Power On And Off
Basic Operation WITCHING OWER N AND Be sure the battery pack is installed. Connect the antenna to the top panel ANTENNA jack. Switch on the transceiver by rotating the VOL control clockwise out of the click-stop (a momentary beep will sound). -
Page 11: Frequency Navigation
Basic Operation REQUENCY AVIGATION Press the [ VFO ( PRI ) ] button, if necessary, to select the VFO mode. The FT-250R has two VFOs, labeled “A” and “B,” either of which can be used for all of the procedures described in this manual. -
Page 12: Repeater Operation
Basic Operation EPEATER PERATION The ARS (Automatic Repeater Shift) feature in the FT-250R provides repeater shift of the transmit frequency whenever you are tuned to a standard repeater subband (see dia- gram below). When enabled, a small “–” or “+” will be displayed in the upper left-hand corner of the display, signifying that repeater shift is active, and closing the push-to-talk switch changes the display to the (shifted) transmit frequency. -
Page 13: Setting Repeater Tx Offset
Basic Operation Setting repeater Tx Offset Although you should keep the repeater offset programmed to that used in your area, you can change the default repeater offset for special applications: Press the [ F/L ] key, then immediately press the [ 0 ( SET ) ] key to enter the Set mode. Rotate the DIAL to select Menu Item #4 (“SHIFT SHIFT SHIFT... -
Page 14: Advanced Operation
Advanced Operation VFO S PLIT For working on repeaters with odd splits, or communicating with astronauts on orbiting space vehicles, it may be necessary to use non-standard splits between the receive and transmit frequency. If the application is infrequent enough not to warrant the dedication of a memory channel for this purpose, the “VFO Split”... -
Page 15: Tx Battery Saver
Advanced Operation Rotate the DIAL to select the desired “Sleep” duration. The selections available are 200 ms, 300 ms, 500 ms, 1 second, and 2 seconds, or OFF. The default value is 200 ms. When you have made your selection, press the PTT key to save the new setting and exit to normal operation. -
Page 16: Automatic Power-Off (Apo) Feature
Advanced Operation ( APO ) F UTOMATIC OWER EATURE The APO feature helps conserve battery life by automatically turning the radio off after a user-defined period of time within which there has been no dial or key activity. The avail- able selections for the time before power-off are 0.5/1/3/5/8 hours, as well as APO Off. -
Page 17: Disabling The Key Pad Beeper
Advanced Operation ISABLING THE EYPAD EEPER If the keypad’s Beeper creates an inconvenience, it may easily be disabled. Press the [ F/L ] key, then press the [ 0 ( SET ) ] key to enter the Set mode. Rotate the DIAL to select Menu Item #16 (“KEY BP KEY BP KEY BP KEY BP... -
Page 18: Tone Calling (1750 Hz)
Advanced Operation ( 1750 Hz ) ALLING If the repeaters in your country require a 1750-Hz burst tone for access (typically in Eu- rope), you can set the MONI key to serve as a “T ” switch instead. To change the configuration of this switch, we again use the Menu to help us. -
Page 19: Ctcss Operation
Advanced Operation CTCSS O PERATION Many repeater systems require that a very-low-frequency audio tone be superimposed on your FM carrier in order to activate the repeater. This helps prevent false activation of the repeater by radar or spurious signals from other transmitters. This tone system, called “CTCSS”... -
Page 20: Dcs Operation
Advanced Operation DCS O PERATION Another form of tone access control is Digital Code Squelch, or DCS. It is a newer, more advanced tone system which generally provides more immunity from false paging than does CTCSS. The DCS Encoder/Decoder is built into your FT-250R, and operation is very similar to that just described for CTCSS. -
Page 21: Tone Search Scanning
Advanced Operation EARCH CANNING In operating situations where you don’t know the CTCSS or DCS tone being used by another station or stations, you can command the radio to listen to the incoming signal and scan in search of the tone being used. Two things must be remembered in this regard: You must be sure that your repeater uses the same tone type (CTCSS vs. -
Page 22: Memory Operation
Memory Operation The FT-250R provides a wide variety of memory system resources. These include: 199 “Standard” memory channels, numbered “1 1 1 1 1 ” through “199 199.” A Home channel, allowing storage and quick recall of one prime frequency. Five sets of band-edge memories also known as “Programming Memory Scan”... -
Page 23: Memory Offset Tuning
Memory Operation EMORY FFSET UNING Once you have recalled a particular memory channel, you may easily tune off that chan- nel, as though you were in the “VFO” mode. With the FT-250R in the “MR MR” (Memory Recall) mode, select the desired memory channel. -
Page 24: Masking Memories
Memory Operation desired label. A total of seven characters may be used in the creation of a label. When you have programmed a label which is under 7 characters, press and hold in the [ F/L ] key for one second to confirm the label (if the label is exactly 7 characters in length, you do not need to press and hold in [ F/L ] key). -
Page 25: Scanning
Scanning The FT-250R allows you to scan just the memory channels, the entire operating band, or a portion of that band. It will halt on signals encountered, so you can talk to the station(s) on that frequency, if you like. Scanning operation is basically the same in each of the above modes. -
Page 26: Memory Scanning
Scanning EMORY CANNING Memory scanning is similarly easy to initiate: Set the radio to the Memory mode by pressing the [ MR/MW ( SKIP ) ] key, if necessary. Press and hold in the [ ( MHz ) ] / [ ( MHz ) ] key for 1/2 second to initiate scanning. As with VFO scanning, the scanner will halt on any signal encountered that is strong enough to open the squelch;... -
Page 27: Automatic Lamp Illumination
Scanning UTOMATIC LLUMINATION ON The FT-250R will automatically illuminate the LCD Lamp whenever the scanner stops on a signal (the default condition for this feature is “ON”). The procedure for disabling the Scan Lamp is: Press the [ F/L ] key, then press the [ 0 ( SET ) ] key, to enter the Set mode. Rotate the DIAL to select Menu #8 (“SCN LMP SCN LMP SCN LMP... -
Page 28: Setting The Smart Search Mode
Scanning Setting the Smart Search Mode Press the [ F/L ] key, then press the [ 0 ( SET ) ] key, to enter the Set mode. Rotate the DIAL to select Menu #31 (“SMT MOD SMT MOD SMT MOD SMT MOD SMT MOD”). - Page 29 Scanning Memory-Memory mode Store a frequency that you want to use as the Dual Watch “Priority” channel into memory “1 1 1 1 1 .” Set the radio to the Memory mode by pressing the [ MR/MW ( SKIP ) ] key. Rotate the DIAL to select the channel on which you wish to operate while periodically checking for activity on channel “1”...
-
Page 30: Dtmf Operation
DTMF Operation DTMF T You can generate DTMF tones during transmission manually. Press the switch to begin transmission. While transmitting, press the desired numbers on the keypad. When you have sent all the digits desired, release the key. DTMF A Nine DTMF Autodial memories are provided, allowing you to store telephone numbers for autopatch use. -
Page 31: Arts Operation
ARTS Operation (Automatic Range Transponder System) The ARTS feature uses DCS signaling to inform both parties when you and another ARTS- equipped station are within communications range. This may be particularly useful during Search-and Rescue situations, where is important to stay in contact with other members of your group. -
Page 32: Arts Polling Time Options
ARTS Operation (Automatic Range Transponder System) ARTS P OLLING PTIONS The ARTS feature may be programmed to poll every 15 seconds (default value) or 25 seconds. The default value provides maximum battery conservation, because the polling signal is sent out less frequently. To change the polling interval: Press the [ F/L ] key, then press the [ 0 ( SET ) ] key, to enter the Set mode. -
Page 33: To Activate The Cw Identifier
ARTS Operation (Automatic Range Transponder System) Press the [ F/L ] key, then press the [ F/L ] key again, to begin entry of the letters and numbers in your callsign. Rotate the DIAL to select the first letter or number in your callsign. When the correct character has been selected, press the [ ( MHz ) ] key to move on to the next character. -
Page 34: Interface Of Packet Tncs
The FT-250R may be used for Packet operation, using the optional CT-44 microphone adapter (available from your Yaesu dealer) for easy interconnection to commonly-avail- able connectors wired to your TNC. You may also build your own cable using a four- conductor miniature phone plug, per the diagram below. -
Page 35: Cloning
Cloning The FT-250R includes a convenient “Clone” feature, which allows the memory and con- figuration data from one transceiver to be transferred to another FT-250R. This can be particularly useful when configuring a number of transceivers for a public service opera- tion. -
Page 36: Set Mode
Set Mode The FT-250R Set (Menu) mode is easy to activate and set. Use the following procedure: Press the [ F/L ] key, then press the [ 0 ( SET ) ] key, to activate the Set mode. Turn the DIAL to select the Menu item number to be adjusted. Press the [ F/L ] key momentarily, then rotate the DIAL to adjust or select the parameter to be changed on the Menu item selected in above step. - Page 37 Set Mode Item # Menu Item Function Available Values Default DT DLY Select the DTMF Autodialer delay time 450 ms/750 ms 450 ms Program and activate the ANI Identifier – – BATT Indication of the Supply Voltage – – Enable/Disable skipping of a memory during SKIP ON/OFF scanning...
- Page 38 Set Mode Set Item 9 [ RX SAVE ] Function: Select the Receive-mode Battery Saver interval (“Sleep” ratio). Available Values: OFF/200ms(1:1)/300ms(1:1.5)/500ms(1:2.5)/1s(1:5)/2s(1:10) Default: 200ms(1:1) Set Item 10 [ TX SAVE ] Function: Enable/disable the Transmit Battery Saver. Available Values: ON/OFF Default: OFF Set Item 11 [ APO ] Function: Set the Automatic Power-Off time.
- Page 39 Set Mode Set Item 18 [ BELL ] Function: Select the number of CTCSS Bell ringer repetitions. Available Values: OFF/1/3/5/8/REPEAT Default: OFF Set Item 19 [ MON/TCL ] Function: Select the MONI key (just below the PTT switch) function. Available Values: MONI/T.CALL Default: Depends on the transceiver version.
- Page 40 Set Mode Set Item 25 [ SQL TYP ] Function: Select the Tone Encoder and/or Decoder mode. Available Values: OFF/T/TSQ/DCS Default: OFF CTCSS Encoder TSQ: CTCSS Encoder/Decoder DCS: Digital Coded Squelch Encoder/Decoder Set Item 26 [ TN SET ] Function: Setting of the CTCSS Tone Frequency Available Values: 39 standard CTCSS tones Default: 100 Hz In this mode, press the [ F/L ] key, then press the PTT key, to save the new setting and exit...
- Page 41 Set Mode Set Item 31 [ SMT MOD ] Function: Select the Smart Search sweep mode. Available Values: SINGLE/CONT Default: SINGLE SINGLE: The transceiver sweeps the current band once in each direction starting on the current frequency. All channels where activity is present (up to 15 in each direc- tion) are loaded into the Smart Search memories.
- Page 42 Set Mode FT-250R O PERATING ANUAL...
-
Page 43: Specifications
Specifications GENERAL RX: 140 to 174 MHz Frequency coverage: TX: 144 to 146 (148) MHz 5, 10, 12.5, 15, 20, 25 & 50 kHz Channel steps: 600 kHz Standard repeater shift: F2D, F3E Emission type: Nominal: 7.2 V DC, Negative Ground Supply voltage: Operating: 6.0 to 16.0 VDC, Negative Ground (EXT DC Jack) - Page 44 Copyright 2011 VERTEX STANDARD CO., LTD. All rights reserved No portion of this manual may be reproduced without the permission of VERTEX STANDARD CO., LTD. Printed in China...
Need help?
Do you have a question about the FT-250R - ANNEXE 824 and is the answer not in the manual?
Questions and answers