Table of Contents
Advertisement
Quick Links
Advertisement
Table of Contents

Subscribe to Our Youtube Channel
Related Manuals for AUDIOLINE FF893


Summary of Contents for AUDIOLINE FF893
- Page 1 FF893 Cordless telephone with digital answering system This equipment is not designed for making emergency telephone calls when the power fails. Alternative arrangements should be made for access to the emergency services. User guide Downloaded from: http://www.guardianalarms.net...
-
Page 2: Important Information
AUDIOLINE FF893 SAFETY INFORMATION IMPORTANT INFORMATION Use only AUDIOLINE approved cadmium-free NiMH rechargeable battery pack within the handset. Never use other packs. Your replacement packs are available from DORO Australia and many leading retailers. Do not use any power supply except the one provided (Approval No. N/12462). -
Page 3: Table Of Contents
CONTENTS AUDIOLINE FF893 LIST OF CONTENTS Handset functions ..........2 . -
Page 4: Handset Functions
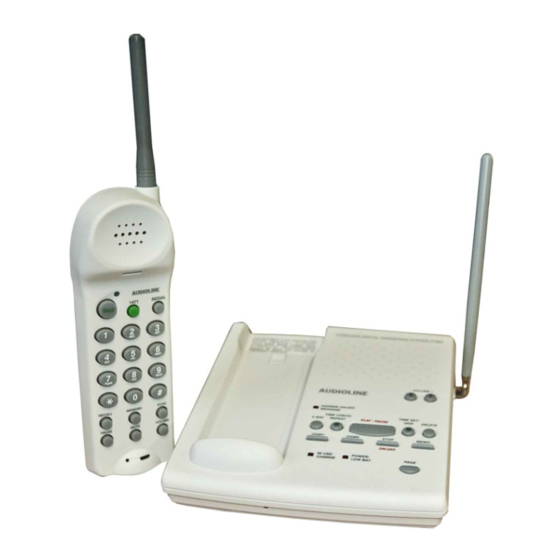
AUDIOLINE FF893 INSTALLATION HANDSET FUNCTIONS 1. Antenna Call Waiting button 2. Earpiece 10. Redial button 3. Talk LED 11. Scan button 4. Talk Button 12. Volume button 5. Keypad 13. Mute button 6. Memory button 14. Charging contacts 7. Recall button... -
Page 5: Base Unit Functions
T/S, 6, 2 ring select 4. Answering machine function keys 10. 180/ 60 Incoming message time 5. Page button Ringer On/Off switch 6. Power / Low Battery LED 12. Connect to the FF893 power supply 13. Connect to the telephone line... -
Page 6: Positioning The Base Unit
AUDIOLINE FF893 INSTALLATION POSITIONING THE BASE UNIT It is essential for best performance of the telephone system that the base unit be positioned properly in your home or office. Place the base unit close to a telephone network socket and a 230/240 volt mains outlet. -
Page 7: Handset Battery Installation
# Connect the telephone line cord to the rear of the base unit and plug into the telephone network socket. # Your FF893 is now ready for use. HANDSET BATTERY CARE For maximum life from your battery, do the following: # After initial charging the base unit must remain connected to the mains power. -
Page 8: Making A Call
AUDIOLINE FF893 TELEPHONE MAKING A CALL Press the button. [TALK] # Dial the telephone number. # # To terminate the call, press the button or replace the handset on the base [TALK] unit. RECEIVING A CALL When an external call is received, the base unit will ring first and the in-use LED will flash. -
Page 9: Range Warning
TELEPHONE AUDIOLINE FF893 RANGE WARNING If you are on a call using the handset and move out of range of the base unit, the sound quality in the handset earpiece will de-grade and the out of range alarm will be heard. -
Page 10: Storing Memory Numbers
AUDIOLINE FF893 TELEPHONE MEMORY NUMBERS Nine of your most frequently used telephone numbers can be stored in the memory. Storing of numbers should be done via the handset. STORING MEMORY NUMBERS To store numbers in memory do the following: # Press and release the... -
Page 11: Call Waiting
TELEPHONE AUDIOLINE FF893 CALL WAITING Your telephone lets you take advantage of the Call Waiting service supplied by Telstra (Australia). With the call waiting service activated do the following: # When a call comes in while you are on the phone, you will hear the Call Waiting beeps. -
Page 12: Setting The Clock
AUDIOLINE FF893 ANSWERING SYSTEM SETTING THE CLOCK It is necessary to set the internal clock in the system to the current time. To set the time do the following: # Press the button until you hear “Sunday”. [TIME/SET/SKIP] # Press to forward to the day required. -
Page 13: The Outgoing Messages (Ogm)
ANSWERING SYSTEM AUDIOLINE FF893 THE OUTGOING MESSAGES (OGM) OGM1 - PRE-RECORDED MESSAGE # Your answering system is pre-recorded with the following message to your caller: ‘Please leave your message after the tone’ # To listen to this message, press and release the button. -
Page 14: Message Playback
# Press PLAY/PAUSE while a message is playing to pause playback. Press again to continue playback. You will hear a tone every second when paused. After pausing for 2 minutes the FF893 will continue playback automatically. # Press DELETE while a message is playing to erase the current message. -
Page 15: Memo Recording
ANSWERING SYSTEM AUDIOLINE FF893 MEMO RECORDING Instead of writing notes on paper you can inform your family/office by recording a memo. The family or office staff can access the memo to get your message. To record a memo message do the following. -
Page 16: Remote Access
AUDIOLINE FF893 REMOTE ACCESS REMOTE ACCESS Your FF893 allows you to control the system from an outside phone. ENTERING REMOTE CONTROL To enter the remote control mode, do the following: # Call your phone from a tone dialling telephone. # When you hear the greeting, enter the 3-digit security code after the beep (located on the bottom of the base unit). -
Page 17: Memory Full
If you forget to switch your system on before leaving home, simply do the following: # Call your telephone number, the FF893 will answer after 12 rings. # Enter your 3-digit security code after the beep (you have 20 seconds). -
Page 18: Troubleshooting
Electronic equipment like TV’s, computers, etc., can emit strong electro magnetic fields which can affect the radio signals. Try not to locate your FF893 next to this type of equipment and ensure that the power and line cords are separated from other electrical units. -
Page 19: Warning
OTHERS AUDIOILNE FF893 THE HANDSET WILL NOT CONNECT WITH AN INCOMING CALL WHEN THE BASE UNIT RINGS P Because this is a cordless telephone, the ringing signal has to be transmitted to the handset which can take a few seconds. It is important that a call is not picked-up on the handset until the handset rings. -
Page 20: Ren, Cleaning & Gurantee
1 telephone to your telephone line. Your telephone line has a maximum REN capacity of 3 (RN of 5). Your Audioline FF893 has a REN of 1 (RN of 1), thus it is feasible to connect 2 (4) more telephones of a value of 1 to your system. -
Page 21: Wall Bracket Installation Guide
WALL MOUNTING AUDIOLINE FF893 WALL BRACKET INSTALLATION GUIDE 1. Put the telephone mounting bracket template on part of the wall which is free from obstructions and wiring. 2. Using a pencil, mark the two required fixings. Drill holes if required. -
Page 22: Notes For Operation In New Zealand
AUDIOLINE FF893 OTHERS NOTES FOR OPERATION IN NEW ZEALAND ALL PRODUCTS The grant of a Telepermit for any item of terminal equipment indicates only that Telecom has accepted that the item complies with the minimum conditions for connection to its network. It indicates no endorsement of the product by Telecom, nor does it provide any sort of warranty.
Need help?
Do you have a question about the FF893 and is the answer not in the manual?
Questions and answers