Advertisement
Preparing the Spray Material
The paints usually need to be diluted for use with the spray gun. You will find guidelines for sprayable dilutions in the following viscosity table (viscosity = consistency of the paint). You can achieve the correct dilution by using the viscosity test cup.
| Handling Table for Viscosity | ||
| Spray Material | Viscosity: (Runout time in seconds) | |
 |  | |
| Thinner-soluble varnishes/ primers | 20-35 | 20-45 |
| Water-soluble varnishes / primers | 20-50 | 20-60 |
| Automobile spray paint | 18-22 | 18-22 |
| Wood preservatives, disinfectants, plant protectants, polishes, strippers, oils | undiluted | |
| Hammer effect enamel | 25-35 | 30-45 |
| Aluminium paints | 20-30 | 20-30 |
Measuring the Viscosity
Dip the viscosity test cup (Illus. 1) completely into the spray material. Hold the test cup up and measure the time (in seconds) until the liquid empties out. Compare the measured "runout time" with the Viscosity Table.

Start-up
Before connecting to the mains supply, please be sure that the supply voltage is identical with the value given on the rating plate (on the side of the spray gun).
- Dilute the spray material according to the above table.
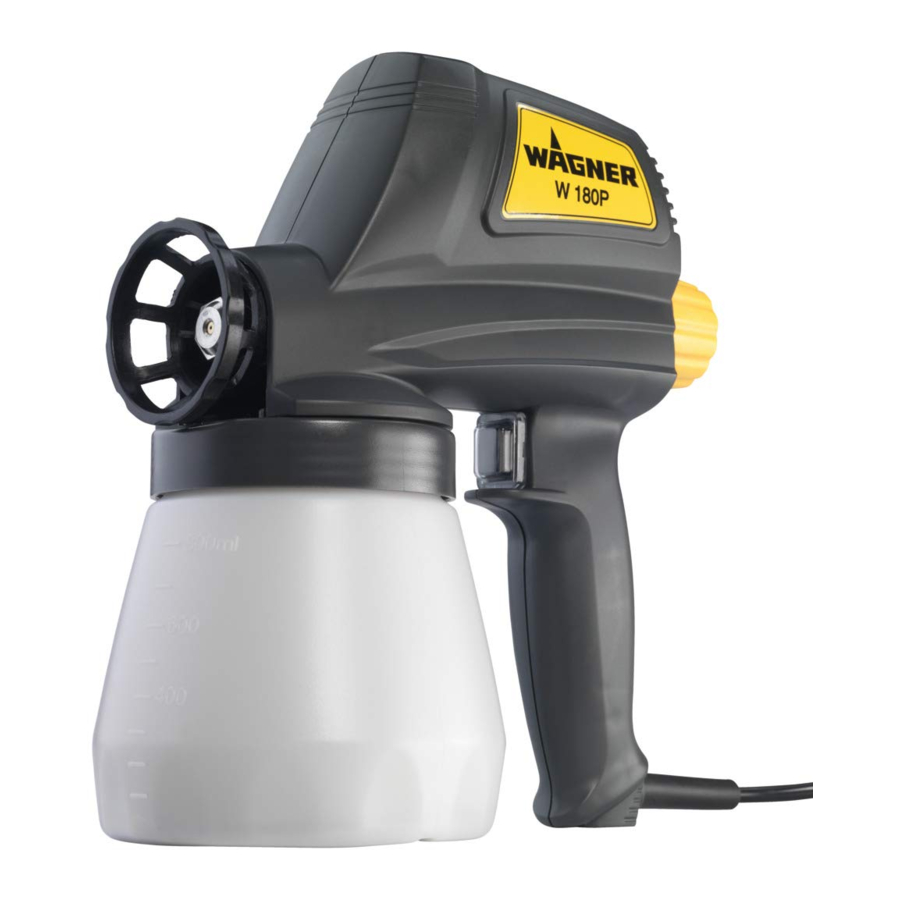
- Place the container on a sheet of paper and fill it with the prepared spray material.
![warning]() Attention! Do not operate the spray gun without spray material in the container; this can lead to increased wear of the pump!
Attention! Do not operate the spray gun without spray material in the container; this can lead to increased wear of the pump! - Position the spray gun on the container and turn the container to the right until the container fits tightly (Illus. 2, arrow).
![]()
- Activate the switch to start up the spray gun.
First the spray gun sucks in spray material, then after a few seconds the material emerges from the nozzle. To accelerate the intake, turn the fine adjustment button to maximum. 5) By turning the fine adjustment button you can vary the spray amount (Illus.3,arrow).


 Regulating with the fine adjustment button influences the spray pattern depending on the spray material and the degree of dilution.
Spray Technique
- The spray result depends heavily on the smoothness and cleanliness of the surface to be sprayed. Therefore the surface should be carefully prepared and kept free of dust.
- Cover areas that arenot to be sprayed. When working keep in mind that wind, for example, may transport paint mist over great distances and cause damage.
- Test the spray gun on cardboard or a similar surface to find the correct setting.
- When spraying, hold the spray gun in a horizontal position. Use theflexible nozzle extension (Illus. 4 and 8, special accessories) for spraying upwards (e.g. a ceiling) or downwards (e.g. an unhinged door laid on the floor).


- Begin spraying outside of the spray area and avoid interruptions inside the spray area.
- Do not apply too much paint during one spraying operation. First apply a thin layer and allow to dry briefly before applying a covering layer. This is especially important with vertical surfaces to avoid paint sags.
- The distance from the nozzle to the object to be sprayed depends on the delivery rate. With a low delivery rate it is possible to go very close to the object. This reduces the amount of spray mist.
- The spray gun should be worked as evenly as possible during the spray operation. Accelerating or slowing down during the spray operation causes an uneven spray pattern, spattering, dripping and orange peel.
- The spray movement should come from the arm, not just from the wrist. This ensures that a uniform distance is maintained between the spray gun and the spray surface during the spray operation (Illus. 5).

- To achieve optimal spray results, spray back and forth over the surface (Illus. 6).


Cleaning and Maintenance
Proper cleaning is the prerequisite for problem-free operation of the paint application device. No warranty claims are accepted in case of improper or no cleaning.
 Attention! Never immerse the spray gun in liquid when cleaning.
- Empty out the remaining paint from the container.
- Put proper thinner in the container and trigger the sprayer for approx. 2 seconds.Do not use flammable materials for cleaning purposes.
- Pull the main plug out of the socket.
- Disassemble the spray gun as shown in Illus. 9 (spare parts).

- Thoroughly clean all soiled parts.
- Reassemble the parts in reverse order.
- Put a few drops of oil (e.g. sewing machine oil) in the intake and runback holes (Illus. 7, arrow). Briefly switch on the spray gun.


The spray gun can only operate satisfactorily if it is cleaned and preserved after each use.
| Accessories W 180 P (not included in scope of delivery) | |
| Designation | Order No. |
| Paint container with cover | 0413 909 |
| Needle-jet nozzle | 0209 045 |
| Flexible nozzle extension with atomiser For spraying ceilings, resting objects or hard-to-reach areas e.g. radiators | 0046 675 |
| Spare Parts List (Illus. 9) | ||
| Pos | Name | Order No. |
| 1 | Suction tube | 0413 305 |
| 2 | Paint container with cover | 0413 909 |
| 3 | Nozzle 0,8 mm | 0046 903 |
| 4 | Locking nut | 0413 310 |
| 5 | Valve | 0209 042 |
| 6 | Pump housing | 0413 202 |
| 7 | Piston spring | 0033 028 |
| 8 | Piston | 0198 207 |
| 9 | Nozzle spanner | 0199 327 |
| 10 | Viscosity measuring cup | 0209 058 |
Correction of Malfunctions
| Problem | Cause | Remedy |
Spray gun buzzes and does not work |
| ➞ Disassemble pump and clean with thinner ➞ Please contact Wagner Service |
Spray gun does not suck in |
| ➞ Insert valve ➞ Adjust suction tube ➞ Clean ➞ Clean ➞ Thin accordingly |
Spray gun sucks in but does not spray |
| ➞ Clean ➞ Clean |
Spray gun works but sprays unevenly |
| ➞ Refill ➞ Use flexible nozzle extension (see accessories) ➞ Dilute accordingly ➞ Reset according to spray material ➞ Replace ➞ Replace ➞ Use correct valve |

If the supply cord of this appliance is damaged, it must only be replaced by a repair shop appointed by the manufacturer, because special purpose tools are required.
Do not connect the blue or brown wire to the earth terminal of the plug! The wires in this supply cord are coloured in accordance with the following code:
blue = neutral
brown = live

As the colours of the wires in the supply cord of this appliance may not correspond with the coloured markings identifiying the terminals in your plug, proceed as follows:
- Should the moulded plug have to be replaced, never re-use the defective plug or attempt to plug it into a different 13 A socket. This could result in an electric shock.
- Should it be necessary to exchange the fuse in the plug only use a 5A fuse approved by ASTA in accordance with BS 1362.
- To ensure that the fuse and fuse carrier are correctly mounted please observe the provided markings or colour coding in the plug.
- After changing the fuse, always make sure that the fuse carrier is correctly inserted. Without the fuse carrier, it is not permissible to use the plug.
- The correct fuses and fuse carriers are available from your local electrical supplies stockist.
General Safety Instructions
You have purchased a proprietary device that requires careful cleaning and care to ensure trouble-free functioning. Read the operating instructions carefully before using the tool and observe the safety instructions. Keep the operating instructions in a safe place.

 Read all the instructions. Non-observance of the instructions below can cause electric shock, fire and or serious personal injuries. The term "power tool" used below covers both mains-operated power tools (with mains lead) and accumulator-operated power tools (without mains lead).
- Work area safety
- Keep work area clean and well lit. Cluttered or dark areas invite accidents.
- Do not operate power tools in explosive atmospheres, such as in the presence of flammable liquids, gases or dust. Power tools create sparks which may ignite the dust or fumes.
- Keep children and bystanders away while operating a power tool. Distractions can cause you to lose control.
- Electrical Safety
- Power tool plugs must match the outlet. Never modify the plug in any way. Do not use any adapter plugs with earthed (grounded) power tools. Unmodified plugs and matching outlets will reduce risk of electric shock.
- Avoid body contact with earthed or grounded surfaces, such as pipes, radiators, ranges and refrigerators. There is an increased risk of electric shock if your body is earthed or grounded.
- Do not expose power tools to rain or wet conditions. Water entering a power tool will increase the risk of electric shock.
- Do not abuse the cord. Never use the cord for carrying, pulling or unplugging the power tool. Keep cord away from heat, oil, sharp edges or moving parts. Damaged or entangled cords increase the risk of electric shock.
- When operating a power tool outdoors, use an extension cord suitable for outdoor use. Use of a cord suitable for outdoor use reduces the risk of electric shock.
- If operating a power tool in a damp location is unavoidable, use a residual current device (RCD) protected supply. Use of an RCD reduces the risk of electric shock.
- Personal safety
- Stay alert, watch what you are doing and use common sense when operating a power tool. Do not use a power tool while you are tired or under the influence of drugs, alcohol or medication. A moment of inattention while operating power tools may result in serious personal injury.
- Use personal protective equipment. Always wear eye protection. Protective equipment such as dust mask, non-skid safety shoes, hard hat, or hearing protection used for appropriate conditions will reduce personal injuries.
- Prevent unintentional starting. Ensure the switch is in the off-position before connecting to power source and/or battery pack, picking up or carrying the tool. Carrying power tools with your finger on the switch or energising power tools that have the switch on invites accidents.
- Remove any adjusting key or wrench before turning the power tool on. A wrench or a key left attached to a rotating part of the power tool may result in personal injury.
- Do not overreach. Keep proper footing and balance at all times. This enables better control of the power tool in unexpected situations.
- Dress properly. Do not wear loose clothing or jewellery. Keep your hair, clothing and gloves away from moving parts. Loose clothes, jewellery or long hair can be caught in moving parts.
- Power tool use and care
- Do not force the power tool. Use correct power tool for your application. The correct power tool will do the job better and safer at the rate for which it was designed.
- Do not use the power tool if the switch does not turn it on and off. Any power tool that cannot be controlled with the switch is dangerous and must be repaired.
- Disconnect the plug from the power source and/or the battery pack from the power tool before making any adjustments, changing accessories, or storing power tools. Such preventive safety measures reduce the risk of starting the power tool accidentally.
- Store idle power tools out of reach of children and do not allow persons unfamiliar with the power tool or these instructions to operate the power tool. Power tools are dangerous in the hands of untrained users.
- Maintain power tools. Check for misalignment or binding of moving parts, breakage of parts and any other condition that may affect the power tool's operation. If damaged, have the power tool repaired before use. Many accidents are caused by poorly maintained power tools.
- Use the power tool, accessories and tool bits etc. in accordance with these instructions, taking into account the working conditions and the work to be performed. Use of the power tool for operations different from those intended could result in a hazardous situation.
- Service
- Have your power tool serviced by a qualified repair person using only identical replacement parts. This will ensure that the safety of the power tool is maintained.
- If the supply cord is damaged, it must be replaced by the manufacturer or it's service agent or a similarly qualified person in order to avoid a safety hazard.
Safety Instructions for Spray Guns
Attention! Danger of injection
Spray materials emerge from nozzle tips under high pressure.
Never point the spray stream towards human beings or animals.
- Do not use the spray guns to spray flammable substances.
- The spray guns are not to be cleaned with flammable solvents.
- The spray gun is not to be used in work places covered by Ex-protection regulations.
- To avoid the hazard of explosion when spraying, provide for effective natural or artificial ventilation.
- No sources of ignition are to be in the immediate area when spraying, e.g. open flame, cigarettes, sparks, glowing wires and hot surfaces.
- Before carrying out any work on the spray gun, unplug the lead from the power socket.
- Take precautionary measures against potential hazards from the spray liquid and follow any instructions given on containers or laid down by the manufacturer of the liquid.
- Do not spray any liquid of unknown hazard potential.
- Wear a breathing mask and ear protection.
With original WAGNER accessories and spare parts, you have the guarantee that all safety regulations are fulfilled.
| Technical Data | |||
| Max. delivery rate: | 270 g/min | Container capacity: | 800 ml |
| Max. viscosity: | (runout time) 80 sec. | Double insulation: |  |
| Max. pressure spikes: | 150 bar | Pump: | Replaceable |
| Power source: | 230 V, 50 hz | Pump cylinder: | Special steel |
| Power consumption: | 110 W | Piston: | Hard-chrome-plated special steel Ø 5 mm |
| Round spray nozzle: | 0.8 mm | Weight: | 1.5 kg |
| Sound pressure level:* Uncertainty K: | 86 dB(A) 4 dB | Sound pressure output:* Uncertainty K: | 99 dB(A) 4 dB |
| Oscillation level:* Uncertainty K: | 10.5 m/s² 1.5 m/s² | ||
* Measured in accordance with EN 60745-1
Materials to be used:
Paints and varnishes containing solvents, acrylic enamel paints, water-soluble varnishes, glazes, polishes, wood preservatives, disinfectants, plant protectives, saturants, as well as oils and other watery liquids.
The following spray substances are not suitable for use:
Dispersion and latex paints, materials containing strong abrasives, glazes with coarse particles, strippers and caustic solutions, silicate paints. Use of these spray materials can lead to increased wear or corrosion damage in the pump area, which are not covered by the WAGNER-Guarantee.
Functional Description of the Spray Gun
The spray gun sucks in spray materials. The airless atomisation results when the spray material is pumped at high pressure through the swirl system and the nozzle bore.
Documents / ResourcesDownload manual
Here you can download full pdf version of manual, it may contain additional safety instructions, warranty information, FCC rules, etc.
Advertisement


Need help?
Do you have a question about the W 180 P and is the answer not in the manual?
Questions and answers