Advertisement
PARTS & FUNCTION

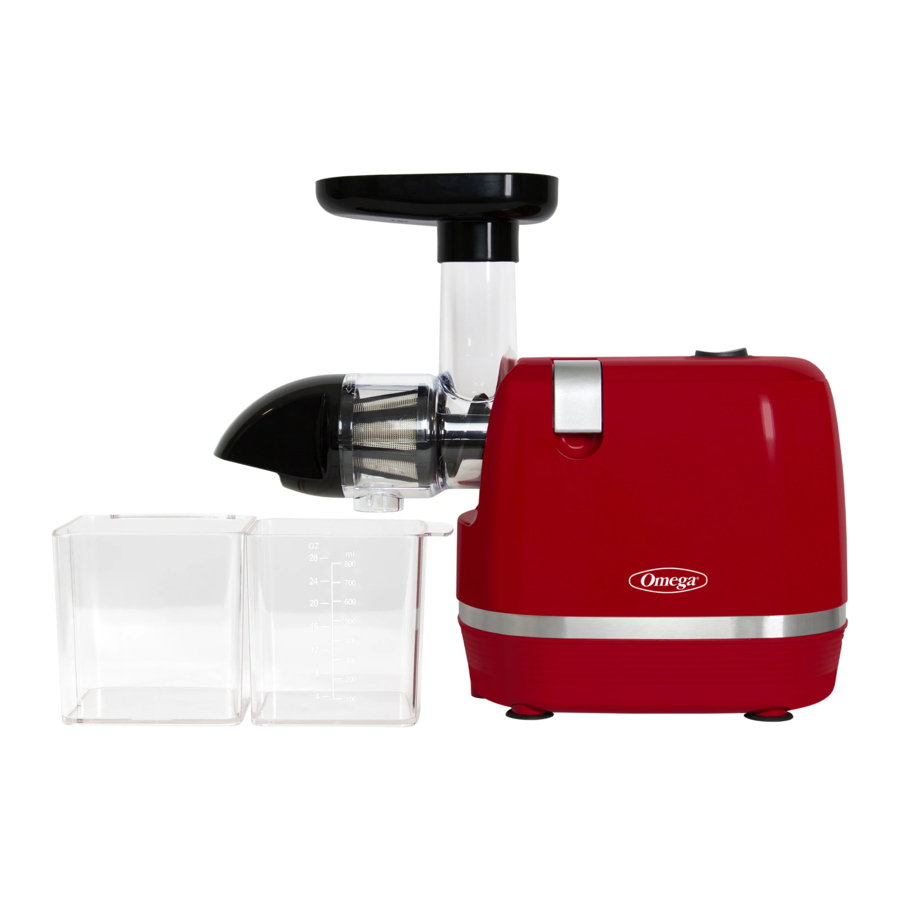
| No. | Part Name | Function |
| 1 | POWER CORD | USED FOR CONNECTING TO A POWER SUPPLY OUTLET. |
| 2 | MAIN BODY | ELECTRICAL MOTOR IS HOUSED IN THE MAIN BODY. DO NOT IMMERSE IN WATER. |
| 3 | POWER SWITCH | CONTROLS THE POWER OF THE JUICER. |
| 4 | LOCKING LATCH | LOCKS THE DRUM TO THE HOUSING. LIFT LOCKING CLIP TO DISMANTLE. |
| 5 | JUICE CUP | FOR JUICE. |
| 6 | PULP CUP | FOR PULP. |
| 7 | PUSHER | WHEN ADDING INGREDIENTS, PUSH AND PRESS THE INGREDIENTS LIGHTLY WITH THE PUSHER INTO THE HOPPER TO IMPROVE JUICING EFFICIENCY. |
| 8 | HOPPER | PLACED ABOVE DRUM AND ON TOP OF THE FEED CHUTE |
| 9 | DRUM & FEED CHUTE | TO JUICE, THE DRUM CONNECTS TO THE BODY. INGREDIENTS ARE PLACED INTO THE FEED CHUTE AT THE TOP OF THE DRUM. |
| 10 | AUGER | TO JUICE, THE AUGER IS PLACED INSIDE THE DRUM AND CONNECTS TO THE BODY. THE AUGER GRINDS AND SQUEEZES FRUITS AND VEGETABLES. |
| 11 | JUICING SCREEN | FILTERS EXTRACTED JUICE FROM INGREDIENTS. |
| 12 | END CAP | PULP IS RELEASED THROUGH THE END CAP. |
OPTIONAL ACCESSORIES

| No. | Part Name | Function |
| 13 | SLICING PUSHER | SLICES INGREDIENTS. |
| 14 | SLICING DRUM & FEED CHUTE | TO SLICE OR SHRED, THE SLICING DRUM CONNECTS TO THE BODY. INGREDIENTS ARE PLACED INTO THE FEED CHUTE AT THE TOP OF THE DRUM. |
| 15 | SLICING KNIFE | TO SLICE INGREDIENTS, THE SLICING KNIFE ATTACHES TO THE SLICING DRUM. |
| 16 | SHREDDING KNIFE | TO SHRED INGREDIENTS, THE SHREDDING KNIFE ATTACHES TO THE SLICING DRUM. |
Optional Accessories
Can be ordered online at: www.omegajuicers.com/collections/replacement-parts
DIRECTIONS FOR USE
Before the first use of product, please completely clean the components contacting ingredients.
(See Maintenance)
 | BUTTON OPERATION INSTRUCTIONS:
|
For Juicing:
This product will not start working until all the parts and components are correctly assembled.
| 1 |  |
|
| 2 |  | ALIGN THE SCREW END OF THE AUGER WITH THE HOLE ON THE BODY OF THE MACHINE. PUSH STRAIGHT INTO THE DRUM AND INTO THE MACHINE. IN CASE OF MISALIGNMENT, ROTATE THE AUGER SLIGHTLY. |
| 3 |  |
|
| 4 |  | ALIGN THE THREE BUCKLES ON THE ENDCAP AND THE THREE BUCKLES ON THE DRUM. LOCK THE ENDCAP BY TURNING COUNTER-CLOCKWISE. |
| 5 |  | PLACE THE JUICE CONTAINER UNDER THE JUICE SPOUT. |
| 6 |  | PLACE THE PULP CONTAINER UNDER THE ENDCAP. |
| 7 |  | ATTACH THE HOPPER ON TOP OF THE FEED CHUTE. THE HOPPER HELPS TO KEEP THE INGREDIENTS FROM SPILLING. |
| 8 |  |
|
| 9 |  | WASH ALL FRUIT AND VEGETABLES. CUT INTO PIECES THAT WILL FIT INTO FEED CHUTE. REMOVE ALL PITS AND SEEDS. REMOVE THICK SKINS BEFORE INSERTING. |
| 10 |  | TURN ON BY PRESSING REVERSE ON THE POWER SWITCH. DO NOT OPERATE FOR MORE THAN 10 MINUTES.
|
| 11 |  | USE THE PUSHER TO PUSH INGREDIENTS INTO THE FEEDING CHUTE. DO NOT FORCE THE INGREDIENTS. PUSH WITH APPROPRIATE PRESSURE. (NEVER PUT FINGERS OR OTHER OBJECTS INTO THE FEED CHUTE. IF A CLOG OCCURS, DISCONNECT THE POWER SUPPLY. REMOVE THE PULP AND POUR THE JUICE INTO A GLASS BEFORE CONTINUING TO USE THE APPLIANCE.) |
| 12 |  | WHEN JUICING IS COMPLETE, SWITCH OFF. DISCONNECT THE POWER PLUG FROM THE POWER SUPPLY.
|


DIRECTIONS FOR USE OF OPTIONAL ACCESSORIES
For Slicing / Shredding:
This product will not start working until all the parts and components are correctly assembled.
| 1 |  |
|
| 2 |  | ALIGN THE HOLE IN THE MIDDLE OF THE SLICING KNIFE WITH THE BUCKLES INSIDE THE SLICING DRUM. PUSH GENTLY UNTIL THE SLICING KNIFE IS SECURE. IN CASE OF MISALIGNMENT, ROTATE THE AUGER SLIGHTLY. |
| 3 |  | PLACE A CONTAINER UNDER THE SPOUT TO COLLECT THE SLICES/SHREDS OF INGREDIENTS. |
| 4 |  |
|
| 5 |  | WASH ALL FRUIT AND VEGETABLES. CUT INTO PIECES THAT WILL FIT INTO FEED CHUTE. REMOVE ALL PITS AND SEEDS. REMOVE THICK SKINS BEFORE INSERTING. |
| 6 |  | TURN ON BY PRESSING REVERSE ON THE POWER SWITCH. DO NOT OPERATE FOR MORE THAN 10 MINUTES.
|
| 7 |  | USE THE SLICING PUSHER TO PUSH INGREDIENTS INTO THE FEEDING CHUTE. DO NOT FORCE THE INGREDIENTS. PUSH WITH APPROPRIATE PRESSURE. (NEVER PUT FINGERS OR OTHER OBJECTS INTO THE FEED CHUTE. IF A CLOG OCCURS OR THE CUP IS FULL, DISCONNECT THE POWER SUPPLY. REMOVE THE CLOG AND/OR EMPTY THE CUP BEFORE CONTINUING TO USE THE APPLIANCE.) |
| 8 |  | WHEN SLICING AND SHREDDING IS COMPLETE, SWITCH OFF. DISCONNECT THE POWER PLUG FROM THE POWER SUPPLY.
|
MAINTENANCE AND CLEANING
- Before cleaning, switch off appliance and disconnect the power plug from the power supply.
- Clean the product immediately after use.
- Do not submerge the machine body in water. Wipe the body with a dampened cloth.
- Before storing the appliance, make sure that the appliance and components are clean and dry.
The following procedure can be referred to clean detachable components:
| 1 |  | REMOVE PUSHER AND HOPPER. |
| 2 |  |
|
| 3 |  | REMOVE THE END CAP FROM THE JUICE SCREEN. REMOVE THE JUICING SCREEN FROM THE AUGER. REMOVE THE AUGER FROM THE DRUM AND FEED CHUTE. |
SAFETY INDEXES
| RATED VOLTAGE | 120V~ |
| RATED POWER | 150W |
| RATED FREQUENCY | 60HZ |
| CONTINUOUS OPERATING TIME | ≤10 MIN. |
| TIME INTERVAL | ≥20 MIN. |
IMPORTANT SAFEGUARDS
When using electrical appliances, basic safety precautions should always be followed including the following.
- READ ALL INSTRUCTIONS BEFORE USING.
![shock hazard]() If you do not use this device properly, there is a danger of injury. To protect against electrical shock, do not immerse cord, plug, or main body (motor) in water or other liquid.
If you do not use this device properly, there is a danger of injury. To protect against electrical shock, do not immerse cord, plug, or main body (motor) in water or other liquid.- Close supervision is necessary when any appliance is used near children. Store the product out of the reach of children. Do not let persons with physical impairments, feeling or mental abnormalities, or persons lacking related experience or knowledge (including children) to use or play with this product.
- Input voltage of this product is AC120 60Hz. Please confirm this before use.
- Unplug from outlet before assembling, before taking off parts, before cleaning and when not in use.
- Avoid contact with moving parts.
- Do not operate any appliance with a damaged cord or plug or after the appliance malfunctions or has been damaged in any manner. Return appliance to the manufacturer for examination, repair, or electrical or mechanical adjustment.
![burn hazard]()
![shock hazard]()
The use of attachments not recommended or sold by manufacturer may cause fire, electric shock or injury.- Before use, check for damage on the power cord, plug, juice screen, auger, containers for juicing and other components for slicing, shredding and ice mixing/sorbet. If a component is found to be damaged, please do not use the product (stop using the product) and contact the Company's customer service department. Please do not attempt to detach and repair damaged components.
- Do not let cord hang over edge of table or counter or touch heated surfaces.
- Before operating and powering on the product, please ensure that the detachable components such as the, juice screen, auger, container for juicing are correctly installed.
- Do not put your fingers or other objects into the juicer while it is in operation. If food becomes lodged in opening, use food pusher or another piece of fruit or vegetable to push down the lodged food. When this method is not possible, turn off the machine, remove the plug from wall outlet and disassemble juicer to remove the remaining food.
- Cut ingredients into small pieces before placing in the feed chute of the juicer. If the fruits & vegetables are with pits, hard seeds, thick skin and/or hard shell, please remove before placing in feed juice.
- It is normal for the detachable components of the juicer to stain from juicing. This will not affect the quality of the juicer or the nutritional value of the juice.
- The juicer is equipped with an intelligent protection chip for automatic shut-off. If the motor is too hot, the juicer will automatically shut down for a period of 20-30 minutes. Once the motor is cool in temperature, the juicer will work again. This safety feature extends the life of the juicer.
- The juicer is designed with electrical current-limiting. When juicing hard ingredients, the motor may stall. The motor will stop working if an audible "beep" sounds. This mechanism is an over current protection of the motor. This safety feature extends the life of the juicer.
- To disconnect, press/switch OFF then remove plug from wall outlet. Make sure the motor stops completely before disassembling.
- Do not place detachable components in water higher than 176°F (80°C) or in a microwave. Excessive hot temperatures may cause the components to deform or damage.
- Do not place the body of this machine into water or other liquids.
- Do not use steel wool, abrasive cleaner or corrosive liquids (such as petrol or acetone) to clean this product.
- Do not place on or near a hot gas or electric burner or in a heated oven.
- Do not use appliance for anything other than its intended use.
- Keep the appliance clean. Refer to the Care & Cleaning instructions in this manual.
- FOR AT HOME USE ONLY. This product is a class-I electrical appliance.
SAVE THESE INSTRUCTIONS
Join us on:
INSTAGRAM @OmegaJuicing
FACEBOOK @OmegaJuicers
PRODUCT REGISTRATION, VISIT:
www.omegajuicers.com/omega-warranty-registration
RECIPES, VISIT:
www.omegajuicers.com/recipes
CUSTOMER SERVICE:
Visit: www.omegajuicers.com
After using your Omega, we kindly ask you to rate the machine on www.OmegaJuicers.com
Documents / Resources
References
![www.omegajuicers.com]() Juicer Parts, Omega Juicers, Vegetable Juicer Parts, Fruit Juicer Part
Juicer Parts, Omega Juicers, Vegetable Juicer Parts, Fruit Juicer Part![www.omegajuicers.com]() Juicers and Blenders Product Registration for Omega Juicers
Juicers and Blenders Product Registration for Omega Juicers![www.omegajuicers.com]() Omega Recipes – Omega Juicers
Omega Recipes – Omega Juicers![www.omegajuicers.com]() Omega Juicers: Experience the Power of Juicing for Optimum Health!
Omega Juicers: Experience the Power of Juicing for Optimum Health!
Download manual
Here you can download full pdf version of manual, it may contain additional safety instructions, warranty information, FCC rules, etc.
Advertisement


Need help?
Do you have a question about the COLD PRESS 365 H3000RED and is the answer not in the manual?
Questions and answers