Advertisement
- 1 Tips for Perfect Espresso
- 2 ESPRESSO DRINKS
- 3 IMPORTANT SAFEGUARDS
- 4 IN THE BOX
- 5 MACHINE SET UP
- 6 BREWING ESPRESSO Using Pre-Ground Espresso
- 7 BREWING ESPRESSO Using E.S.E. POD Espresso
- 8 BREWING CAPPUCCINO or LATTE
- 9 DELIVERING HOT WATER
- 10 TEST YOUR WATER
- 11 WATER FILTER
- 12 CLEANING and MAINTENANCE: DESCAILING
- 13 ACCESSORIES
- 14 Documents / Resources
Tips for Perfect Espresso
- Use freshly roasted espresso beans (avoid caramelized beans).
- Store coffee beans in a cool, dark and dry container. Vacuum sealed if possible.
- Pre-heat your espresso and cappuccino cups using the cup warmer storage on the top of the machine.
- Set the water temperature according to your needs.
- For an extra creamy espresso lower the spouts to bring them as close to the cup/cups as possible.
ESPRESSO DRINKS
Espresso

A small 1 or 2 oz. shot of pressure brewed espresso using approximately 1 Tbsp. of finely ground coffee.
Cappuccino

A single espresso shot topped with equal parts steamed and frothed milk (in a ratio of 1:1:1) served in a 4 to 6 ounce cup.
Café Latte

A double espresso shot topped with steamed milk to fill; a ratio of 2:1 of milk to espresso is typical.
Caffee' Mocha

This drink is based on layers of chocolate, milk, espresso and cream. Ingredients in a glass, prepare hot, frothed milk, let it cool. Pour the chocolate sauce into a different glass, carefully pour the milk. Slowly add the espresso. Top off with whipped cream and garnish with chocolate flakes.
Ingredients: 1 oz. of espresso coffee
4 oz. of hot milk
1 – 2 tablespoons of cold chocolate sauce
Whipped cream
Chocolate flakes
Italian Macchiato

A single or double espresso topped with a dollop of heated milk and served in a traditional espresso cup.
Espresso Lungo

From 3 oz. up to 4 oz. of brewed espresso using finely ground coffee.
Americano

1/3 of espresso lungo and 2/3 of hot water.
Caramel Macchiato

A tasty variation of latte macchiato with the addition of caramel syrup Ingredients. Pour the caramel syrup down the inside of the glass. Pour first the cold milk and then the whisked hot milk into the glass. Add the milk foam. Prepare the espresso and pour it into the glass. Add a bonnet of milk foam.
Ingredients: 1 oz. of espresso coffee
1 oz. of cold milk
5 oz. of hot milk
Caramel syrup
... more recipes at: coffeemakers.delonghi.us/coffee-recipes-0
IMPORTANT SAFEGUARDS
When using electrical appliances, basic safety precautions should always be followed, including the following:
- Read all instructions.
- Do not touch hot surfaces. Use handles and knobs.
- To protect against fire, electrical shock and personal injury, do not immerse cord, plug or appliance in water or other liquid.
- Never allow the appliance to be used by children.
- Unplug from the outlet when not in use and before cleaning. Allow to cool before fitting or taking off parts, and before cleaning the appliance.
- Do not operate with a damaged cord or plug, or after the appliance malfunctions, or has been damaged in any manner. Return the appliance to the nearest authorized service facility for examination, repair or adjustment.
- The use of accessory attachments or spare parts not recommended by the appliance manufacturer may result in fire, electrical shock or personal injury.
- Do not use outdoors.
- Do not let the cord hang over the edge of the table or counter, or touch hot surfaces.
- Do not place on or near a hot gas or electrical burner, or in a heated oven.
- Plug cord into the wall outlet. To disconnect, turn any control to "off", then remove plug from wall outlet.
- Do not use the appliance for other than the intended use. This appliance is to be utilized for domestic use only. Any other use is to be considered improper and therefore, dangerous.

To reduce the risk of fire or electric shock, do not remove the cover. No user serviceable parts inside. Repair should be done by authorized service personnel only!
SAVE THESE INSTRUCTIONS • THIS PRODUCT IS FOR HOUSEHOLD USE ONLY
SHORT CORD INSTRUCTIONS
- A short power cord is provided to reduce risks resulting from becoming entangled in or tripping over a longer cord.
- Longer, detachable power supply cords or extension cords are available and may be used if care is exercised in their use.
- If an extension cord is used, the marked electrical rating should be at least as great as the electrical rating of the appliance. If the appliance is provided with 3 - wire, grounding type cord, the extension should be a GROUNDING TYPE 3 – WIRE CORD. The longer cord should be arranged so that it will not drape over the counter-top or table top where it can be pulled on by children or tripped over.
- Your product is equipped with a polarized alternating current line plug (a plug having one blade wider than the other). This plug will fit into the power outlet only one way. This is a safety feature. If you are unable to insert the plug fully into the outlet, try reversing the plug. If the plug should still fail to fit, contact your electrician to replace your obsolete outlet. Do not defeat the safety purpose of the polarized plug.
CAREFULLY READ AND KEEP THESE INSTRUCTIONS!
- This machine is designed to "make espresso coffee" and "hot drinks". Be careful to avoid scalding from the water and steam jets or by using the machine incorrectly.
- This appliance is for household use only. All other use is considered improper and consequently dangerous.
- The manufacturer is not liable for damage caused by improper, incorrect or unreasonable use of the appliance.
- During operation, do not touch the hot surfaces of the appliance. Use the knobs or handles.
- Do not touch the appliance with damp hands or feet.
- Do not allow children or unfit persons to use the appliance unsupervised.
- Do not allow children to play with the appliance.
- In the event of breakdown or faulty operation, turn the appliance off and do not tamper with it. For repairs, contact a technical service center authorized by the manufacturer only. Request that only original spare parts be used.
Failure to respect the above may compromise the safety of the appliance.
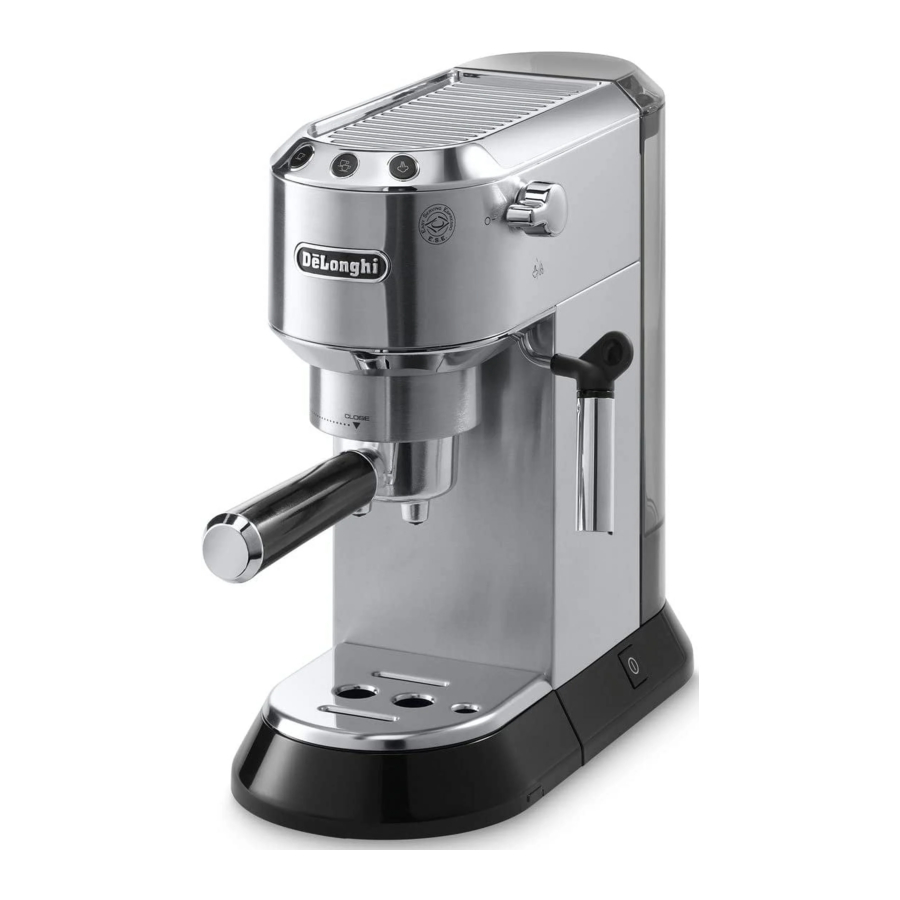
IN THE BOX

A1. Water tank lid
A2. Water tank
A3. Cup warmer
A4. Control panel buttons
A5. Steam dial
A6. Water spout / milk container coupling
A7. ON / OFF switch
A8. Drip tray
B1. Filter-holder with 3 cups
B2. Tamper/dispenser measure scoop
MACHINE SET UP


Main switch on side of machine.

The machine preforms a self-test signalled by the sequential flashing of lights.

The machine is warming up, when lights stop blinking the machine is almost ready for use.


Fill water tank


Turn the steam dial to the position. The machine will prime and a little water will be released.

Turn the steam dial to the  position. The machine is ready for use.
Machine is now ready to work!
BREWING ESPRESSO Using Pre-Ground Espresso

Use correct filter, marked on bottom of cup.


Brew 1 or 2 Espresso at one time.
BREWING ESPRESSO Using E.S.E. POD Espresso


Use correct filter, marked on bottom of cup.


E.S.E. (which stands for Easy Serving Espresso) is the technology being used to simplify the preparation of a good espresso using just a few simple actions, thanks to the adoption of the "serving" (individual pre-packed doses containing 7 grams of ground coffee that has been pressed and hermetically sealed between two fine layers of filter paper).

BREWING CAPPUCCINO or LATTE
Refer to previous section BREWING ESPRESSO for the espresso related part.


Fill 1 /3 of the pitcher, 3.5 oz. for Cappuccino, 6 oz. for Latte.

Be sure frother is immersed in milk, but not beyond the highlighted mark on the spout

Set the desired level of foam.

If both coffee buttons are blinking, you must cool down the boiler.

Turn dial ON allowing water to be delivered. When water stops, turn dial to  position.

Prepare the coffee as described in the previous sections. Brew in a larger cup.

Pour the milk over the espresso and enjoy!
Tip for the BEST CAPPUCCINO:
Use Skim or 2% Milk at Refrigerator Temperature (about 41F/5C)
DELIVERING HOT WATER
Delivering hot water
- Place a container under the spout (as close as possible to avoid splashes).
![]()
- Turn the steam dial to the
![]() position. Water runs out of the spout.
position. Water runs out of the spout. - Turn the dial to the
![]() position when the desired amount of water has been delivered. NOTE: You can stop the flow of water by pressing the button. (You should not run off hot water for more than 2 minutes at a time).
position when the desired amount of water has been delivered. NOTE: You can stop the flow of water by pressing the button. (You should not run off hot water for more than 2 minutes at a time). - Press any button.

 position. Water runs out of the spout.
Danger of burns.
Never leave the machine unsupervised while delivering hot water or steam. The spout becomes hot during delivery. Hold by the handle only.
Delivering steam

- Make sure the under the spout is attached correctly.
- Fill a container with the liquid to be heated/ frothed and immerse the spout/ cappuccino maker in the liquid.
- Press the
![]() button twice. After a few seconds, the steam to heat the liquid comes out of the cappuccino maker.
button twice. After a few seconds, the steam to heat the liquid comes out of the cappuccino maker. - When the required temperature/foam is obtained, interrupt steam delivery by pressing the
![]() button again. (You should not discharge steam for more than 3 minutes at a time).
button again. (You should not discharge steam for more than 3 minutes at a time).
Tips for using steam to froth milk
|
TEST YOUR WATER
Measuring Water Hardness
- Remove the "total hardness test" indicator paper attached to this manual from its pack.
- Immerse the paper completely in a glass of water for one second.
- Remove the paper from the water and shake lightly. After about a minute, 1,2,3, or 4 red squares form, depending on the hardness of the water. Each square corresponds to one level.

Press ![]() button and hold for 10 seconds. The lights will blink in sequence. You are now in the setting menu.
button and hold for 10 seconds. The lights will blink in sequence. You are now in the setting menu.

Press the  button to enter the water hardness setting.

Press the button that correspond to the correct hardness level.

The button indicates that the selection has been saved.
When setting the water hardness, it is very important to set the correct frequency of the descaling cycles. You should always keep this machine clean, and it will help improve its performance and prolong the life of the machine.
WATER FILTER
Installing the filter
- Remove the filter from packaging and rinse the filter with about half a liter of tap water.
- Rotate the calendar disk (A) so that the next two months are displayed.
![]()
- Remove the tank from the appliance and fill with water.
- Insert the filter (B) in the water tank and immerse it completely for ten or so seconds, sloping it to enable the air bubbles to escape.
![]()
- Insert the filter in the filter housing (C) and press as far as it will go.
![]()
- Close the tank with the lid (D), then replace the water tank in the machine.
![]()
- The new filter is active. You can now use the coffee maker.


Please note! The filter lasts about two months if the appliance is used normally. If the coffee maker is left unused with the filter installed, it will last a maximum of three weeks.
CLEANING and MAINTENANCE: DESCAILING
DESCALING
Descale the machine when the ![]() orange light comes on.
orange light comes on.
Descaler contains acids which may irritate the skin and eyes. It is vital to respect the manufacturer's safety warnings given on the descaler pack and the warnings relating to the procedure to follow in the event of contact with the skin and eyes.
 NOTE: Failure to descale the appliance as described above voids the guarantee.
- Turn the machine on.
- Completely empty the water tank (A) and remove the water filter (if present).
![]()
- Pour the descaler (B) and water (C) into the tank, according to the manual instructions.

- Place an empty container (D) with a minimum capacity of 50 oz under the hot water spout and boiler outlet.

- Press the
![]() button and hold for 10 seconds. The lights will blink in sequence. You are now in the setting menu.
button and hold for 10 seconds. The lights will blink in sequence. You are now in the setting menu. - Turn the steam dial to
![]() and press
and press ![]() button. The descaling program automatically performs a series of deliveries at intervals to remove the lime scale from inside the coffee machine.
button. The descaling program automatically performs a series of deliveries at intervals to remove the lime scale from inside the coffee machine.


 and press
Danger of Burns
Hot water containing acid flows from the spout. Avoid contact with splashes of water.
- From time to time turn the steam dial to the position to deliver small quantities of descaler from the boiler outlet.
- Once the descaling solution is terminated, the
![]() orange light starts blinking.
orange light starts blinking. - To eliminate the solution and lime scale residues, rinse the tank and fill it with fresh water (without descaler); empty the containers and place them under the boiler outlet and hot water spout.
- Turn the steam dial to
![]() the position and press the
the position and press the ![]() button to start the rinsing.
button to start the rinsing. - From time to time turn the steam dial to the position to deliver small quantities of water from the boiler outlet.
- Once the water tank is empty, turn the steam dial to
![]() position.
position.
The appliance is now ready for use.
Repairs to the coffee machine relative to lime scale problems are not covered by the warranty if the descaling procedure described above is not performed on a regular basis.
- Descaler contains acids which may irritate the skin and eyes. It is vital to respect the manufacturer's safety warnings given on the descaler pack and the warnings relating to the procedure to follow in the event of contact with the skin and eyes. Use De'Longhi descaler only. Under no circumstances should you use sulphamic or acetic based descalers.
Their use invalidates the guarantee. Failure to descale the appliance as described also invalidates the guarantee.
ACCESSORIES
Enjoy our full line of drinkware: an exclusive line of Espresso, Cappuccino, Latte glasses and milk pitcher.

Care Kit Line
Experience the De'Longhi Care Kit Line to improve the performance of your fully automatic machine.

... to learn more about the De'Longhi accessories visit: delonghi.com
Documents / Resources
References
Download manual
Here you can download full pdf version of manual, it may contain additional safety instructions, warranty information, FCC rules, etc.
Advertisement


Need help?
Do you have a question about the DEDICA EC680M and is the answer not in the manual?
Questions and answers