Honeywell CT60, CT60 XP Manual
- User manual (124 pages) ,
- Quick start manual (19 pages) ,
- Manual (17 pages)
Advertisement
INTRODUCTION
Honeywell offers a full range of Universal Dock accessories for the CT60 and CT60 XP mobile computers, including:
- Home Bases and Ethernet Bases for one device and one battery
- Charge and Ethernet Bases for up to four devices
- Display Docks
- Replacement Cups for Universal Bases
Note: Throughout this manual, all versions of the mobile device are referred to as the computer unless information is specific to a particular model.

We recommend the use of Honeywell accessories and power adapters. Use of any non-Honeywell accessories or power adapters may cause damage not covered by the warranty.
Make sure that all components are dry prior to using the computers and batteries with accessories. Using wet components may cause damage not covered by the warranty.
To learn about Battery Maintenance for Portable Devices, go to honeywell.com/ PSS-BatteryMaintenance.
List of Universal Dock Accessories
For a complete list of accessories for your mobile computer and their part numbers see the Accessories Catalog for your device, available for download at sps.honeywell.com.
| Accessory | Part Number | Use With |
| Universal Home Base | CT60-HB-UVN | CT60/CT60 XP |
| Universal Ethernet Home Base | CT60-EB-UVN | CT60/CT60 XP |
| Universal Charge Base | CT60-CB-UVN | CT60/CT60 XP |
| Universal Ethernet (Net) Base | CT60-NB-UVN | CT60/CT60 XP |
| Universal Display Dock | CT60-DB-UVN | CT60/CT60 XP |
| Universal 5-Bay Charger | CT60-5CB-UVN | CT60/CT60 XP |
| Universal Cup | CT60-UCP-N | CT60/CT60 XP |
Contact your local sales representative for ordering information.
Agency Models
CT40-HB, CT40-EB, CT40-CB, CT40-NB, CT40-DB, ME-5bay-CB
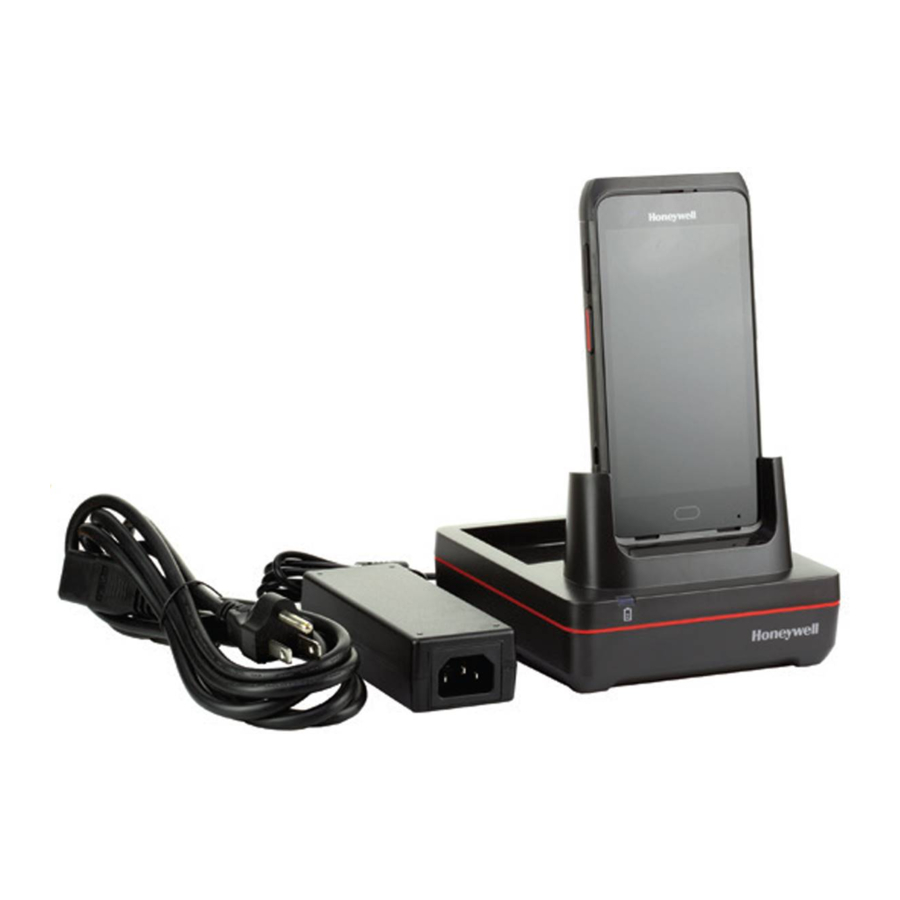
HOME BASE AND ETHERNET HOME BASE
A Home Base is a charge/communication base for one mobile computer and one spare battery. The CT60-HB-UVN Universal Dock Home Base has one USB client connector.
An Ethernet Home Base is also a charge/communication base for one mobile computer and one spare battery. However, the CT60-EB-UVN Universal Dock Ethernet Base also has an Ethernet connector as well as a USB client connector (Type B).
Universal Dock bases have removable device cups that can be replaced.
(See Universal Dock Cups.) The CT60 Universal Dock Home Base and
Ethernet Home Base also have removable battery cups. (See Replace the Battery Cup.)
Features


Out of the Box
Make sure that your shipping box contains these items:
- Universal Dock Home Base (CT60-HB-UVN) or Universal Dock Ethernet Home Base (CT60-EB-UVN)
- Power supply
- Power cord (if purchased)
- Product documentation
If any of these items are missing or appear damaged, contact your Customer Account Representative. Keep the original packaging in the event that you need to return the base for service or if you want to store the charger while not in use.
Connect Power
Use only a UL Listed power supply that has been qualified by Honeywell with an output rated at 12VDC and 3A. The power supply input rating is 90-264 VAC, 50/ 60 Hz. The operating temperature is -10°C to 50°C (14°F to 122°F). The maximum output of the base is 5VDC/2A.
- Plug the power cord into the power supply.
- Plug the power supply cable into the power connector on the back of the base.
- Plug the power cord into a standard wall outlet.
Charge the Battery Pack
Insert computer into the Home Base (CT60-HB-UVN) or Ethernet Home Base (CT60-EB-UVN). Unit will not charge unless a battery is installed.
CT60-HB-UVN/CT60-EB-UVN

You can also, insert a battery pack into the Home Base for charging.

Replace the Battery Cup
The CT60-HB-UVN and CT60-EB-UVN Universal Dock bases have replaceable battery cups.
Keep the base flat to avoid dropping the battery cup.
- Remove all cables to allow clear access to the latch.
- While holding the battery cup latch to the right, lift the back of the cup.


- Release the latch and lift the old cup out of the base.


- Insert the new cup tilted slightly towards the front of the base.
![]()
- While holding the latch to the right, push the back of the cup into the base until it snaps in.
![]()
- Release the latch.


Status LED
| LED | Status | Description |
| Battery | Solid Green | The battery is connected to external power and is fully charged. |
| Solid Amber | The battery is connected to external power and is charging. | |
| Solid Red | There is a battery charging fault, such as over-temperature. |
Mount the Home Base
You can mount the Home Base on a flat, horizontal surface such as a desktop or workbench with an optional DIN rail.
Mounting hardware required:
- DIN rail
- 3/16-inch diameter x 5/8-inch long pan head screw
- 1/2-inch OD x 7/32-inch ID x 3/64-inch thick washer
- 3/16-inch diameter nut
- Slide the DIN rail into the slot on the bottom of the Home Base.
- Secure the DIN rail to the flat surface with the hardware.


CHARGE BASE AND ETHERNET BASE
The CT60-CB-UVN Universal Dock Charge Base charges up to four mobile computers.
Universal Dock Ethernet (Net) Base CT60-NB-UVN holds four mobile computers and functions as both a charge and communication base, with two RJ45 Ethernet ports.
Universal bases have removable cups that can be replaced. (See Universal Dock Cups.)
Features

Out of the Box
Make sure that your shipping box contains these items:
- Universal Dock Charge Base (CT60-CB-UVN) or Universal Dock Ethernet Base (CT60-NB-UVN)
- Power supply
- Power cord (if purchased)
- Product documentation
If any of these items are missing or appear damaged, contact your Customer Account Representative. Keep the original packaging in the event that you need to return the base for service or if you want to store the charger while not in use.
Connect Power
Use only a UL Listed power supply that has been qualified by Honeywell with an output rated at 12V/7A. The power supply input rating is 100-240 VAC, 50/60 Hz. The operating temperature is -10°C to 50°C (14°F to 122°F).
- Plug the power cord into the power supply.
- Plug the power supply cable into the power connector on the back of the base.
- Plug the power cord into a standard wall outlet.
Charge the Battery Pack
Insert device with battery installed into the Charge Base or Net Base.
CT60-CB-UVN/CT60-NB-UVN

Mount the Charge Base or Net Base
You can mount the charger on a flat, horizontal surface such as a desktop or workbench with an optional DIN rail.
Mounting hardware required:
- DIN rail
- 3/16-inch diameter x 5/8-inch long pan head screw
- 1/2-inch OD x 7/32-inch ID x 3/64-inch thick washer
- 3/16-inch diameter nut
- Slide the DIN rail into the slot on the bottom of the Charge Base or Net Base.
- Secure the DIN rail to the flat surface with the hardware.


5-BAY CHARGE BASE
The Universal Dock Five-Bay Charge Base provides the flexibility of charging five units.
Universal Dock bases have removable cups that can be replaced. (See Universal Dock Cups.)
Features


Out of the Box
Make sure that your shipping box contains these items:
- 5-Bay Charge Base (CT60-5CB-UVN)
- Power supply
- Power cord (if purchased)
- Product documentation
If any of these items are missing or appear damaged, contact your Customer Account Representative. Keep the original packaging in the event that you need to return the base for service or if you want to store the charger while not in use.
Connect Power
Use only a UL Listed power supply that has been qualified by Honeywell with an output rated at 12V/8A. The power supply input rating is 100-240 VAC, 50/60 Hz. The operating temperature is 0°C to 45°C (32°F to 113°F).
- Plug the power cord into the power supply.
- Plug the power supply cable into the power connector on the back of the base.
- Plug the power cord into a standard wall outlet.
DISPLAY DOCK
A display dock allows a CT60 or CT60 XP to become a personal computer. A monitor, keyboard, mouse, and audio can be connected through the dock via the USB ports. The dock also provides an Ethernet connection.
Universal bases have removable cups that can be replaced. (See Universal Dock Cups.)
Features

Note: The display dock supports USB direct connections only. The dock does not support USB hub connections, including keyboards with USB port(s).
Out of the Box
Make sure that your shipping box contains these items:
- CT60 Universal Display Dock (CT60-DB-UVN)
- Power adapter
- Power cord
- Regulatory Sheet
If any of these items are missing or appear damaged, contact your Customer Account Representative. Keep the original packaging in the event that you need to return the base for service or if you want to store the charger while not in use.
Dock Connectors
Connect Power
Use only a UL Listed power supply that has been qualified by Honeywell with an output rated at 12 VDC and 3 A. The power supply input rating is 100-240 VAC, 50/60 Hz. The operating temperature is --10°C to 50°C (14°F to 122°F). The maximum output of the base is 5VDC/2A.
- Plug the power cord into the power supply.
- Plug the power supply cable into the power jack on the back of the dock.
- Plug the power cord into a standard wall outlet.
Connect to Monitor
Note: See Monitor Connections for a list of approved connections.
- Plug the HDMI cable into the dock.
- Plug the other end of the HDMI cable into the monitor.
Connect to an Ethernet Network
- Plug the Ethernet cable into the dock.
- Place the computer in the dock.
Note: For advanced Ethernet settings, go to sps.honeywell.com for the CT60 User Guide.
Connect to an USB Device
Note: See USB Devices for a list of approved USB devices.
Note: The dock supports USB direct connections only. The dock does not support USB hub connections, including keyboards with USB port(s).
Plug the USB type A cable into a USB port on the dock.
Status LED
| Status | Description |
| Constant Green | The dock is connected through HDMI. |
| Off | The dock is not connected or lost connection through HDMI. |
Check Software on Computer
Before using the Display Dock ensure your computer is running the DisplayLink software. Honeywell recommends updating your unit to the latest operating system for best results.
Insert Computer into the Dock
Ensure the computer is fully seated into the dock.

The first time you insert the computer into the dock, prompts appear on the screen. Follow the prompts on the screen to:
- Set default for DisplayLink Presenter to open when the USB device is connected.
- Start capturing everything that is displayed on your screen.
Note: These prompts no longer appear when you insert the device into the dock unless you left "Don't show again" unchecked.
The computer will automatically change to landscape and the resolution will update to the monitor settings.
Configure the Display Dock Settings
You can configure the parameters on the computer for the Display Dock using the Display Dock Settings app.
Set Display Dock Settings
The Display Dock Settings app is available from the all apps menu under Settings.
- Swipe up from the bottom of the Home screen to access all apps.
- TapSettings > Honeywell Settings > Display Dock Setting.
Set Monitor Settings
- Swipe up from the bottom of the Home screen to access all apps.
- TapSettings > Honeywell Settings > Display Dock Setting.
- Choose one of the following options to set the view:
- TapSystem portrait screen, to have the computer stay in portrait view.
- TapSystem landscape screen, to have the computer stay in landscape view.
- To set the system resolution, tapResolution and choose one of the following options:
- 1080 x 1920
- 720 x 1280
- To set the density, tapDensity and chose one of the following options:
- 160
- 240
- 320
- 400
Set Peripheral Settings
- Swipe up from the bottom of the Home screen to access all apps.
- TapSettings > Honeywell Settings > Display Dock Setting.
- To set the right mouse button to the back key, tapRight mouse button to toggle the feature on or off.
- TapHDMI audio to toggle between
![]() Sound to terminal or
Sound to terminal or ![]() Sound to external monitor.
Sound to external monitor.
Set Mode Settings
- Swipe up from the bottom of the Home screen to access all apps.
- TapSettings > Honeywell Settings > Display Dock Setting.
- To set the external monitor mode:
- SelectPrimary Mode to automatically adjust as configured in settings or
- SelectMirror mode to match the terminals settings.
Connected Devices
Monitor Connections
Supported Devices
- HDMI versions 1.4 and above
- VGA - supported through HDMI/VGA converter
- DVI - supported through HDMI/DVI converter
Non-Supported Devices
- HDMI splitter for two monitors
- Display Port
USB Devices
Supported Devices
- Standard three button mouse with scroll
- Standard QWERTY keyboard without HUB/USB type A ports on the keyboard
- USB headset/USB to 3.5mm audio converter
- USB mass storage devices (thumb drives), not recommended for large transfers (over 1GB)
Non-Supported Devices
- USB Hubs
- USB devices with additional USB type A ports
Clean the Dock
You may need to clean the dock to keep the dock in good working order. Clean the dock as often as needed for the environment in which you are using the dock with a dry soft cloth.
Mount the Display Dock
You can mount the dock on a flat, horizontal surface such as a desktop or workbench with an optional DIN rail.
Mouthing hardware required:
- DIN rail
- 3/16-inch diameter x 5/8-inch long pan head screw
- 1/2-inch OD x 7/32-inch ID x 3/64-inch thick washer
- 3/16-inch diameter nut
- Slide the DIN rail into the slot on the bottom of the dock.
- Secure the DIN rail to the flat surface with the hardware.


UNIVERSAL DOCK CUPS
Universal Docks have removable cups that can be replaced with Universal Cups CT60-UCP-N.
For more information about universal docks for CT60 and CT60 XP computers, see:
- Home Base and Ethernet Home Base
- Charge Base and Ethernet Base
- Display Dock
Out of the Box
Make sure that your shipping box contains these items:
- Universal Cup (CT60-UCP-N)
If any of these items are missing or appear damaged, contact your Customer Account Representative. Keep the original packaging in the event that you need to return the base for service or if you want to store the charger while not in use.
Replacing a Universal Cup
Note: The Universal Charge base is shown in the instructions below for illustration purposes. The steps for removing and inserting a cup are the same for all universal bases.
- Push the latch towards the front of the base.
![]()
- Tilt the back of the cup upwards.
![]()
- Lift the old cup out of the base.
![]()
- Insert the new cup tilted slightly towards the front of the base.
![]()
- Push the cup into the base until it snaps in.
![]()


Customer Support
Technical Assistance
Go to sps.honeywell.com, and then select Support > Productivity to find a host of options to help you quickly find the support you need and/or who to contact.
Product Service and Repair
Honeywell International Inc. provides service for all of its products through service centers throughout the world. Go to sps.honeywell.com, and then select Support to find a service center near you or to get a Return Material Authorization number (RMA #) before returning a product.
Documents / Resources
References
Download manual
Here you can download full pdf version of manual, it may contain additional safety instructions, warranty information, FCC rules, etc.
Advertisement


Need help?
Do you have a question about the CT60 and is the answer not in the manual?
Questions and answers