Apera Instruments PH60-MS Manual
- User manual (16 pages) ,
- Troubleshooting (3 pages)
Advertisement
- 1 Introduction
- 2 What's in the Kit
- 3 Keypad Functions
- 4 Preparation Before Use
- 5 pH Calibration
- 6 pH Measurement
- 7 Electrode Cleaning
- 8 Electrode Storage
- 9 Parameter Settings
- 10 Instrument Technical Specifications
- 11 Electrode Technical Specifications
- 12 Electrode Replacement
- 13 Battery Replacement
- 14 Troubleshooting Guide
- 15 Limited Warranty
- 16 Documents / Resources
Introduction
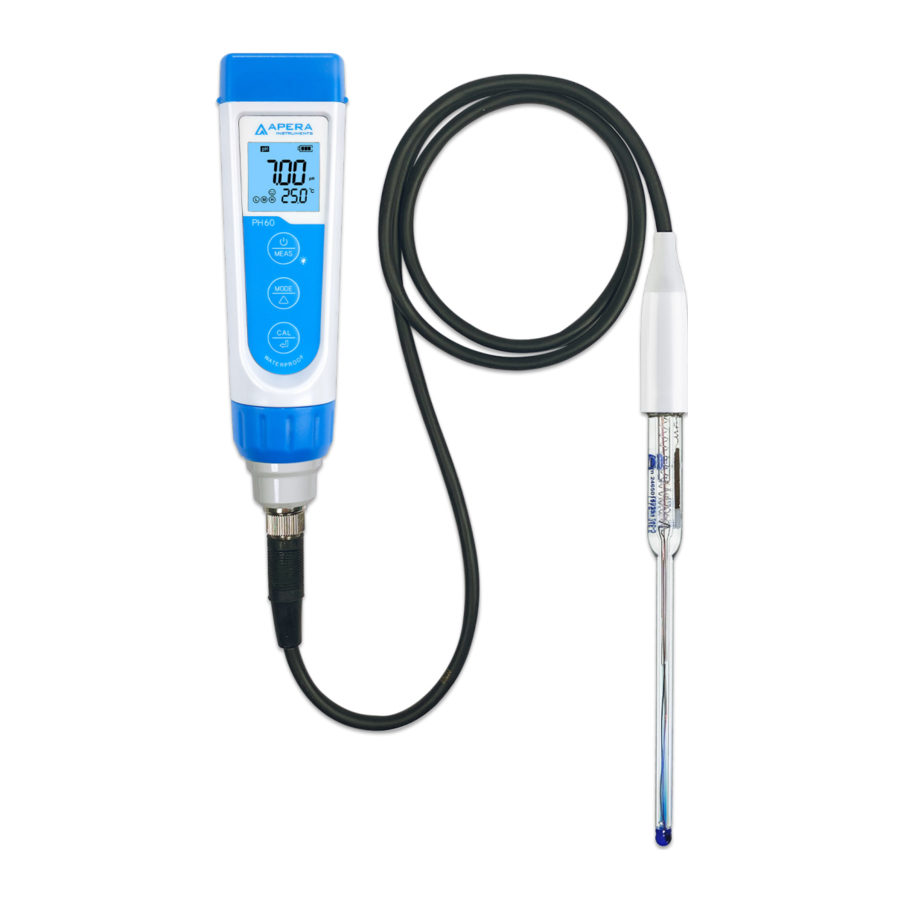
The PH60-MS pH Meter with LabSen® 246-5 pH/temp. electrode is made for measuring pH of general water solutions in small-volume (>60 micro liter) or in test tubes. Please read this manual carefully before use in order to get the best result.
For video tutorials, please go to support.aperainst.com
 ATTENTION
- NEVER use the product when it's freezing cold. Let it warm to room temperature before using.
- NEVER use your finger to touch the pH glass membrane or use other materials to rub it. Doing so could generate static electricity and cause measurement errors. To remove extra water on electrode, just shake it off or blot dry with Kim-wipe or lint-free cloth.
What's in the Kit

- User Manual
- LabSen 246-5 pH Electrode
- PH60 Meter Body
- CalPod Solution Organizer
- pH 4.00 Solution
- PH 700 Solution
- 0H 10.01 Solution
- 3M KCL Soaking Solution
- Protective cap
- Semi-micro Container
Keypad Functions
Short Press — 1 second
Long Press — 3 seconds
 |
|
 |
|
 |
|
Preparation Before Use
- LabSen 246-5 Electrode Structure

- Pull out the battery insulation paper.
- Loosen the storage vial locking ring by twisting it counterclockwise. Then pull out the electrode slowly.

- Let the storage vial (containing soaking solution) stand in the center of the CalPod solution organizer just in case it spills.

- Rinse off the electrode with pure water (preferably distilled or deionized water. RO water is the alternative), then blot dry the electrode with Kimwipe or clean tissues to remove excess water (Make sure NOT to rub the glass membrane).
- Perform at least a 2-point calibration before first-time use. For calibration details, refer to pH Calibration Section.


pH Calibration

How to Calibrate
- Short press
![]() to power on the meter. Remove the storage sleeve and rinse off the electrode in pure water (refer to Preparation Before Use Section, Steps 3 to 5).
to power on the meter. Remove the storage sleeve and rinse off the electrode in pure water (refer to Preparation Before Use Section, Steps 3 to 5). - Pour pH buffer solutions into CalPod. Dip the electrode into pH 7.00 solution first, and make a quick stir in the solution, then let it stand.
- Long press
![]() to enter calibration mode, the screen will turn green
to enter calibration mode, the screen will turn green
(Short press![]() if you decide to quit calibration and return to measurement mode).
if you decide to quit calibration and return to measurement mode). - Wait for the reading to stabilize (when
![]() stays on the screen), then short press
stays on the screen), then short press ![]() again to finish the first point calibration (pressing
again to finish the first point calibration (pressing ![]() too early could lead to Er2 error). "7.00" will be flickering and the meter will return to measurement mode. Icon
too early could lead to Er2 error). "7.00" will be flickering and the meter will return to measurement mode. Icon ![]() (the middle point) will appear at the bottom left, indicating a successful 1-point calibration.
(the middle point) will appear at the bottom left, indicating a successful 1-point calibration. - To calibrate the 2nd point, rinse off the electrode with pure water and remove excess water. Dip the electrode into pH 10.01 solution and repeat Step 3 to.4. "10.01" will be flickering and
![]() (the high point) will show up next to
(the high point) will show up next to ![]() , indicating a successful 2-point calibration.
, indicating a successful 2-point calibration. - To calibrate the 3rd point, rinse off the electrode with pure water and remove excess water. Dip the electrode into pH 4.00 solution and make a quick stir, then repeat Step 3 to 4. "4.00" will be flickering and
![]() (the low point) will display next to
(the low point) will display next to ![]() and
and ![]() , indicating a successful 3-point calibration.
, indicating a successful 3-point calibration.
Notes about Calibration
- Always start calibrating with pH 7.00 first. Perform the 2nd and 3rd point calibration immediately after the 1st point is finished. Do NOT turn off the meter before you calibrate the second or third point. Otherwise, after you restart the meter and perform calibration in pH 4.00 or pH 10.01,Er1 error will be generated and you will have to calibrate with pH 7.00 again. For more troubleshooting tips with calibration.
- The pH 4.00 and pH 7.00 buffer solutions poured into the CalPod can be used for up to 10 times as long as they are not contaminated and the CalPod is capped when not in use. pH 10.01 can only be used for up to 5 times as it will lose its accuracy much faster. After that, replace the buffer solutions in the calibration vials with new ones to keep the accuracy. Keeping the freshness and cleanliness of calibration buffers is essential for accurate pH measurement.
- Isothermal Measurement Principle — The automatic temperature compensation of pH meters is not sufficient in compensating all pH measurement errors caused by temperature changes. To obtain the most accurate measurement, the meter should be calibrated in the buffer solution that is at the same temperature as the sample solution.
- The tester can perform 1 to 3 points of automatic calibration and can recognize 5 types of pH standard solutions. For details, please refer to the following table:
| Calibration | USA Standard Series | NIST Standard Series | Icon | Recommended | ||
| 1-point | 7.00 pH | 6.86 pH |  | Accuracy requirement ≥ 0.1 pH | ||
| 2-point | Option A | 1st pt: 7.00 pH 2nd pt: 4.00 pH or 1.68 pH | Option A | 1st pt: 6.86 pH 2nd pt: 4.01 pH or 1.68 pH |  | Range < 7.00 pH |
| Option B | 1st pt: 7.00 pH 2nd pt: 10.01 pH or 12.45 pH | Option B | 1st pt: 6.86 pH 2nd pt: 9.18 pH or 12.45 pH |  | Range >7.00 pH | |
| 3-point | 1st pt: 7.00 pH 2nd pt: 4.00 or 1.68 pH 3rd pt: 10.01 or 12.45 pH | 1st pt: 6.86 pH 2nd pt: 4.01 or 1.68 pH 3rd pt: 9.18 pH or 12.45 pH |  | Range: 0 to 14.00 pH | ||
How Often to Calibrate the Electrode?
The frequency that you need to calibrate your pH electrode depends on many factors such as the nature of test samples, condition of electrodes, and the requirement of the accuracy. For high-accuracy measurements (≤ ±0.02pH), the electrode should be calibrated before every test; For general-accuracy measurements (≥ ±0.1 pH), calibrate the electrode every 1-2 weeks.
In the following cases, the electrode must be re-calibrated:
- The electrode hasn't been used for a long time or a different electrode is connected.
- After measuring strong acid (pH<2) or strong base (pH>12) solutions.
- After measuring fluoride-containing solution and strong organic solution.
- There is a significant temperature difference between the test sample and the buffer solution.
pH Measurement
How to Take pH Measurement
- Short press
![]() to power on. Remove the storage sleeve and rinse the electrode in distilled/deionized water, then shake off the excess.
to power on. Remove the storage sleeve and rinse the electrode in distilled/deionized water, then shake off the excess. - Submerge the electrode into your sample solution at least 1 inch deep, make a quick stir and hold still. Record the reading as the pH measurement when it is stabilized (
![]() comes up and stays on screen).
comes up and stays on screen). - If necessary, turn on the Auto-Hold function (refer to Parameter Setting Instruction Section), the reading will be automatically locked when it's stable for more than 10 seconds. Short press
![]() to cancel the Auto-Hold and keep measuring.
to cancel the Auto-Hold and keep measuring.
How to Take pH Measurement in Small-Volume
- The LabSen 246-5 pH electrode can measure as low as 60 µL of water sample with the use of the semi-micro container included in the test kit. Make sure to add in your sample solution to the level where the junction (the white spot) of the electrode can be submerged.
![]()

Electrode Cleaning
The meter is only as accurate as the electrode is clean. Always thoroughly rinse off the electrode before and after each measurement with distilled water or deionized water in a container or with a wash bottle.
To remove excessive water, just shake them off or blot dry with Kimwipe or lint-free cloth. Never rub the glass membrane of the electrode. Otherwise static electricity will be generated and cause measurement error.
For tough contaminants staying on the glass membrane or junction, refer to the following table for cleaning procedures:
| Type of Contamination | Cleaning Agent | Soaking Time |
| Lipophilic substances, e.g. oil and fat deposits | Home dish soap water | 5 – 10 minutes |
| Proteins | Apera Electrode Cleaning Solution (SKU: AI1166) | 30 – 60 minutes |
| Inorganic coatings such as hydrocarbons | commercially available glass cleaning solutions | 5 – 10 minutes |
| Hard, scale-type calcium deposits | Apera Electrode Cleaning Solution (SKU: AI1166) | 5 – 10 minutes |
| Alkaline coatings | Apera Electrode Cleaning Solution (SKU: AI1166) | 5 – 10 minutes |
| Acidic coatings | 0.1M NaOH solution | 5 – 10 minutes |
| Sulfide-containing substances | Thiourea | 30– 60 minutes, leave until junction discoloration disappears. |
| Unknown substances | Apera Electrode Cleaning Solution (SKU: AI1166) | 30 – 60 minutes |
Use a soft brush to help thoroughly clean off the contaminants. After the cleaning procedure, the pH electrode should always be soaked in 3M KCl solution for 12-24 hours for rehydration. A re-calibration is also necessary before a new pH measurement.
Electrode Storage
- Add 3M KCL soaking solution to the electrode storage vial and store the electrode in it. Twist on the vial locking ring tightly. If the 3M KCL soaking solution is contaminated, replace it with fresh solution. As a rule of thumb, replace the soaking solution on a monthly basis.
- If you ever find white crystals outside the storage storage vial, it is perfectly normal. It is the 3M KCL soaking solution that crystallizes over time by its nature. Just rinse them off and add in new soaking solution. This chemical is not poisonous or dangerous, and the electrode's performance will not be affected.
- NEVER store the electrode in pure water like tap, RO, distilled, or deionized water as they could damage the pH electrode. If this happens, immediately soak the pH electrode in 3M KCL soaking solution overnight, then re-calibrate it before use.
Parameter Settings
Settings Menu
| Symbol | Parameter Setting Contents | Code | Factory Default |
| P1 | Select pH buffer standard | USA – NIST | USA |
| P2 | Low value measurement alarm setting | 0 to 14.00pH | 0 |
| P3 | High value measurement alarm setting | 0 to 14.00pH | 14.00 |
| P4 | Auto. Hold | Off – On | Off |
| P5 | Select backlight | Off - 1 - On | 1 |
| P6 | Select temperature unit | ℃ - ℉ | ℉ |
| P7 | Restore to factory default | No – Yes | No |
Parameter Settings
When the meter is turned off, long press ![]() to enter parameter settings → Short press
to enter parameter settings → Short press ![]() to switch between P1-P2-P3...P7 → Short press
to switch between P1-P2-P3...P7 → Short press ![]() to select the parameter (starts flickering) → Short press
to select the parameter (starts flickering) → Short press  to change the parameter → Short press
 ![]() to confirm the change → Long press
to confirm the change → Long press  to return to measurement mode.
Parameter Setting Instruction
Standard pH Buffer Series (P1)
There are two options of standard buffer series: USA series and NIST series. Factory default is USA series, for details see Notes about Calibration section.
Alarm Function (P2&P3) Examples
- Alarm triggered when reading ≤ 3.20 pH:
Set lowest value (P2) to 3.20 pH, highest value (P3) to 14.00 pH, when stable reading is less than 3.20 pH, the screen will turn red to send off the alarm. - Alarm triggered when reading ≥ 8.60 pH:
Set highest value (P3) to 8.60 pH, lowest value (P2) to 0.00 pH, when the stable reading is greater than 8.60 pH, the screen will turn red to send off the alarm. - Alarm triggered when reading ≤ 3.20 pH or ≥ 8.60 pH
Set lowest value (P2) = 3.20 pH, highest value (P3) = 8.60 pH, when the stable reading is less than 3.20 pH or greater than 8.60 pH, the screen will turn red to send off the alarm.
Auto-Hold (P4)
Select "On" to activate the Auto-Hold function. When reading is stable for more than 10 seconds, the tester will lock the value automatically, and HOLD icon will show up on LCD. Short-press ![]() to cancel the auto-hold (HOLD icon will go off).
to cancel the auto-hold (HOLD icon will go off).
Backlight (P5)
"Off"-turn off backlight, "On"-turn on backlight, 1- backlight will last for 1 minute.
Temperature Unit (P6)
Select between C˚ and F˚.
Factory Default Setting (P7)
Select "Yes" to set the meter to its default status (erase all calibration records and return all parameter settings to the default value). This function can be used when the meter does not work well in calibration or measurement. Calibrate the meter again after setting the meter to factory default.
Instrument Technical Specifications
| pH | Range | -2.00 – 16.00 pH |
| Resolution | 0.01 pH | |
| Accuracy | ±0.01 pH ±1 digit | |
| Calibration Points | 1 – 3 points | |
| Automatic Temperature Compensation (ATC) | 0 – 100˚C (32 to 212˚F) | |
| Temperature | Measuring Range | 0 – 100˚C (32 to 212˚F) |
| Resolution | 0.1˚C | |
| Accuracy | ±0.5˚C | |
| Screen | 3-color LCD screen, Blue: Measurement; Green: Calibration; Red: Alarm | |
| Reading Lock | HOLD comes up on screen | |
| Low-Voltage Warning |  flashing, reminder of battery replacement needed flashing, reminder of battery replacement needed | |
| Auto. Power-Off | In 8 minutes without operation | |
| Waterproof Rating | IP67 | |
| Power | DC3V, AAA alkaline batteries×4 | |
| Battery Life | Operation up to 2000 hours | |
| Dimension& weight | Tester: 40×40×178mm/133g; Case: 255×210×50mm/700g; | |
Electrode Technical Specifications
| Measurement Range | 0 – 14 pH |
| Temperature Range | 0 to 100˚C (32 to 212˚F) |
| Reference System | Long-life Reference System |
| Junction | Ceramic |
| Reference Electrolyte | 3M KCl |
| Shaft Dimension | 12*120mm |
| Membrane Impedence | <350MΩ |
| Temperature Sensor | 30KΩ NTC |
Electrode Replacement
Every pH electrode gradually ages and will eventually fail. A typical service life of a pH electrode is 1-2 years depending on many factors such as frequency of use, nature of test samples, how well it is maintained, and etc. We recommend replacing your pH electrode every 1 to 2 years to guarantee the optimal performance.
- Disconnect the old electrode

Never twist the black rubber part to prevent damage. - Install the new electrode

- After installing the new electrode, please at least perform a 2-point calibration.
Refer to pH Calibration Section for how to calibrate. - pH Electrodes Compatible with the Meter for Other Applications
- LabSen 335 pH/Temp. Electrode for wastewater, suspensions, and emulsions\
- LabSen 246-5 pH/Temp. Electrode for small-volume solutions and test tubes
- LabSen 845 pH/Temp. Electrode for strong alkaline and high-salinity solutions
- LabSen 835 pH/Temp. Electrode for HF-containing and strong acidic solutions
- LabSen 865 pH/Temp. Electrode for high temperature and caustic solutions
- LabSen 855 pH/Temp. Electrode for viscous samples
- LabSen 765 pH/Temp. Electrode for meats
- PH60S-E spear probe for foods e.g. cheese, sauce, milk, fruits, dough, etc.
- GS2-E spear probe for soil direct test
- PH60F-E flat probe for surface test


Battery Replacement
Please install batteries according to the following steps. *Please note the correct direction of battery installation: The "+" OF EVERY SINGLE Battery MUST FACE UP.
 (WRONG INSTALLATION OF BATTERIES WILL CAUSE DAMAGE!)

- Loosen the pocket clip
- Pull off the battery cap
- Slide and unlock battery compartment
- Open the battery compartment
- Insert the batteries (all "+" FACE UP)
- Press down the battery compartment
- Slide and lock the battery compartment
- Close on the battery cap (make sure it's tightly closed with the O-ring.
Otherwise the waterproof rating could be compromised.)
Troubleshooting Guide
| Trouble | Reason | How to Fix |
| Calibration Error | Incorrect calibration order (Er1) | Always calibrate pH 7 first, then pH 4 or pH 10. Refer to pH Calibration Section. |
| Calibration solutions are in poor condition (Er1) | Make sure your calibration standard solutions are fresh and clean, and made by a legitimate manufacturer. | |
| Contaminated electrode (Er1) | Thoroughly clean off the electrode. Refer to Electrode Cleaning Section. | |
| Aged electrode (Er1) | Replace the electrode. | |
| Dried-out electrode (Er1) | Soak in the soaking solution overnight to restore. | |
| Electrode is not in full contact with solutions (Er1) | Make sure the storage vial is taken off and the electrode is fully immersed in the solution (above the junction). | |
| Air bubbles around the sensor (Er1) | Make a quick stir in the solution to remove air bubbles. | |
Pressing  too fast (Er2) too fast (Er2) | Wait for the reading to be fully stabilized before pressing  to finish the calibration to finish the calibration | |
| Reading is always slowly changing, won't stabilize. | Contaminated electrode | Thoroughly clean off the electrode. Refer to Electrode Cleaning Section. |
| Clogged junction | Refer to Electrode Cleaning Section to thoroughly clean off the junction. | |
| Aged electrode | Replace the electrode. | |
| Testing low ionic strength solutions e.g. distilled water and deionized water | Refer to pH Measurement Section. | |
| Display similar readings in any solutions or stuck at 7.00 pH | Broken electrode |
|
| Instrument defect | Contact us for warranty fulfillment | |
| Jumping Readings (generating random numbers) | Electrode is not in full contact with solutions | Make sure the storage vial is taken off and the electrode is fully immersed in the solution (above the junction). |
| Air bubbles around the sensor | Make a quick stir in the solution to remove air bubbles. | |
| Electrode is not properly connected or the connector is broken. |
| |
| Calibration is successful, but I think measurement is not accurate | Aged electrode | Replace the electrode. |
| Air bubbles around the sensor | Make a quick stir in the solution to remove air bubbles. | |
| Wrong buffer standard is selected | Match the buffer standard with the calibration buffers you use by changing the settings in P1. | |
| Clogged junction | Refer to Electrode Cleaning Section to thoroughly clean off the junction. | |
| Comparison with other meters, test strips, or drop tests |
| |
| Calibration solutions are in poor condition | Make sure your calibration standard solutions are fresh and clean, and made by a legitimate manufacturer. | |
| The electrode is not suitable for your test sample or testing environment | Contact us to find the most appropriate electrode for your specific application. |
Limited Warranty
To get the fastest warranty fulfillment, go to support.aperainst.com and click "New Support Ticket" on the upper right corner. Then fill in the form and click Submit. Our customer care specialists will be in touch and help you fulfill the warranty as soon as possible.
Tel: 1-614-285-3080
Email: info@aperainst.com
Website: aperainst.com
Documents / Resources
References
![support.aperainst.com]() Support : Apera Instruments
Support : Apera Instruments![aperainst.com]() Apera Instruments® Meters and Sensors for pH, Conductivity, TDS, Salinity, ORP, DO, Turbidity, ISE
Apera Instruments® Meters and Sensors for pH, Conductivity, TDS, Salinity, ORP, DO, Turbidity, ISE
Download manual
Here you can download full pdf version of manual, it may contain additional safety instructions, warranty information, FCC rules, etc.
Advertisement


Need help?
Do you have a question about the PH60-MS and is the answer not in the manual?
Questions and answers