Pullup & Dip Doorway Pull-Up Bar Manual
- User manual (24 pages) ,
- User manual (96 pages)
Advertisement
User instructions
- Make sure that your door frame is in good condition. The door frame must be able to sustain the forces generated by using the pull-up bar. Plasterboard walls are not suitable.
- The door frame must be between 1.5 to 3.5 cm (0.6 to 1.4 inch) in depth.
- The wall must be between 15 to 23 cm (5.9 to 9 inch) thick.
- The width of the door opening must be from 70 to 95 cm (28 to 37 inch).
- The maximum weight limit of 110 kg (242.5 lbs) must not be exceeded at any time!
- Please only use the handles of the bar and the bent bar as a pull-up bar.
- Avoid forceful and sudden movements and jumping up to the bar as this could cause it to detach from the anchorage.
- Do not hang upside down from the pull-up bar! Do not hang from the pull-up bar by your legs or feet!
- Always perform the different variations of pull-up exercise with straight posture and with controlled (i.e. not swinging or abrupt) movement of your body.
- Please note that FT Fitness Technology GmbH does not accept any liability for damage caused during or as a result of improper assembly, use or exceeding weight limits.
Storage and maintenance
Store your device indoors. When storing the device, avoid exposing it to direct sunlight or moisture and keep it away from heat sources.
Clean the device and the handles with a damp, soft and clean cloth. Do not use any abrasive, corrosive, acidic or alkaline cleaning agents, as these may damage the surface of the device or cause scratches.
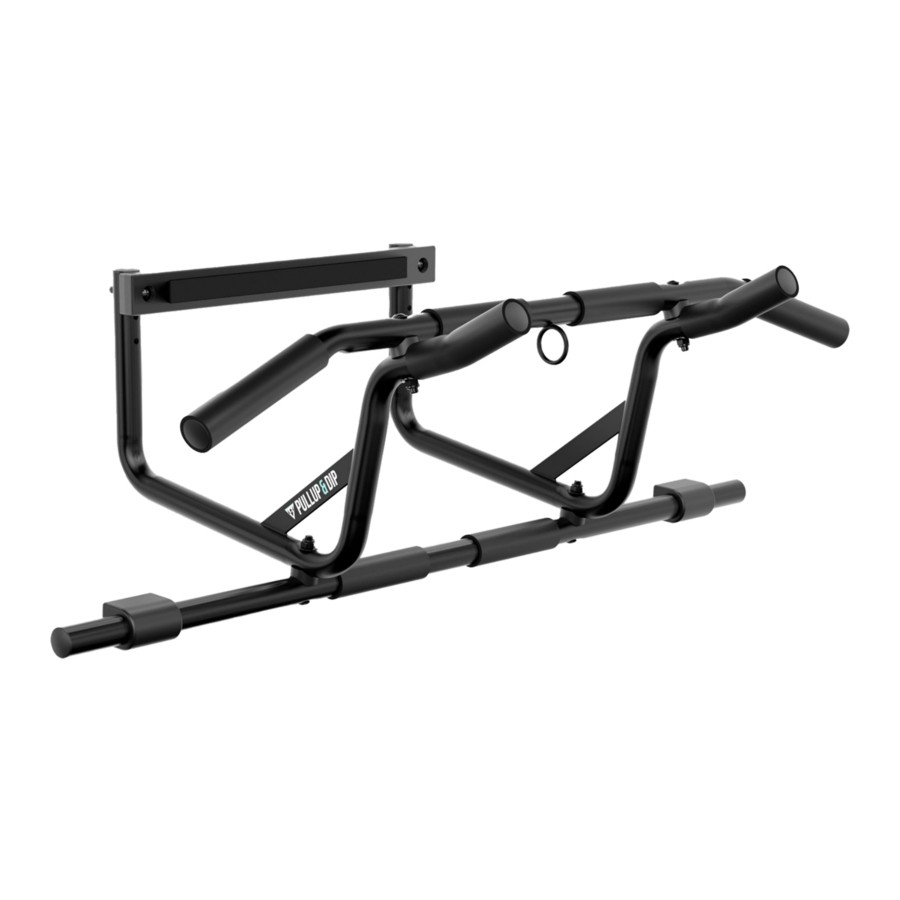
Product features and scope of delivery
DIMENSIONS AND WEIGHT
Product weight: 4,2 kg (9 lbs)

FEATURES

SCOPE OF DELIVERY
Inclusive:
Pull-up band (strength: LIGHT) and eBook with 23 tips for more pull-ups (DE/EN).

Assembly instructions
EXPLODED VIEW

| Pos. | Item | Quantity | |
| 1 | Tubes Main Arm |  | 2 |
| 2 | Tube Door |  | 1 |
| 3 | Curved Handle Bar |  | 1 |
| 4 | Brace Door |  | 1 |
| 5 | Screws M8 |  | 4 |
| 6 | Washers |  | 4 |
| 7 | Spacer |  | 4 |
| 8 | Hex Nut M8 |  | 4 |
| 9 | Screws M6 |  | 2 |
| 10 | Hex Nut M6 |  | 2 |
| 11 | Spring Washer |  | 2 |
Required tools:
- 6 mm allen wrench
- Wrench with 10 mm and 13 mm width across flats
 Before installation, please check what material your desired mounting location is made of and if it is durable.
Get to the assembly instructions video directly

Assembly
Screws kit for curved handle bar & tube door.

Use items: 1.| 2.| 5.| 6.| 7.| 8.

Use items: 1.| 3.| 5.| 6.| 7.| 8.

Screws kit for brace door.

Use items: 1.| 4.| 9.| 10.| 11.

EXERCISES
Find here the right training exercises for this product:

IMPORTANT SAFETY INSTRUCTIONS
- It is important to read the entire user manual before assembling and using the device. Safe and efficient use can only be ensured if the device is properly assembled, maintained and used. It is your responsibility to ensure that all users of the equipment are aware of all precautions and warnings.
- Before starting your workout, consult your physician to determine if you have any physical or health limitations that may pose a risk to your health and safety or prevent you from using the device properly. Consulting your physician is vital if you are taking any medications that affect your heart rate, blood pressure, or cholesterol levels.
- Pay attention to your body's signals. Incorrect or excessive use can be harmful to your health. Stop exercising if any of the following symptoms occur: pain, chest tightness, irregular heartbeat, extreme shortness of breath, lightheartedness, dizziness or nausea. If any of these symptoms occur, consult your physician before continuing with your exercise program.
- Start your training slowly and increase the intensity in reasonable steps. Even if you are experienced in training, start with easier exercises to familiarize yourself with the exercises before proceeding to more advanced variations.
- Include a few minutes of warm up before each workout to prevent injury. Stretching your body properly before and after the exercises can prevent cramps or injuries.
- Wear suitable clothing during training. Your workout clothes should be comfortable and allow you to move easily. Wear sports shoes made of supportive material and with non-slip soles.
- Keep children and animals away from the device at all times. The device is designed for adults only.
- Make sure that all screws, nuts, etc. are tightened before using the device.
- Always make sure that your device is securely mounted before using it.
- The safety level of the device can only be maintained if it is regularly inspected for damage and/or wear.
- Perform a visual inspection BEFORE EACH USE. Never use the device if it is not functioning properly or if any parts of the device are damaged or worn out.
- This device is for domestic use only.
- Use the device ONLY for its intended use, as described by the manufacturer. Do not modify the device and do not use any additional parts that are not recommended by the manufacturer.
- The device is not designed to be attached to or used as a child's swing, for example. Any improper use of the pull-up bar is at your own risk!
- Make sure that the mounting is secure! At the ends of the straight bar are sliding rubber caps. You can move them horizontally depending on the width of your door frame, so that the rubber caps can rest on your door frame and the pull-up bar sits perfectly in the door frame.
![]()

CONTACT
Any questions or comments?
![]() @pullupanddipofficial
@pullupanddipofficial
![]() facebook.com/pullupanddip
facebook.com/pullupanddip
![]() youtube.com/pullupdip
youtube.com/pullupdip
FT Fitness Technology GmbH
Im Oberhof 4
88260 Argenbuehl
Germany
+49 89 215300-747
service@pullup-dip.com
www.pullup-dip.com
Documents / Resources
References
Download manual
Here you can download full pdf version of manual, it may contain additional safety instructions, warranty information, FCC rules, etc.
Advertisement


Need help?
Do you have a question about the Doorway Pull-Up Bar and is the answer not in the manual?
Questions and answers